
Site hosting news, tutorials, tips, How Tos and more
![]()
Now that we support it, here’s a quick tutorial on how to deploy an ASP.NET Core 1.0 Application to Winhost using Web Deploy.
Please note that you cannot publish to a sub-directory using Web Deploy at this time due to a bug which Microsoft will correct at a later date. If you want to publish your application to a sub-directory, you will need to use FTP.
![]()
Note: The manual methods in this tutorial are great, but if you’re looking for a “set-it-and-forget-it” automated backup solution, we offer a site backup service that can also back up your MS SQL and MySQL databases. Read about it on our site, or activate it in Control Panel. It’s easy, it’s inexpensive and it’s cool. What more could you ask for?
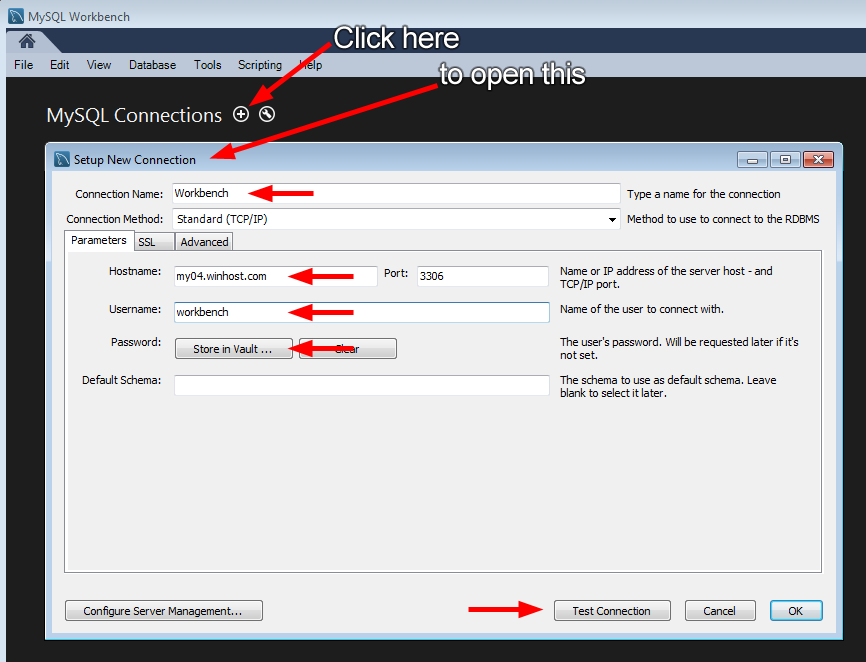
Making a backup in MySQL workbench is a pretty easy task once you know what to do, but it can be a little confusing the first time around. Allow us to save you some time with these simple instructions.
Version 6.3.7 is shown here, and of course future versions may differ. Download MySQL Workbench here (you’ll need a free Oracle account if you don’t already have one – just click the “Register” link in the upper right corner of that download page).
First thing you’ll need to do in Workbench is connect to your database.
If everything is correct you’ll see the successful connection box.
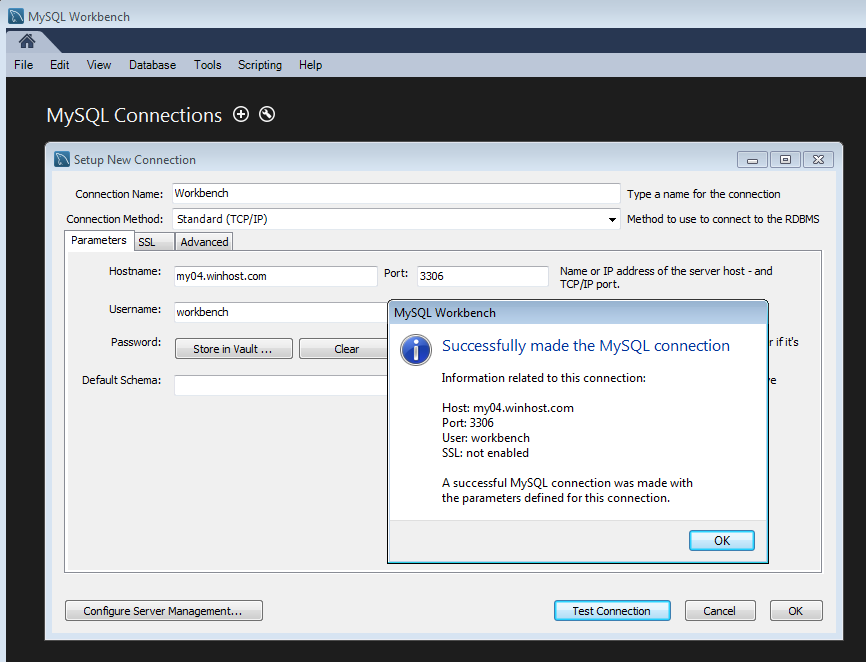
Go ahead and close that, and click the connection that you just set up.
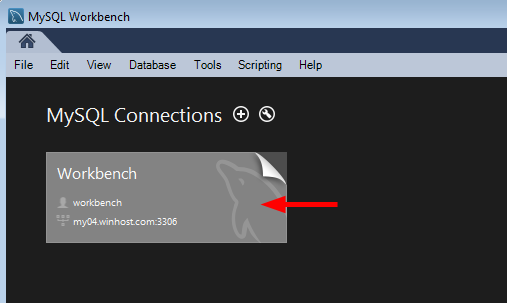
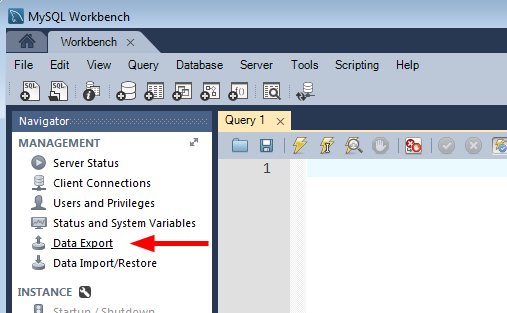
Click “Data Export.”
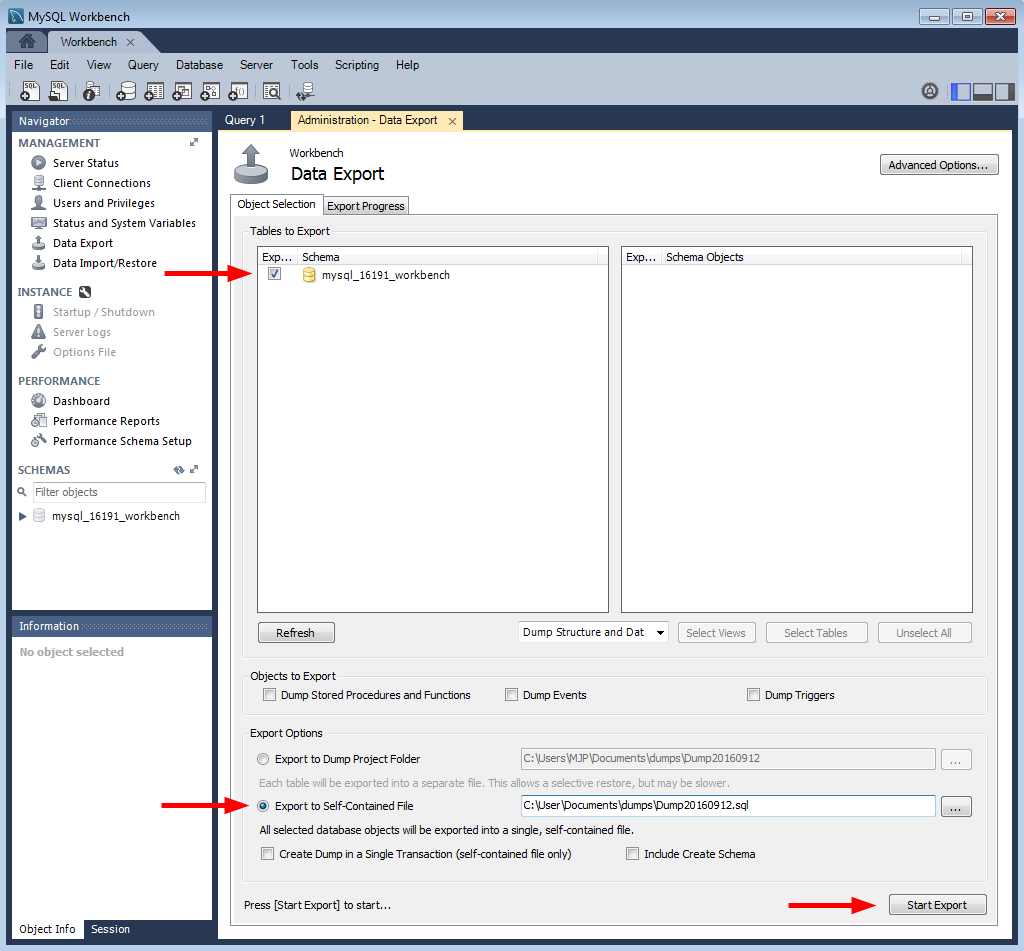
There are a lot of options on the next screen. For the purposes of this how-to we’re just making a simple backup of the entire existing database, so we’re not going to use most of those options. But as you can see, you can do a lot more than just a simple database dump here.
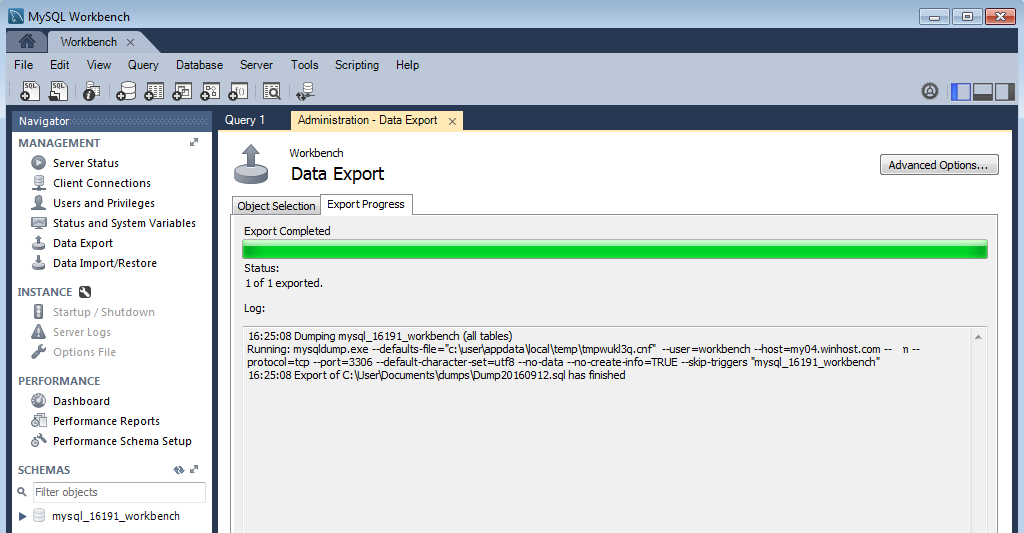
If everything goes according to plan you’ll see the “Export competed” dialog, and you’ll be all set. Your database is backed up for development use or simply for safe keeping.
That’s all there is to making a backup.
But check out the “Data Import/Restore” link right under the “Data Export” link. As you might have guessed, you use that link to restore a locally stored backup up to the MySQL server here at Winhost. We’ll talk about that in a future article.
![]()
When you order an SSL certificate from us, your primary domain name will be secured for free. So, if you order an SSL certificate for www.HostingAccountDomain.com, then HostingAccountDomain.com.com will be added as a Subject Alternative Name automatically.
So you can secure both www.HostingAccountDomain.com and HostingAccountDomain.com with just one certificate.
This works for any subdomain, not just for the www. prefix. You can order a certificate for login.HostingAccountDomain.com and HostingAccountDomain.com will be added to the certificate.
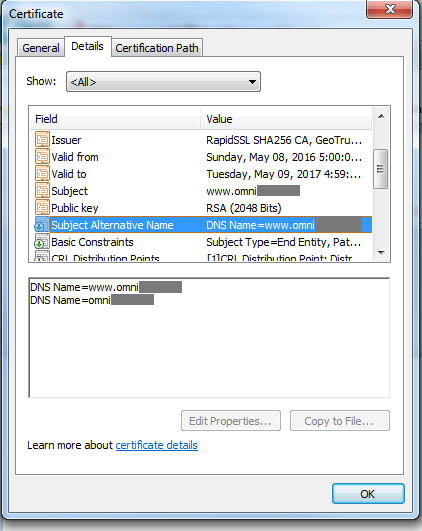
Here’s a sample certificate where you see both the subdomain and the primary domain secured:
Note that this is only applicable to single-level domains. For example, www.test.HostingAccountDomain.com will not secure test.HostingAccountDomain.com.
This works for all of the certificates available through Winhost!
![]() It’s important to keep your web applications up-to-date. This prevents known vulnerabilities from being exploited and wreaking havoc on your site. That goes for any third-party software you might use on your site, but today we’re going to talk about updating DotNetNuke.
It’s important to keep your web applications up-to-date. This prevents known vulnerabilities from being exploited and wreaking havoc on your site. That goes for any third-party software you might use on your site, but today we’re going to talk about updating DotNetNuke.
The most important thing before upgrading is to back up your current DotNetNuke site. Also, if you are using any third-party themes or modules, please contact the author(s) before upgrading to make sure they are still supported in the latest version of DNN.
Backing up the MS SQL database
This will place the backup of your MS SQL database within the App_Data directory with the file extension “.bak.”
Backing up your web site files via FTP
Downloading the upgrade files and Extracting
Important: you must know your SuperUser account login in order to upgrade.
You can download the Upgrade files through DNN’s download page.
Uploading the updated files
Upgrading
![]()
Over the years there have been a number of customers who have asked if Winhost supports NoSQL databases. There is actually one NoSQL solution you can install in our environment, and it’s RavenDB. In this guide, I will show you how to get started with it (i.e. installed and running) if you want to try it out. The instructions have been taken from the official site and modified for our hosting environment.
First, download the .zip file from the RavenDB website and then extract it. Open up the “Web” folder and make the following changes to the web.config file in that folder:
Change line 3 from:
<add key="Raven/WorkingDir" value="APPDRIVE:\Raven\" />
To:
<add key="Raven/WorkingDir" value="APPDRIVE:\web\ftpusername" />
Replacing ftpusername with the correct value.
Add/Insert the following in between the <system.web></system.web> XML tags to enable Full trust:
<trust level="Full" />
Once you have finished making the changes to the web.config file, save it. Then upload the entire “Web” directory into your hosting space.
Using the Winhost Control Panel, create an Application Starting Point for the “Web” folder. Open the “Web” folder using a browser (e.g.: http://www.HostingAccountDomain.com/web).
You’ll get an error regarding WebSockets. You can open up a support ticket to have it enabled and have “Overlapped Recycle” disabled in your App Pool settings, and that should complete the installation so that you can try it out.
![]() Broken image links are a common problem when you move your WordPress installation to another domain name or even to another subfolder. WordPress uses absolute paths to link images and objects to the page. The absolute path is usually defined during the initial WordPress setup process when you first configure WordPress. No problem right? You understand and know what absolute paths mean, and WordPress is working with no problems.
Broken image links are a common problem when you move your WordPress installation to another domain name or even to another subfolder. WordPress uses absolute paths to link images and objects to the page. The absolute path is usually defined during the initial WordPress setup process when you first configure WordPress. No problem right? You understand and know what absolute paths mean, and WordPress is working with no problems.
But what happens when you change the domain name for your WordPress site, or you move your WordPress site to a subfolder? Now you call on your WordPress site and some links are broken, images don’t show up, or some of the pages may come up with a 404 not found error. You right click on an image or object on the page and you can see the URL address does not match with the URL address on the address bar.
What a mess. Now what?
Fear not, this is actually a fairly easy fix!
There are a few easy way to fix this. The first thing to try is logging in to the WordPress admin section and changing the values in Settings > General. But sometimes the location change can make logging in to the admin section impossible, in which case you’ll want to try setting the new URL by either defining the SiteURL and Home variables in your configuration file, or going in to the database and changing them there.
Updating the wp-config.php file
Log into your site via FTP and look for the WordPress wp-config.php file. Open the file with a text manager such as NotePad and add these lines. Typically you should be able to add the lines under the connection string section of the configuration file.
/**Manually Define SiteURL and Home */
define(‘WP_HOME’,’http://www.newdomain.com’);
define(‘WP_SITEURL’,’http://www.newdomain.com’);
If you have just moved the WordPress files to a subfolder then the URL would look somewhat like this.
define(‘WP_HOME’,’http://www.newdomain.com/newsubfolder’);
define(‘WP_SITEURL’,’http://www.newdomain.com/newsubfolder’);
In my opinion, this is actually the easiest way to fix this. But some site owners don’t like to hard code values into the page, so the second way to solve the problem is to update the database. WordPress uses MySQL as it’s back end, and the SiteURL and HOME URL values are stored in there in plain text, so they’re easy to change.
Updating your WordPress database:
Log into your WordPress database. The table you will be looking for is wp_options. wp_ is the default prefix that WordPress will use in the initial setup. You may have used a different DB prefix during set up, but in general what you are looking for is the “Options” table.
Run this SELECT command against the Options table.
USE [Database Name];
SELECT option_name, option_value FROM wp_options
WHERE option_name="home" OR option_name="siteurl";
You should see results similar to this.
| option_name | option_value |
| home | http://www.olddomain.com |
| siteurl | http://www.olddomain.com |
To update the option_value column, just run this command against your database.
USE [Database Name];
UPDATE wp_options
SET option_value="http://www.newdomain.com"
WHERE option_name="siteurl" OR option_name="home";
If you are moving the WordPress site to a subfolder, the option_value would include the path to the subfolder:
SET option_value="http://www.newdomain.com/subdomain"
That should be it. Either method will work. But don’t forget, at Winhost we can migrate your WordPress website for you. We’ll create and restore the MySQL database, update your connection string and make sure the absolute path it setup correctly. Simply contact our Support Department for more details on what we will need to migrate your site for you.
![]() I’ve seen this before, a small or medium sized business pays a developer to build a NopCommerce website to run their online store. They pay several hundred – or even thousands – of dollars to get it up and running. Customized design and themes are added to give NopCommerce a custom look unique to the company. Everything goes well, the site is launched and the customer is happy. The developer has done their job and now they’ve moved on to their next project.
I’ve seen this before, a small or medium sized business pays a developer to build a NopCommerce website to run their online store. They pay several hundred – or even thousands – of dollars to get it up and running. Customized design and themes are added to give NopCommerce a custom look unique to the company. Everything goes well, the site is launched and the customer is happy. The developer has done their job and now they’ve moved on to their next project.
Then some months later the unthinkable happens, and the previously happy customer forgets the username or password to the NopCommerce admin account. They try to run through the NopCommerce password recovery process but it’s not working. They either don’t remember, or no longer have access to, the email address to the account. Regardless, the bottom line is that they do not know the credentials to your NopCommerce Admin account and the password recovery process is simply not working.
Luckily, if this ever happens to you there’s a work-around. You’ll need access to the SQL database that NopCommerce is using for the back end data source. You’re going to go directly to the database and change the password in the table that stores the admin account password.
But first you’ll need to create a new registered user in NopCommerce so that you will have a password that you can use to replace the admin account password. Log in to your NopCommerce site and click the “Register” link to set up a new user. You’re going to use the email address and password for this new user in the next steps.
Once the new user is created, log in to the NopCommerce database and search for the new user you just registered by running this SQL command against your database:
use [Database Name]

go

Select ID, Username, Password, PasswordSalt from dbo.Customer WHERE Username='[email protected]'
Replace [email protected] with the actual email address of the new user just registered. From the results of that command, copy the “Password” and “PasswordSalt” values.
Then run this update command:
use [Database Name]

go

Update dbo.Customer

Set Password='<password copied from previous query>', PasswordSalt='<password salt copied from previous query>' WHERE ID='1';
The WHERE clause specifies the admin account, which will have ID value of ‘1’ since it is the first account created when setting up NopCommerce. Now you should be able to log in to the NopCommerce Admin account with the new password.
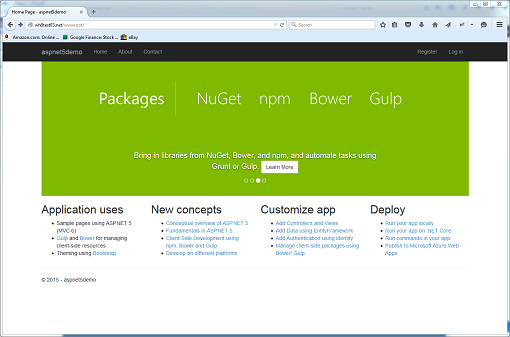
![]() Prompted by a few customers who are boldly going where no programmer has gone before, I’m proud to say that you can deploy an ASP.NET 5 (vNext) application to Winhost. Even though it’s in Beta right now, and this article will show you how.
Prompted by a few customers who are boldly going where no programmer has gone before, I’m proud to say that you can deploy an ASP.NET 5 (vNext) application to Winhost. Even though it’s in Beta right now, and this article will show you how.
ASP.NET 5 (vNext) represents a fundamental shift in how applications are going to be developed in the future as you will be able to deploy the application in any environment (Linux, Mac, or Windows). It no longer requires a Global Assembly Cache (GAC) as all the assemblies and runtime libraries are obtained using NuGet and then packaged with your application making it self-contained. They are placed in a special approot folder which also contains your source code. The approot folder replaces the functionality of the App_Code or Bin folders. Another folder named wwwroot is also created which contains static files (e.g. html, css, images, etc) and is where your application is launched from.
Because it’s in Beta, I highly recommend that you pay attention to Microsoft’s Roadmap for the release schedule as I’m sure things will have changed by the time it’s officially released. And for the same reason, I can only say these instructions are applicable up to Beta6 in case things change in the future. I’m afraid this guide only covers the publishing portion. If you need help with developing an ASP.NET 5 (vNext) application and don’t know where to start, please make sure you visit the Official Website. I’m also sorry to say that Web Deploy publishing is not supported at this time, only FTP publishing.
Publishing to a sub-directory at Winhost:
A vNext application can only be created using Visual Studio 2015 Professional or higher, so you’ll need to obtain a copy, install it, and then launch the program.
A) Create a new project by selecting File -> New -> Project…

B) Under Visual C# (or the language of your choice), select Web and to the right, select ASP.NET Web Application. Give your project a name if you’d like.
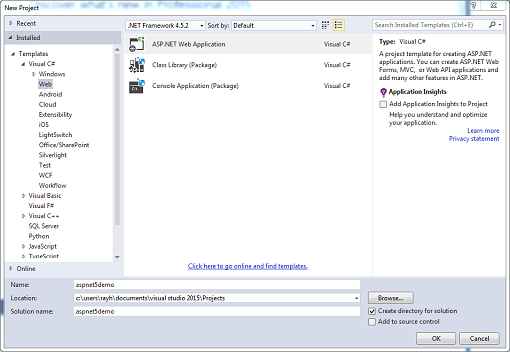
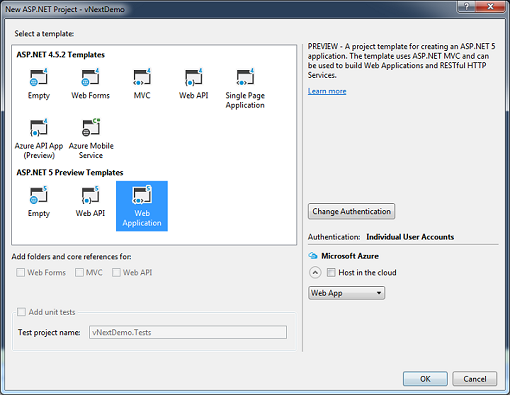
C) In the New ASP.NET Project window, select Web Application for the ASP.NET 5 Preview Template and uncheck Host in the cloud under Microsoft Azure. Click OK continue.
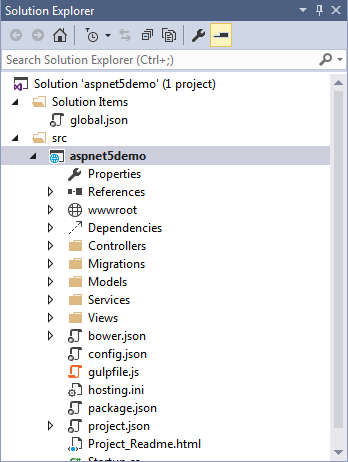
D) If you take a look at the Solution Explorer window, you’ll notice that the file structure is very different from that of a web forms or MVC application. One key change is that the configuration details are no longer stored in .config files. They are stored in JSON (JavaScript Object Notation) format. Again, this tutorial won’t cover any of the programming aspects, but if you’d like to learn more, you can read the official ASP.NET 5 documentation.
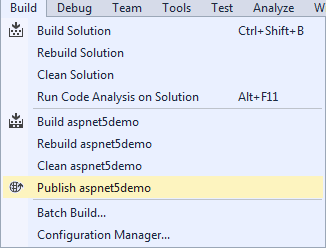
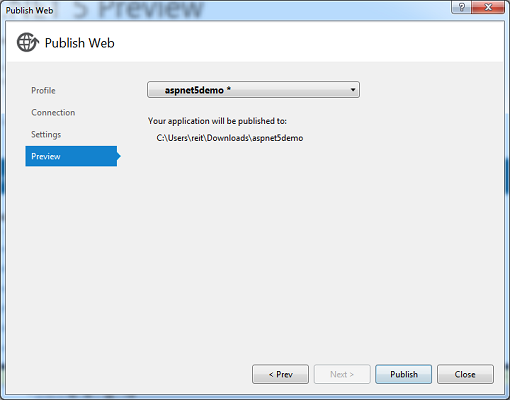
E) Since this is sample application, we can just publish it without making any changes. Select Build -> Publish on the menu bar.
F) In the Profile section, select File System.
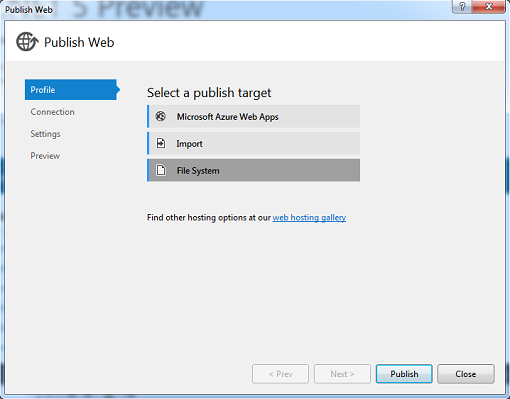
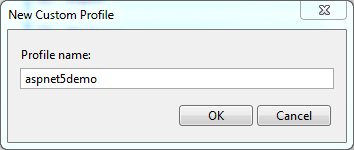
G) Name the profile.
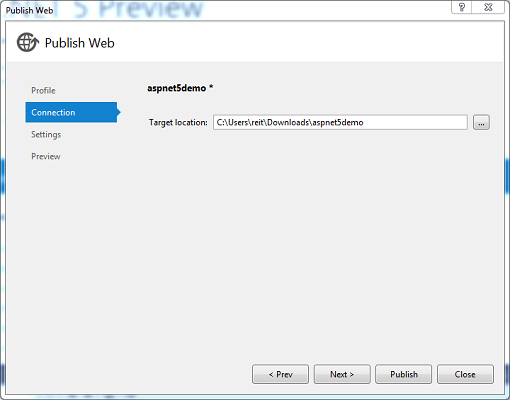
H) In the Connection section, set the Target location to a directory that is easily accessible and click on the Next> button.
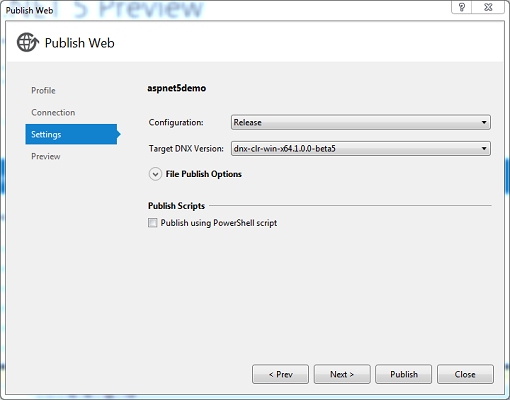
I) In the Settings section, set the Configuration to Release. For the Target DNX Version, it should match the framework your application is written in. DNX stands for .NET Execution Environment which allows your application to be deployed across different platforms (Windows, Mac and Linux). For more information, you can consult the DNX documentation.
If you plan to use the 64 bit versions of the CLRs, you’ll need to open up a support ticket to request that we disable 32-bit support for your application pool, otherwise, it won’t work properly. Uncheck Publish using Powershell script and click on the Next> button.
J) Click the Publish button to start.
K) Once the publishing has finished, you will see the two folders I mentioned earlier, approot and wwwroot. In the wwwroot folder, there is a web.config file that is used to direct the application on how to start. To protect the approot folder from being viewed, we’ll use Request Filtering, create a web.config file with the following markup, and place it in the root level of the site. Some applications require “Full” trust in order to run, so we’ll go ahead and add that to the web.config file as well.
<?xml version="1.0" encoding="UTF-8"?>
<configuration>
  <system.web>
    <trust level="Full" />
  </system.web>
  <system.webServer>
    <security>
      <requestFiltering>
        <hiddenSegments>
          <add segment="approot" />
        </hiddenSegments>
      </requestFiltering>
    </security>
  </system.webServer>
</configuration>
L) Upload these two folders to your site and ignore the other files. Create an Application Starting Point for the wwwroot folder using the tool in the Winhost Control Panel.
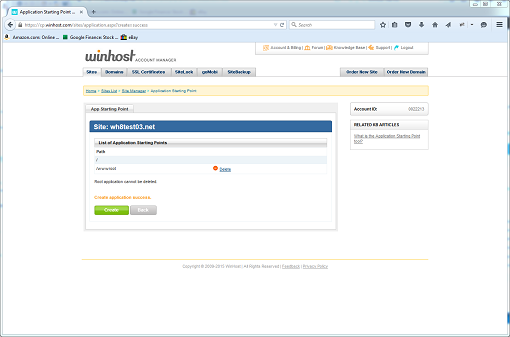
Voila! Your application works but only from a sub-directory (i.e. http://www.mysite.com/wwwroot).
Publishing to the root at Winhost:
If you want your application to run from the root of your site, you just need to make a few modifications post publishing. Locate the project.json file in /approot/src/projectname directory and open it. Change the second line from “webroot”: “../../../wwwroot” to “webroot”: “../../..” Move the contents of the wwwroot directory up one file level. You’ll also need to merge the two web.config files and change the following lines:
<add key=”runtime-path” value=”..\approot\runtimes” />
To:
<add key=”runtime-path” value=”.\approot\runtimes” />
And
<add key=”dnx-app-base” value=”..\approot\src\aspnet5demo” />
To:
<add key=”dnx-app-base” value=”.\approot\src\aspnet5demo” />
Your application now works from the root.

Ftp’ing through Visual Studio
You can also use FTP to publish your files within Visual Studio by creating a publishing profile. Take any text editor, create a file and name it with a .publishsettings extension (e.g. my.publishsettings), and paste the following XML markup into the page:
<?xml version="1.0" encoding="utf-8"?>
<publishData>
  <publishProfile
    profileName="FTP"
    publishMethod="FTP"
    publishUrl="ftp://ftpaddress"
    userName="username"
    userPWD="password"
    destinationAppUrl="http://httpaddress"
    />
</publishData>
Replace ftpaddress, username, password, and httpaddress with the appropriate values. Save the file. At Step F, instead of choosing File System, select the Import option instead and load the my.publishsettings file. Follow the rest of the steps to finish configuring the application. I wouldn’t recommend this method since you’ll need to download some files to make edits and then re-upload them, however, I wanted to make you aware that it is possible.
Please also take note that an ASP.NET 5 (vNext) application must be deployed to an IIS 7.5 or higher server.