
Site hosting news, tutorials, tips, How Tos and more
![]()
Note: beginning with Chrome version 46 the yellow caution triangle has been removed from the https URL when Chrome encounters minor errors such as those described in this article.
If you use an SSL certificate (https) on your site, you may have seen a couple of new things happening in Google Chrome.
When you upgrade the Google Chrome browser to version 41 or later, you may see various warning messages such as, “The identity of this website has not been verified,” “Your connection to <domain> is not encrypted,” or other visual indications that the https connection is not secure.
Those indications can appear when your SSL certificate uses a SHA-1 signature (most SSL certificates issued before 2015 use SHA-1).
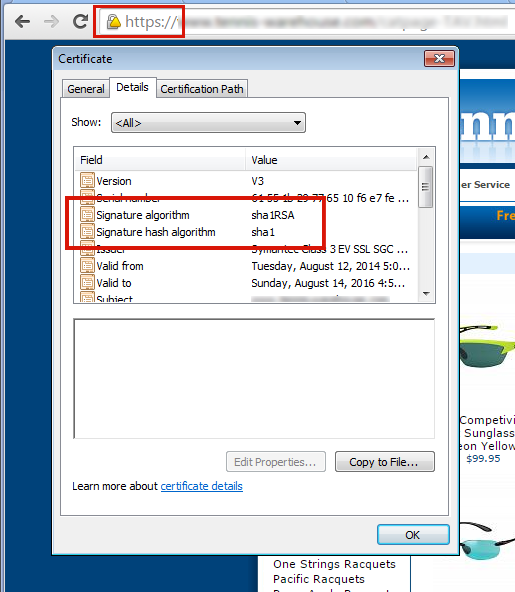
To fix the problem of browser security warnings you must get your SSL certificate re-keyed for SHA-2. If you don’t see those warnings in Chrome and you purchased your certificate recently, it may already be SHA-2. You can verify using this test site.
1) Contact us and we will re-generate and re-submit the CSR.
2) You’ll then get an email from GeoTrust with a link to complete the process. When completing the re-key on the GeoTrust site, be sure that SHA-2 is selected as the “Hashtag Algorithm.” You can find step-by-step instructions (and a video) here.
3) After you’ve completed the reissuing process, you’ll receive an email with the new certificate. Go to Control Panel and paste the new certificate into the SSL manager and you’re finished.
1) Contact us and we will re-generate the CSR and email it to you. Then you’ll have to contact the issuer of your certificate to get your certificate re-keyed for SHA-2.
2) When you receive the re-keyed certificate, go to Control Panel and paste the new certificate into the SSL manager and you’re finished.
There is another potential problem after you’ve re-keyed your SSL certificate. While the address bar will show the green lock icon, if visitors dig deeper in Chrome, they may see an “Obsolete Cryptography” message.
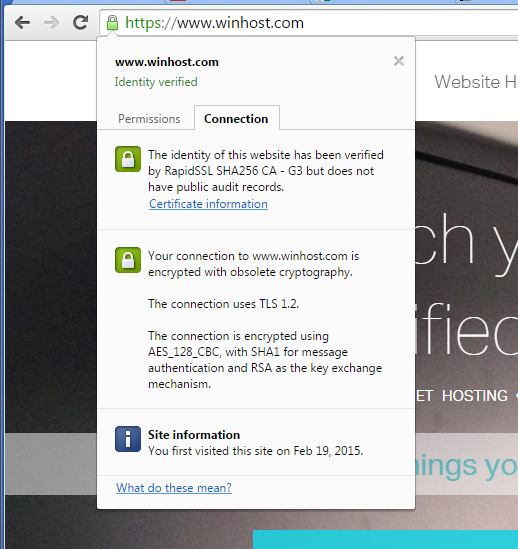
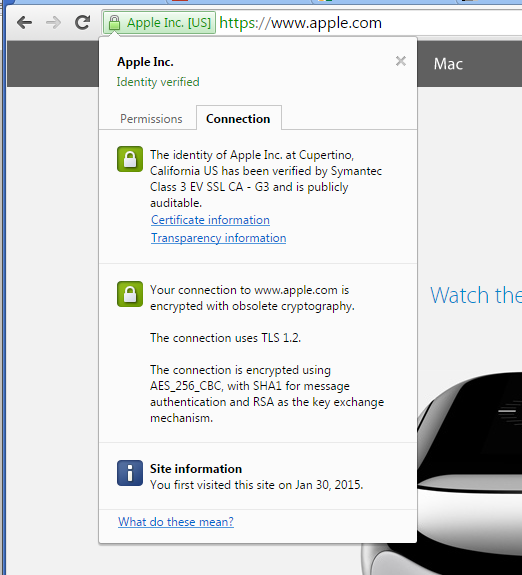
Basically what’s happening now is they are ignoring the cipher preference we use on the server (which includes their preferred ciphers) and pointing out any “weak ciphers” they find. You might notice that many large corporate sites (such as Apple) are also insecure according to Chrome, for similar reasons.
That “obsolete cryptography” message may be with us for a while because Google is not providing any information (yet) on exactly what they want from the server to stop calling it insecure. It would seem that what Google would like to see is every server everywhere removing support for all older cryptographic methods.
The problem with that is removing some of those methods will shut out visitors using some older browsers and operating systems that don’t support newer methods (i.e. Windows XP). Since our servers are shared by many customers, it isn’t really an option for us to make global changes that prevent some visitors – even a small number – from accessing our customer’s sites.
We do run some special servers that do not support any of the older cryptography methods, they are primarily used by customers who need a “hardened” server to pass a PCI compliance scan. But the added security comes at a cost, as older browsers can’t connect to sites on those servers via https. Additionally, a few other things that you may take for granted now may not work, or may require adjustment or a work-around on your part. But if you’d like to move your site to such a server, just let us know.
And of course we continue to monitor information from Google on recommended server configuration, as well as continuing to test various configurations ourselves to prevent the “obsolete cryptography” message.
If you have any trouble re-keying a certificate, or if you have any questions about these ongoing changes, drop us a line and we’ll do our best to help.
![]()
Did you know you could use a MySQL database to store your ASP.NET Membership Table information rather than Microsoft SQL Server? I’ve written this simple guide to help you get started.
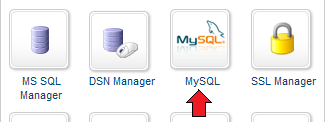
First, create a MySQL database through the Winhost Control Panel. Click on the Sites tab.
 Click on the Manage link and then click on the MySQL button.
 Click the Add button and enter the values for Database Name, Database User, and Quota. Click the Create button to finish creating the database. Now click on the Manage link and record the connection information (Database Name, Database Server, Database User, and Database Password) on a piece of paper or a text editor such as Notepad.
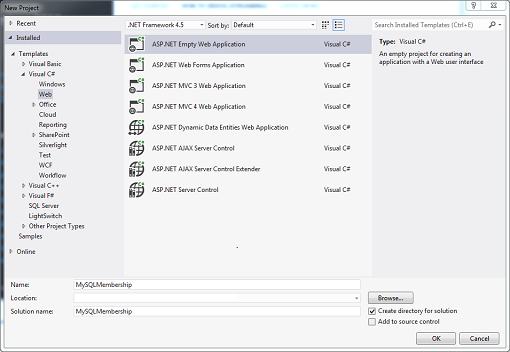
Start Visual Studio and create a New Project by going to File -> New –> Project… (Ctrl+Shift+N).
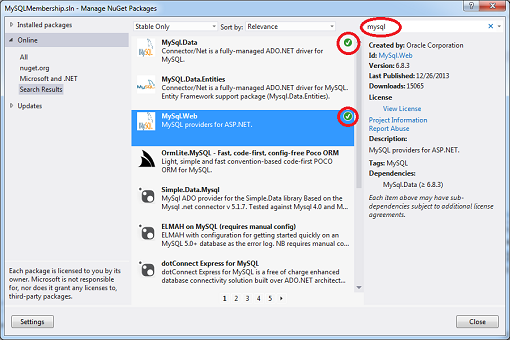
 Add the necessary .NET assemblies to your project using NuGet. Go to TOOLS -> Library Package Manager -> Manage NuGet Packages for a Solution… Type mysql in the Search field and hit Enter. Install both the MySql.Data and MySql.Web assemblies. A check mark will appear to the right when the assemblies have been installed.
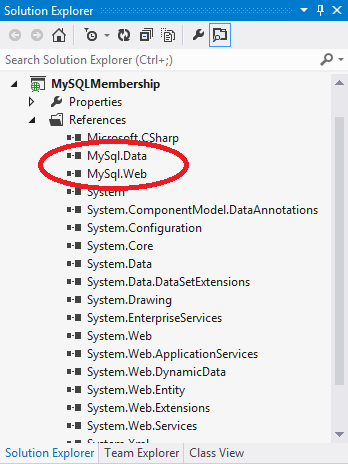
 Another way to verify that the assemblies have been installed correctly is that they will appear as References in the Solution Explorer window.
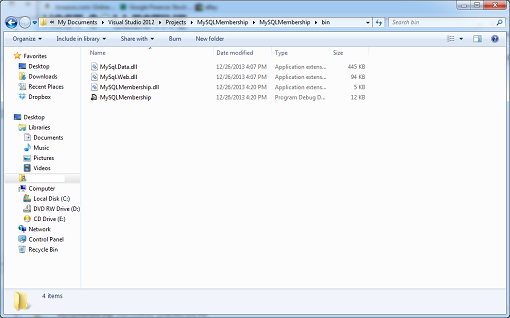
 When you compile your project, a copy of these assemblies will be added to your local /bin folder which you will need to upload to your site account.
 The next step is to modify the Web.config file with this markup:
<?xml version="1.0"?>

<!--
For more information on how to configure your ASP.NET application, please visit
http://go.microsoft.com/fwlink/?LinkId=169433
-->

<configuration>
  <connectionStrings>
    <add name="MySqlMembershipConnection"
         connectionString="Data Source=my02.winhost.com;user id=membership;password=password;database=mysql_48503_membership;"
         providerName="MySql.Data.MySqlClient"/>
  </connectionStrings>
  <system.web>
    <compilation debug="true" targetFramework="4.5" />
    <httpRuntime targetFramework="4.5" />
    <authentication mode="Forms">
      <forms loginUrl="~/Account/Logon"
             timeout="30"
             name=".ASPXFORM$"
             path="/"
             requireSSL="false"
             slidingExpiration="true"
             defaultUrl="Default.aspx"
             enableCrossAppRedirects="false" />
    </authentication>
    <membership defaultProvider="MySqlMembershipProvider">
      <providers>
        <clear/>
        <add name="MySqlMembershipProvider"
             type="MySql.Web.Security.MySQLMembershipProvider, mysql.web"
             connectionStringName="MySqlMembershipConnection"
             enablePasswordRetrieval="false"
             enablePasswordReset="true"
             requiresQuestionAndAnswer="false"
             requiresUniqueEmail="true"
             passwordFormat="Hashed"
             maxInvalidPasswordAttempts="5"
             minRequiredPasswordLength="6"
             minRequiredNonalphanumericCharacters="0"
             passwordAttemptWindow="10"
             applicationName="/"
             autogenerateschema="true"/>
       </providers>
    </membership>
    <roleManager enabled="true" defaultProvider="MySqlRoleProvider">
      <providers>
        <clear />
        <add connectionStringName="MySqlMembershipConnection"
             applicationName="/"
             name="MySqlRoleProvider"
             type="MySql.Web.Security.MySQLRoleProvider, mysql.web"
             autogenerateschema="true"/>
      </providers>
    </roleManager>
    <profile>
      <providers>
        <clear/>
        <add type="MySql.Web.Security.MySqlProfileProvider, mysql.web"
             name="MySqlProfileProvider"
             applicationName="/"
             connectionStringName="MySqlMembershipConnection"
             autogenerateschema="true"/>
      </providers>
    </profile>
  </system.web>
</configuration>
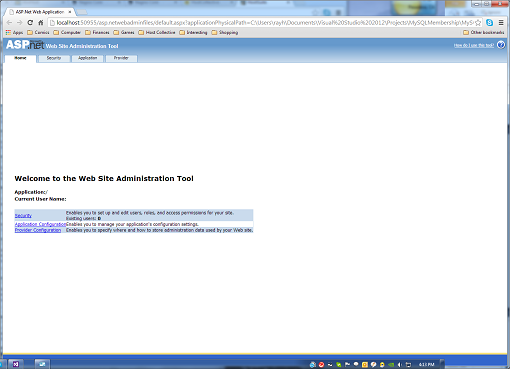
Replacing the connection string section with the Winhost Connection String to your MySQL database. Save the file. The key to creating the tables is this attribute in the XML markup: autogenerateschema=”true” Now, select BUILD -> Build Solution (Ctrl+Shift+B) to compile your application, and then select PROJECT -> ASP.NET Configuration. This will launch the ASP.NET Web Site Administration Tool.
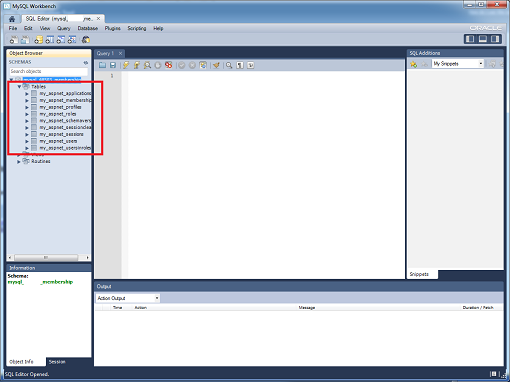
 Once the tool has been launched, the tables will be created, and you can check by logging into your MySQL database using an administration tool like MySQL WorkBench.
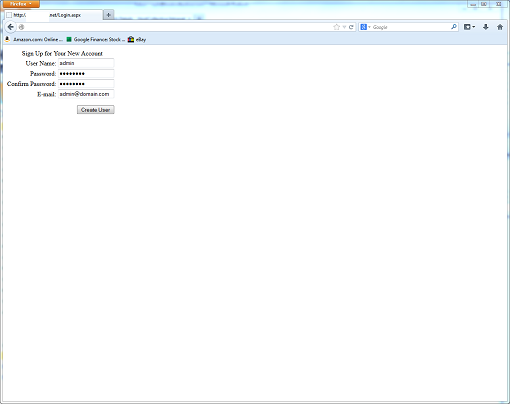
 Now, let’s build a very simple ASP.NET application that will allow you to create users. Go back to your project in Visual Studio, right click on your project name in Solution Explorer and select Add -> New Item… (Ctrl+Shift+A). Select Web Form and name the file. Switch to Design Mode. In the Toolbox Window, expand Login of the tree view, and drag and drop the CreateUserWizard control on to the page. Build your application.
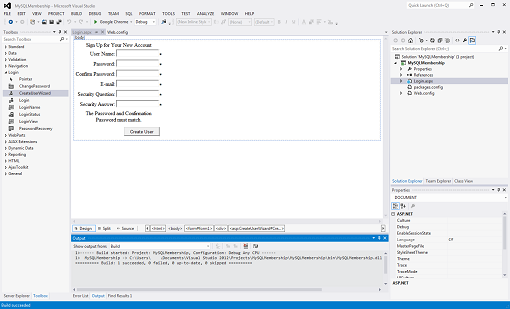 Deploy your files to the Winhost server using FTP or Web Deploy and then access your site using a browser either with your domain name or Secondary URL. Fill out the create user form and click on the Create User button.
 If you go back and access your database using MySQL WorkBench and query the my_aspnet_users table, you can see that the user was created.
 You can also just use the ASP.NET Web Site Administration Tool to create the users. Of course, none of this information is necessarily new, so I want to thank Nathan Bridgewater’s blog and Oracle for helping me put together this tutorial for our customers at Winhost.
![]()
phpMyAdmin is a free software tool designed to help administrate a MySQL database over the Web, and in this quick tutorial, I will show you how to install it here at Winhost. First, you need to create a MySQL database through the Control Panel.
Click on the Sites tab.
Click on the Manage link and then click on the MySQL button.
Click the Add button and enter the values for Database Name, Database User, and Quota. Click the Create button to finish creating the database. Now click on the Manage link and record the connection information (Database Name, Database Server, Database User, and Database Password) on a piece of paper or a text editor such as Notepad.
Now download the source code from the phpMyAdmin website.
Extract the contents using a decompression program such as 7-Zip. Now make a copy of the config.sample.inc.php file and save the new file as config.inc.php. In the config.inc.php file, alter line 31:
$cfg['Servers'][$i]['host'] = 'localhost';
By changing ‘localhost’ to the database server name. For example:
$cfg['Servers'][$i]['host'] = 'my01.winhost.com';
Now, upload the contents to your Winhost account and access it, adding a Default Document if necessary.
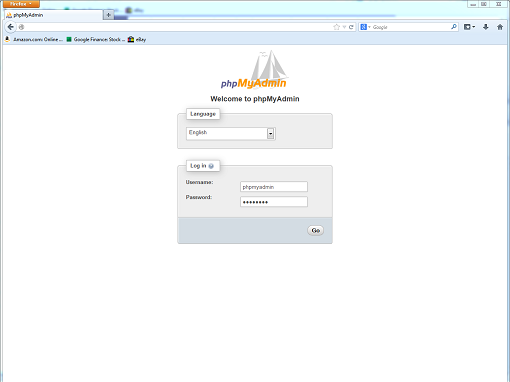 Voila! You are now ready to manage your MySQL database with phpMyAdmin.
![]()
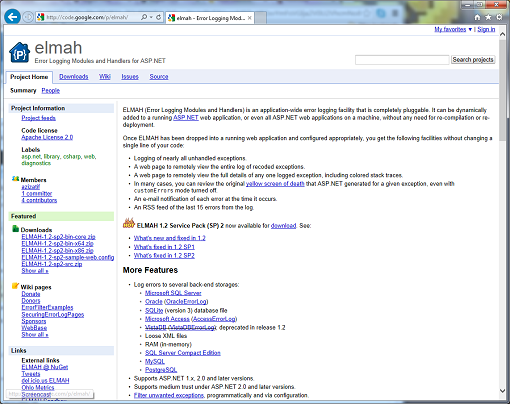
Prompted by a forum post, here are instructions on how to install Elmah, an application-wide Error Logging Module and Handler for ASP.NET on your hosting account here at Winhost. First, you’ll need to download Elmah at this link. For this tutorial, I downloaded ELMAH-1.2-sp2-bin-x64.zip.
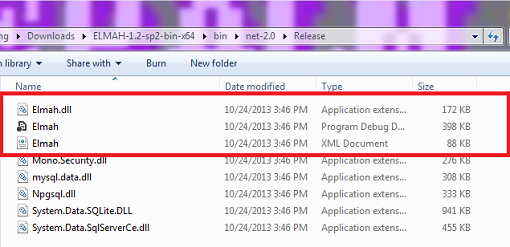
After you have downloaded the .zip file, extract its contents. Open the /bin directory and find the .NET Framework libraries you want to use. Most likely you will be using the assemblies in the net-2.0 -> Release folder. Upload only the Elmah assemblies (i.e. Elmah.dll, Elmah.pdb, and Elmah.xml) to the /bin folder of your web application.
You can configure Elmah to store the exception information in different types of databases, but for this tutorial, I will only be showing you how to set it up with Microsoft SQL Server. If you don’t have a database setup already, follow these instructions to create one:
1) Log into the Winhost Control Panel at https://cp.winhost.com
2) Click on the Sites tab.
3) Click on the Manage link next to the site you want to manage.
4) Click on the MS SQL Manager button.
5) Click on the Add button.
6) Select the database version in the drop down list, name the database, set the quota, and then click on the Create button.
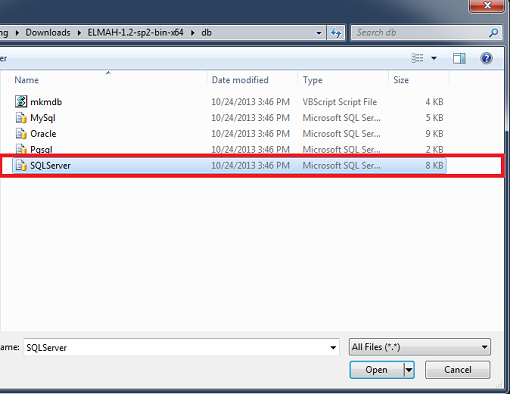
Then log into your database using SQL Server Management Studio. Select File -> Open -> File… (or hit CTRL-O) and navigate to the /db directory of your Elmah extracted files. Select the SQLServer.sql file and click on Open.
Hit F5 to execute the script. This will create the error logging database objects in your database. The final step is to configure your web.config file. The configuration will depend on what type Application Pool Pipeline mode you use. For Classic mode, add the following XML markup to your web.config file to enable Elmah, only substituting Winhost_Database_Connection_String with your actual database connection string.
<configuration>
  <configSections>
    <sectionGroup name="elmah">
      <section name="security" requirePermission="false" type="Elmah.SecuritySectionHandler, Elmah" />
      <section name="errorLog" requirePermission="false" type="Elmah.ErrorLogSectionHandler, Elmah" />
      <section name="errorMail" requirePermission="false" type="Elmah.ErrorMailSectionHandler, Elmah" />
      <section name="errorFilter" requirePermission="false" type="Elmah.ErrorFilterSectionHandler, Elmah" />
    </sectionGroup>
  </configSections>
  <elmah>
    <security allowRemoteAccess="yes" />
    <errorLog type="Elmah.SqlErrorLog, Elmah" connectionStringName="Elmah" />
  </elmah>
  <connectionStrings>
    <clear />
    <add name="Elmah" connectionString="Winhost_Database_Connection_String" />
  </connectionStrings>
  <system.web>
    <httpHandlers>
      <add verb="POST,GET,HEAD" path="elmah.axd" type="Elmah.ErrorLogPageFactory, Elmah" />
    </httpHandlers>
    <httpModules>
      <add name="ErrorLog" type="Elmah.ErrorLogModule, Elmah" />
    </httpModules>
  </system.web>
</configuration>
For Integrated mode, use the following XML markup:
<configuration>
  <configSections>
    <sectionGroup name="elmah">
      <section name="security" requirePermission="false" type="Elmah.SecuritySectionHandler, Elmah" />
      <section name="errorLog" requirePermission="false" type="Elmah.ErrorLogSectionHandler, Elmah" />
      <section name="errorMail" requirePermission="false" type="Elmah.ErrorMailSectionHandler, Elmah" />
      <section name="errorFilter" requirePermission="false" type="Elmah.ErrorFilterSectionHandler, Elmah" />
    </sectionGroup>
  </configSections>
  <elmah>
    <security allowRemoteAccess="yes" />
    <errorLog type="Elmah.SqlErrorLog, Elmah" connectionStringName="Elmah" />
  </elmah>
  <connectionStrings>
    <clear />
    <add name="Elmah" connectionString="Winhost_Database_Connection_String" />
  </connectionStrings>
  <system.webServer>
    <handlers>
      <add name="Elmah" verb="POST,GET,HEAD" path="elmah.axd" type="Elmah.ErrorLogPageFactory, Elmah"/>
    </handlers>
    <modules>
      <add name="ErrorLog" type="Elmah.ErrorLogModule, Elmah" />
      <add name="ErrorMail" type="Elmah.ErrorMailModule, Elmah" />
    </modules>
  </system.webServer>
</configuration>
You can find your Winhost database connection string by:
1) Log into the Winhost Control Panel at https://cp.winhost.com
2) Click on the Sites tab.
3) Click on the Manage link next to the site you want to manage.
4) Click on the MS SQL Manager button.
5) Click on the Manage link next to the database you want to manage.
The connection string information will appear at the bottom. Remember to replace the ****** in the password section with your actual database password. If you have forgotten it, use the Edit link next to Database Password to change it. If you need more details on other Elmah settings, refer to the sample web.config file in the /samples directory.
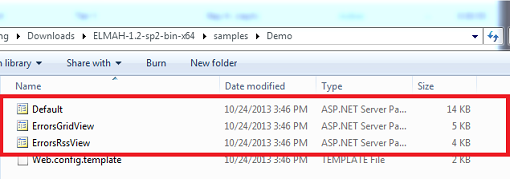
That’s it! Elmah is now configured to trap exceptions from your web application. It also comes with some sample reporting pages in the /samples/Demo directory which you can upload to review the errors trapped.
![]()
In this tutorial I’m going to show you how to migrate your email messages to Winhost using the SmarterMail’s Mailbox Migration tool.
Prerequisites
Let’s Start
Log in to your SmarterMail interface via Control Panel.
You will need to use our mail server’s URL to access the email system since your domain name isn’t pointing to us yet.
First log in to the Control Panel on Winhost.
Next you will see a link on the Email Manager page called SmarterMail Manager. Click on it and it will automatically log you into the SmarterMail interface. This step helps you complete two things:
After you’re done creating the email users using the postmaster email account, log out at the upper right hand corner and log back in with one of the email users you just created, one of the addresses whose mail you want to migrate.
Once logged in on SmarterMail with the new email user
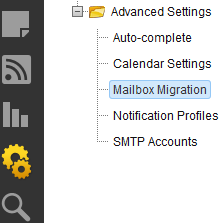
This will pop up a new window for the Mailbox Migration.
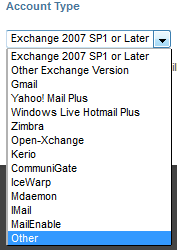
As you can see you have different options to choose from but in this tutorial we’re going to use the option Other.
Remember that you will need to log out of SmarterMail and log back in with each user you wish to migrate. It would be very unfortunate to migrate all the email messages from all the email users on a single email account on SmarterMail. So please be careful when migrating and make sure you migrate the correct email messages to the correct user.
![]()
Some of us (like me) have at one time or another forgotten the Admin Login for our WordPress site. Maybe you’ve tried using the Lost your password? function, but for whatever reason that doesn’t work.
So what do you do now? Start all over?
Nope. We’re going to modify our user table on the MySQL database by creating a new MD5 hash.
Well, first you need to create a new MD5 hash using this handy web site. Enter your new password in the string field of the site. Now save the MD5 hash text the site created for you and save it in a text file. You might also want to save the password in the text file just in case, but don’t forget to delete it once you’re done.
Now, you’re going to use MySQL Workbench to connect to the WordPress database. To learn how to connect to your MySQL database using Workbench please read our Knowledge Base article.
Once connected with MySQL Workbench expand the database. Expand your tables and right click on the users (this table may also be called wp_users depending on which table prefix you used when you installed WordPress).
After right clicking on the users tabled select Edit table data.
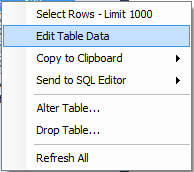
Find your admin user. Under the user_pass column next to the admin user and enter the MD5 hash you created. It should look like this:

Now click on the Apply button in MySQL Workbench. Click Apply again on the next window. Now click Finish.
After you completed all those steps you should now be able to log in to your admin section with the new password you created.
![]()
In this tutorial I’m going to show you how to configure goMobi to work with your WordPress site. Many of our users are using WordPress for their sites, and now you can have a Mobile web site for your WordPress-based site.
If you don’t have goMobi service yet, you can order goMobi through Control Panel. If you don’t have a WordPress site yet, we have a blog post article that shows you how to install WordPress using our Control Panel Application Installer.
Once your WordPress site is up and running and you have ordered goMobi for your site, check out this video on some the different things you can do with goMobi.
When you’re done watching the video you’re ready to configure WordPress with goMobi.
Log in to your goMobi account through our control panel by click on the goMobi tab at the top.
Now click on the blue Launch Mobile Site Builder link to log in. This will open a small window in your web browser.
Creating your mobile site can be relatively simple, or you can take full advantage of everything goMobi offers and spend some time setting up your mobile site. It can be a lot to go through, so we won’t step through it here. We’re primarily concerned with getting your mobile site to work with WordPress.
After you’ve created your goMobi site, you’ll need to create the redirection code that you will install on your WordPress application. This is necessary to properly route mobile traffic to your new mobile site.
In the goMobi window click on the Tools tab at the top.
![]()
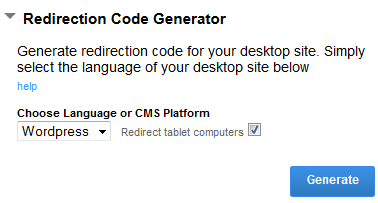
Now expand the Redirection Code Generator section.
Place a check mark next to Redirect tablet computers if you want to redirect tablet computers too.
Select WordPress from the drop down menu and click Generate.
Clicking on the Generate button will create a mredirect.zip file that you will need to download locally onto your computer.
Now extract the .zip file onto your computer and connect to your site via FTP. We are going to upload the file into your WordPress site files directory.
If you don’t have an FTP client, we suggest FileZilla. If you install FileZilla, we have a knowledge base article that shows you how to use it to connect to your site.
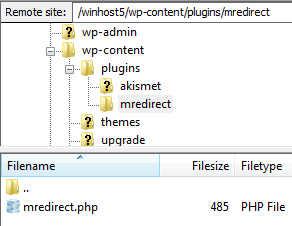
When connected via FTP double click on the wp-content directory folder. Now go in to your plugins folder by double clicking on that too.
You want to upload the exacted mredirect folder containing the mredirect.php file to the plugins directory:
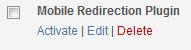
Now simply log in to your WordPress site as the Admin and activate the plug-in.
Once you have activated the plug-in, any mobile traffic to your WordPress application will be redirected to your mobile web site.
![]()
Can you believe it? There is a new framework to learn and use. It is called YII Framework. YII stands for Yes It Is (how quaint, I must say). YII is a PHP based MVC framework created specifically for highly active web applications, such as portals, forums, CMS, and e-commerce systems. It is designed to be light-weight, with a sophisticated caching mechanism.
You’ll want to look at the official YII home page to understand more about this framework.
The good news is it works on our shared hosting platform. According to YII’s documentation, the only requirement it needs is to have PHP version 5.1 or higher installed on the server; which we do have (PHP ver 5.3.13). Now, setting up a YII web application on our shared hosting environment does require some specialized steps you’ll need to take.
First you’ll need to download the YII Framework folder. Inside this folder are the YII files and extensions. You can download it here.
The second step you’ll need to incorporate is to modify the path your application will be looking for the YII framework. By default it’s set to look outside the root. A lot of the documentation was for an Apache web server therefore they had one standardized YII Framework folder that everyone accessed. That will be impossible on our shared hosting environment since each application only has permission within its’ own root. You will upload the YII Framework folder on your root and modify your application to search the framework from within.
As an example set the code from:
$yii=dirname(__FILE__).'/../framework/yii.php';
to:
$yii=dirname(__FILE__).'./framework/yii.php';
Next, you may need to modify the default time zone setting. By default it is set to UTC, which may not be the same as the server. The application will throw this error if left unchanged.
PHP Warning: phpinfo(): It is not safe to rely on the system’s timezone settings. You are *required* to use the date.timezone setting or the date_default_timezone_set() function.
In case you used any of those methods and you are still getting this warning, you most likely misspelled the timezone identifier. We selected the timezone ‘UTC’ for now, but please set date.timezone to select your timezone. in E:\ \YII_Framework\testdrive\test.php on line 3
To fix this problem, you’ll need to create a user.ini file. The file name should be user.ini and place it in your root folder. The default time zone should be delegated to the user level. Add this code in your user.ini file:
[DATE]
date.timezone = “GMT”
Save the user.ini file and that should solve it.
Note: I tested this several times and it may not throw this specific time zone error, but regardless, setting up a user.ini file shouldn’t hurt your application. The user.ini file acts like the PHP.INI file which is the basic PHP configuration for all PHP applications. The user.ini file allows for PHP.INI control at the account level. This is very useful in a Windows platform where we can only have one PHP.INI for the entire server. Keep in mind that some PHP elements/settings cannot be delegated to the account level due to security reasons.
One last step you will want to take before you are done is to protect your YII framework files/extensions from being downloaded. Because the framework itself uses PHP files, it can potentially be downloaded by a browser, modify certain configuration settings on the framework and potentially get re-uploaded back to the server. That can open security holes or exploits to your YII Framework application.
What you will want to do is setup the Framework folder with the same security restrictions as an ASP.Net Bin folder, where your application can access it, but no browser can directly navigate to it and download the files. You will use the RequestFiltering Module to protect the folder Framework. Create a web.config file if you don’t already have one, and place it on the root. Add this XML element within the system.webServer section of the web.config file.
<security>
  <requestFiltering>
    <hiddenSegments>
    <add segment="Framework" />
    </hiddenSegments>
  </requestFiltering>
</security>
That’s it, you’re all done. As you can see YII Framework is compatible with our Windows shared hosting platform.