
Site hosting news, tutorials, tips, How Tos and more
![]()
If you have domain names registered elsewhere but use them on a Winhost site, you may want to consider moving your domains to your Winhost account so you have all of your web site properties under one (virtual) roof. Here’s how you do that.
The first thing to do is to take note of a few things that will make your transfers smooth and trouble-free:
We have some videos that cover the domain preparation process for the most popular registrars. You can see them here.
To get started, log in to Control Panel and click the Domains tab.
![]() Click the Transfer Domain Name button.
Click the Transfer Domain Name button.
![]() Enter the domain name you wish to transfer, select the extension and click the Continue button.
Enter the domain name you wish to transfer, select the extension and click the Continue button.
![]() At this point our system performs a check to make sure your domain is eligible for transfer. If you have missed a step in preparing your domain name for transfer, or it is ineligible for any other reason, you will see the following error:
At this point our system performs a check to make sure your domain is eligible for transfer. If you have missed a step in preparing your domain name for transfer, or it is ineligible for any other reason, you will see the following error:
Domain status [status] does not allow for transfer
Go back and check the pre-transfer steps and make sure you haven’t missed anything. If the transfer initiation still fails and you are unsure why your domain is not eligible for transfer, please contact the current registrar.
If your domain is eligible for transfer, you will be taken to the next step which includes:
WHOIS Privacy – choose whether your whois contact information will be visible to the public. There is a $5 annual fee to activate whois privacy. Whois privacy is not transferable from your previous registrar.
Next you will want to complete the contact information in the following fields (we will pre-populate the Registrant fields with information from your Winhost account):
The next section is where you choose to keep the Name servers for the domain the same as they currently are, or change them to point to Winhost. If your name servers do not point to Winhost and you intend to use the domain on a site in your Winhost account, chose “Change to Winhost’s name servers.”
![]()
The next step is to double check the contact information, name servers and “Transfer Request Approver” email. You must have access to the Transfer Request Approver email address in order to complete the transfer process.
You can edit any information that needs to be changed on this page.
If everything looks good, click the “Transfer Domain Name” button.
![]() If you need to set up a new site for the domain name, you can click the Order New Site for this Domain button on the final page.
If you need to set up a new site for the domain name, you can click the Order New Site for this Domain button on the final page.
Once you have approved the transfer to us, the actual transfer between the two registrars can take a day or two. Depending on who the old registrar is, you may be able to speed up the process by also approving the transfer from their control panel. Though this is not always applicable, many of the larger registrars, such as GoDaddy, do allow for transfer approval.
While the transfer is in progress your domain will continue to function as normal (there is no “downtime” in a registrar transfer) and the domain’s status will be “Pending Transfer” in the Winhost Control Panel. When the transfer is complete the domain status changes to “Active.”
If you run into any problems, we have a Knowledge Base article that provides a step by step explanation of the domain transfer process.
![]()
We’ve made changing plans really easy so you can upgrade plans any time you need to – with a click of a button.
To upgrade plans, visit the Control Panel Site Manager of your site – just hit the Sites tab.
 If you are hosting several Basic/Max/Ultimate Sites with us, then you’ll get a list of your Sites. Click on the “Manage” link for the Site you want to make an update, otherwise you will be taken to your Site dashboard.
At the bottom of the left panel section you see an “change plan” button. Click that button and follow the instructions.
 Of course, an upgrade will have some costs involved so we’ve put together this knowledge base post to explain what happens when you upgrade plans: How will I be charged for an plan upgrade.
![]()
You may be wondering, “Why is this feature even in Control Panel?”
There are two reasons we offer the ability to disable email:
1) It’s for customers who want to host their site with us but want another provider to host their email. This is useful in situations where a customer opens multiple site accounts and wants one of the site’s email delivered to an outside entity. Email is routed locally before it gets forwarded, so if the email service is active on Winhost, it will not get delivered to the other provider. By disabling the service, you will ensure that the email gets delivered correctly.
2) It’s for customers who do not want to use email services.
To disable the email service on Winhost, log into your Control Panel and click on the Sites tab.
 Click on the Manage link for the Site you want to update and then click on the Email button.
 Now select Disabled in the drop down list and click on the Update button.
 A pop up box will appear asking you to confirm. Please note that if you choose to disable your email, it will delete all existing accounts and messages on the servers at Winhost.
The process is irreversible, and we cannot retrieve your account or messages once it has been disabled. You will need to recreate all the accounts again if you choose to re-enable your email services at Winhost.
![]()
This is the first in a series of weekly posts covering Control Panel features and procedures.
Have you been using a domain for your site and it’s no longer working for you?
Don’t fret – you can change the domain for your site easily in the Winhost Control Panel.
To make the domain change, log into your Control Panel and hit the Sites Tab.
If you are hosting several Basic/Max/Ultimate Sites with us, then you’ll get a list of your Sites. Click on the Manage link for the Site you want to make an update, otherwise you will be taken to your Site dashboard.
At the bottom of the left panel section you see a Change Domain button. Click that button and follow the instructions.
 That’s how easy it is to change a domain.
Now for some more details…
Things you should note
More Notes on the Domain
![]()
In addition to the Spam Filtering tool offered by SmarterMail, you can use Content Filtering to further reduce the amount of spam you receive. The difference between Spam Filtering and Content Filtering is that Spam Filtering filters a message on a more generic basis (think of a wide net) while Content Filtering filters a message specifically based on the rule you set up (think of plugging up a particular hole in the net).
Let’s see this in action. First, let’s access the feature by:
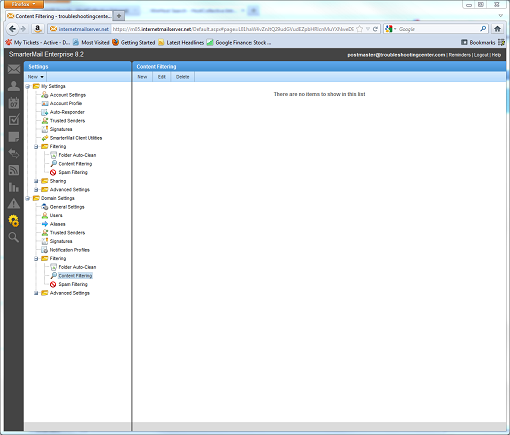
Now, click on the New button to create a new rule. This will start a wizard and bring up the next screen which provides a plethora of specific criteria you can filter messages by. For example, if you notice that a lot of the spam messages are coming from a particular email address, you can filter all messages from that address.
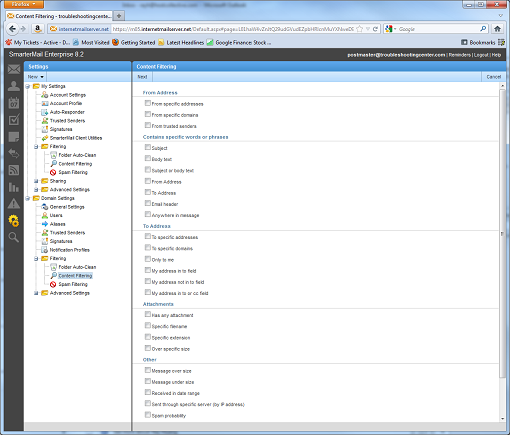
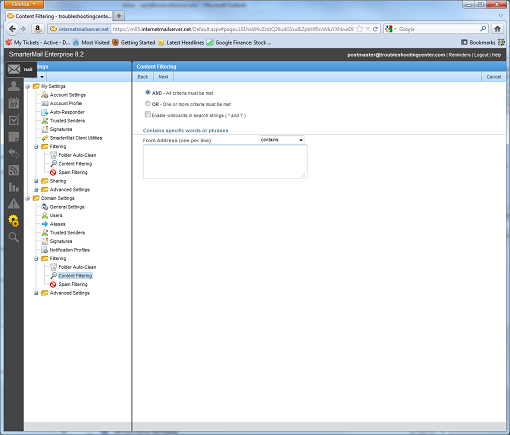
In this tutorial, I will do just that. I will go ahead and check the From Address box and click on Next. This brings up an AND/OR conditional screen which allows you to define more ‘complex’ rules. I will keep it simple by entering a single Gmail address I will be sending a test message from and click on Next to continue.
Now, I will name my rule and select one of 7 actions to take:
Mark as read
Do not deliver
Move message
Prefix subject
Add Header
Copy Message
Reroute message
I have checked the Move message box and in the field, I typed in “Deleted Items” for the name of the folder I want the message placed in. I click on Save to complete the rule. Now, I send a test message from my specific Gmail account, and voila, the message is automatically placed in the Deleted Items folder.

If you notice, there is another message waiting in my Inbox. I discovered on initial testing that the Spam Filtering rules take precedent over any Content Filtering rules. This means if the message was processed by Spam Filtering, it will not trigger any of the rules you’ve setup in Content Filtering. Please keep this in mind when you are setting up new rules. By using a proper combination of Spam Filtering and Content Filtering, you can greatly reduce the amount of spam you receive.
![]()
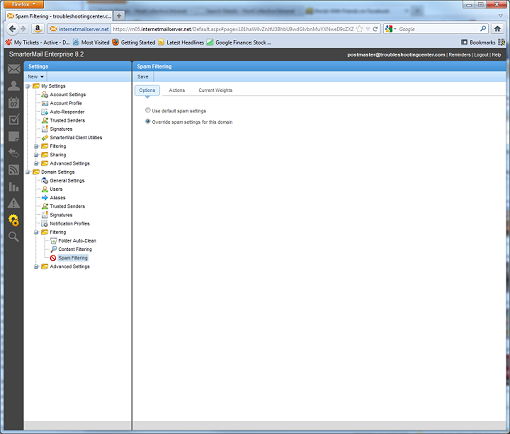
There may be some confusion regarding how to properly configure the spam settings in SmarterMail, so I decided to write this tutorial to give everyone a clearer understanding of how it actually works.
Spam is filtered based on the sum of the weights assigned to a number of predefined criteria. These settings can only be adjusted by the Primary Domain Administrator which is the postmaster account. To gain access to the settings page:
Now we can begin the process of adjusting the spam settings. Under the Options tab, check the Override spam settings for this domain radio button.
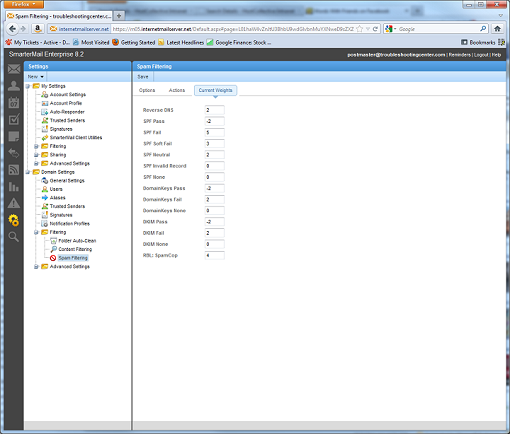
Next, click on the Current Weights tab. You’ll notice a list of criteria with text boxes which you can edit now. Here is where you can assign values to each criterion. Please note you can assign both negative and positive values which are important to understand because it affects the total weight of a message. I didn’t adjust the settings for now, but remember if you make any changes to the Spam Filtering window to click on Save so that the changes will be applied.
Now, we will take a look at the Actions tab. Here, there are two fields which you can edit. The Weight value here represents the total weight before the spam filter will take action. Any value over this total weight will trigger the action selected in the drop down box. There are only 3 actions you can apply:
Delete Message
Move to Junk E-mail Folder
Add Text to Subject
This will make more sense when we review an email header. Remember to click on Save to save your changes.

For testing purposes and this tutorial, I set the weight for the Low Probability of Being Spam to -5 and set the action to Add Text to Subject with the text “SPAM-LOW:” Then I sent myself a test message from Gmail and voila, the message was filtered.
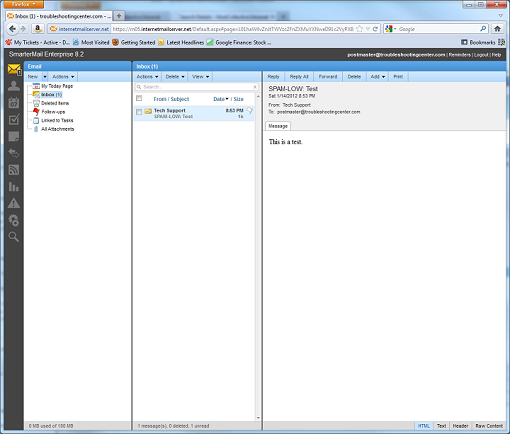
Now, to see which criteria were used to calculate the total weight, we’ll need to look at the header information. On the bottom right hand corner, click on Header. You’ll want to pay attention to these tags:
X-SmarterMail-Spam
X-SmarterMail-TotalSpamWeight
For the test message I sent, this is the complete header information:
X-SmarterMail-Spam: SPF_Pass, SpamAssassin 0 [raw: 0], DK_None, DKIM_Pass
X-SmarterMail-TotalSpamWeight: -4
If you notice, many of the tags correlate directly with the values assigned under Current Weights, so the total weight is the sum of the values you assigned to the criteria. In this case, it was (-2) + (0) + (0) + (-2) which equals -4. Since I set the weight in the Actions pane to be -5, this message was filtered properly because -4 is greater than -5. If you feel you’re receiving too much spam, you can review the spam message’s header information to determine which criteria were used and make adjustments accordingly.
![]()
I’ve been reading that some registrars make it difficult for a person to leave them. That once you register your domain name, they will do almost anything to keep you. There may be a good reason why you want to jump ship and have your domain name registered with a different registrar. It could be for price, convenience, or simply better support. Regardless of the reason it should not be “rocket science” to change your registrar.

Now, I’m not here to insult anyone, but what I want to make it clear that Winhost has made every effort to allow customers who register their domain name through us to move to another registrar if they wish. Before we proceed with the steps—and you may be surprised how simple it is—let us run through a preliminary check list.
Everyone should check this list before attempting a registrar transfer, regardless of what registrar you are with.
Preliminary Checklist
Now that you’ve gone through the list, transferring a domain name away from us should be fairly easy. Oh, before I forget, make sure you have selected a registrar that you will be transferring the domain to. You will need to set up an account with them before you initiate the transfer. Each registrar has their own steps for registering so I’m not going to go over them in this article.
Here are the steps to transferring a domain name away to another registrar:
That should be it. Pretty easy, right? If anything goes wrong, check with the new registrar to see where the process may have failed. Check your email address in the whois information, and lastly you can always open a ticket to Winhost support to see if anything is stopping the registrar transfer on our end.
While this article has been about how to move your domain away from Winhost, we do hope that you will continue to use our hosting services. We think we provide the best hosting value available anywhere. You may be able to find a lower price, but one thing you will not find at the cut-rate hosts is our level of service and commitment to quality. Those are things we live and breathe, we don’t just talk about them.
If you are at one of those lowest-common-denominator hosts now and you want to come join the Winhost family, stay tuned for an upcoming article on painless host transfer. Yes, it is possible!
![]()
You know, when you’re naming a company you might think all you have to do is come up with an appropriate, catchy name, secure the .com and you’re all set. Funny thing is, you can do all those things and still have some unpleasant neighbors in search results.
 Let’s take, oh, I don’t know, Winhost for example. For a company that specializes in Windows hosting like we do, it seems perfect. And it is perfect. But when you search for Winhost on any big search engine (meaning Google, but I’m trying to be fair to scrappy little upstart bing), the first things you’ll see is us, but also on that first page you’ll see listings for pages describing a nasty malware Trojan infecting people’s computers.
Yes, we share the name of a virus! Cool, isn’t it?
No?
Yeah, I didn’t think so either.
Luckily winhost.exe is a relatively old piece of maliciousness, so it’s slowly fading from view. But I figured if we’re going to talk about it, I may as well tell you how to get rid of it! So if you’re suffering from this nasty old threat, here’s a solution:
First you want to delete the file itself. It’s commonly found in C:/Windows/System32. It can also be found in your startup directory, so be sure to check there. Also, perform a search on your System folder just in case the file has been copied to other locations.
Okay, here comes the fun part. Of course deleting the winhost.exe file from your hard drive is not enough. Once you have deleted the file(s), you also have to delete it from the registry.
Before you start modifying the registry it is a good idea to back it up. To backup your registry go to Start/Run and type regedit. Click File/Export and save the file.
You may also want to set a restore point on your computer (though you’d be restoring the virus too if you reverted), go to Start/Run and type RSTRUI and follow the wizard to create your restore point.
Now for the registry.
The fastest way to find and delete all of the winhost.exe entries in your registry is to go to Start/Run and type regedit. Make sure you are focused on the top level of the registry key which should be “Computer” so that it will search the entire registry tree. Go to Edit/Find and type winhost.exe. It will go through the registry and you can delete the winhost.exe records one by one. It is important to make sure all the entries are deleted, but the most important registry keys to be sure to clean up are:
HKEY_LOCAL_MACHINE\SOFTWARE\Microsoft\Windows\CurrentVersion\Run
HKEY_LOCAL_MACHINE\SOFTWARE\Microsoft\Windows\CurrentVersion\RunServices
HKEY_CURRENT_USER\SOFTWARE\Microsoft\Windows\CurrentVersion\Run
Next, go to the refrigerator and have a cold drink. because you’re finished!