
Site hosting news, tutorials, tips, How Tos and more
![]()
In this tutorial I’m going to show you how to install nopCommerce using the Winhost App Installer in Control Panel. It’s recommended to be on the Max or Ultimate plan if you plan on using nopCommerce for your site. If you are currently on the Basic plan please read our knowledge base article on how to upgrade your hosting plan.
To get started: You are going to need to create a SQL database in Control Panel first.
Login to Control Panel.
Click the Sites tab.
Click the “Manage” link next to the site you wish to install nopCommerce on.
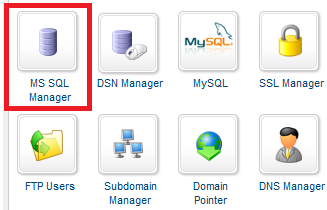
Now we want to create a SQL database for nopCommerce.
Click the MS SQL Manager box.
Click the green “Add” button.
Now enter a database name and how much SQL disk space you wish to allocate to it.
Click the green “Create” button.
To change the password for the main SQL database user, click “Manage” next to the SQL database.
Click on “Edit” next to password and update it.
Save these settings because we will need them later when we’re installing nopCommerce.
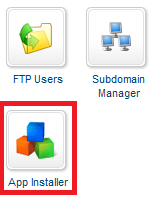
Go back to the “Site Manager” page of Control Panel.
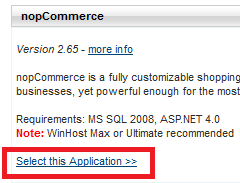
Click the “App Installer” box.
Click the “Select this Application” link.
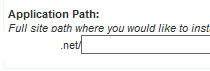
In this tutorial I will be installing nopCommerce in the root directory of my hosting account. If you want to install nopCommerce in a subdirectory you will need to enter the name of the subdirectory in the section below.
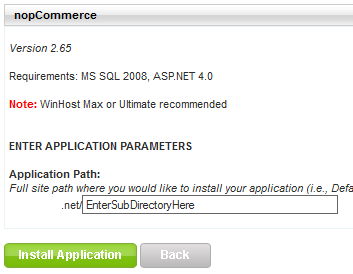
Since I’m installing nopCommerce in the root I will need to remove the text in the box field above. So this field will be empty for me:
WARNING: Using the App Installer tool will delete all files within the Application Path location.
Since I’m installing the web application in the root of my hosting account, everything in my hosting account will be deleted and nopCommerce will be installed.
Click the green “Install Application” button to start the installation on the web server.
Once completed you will receive the a message “Your application installed successfully.” Click the link below this notification (note: If your domain name isn’t pointing to our web servers yet, you will need to use the secondary URL to view your site on our web servers). The secondary URL can be found on the control panel Site Manager page.
Once you’re on the site where nopCommerce was installed, enter the following information:
Admin User Email:
Admin Password:
For Database Information we’ll be using the following setting:
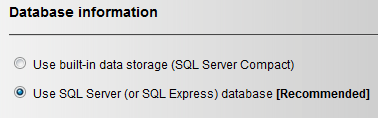
Remember the settings you saved for your SQL database? You will now need to enter them in the below section. My example is the following:
Now click the “Install” button.
Wait for the following screen; “Installing nopCommerce…” to finish.
Once its completed you will be brought to the default page of nopCommerce.
You’re now done with the installation. Don’t forget to pat yourself on the back. 🙂
If you run into any issues or have any questions regarding nopCommerce, please post your questions in our Community Forum. The Technical Support department is unable to assist with nopCommerce installation or configuration.
![]()
Sometimes you just want to tear everything down and then build it back up. Maybe you are tired of your old nopCommerce site and want to try out WordPress.
Maybe you have an older version of an app in your hosting space and you want to upgrade, but first you need to remove the current installation.
Whatever the reason, the support department is often asked, “How do I reset my hosting space?”
Well, there isn’t a tool available in Control Panel to do this, so I have provided the following guide for you to use to clean out your hosting space and return it to “factory default” in two broad steps.
Backing up and removing your database
Backing up your site’s files and then removing them
You might have had to mark a few sub directories as application starting points in the past; I recommend that you unmark them first in order to avoid potential permissions issues.
If you cannot delete some of your files and directories at this point, try recycling your application pool. Sometimes web applications do not “let go” of a file or directory properly, and you will not be able to delete a file while it is in use. Recycling your application pool should remove the lock.
If you tried recycling your application pool but still cannot delete a file, open up a ticket with the support department and ask us to manually remove the files from the server.
Make sure to provide us with a copy of your FTP log, just so we know that you tried to delete the files yourself.
And there you have it, we now have a completely clean hosting space.
Your database has been backed up and removed, so we don’t have to worry about old table data conflicting with new.
Also, all of your application starting points have been removed, and you have regained all of your disk space allotment on the web server.
![]()
Here are some small tips you can use to make your WordPress site a bit more secure and slightly increase performance. Make sure the version of WordPress you’re running is the most recent version. This will ensure any security vulnerabilities found in the Content Management System will be addressed.
To perform an in-place upgrade of WordPress:
1) Log into WordPress as the admin user.
2) On the Dashboard, it should say WordPress x.x.x is available! Click on the Please update now link.
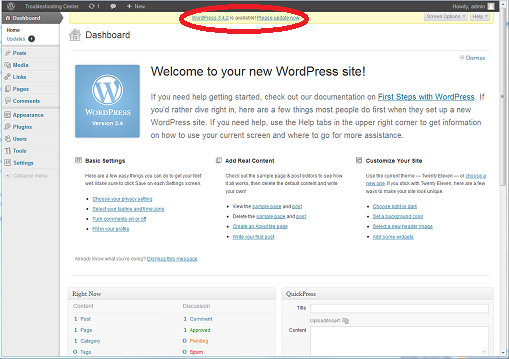
3) Click the Update Now button.
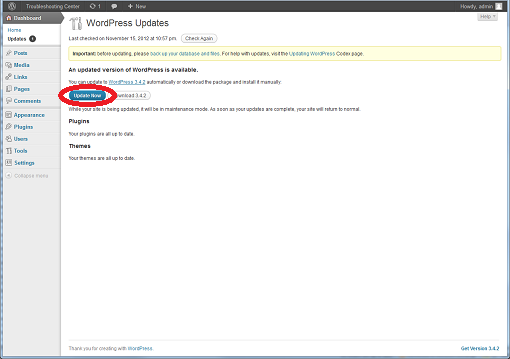
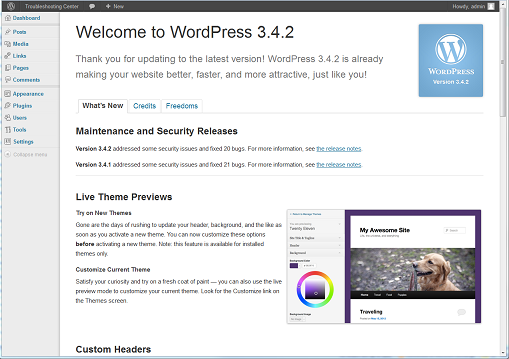
4) Finished!
Alternatively, you can perform a manual upgrade by:
1) Instead of clicking the Upgrade Now button, click Download x.x.x
2) Extract the .zip file’s contents.
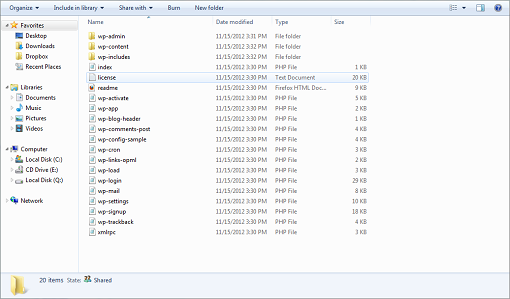
3) Upload the files using FTP, matching the same directory structure.

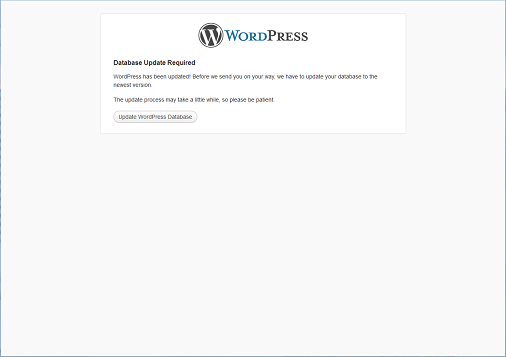
4) Once you refresh the admin screen in the browser, you should get an Update WordPress Database button. Click on it and then the Continue button to complete the process.
You can also add an extra layer of security for the admin section. Ruslan’s Blog shows you how.
According to IIS7 Manager, you can improve the performance a bit by moving the index.php file to the top of the Default Document list.
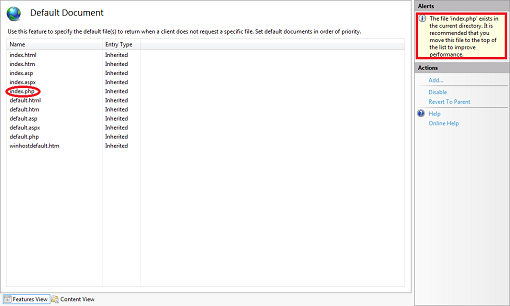
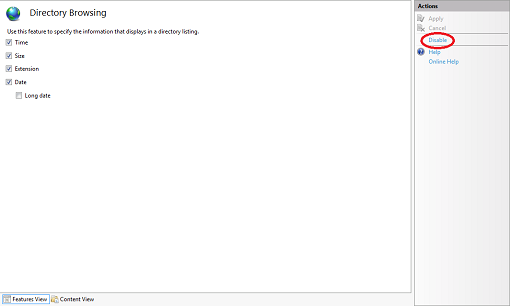
I also suggest you disable Directory Browsing.
Take note that any changes you make through IIS7 Manager will be written to your web.config file, so you should always make a backup of it before proceeding.
![]()
The first step is to log in to SmarterMail with your Postmaster email account.
Log in to the Winhost Control Panel.
Click the Sites tab at the top.
Now click on Manage next to the site you wish to check the email disk space usage.
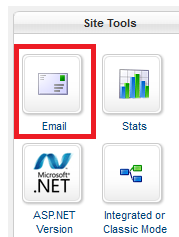
Click the Email icon in the Site Tools section.
On the next page click the SmarterMail Manager link.
This will automatically log you in to the SmarterMail Email system using the Postmaster account.
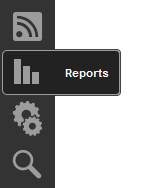
Click on the “Reports” Icon.
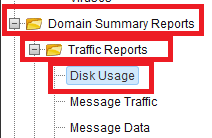
Now Expand the Domain Summary Reports folder. Then Expand the Traffic Reports folder. Click Disk Usage.
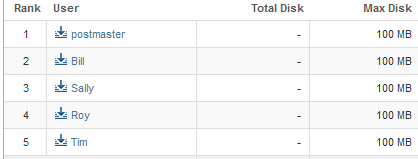
The page will now display how much disk space each email account is using.
![]()
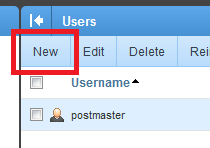
You will need to log in to the SmarterMail system with the postmaster email account first in order to create an email user. To do this please log in to Control Panel on Winhost.
Once you have logged in to Control Panel, click the Sites tab at the top.
Then click on “Manage” next to the site you wish to manage.
Click on the Email box under site tools.
Then click the “SmarterMail Manager” link.
The link will automatically log you into the SmarterMail email system using the Postmaster account.
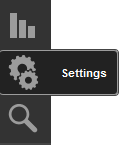
Once you are in the SmarterMail, click the “Settings” button.
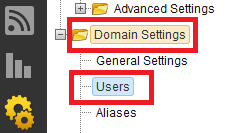
 Then expand the “Domain Settings” folder if it is not already expanded. Then Click on “Users”
Then you may start adding your email users by clicking on the “New”.
![]()
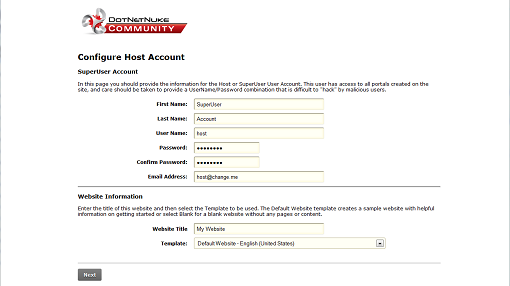
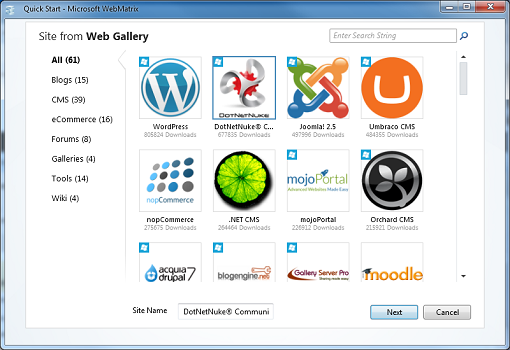
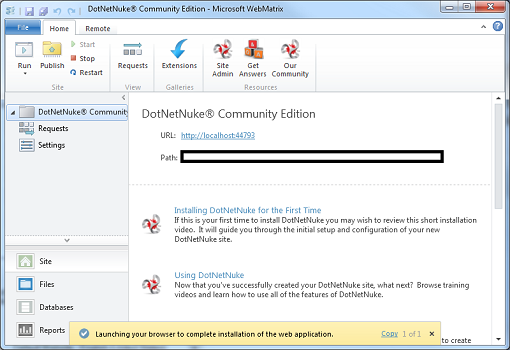
Did you know there are multiple ways of installing/deploying your favorite Content Management System at Winhost? Below, I provide 3 general guidelines and briefly explain the benefits/drawbacks of each. (I’ll be using DotNetNuke as an example.)


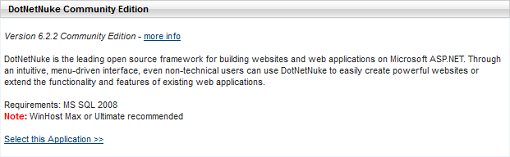
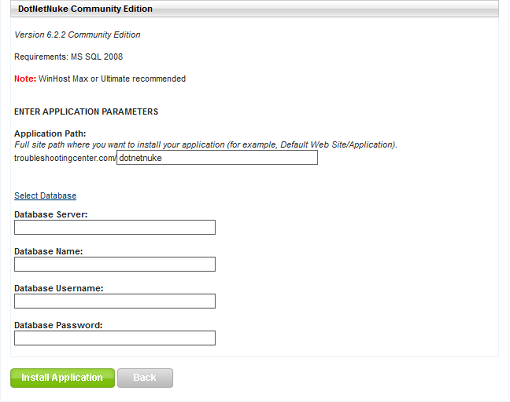
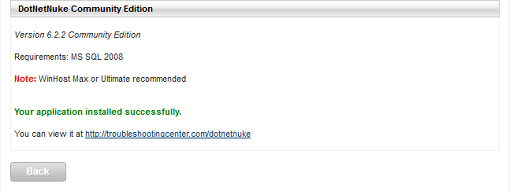
Configuring DotNetNuke example:
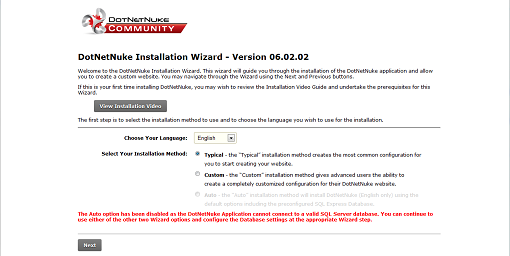

Benefits: The benefit of using this method is that you do not have to upload any files.
Drawbacks: A slight drawback is that CMS version might not be the latest. This may not be a problem as most CMS nowadays have upgrade modules which you can invoke after the install.
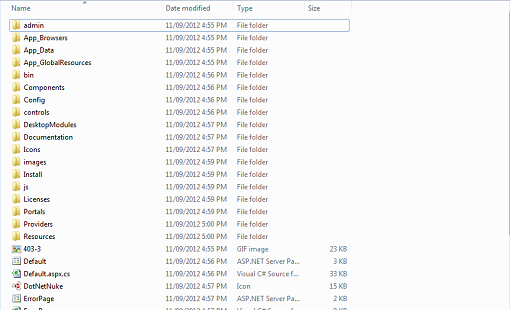
Please also note using the App Installer tool will wipe out any files in the installation directory. If you have files in the root, this is not a good idea. Make sure you make a backup copy of your site before using the App Installer tool.
If you install the application to a sub-directory, it will also mark it as an application starting point. If you have multiple apps running on your site, you will need to take this into consideration if you need to make web.config modifications.

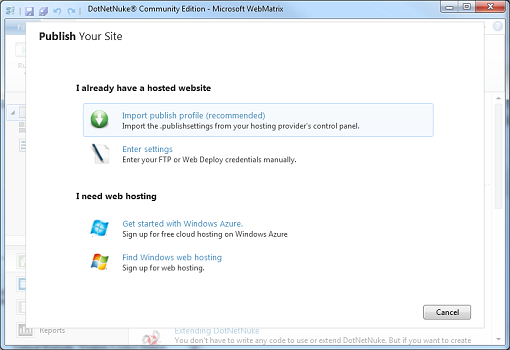
Benefits: The benefit of using this method is that you can use the latest version of the CMS or install a CMS that is not available through the App Installer such as OpenCart.
Drawbacks: The drawback is that you need to be more aware of the CMS’ requirements and may need to perform more steps to configure it properly. It also may not be a viable option if the CMS is particularly large, and you have a slow Internet connection (i.e. it would take a very long time to upload the files).
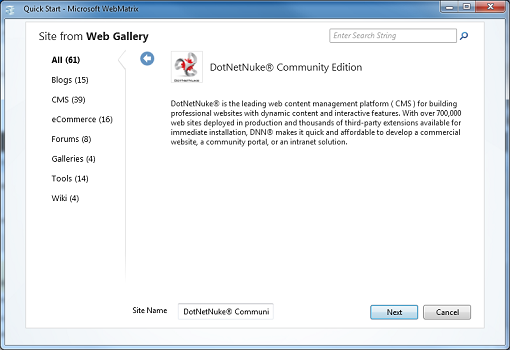


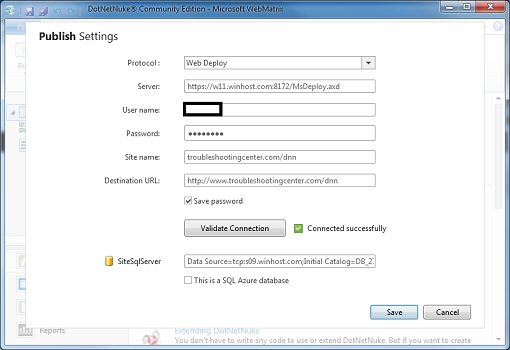
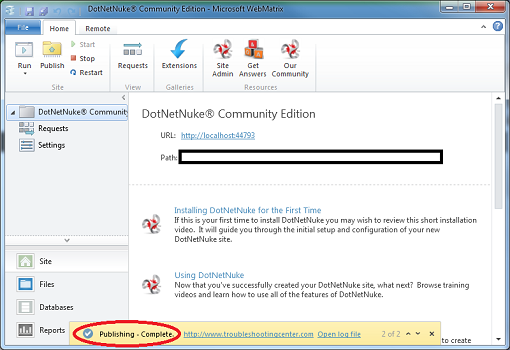
10. For this example, I will use Import publish profile (recommended). Below is a sample screen shot, and I’ve manually entered the database connection string (found in the Control Panel). Click on the Validate Connection button. If it does not say Connected Successfully, then you may have entered the wrong settings or you may have antivirus/firewall software blocking the connection. Click on Save and Continue a few times. (Don’t worry if you get a warning about site compatibility. It should still work.)
11. You will now see a Preview screen, and you can choose what you want to publish. Click Continue when you are done checking the files/database you want to update.

12. You will get a Publishing – Complete message when you are done.
Benefits: The greatest benefit to this method is that you can develop your site locally.
Drawbacks: The drawback with this method is that you may need to perform a lot of prerequisite setup prior to the installation. Configuring changes locally may also not work when you deploy to Winhost. You may still need to make some further alterations to the web.config file.
As with Method 1, you need to be careful when publishing as files in the destination could be overwritten. Always make a backup of your site prior to publishing.
You may also want to spend some time reading this great post from one of our customers on the forums:
http://forum.winhost.com/showthread.php?t=8565&highlight=dnn+installation
![]()
All of us have experienced spam. Spam is unsolicited and unwanted email that arrives in our inboxes. It can range from a minor annoyance to complete disruption of email accounts, or worse yet, can harbor malware, trojans, and viruses.
Some of us go through a period of time where we do not get spam in our inbox, then are suddenly bombarded with it. Some of us even incorporate spam/content filters, often decreasing unwanted and unsolicited email, only to have a renewed surge of spam activity within a year or so.
While our first instinct may be to contact our email administrators to inform them of increased activity and find out if any email server settings have been modified, let’s not forget our own responsibilities to help prevent, diminish, and combat spam from infiltrating our email accounts.
I want to bring up four points that we all need to think about when we want to protect ourselves from these disruptive and intrusive emails.
First, whenever possible, try to avoid using your primary email address when filling out forms. We see it all the time, at the mall or shopping center a booth is offering a free entry to win a prize. We eagerly fill out all the information to win that car or vacation to the Bahamas, and one of the pieces of information they ask for is our email address.
For things like these, try to use an email address that is not your primary email address. Set up a Yahoo or Gmail account that is used solely for these events, and it will help to greatly reduce the amount of spam that arrives in your inbox.
You might think that creating an alternative email address on your primary email domain will solve the problem. For example, your primary email account is [email protected], and you create [email protected]. The problem with this method is that you are disclosing your email domain, and spammers can now bombard @domain.com with “guessed” addresses (such as info@, webmaster@, or even entire dictionaries of usernames) which can eventually spill over to your primary email address.
Second, look at this one as a duty or responsibility: never respond to spam! Delete it, and whenever possible, mark it as spam in your email system so that you build a reputation for what is and isn’t spam. The next time you get a similar spam message it will automatically drop it in your “Trash” or “Junk” folder.
In SmarterMail, if you see an email in your inbox that is spam you can go to Actions/Mark/spam. The more you use this, the more you build up your definition of potential spam.
The third good practice is setting up account level spam and content filtering rules. Many email systems have this feature. In SmarterMail you can go to Settings/Filtering. There you can define your own content filtering and spam filtering rules.
Don’t forget Greylisting! When an email network “greylists” messages, they do not accept the initial incoming message, but rather instruct the sending mail server to try to delivery again later (which most servers will do every few minutes). The assumption being that spam servers will not attempt to send the message again, but legitimate servers will. Greylisting will delay legitimate emails though, so it’s up to you to decide to enable or disable this feature. For the most part, Greylisting is a valuable tool in helping keep your email account clean of unsolicited emails.
Finally, if at all possible, try to avoid “catch-all” email accounts. Catch-all accounts will allow any email address to come through. For example, if you have Catch-all enabled, email addresses that do not exist ([email protected], [email protected]) will make it into your inbox. There may be a business need to have this activated, but this will greatly increase the likelihood of receiving spam, even with a strong spam filtering system.
The last thing that I would like to mention is the necessity of remaining diligent.
Many of us successfully implement the above practices, reducing or even eliminating spam from getting into our inboxes, only to relax our guard, even temporarily, exposing us to a new series of attacks on our email.
Keep in mind that spam is an ongoing threat, and that spam is adaptive and always evolving. Spammers know that they have to constantly update their procedures and techniques to get through to the greatest number of people.
One of the biggest mistakes that we can make is believing that once we have effective anti-spam measures in place, that we do not have to revisit and update those measures. If that were true, spam would have been eliminated a long time ago.
As spammers find new and more sophisticated ways to infiltrate your inbox, you have to remain vigilant and active in combating spam.
![]()
I know you absolutely love the SmarterMail webmail that we provide with your account. What’s not to love? It’s old fashioned, clunky, confusing – perfect!
But you don’t have to be stuck with it. You can “pop” your email boxes using Gmail. “Pop” is just nerd slang for “check.” What we’re talking about here is reading and replying to mail that comes in to the addresses that you’ve set up on your domain name, but doing it all through the Gmail interface, and that’s pretty cool.
This is not a tutorial for using Google Apps mail with your domain. We already have one of those in our forum. This tutorial will show you how to keep your mail service here at Winhost, but use Gmail as your email program.
You have a Gmail account, right? If not, go set one up, then we can get started.
Log in to Gmail and click the Settings gear and select Settings.

Click Accounts and Import.

Click Add a POP3 mail account you own. In the lovely orange popup window that opens, enter the email address that you want to check using Gmail. Click Next Step.

Next you’ll be on the mail settings page of the popup window. There are a lot of variables here (it’s Google, after all), but we’ll concentrate on the simplest, quickest setup.
Username is your complete email address, not just the part before @.
Password is the POP account password that you entered into Control Panel when you set up the email address.
POP Server should be pre-populated with mail.yourhosteddomainname.com.
Everything else can be left in its default state. If you do not intend to use Gmail exclusively, check the box for “Leave a copy of retrieved message on the server,” that will allow you to pull your mail down from another source in addition to Gmail.
But beware, if you use that option and your Winhost email boxes get full, your mail will bounce. To prevent that ever happening, do not check “Leave a copy of retrieved message on the server.”
Click Add Account.

The next window will verify that your account has been added.
It will also ask if you want to be able to send mail “as” the new address. If you intend to use Gmail as your only email client, or if you ever want to respond to the incoming mail for your newly set up account, select Yes, I want to be able to send mail as…
Click Next Step.

If you selected “No” in the previous window, you’re finished.
The end.
But you didn’t select “No,” did you? Good! You’re going to want to be able to send mail from Gmail “as” yourself.
So in the next window simply enter your name. This is the name you want to appear as the sender. Leave Treat as an alias checked.
Click Next Step.

Next the cheerful Google robots are going to ask if you want to send mail through their SMTP server or if you want to send through your domain. It’s much easier to leave the default Send through Gmail checked. And since this is the easy setup guide, that’s just what we’ll do.
Click Next Step.

Before Gmail will let you send mail as yourself they want to make sure that you are who you say you are. Otherwise you could send mail as me — or someone important like Scott Guthrie or Larry the Cable Guy. To get the verification ball rolling, just click Send Verification.
Now you could log in to your POP account with your desktop email client, or use SmarterMail webmail to pick up the Google verification email. But since you’re already checking mail for your address using Gmail, you should be able to click Inbox on the upper left side of the Gmail window and – through the miracle of modern technology – pick up the verification email right there.
Try it. I’ll wait here.

Once you’ve copied the verification code from the email, just enter it into the box in the popup window and click Verify.

The popup window will disappear and nothing else will happen.
Which is good, because nothing else needs to happen. You’re all set!
Speaking of Google, why not join our circles on Google+? We’re waiting for you.