
Site hosting news, tutorials, tips, How Tos and more
![]()
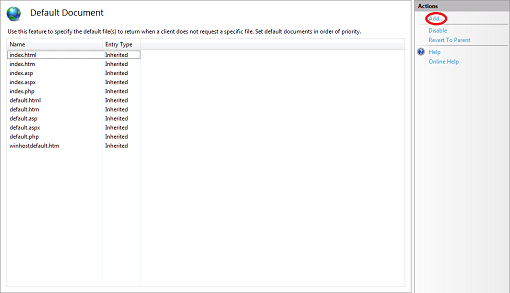
Here’s another tip for those who are new to web hosting or Windows web hosting. Under Windows/IIS, you can specify the default web page that will load up when you enter your site’s domain name. We have preconfigured IIS to automatically load one of these files:
index.html, index.htm, index.asp, default.html, default.htm, default.asp, default.aspx, winhostdefault.htm
And here are the instructions to change these settings:
1. Download and install IIS7 Manager from Microsoft: http://www.iis.net/download/iismanager
2. Configure IIS7 Manager to access your site account. You can follow the instructions in this Knowledge Base article.
Or follow the steps below:
A. Select File -> Connect to a Site…
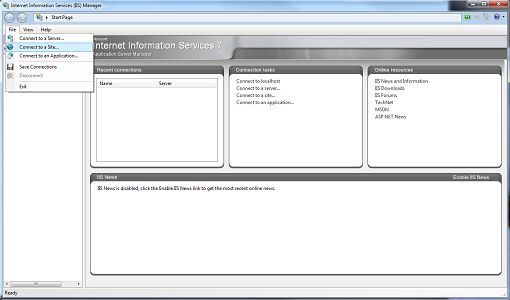
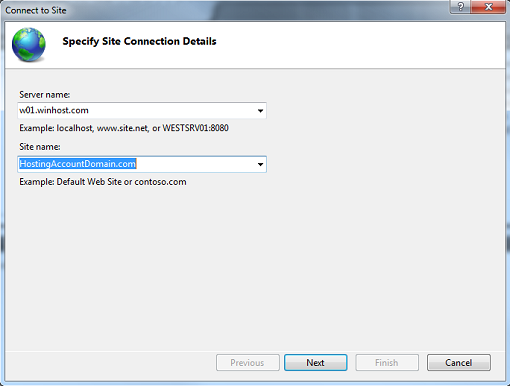
B. Enter the Server name and Site name. This information can be found in the Winhost Control Panel.
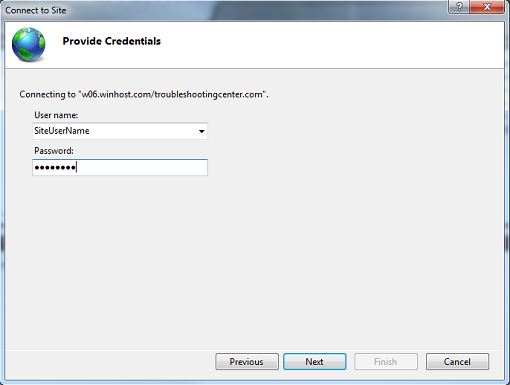
 C. Enter the User name and Password for your site.
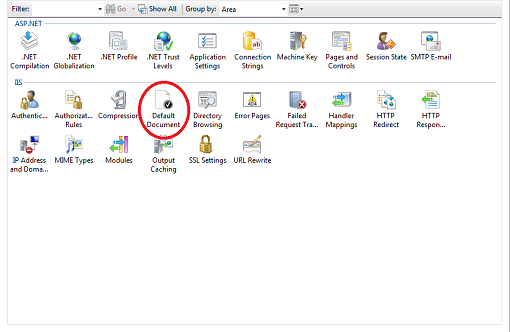
3. You will now see a number of delegated modules. Double click on the Default Document module.
4. To add a page to the Default Document list, click on the Add… link.
5. Here, I have added a page named homepage.html to the list.
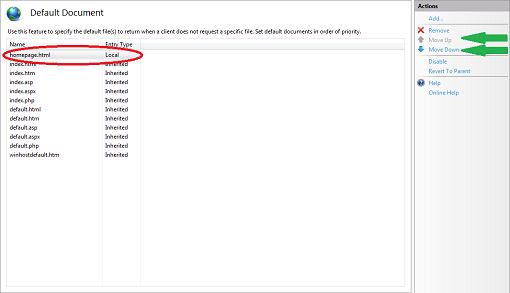
The page that automatically loads is determined by rank from top to bottom. This means if IIS cannot find a homepage.html, it will look for index.htm next and go down the list until the list is exhausted. You can use the Move Up and Move Down links (indicated by the green arrows) to change the rank order. Consequently, you can also Remove pages you do not wish to be on the list.
As a final note, I’ve shown you how to configure the Default Document for the root of your site. You can also configure the Default Document for any subdirectory by selecting it on your left, and then double clicking the Default Document module. Please note that all changes are written immediately to the web.config file in the appropriate directory on the server, and if you know the web.config file well enough, you can also manually add the XML entries using any text editor.
![]()
In this tutorial we will be showing you how to install WordPress using the App Installer feature in the Winhost Control Panel.
You will need a MySQL database, which you can add from within your hosting account.
To get started, log in to the Winhost Control Panel.
Click the “Sites” tab at the top.
Click “Manage” next to the site you wish to install WordPress on.
On the next page you will set up the MySQL database that you will be using for WordPress.
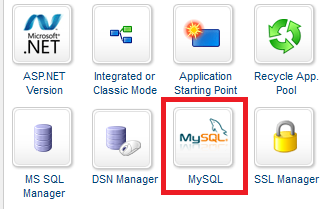
Click the “MySQL” icon:
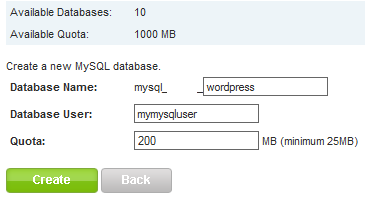
Now create a MySQL database by clicking the “Add” button.
Enter a database name and user name and the amount of disk space you wish to allocate to the MySQL database:
Click “Manage” next to the MySQL database to change the password for the MySQL User you just created:
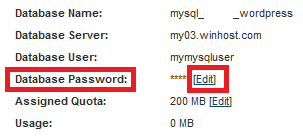
IMPORTANT: Make a note of the MySQL information because we will need this when installing WordPress.
Go back to the “Sites” tab and click “Manage” next to the site you wish to install WordPress on.
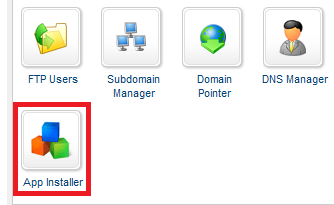
Click the “App Installer” icon:
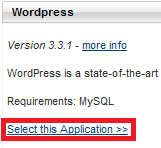
Scroll all the way to the bottom of the page and look for WordPress. Then click “Select this Application”:
For the sake of this tutorial I’ll be installing WordPress on the root of my site. To do this you will need to remove the “wordpress” text in the AppPath field, leaving the text field empty:
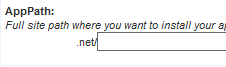
If you wish to install WordPress in a subdirectory, enter the subdirectory in this field. Where you install WordPress depends on how your site is laid out. In most cases the application will be installed in a subdirectory.
WARNING: Installing WordPress on the root of your site will delete everything that is currently on your site’s root. If you install in a subdirectory, the installer will clear the subdirectory and not your root (of course it’s always best to backup your site files first when installing a new web application in case something goes wrong with the installation).
Click the “Install Application” button when you are ready to continue with the installation of WordPress.
If every went according to plan then you should receive the following message.
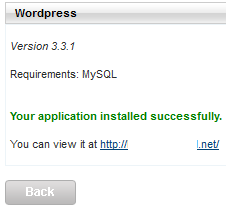
Click on the link after “You can view it at” to continue with the installation.
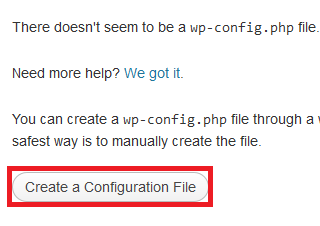
Click the link to go to your WordPress Installation. You’ll see the error message below. Click the “Create a Configuration File” button:
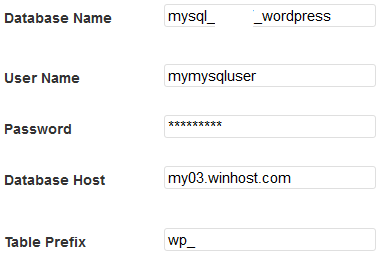
On the next page you will see a list of things you will need in order to install WordPress; Database name, Database username, Database password, and Database Host.
Next, click the “Let’s Go!” button.
Enter the information you made note of when you set up the MySQL database:
Click the “Submit” button.
Click the “Run the Install” button.
On the next page you will choose the settings that you wish to use for your WordPress application. Be sure to remember the Admin User Name and Password for WordPress. If you forget the user name and password you may need to repeat the installation.
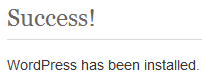
Once you have configured the settings you wish to use, click the “Install WordPress” button. This will bring to the next page confirming you have successfully installed WordPress.
If you run into any issues or have any questions regarding WordPress. Please post your questions in our Community Forum. The Technical Support department is unable to assist with WordPress installation or configuration.
![]()
Many people may not realize this, but there are a few things you can do to help yourself receive a timely resolution when asking for support here at Winhost.
1. Open up a support ticket through the Winhost Support Portal at https://support.winhost.com.
Opening up a support ticket will authenticate your ticket and reduce the amount of time that it takes our support personnel to look up your information or verify that it is a legitimate support request. We cannot provide account-related information unless a ticket is authenticated. It also helps us keep a good ticket history and allows us to find more permanent solutions if there is a re-occurring problem.
 2. Be as specific as possible when you are trying to describe a problem.
If the issue you’re having is generating an error message, please provide it to us along with instructions on how to reproduce it, if possible. If you have screen shots or logs that you think might be helpful, include them as attachments.
Example of a support ticket that is too generic:
“I am having problems with my email.”
Example of a support ticket that is more specific:
“I am having problems with my email account [email protected]. I am unable to send or receive messages using Microsoft Outlook. I have also attached a screen shot of the error that Microsoft Outlook is generating.”
3. Open a different support ticket for separate issues.
For example, if you are having a problem with your database and email, open a support ticket for each issue as they are often unrelated. Please note that billing questions should be directed to our Billing Department and sales questions to our Sales Department.
By following these simple tips, your ticket will be routed correctly and resolved in a timely manner.
![]()
If you’ve been a Winhost customer for more than a year, you may not know that we added the option to enter a second account security question.
You may be thinking, “I created one security question when I opened the account, why should I add a second?” The reason we recommend adding a second question/answer is because we run into a lot of instances where a user will forget their account password and also the answer to the primary security question. Having the second question/answer available could save you a lot of trouble if you ever find yourself locked out of your account.
Go to the Account & Billing section of Control Panel and click the “Security Question” icon. One of the cool features of the additional security question is the ability to add your own question, rather than choosing from one of the standard selections. From the “New Question #2” dropdown, choose “Other: Type in your own security question below.” That will open up a text entry box for your own question.

When you’re finished just hit the “Update” button and that’s it.
Security can be inconvenient, but we really recommend that you change your account password and security questions at least once a year. We’re on your side, but we have very stringent security policies, so if someone gets into your account, it can be difficult for you to regain control. Rotating your passwords and security questions regularly can prevent unfortunate problems down the road.
![]()
If you want more than one domain name to bring up your site, Winhost provides an easy to use Domain Pointer service.
By default, the domain pointers point to the root of your primary hosted domain. They are primarily used to direct multiple domains to the same site. You can direct domain pointers to subdirectories, but that requires a bit of redirect coding. This article doesn’t address that, but we do have Knowledge Base articles to help you down that path.
So if you want to add a domain pointer, here’s all you have to do. Log in to Site Manager in Control Panel. In the Site Tools section, click the Domain Pointers icon.
 Once you’re in the Domain Pointer section, click the Add button.
 Now enter the domain name that you wish to point to the existing site and click the Create button. It’s important to note that the domain pointer order is not a domain registration system. If you need to register the Domain Pointer, click the Domains tab in Control Panel. Once the new name is registered, come back to this process.
 You probably noticed the big red question mark in the image above. Do you want to be able to use email on the Domain Ponter? If so, make sure you check Enable Email Alias. That will activate an alias-based email service for the Domain Pointer. What that means is any email address on your primary domain will also accept messages sent to the same address on the new pointer domain.
For example, let’s say your primary domain is primary.com, and you use pointer.com as a domain pointer. If you set up the email address [email protected], that mailbox will also accept mail for [email protected]. Any pointer.com addresses have to point to an email address on the primary domain name. [email protected] will not work unless [email protected] exists.
For more information on Domain Pointer Email Aliases, see this Knowledge Base article.
The last thing you have to do is make sure that the name server records for the domain name you just added point to Winhost:
ns1.winhost.com
ns2.winhost.com
ns3.winhost.com
If the name servers already point to Winhost, the Domain Pointer should work right away. If not, allow 24 to 48 hours after changing the name servers for the Domain Pointer to start to resolve to your main site.
Need help changing name servers for your domain? Here are instructions for updating name servers for some popular registrars.
![]()
One of the most daunting tasks a webmaster must perform is uploading a large web site to a remote web server. Depending on your Internet connection speed, the task can be tedious as files are uploaded to your root directory one file at a time. If you have 10 or 20 files this is not a big deal. But what if you have hundreds or thousands of files to upload? The files can range from code behind files, to images, audio files, DLL files and more.
Luckily Microsoft has introduced a solution to this problem with MS Web Deploy. Web deploy can be used with IIS 7, Web Matrix, Visual Studio, or through the command prompt MS DOS. The first thing that you will need to do is download MSDeploy. This is the tool that will help you package or zip your web site.
Run through the installation wizard to install the “Web Deployment” tool on your computer. You do not need IIS 7 for this. Although Web Deploy and IIS 7 can work side by side, the Web Deployment Tool can run independently. You can install and run this on Windows 7, Vista, or XP without setting up your own local web server.
One thing you do need to install is the “Remote Manager Service.” This should be part of the Web Deployment Tool installation Wizard, but by default the installation does not install it, therefore you will have to manually install it.
The installation will install the MSDeploy command. This command can be invoked using the MS DOS command prompt. One thing you need to be aware of is that MSDeploy requires administrator rights to run properly. The easiest way this can be done is to navigate to MS DOS using Windows Explorer. Go to C:\Windows\System32 and right click on CMD.EXE. Choose “Run as Administrator”.

Once the command prompt is up, you will navigate to the folder level where MSDeploy.exe exists. On Windows 7, the default installation will place msdeploy.exe in C:\Program Files (x86)\IIS\Microsoft Web Deploy.
msdeploy.exe has an extensive command base. Typing [MSDeploy /?] in the command prompt will yield a large selection of commands and conditions you can run. There are two core tasks that MSDeploy can be used for. One is Archiving and the other Packaging. The two are different and each have their own unique properties. For zipping files and publishing to a remote IIS web server, you will be using the Package Provider. Archive is mainly used for backing up your site for safe storage, where as the packaging method zip up the files for you. For a list of provider settings, you may want to look at this Microsoft site to get your feet wet.
To get started deploying your site with a zip file, one thing you need to know is that you cannot simply use your OS compression tool to zip a website. You will need to use MSDeploy for that. When MSDeploy zips a file, it will also create a couple of xml files. These files are archive.xml and systemInfo.xml. These files describe the properties of your web application. You will need these files to deploy to an IIS server with MSDeploy.
Technically you can manually create these files and then manually zip. However, creating these files from scratch is much more complicated than running MSDeploy. To properly zip your web site, you will first need to navigate to the folder where msdeploy.exe exists. The path to MSDeploy should be C:\Program Files (x86)\IIS\Microsoft Web Deploy V3. Once you are there, run this command in your MSDOS command prompt:
msdeploy.exe -verb:sync -source:iisApp=”C:\ Test_site\Website” -dest:package=c:\Test_site\testsite.zip
You will need to use the provider iisApp so that MSDeploy will know the destination folder will be an application folder. If you are uploading to the root it shouldn’t be a problem since most IIS root folders are already set as an application folder. But if you are going to upload it to a subfolder, zipping the files with the iisApp provider will be important.
Bear in mind that the paths I am using are examples, and it will be up to you to determine the path where your website exists and the path where you want to place the zip file. Once this is done, you can run the MSDeploy command against your remote IIS server:
msdeploy.exe -verb:sync -source:package=”c:\Test_site\testsite.zip” -dest:iisApp=”domain.com/subfolder01″,
wmsvc=domain.com,username=IIS_username,password=IIS_password,
skipAppCreation=false -allowUntrusted=true
The “skipAppCreation” command forces a subfolder to be created as an application folder. By omitting this command the default value will be “true.” If you are uploading directly to your root, you do not need to define this value. You will need to use the iisApp provider as your destination. Otherwise, MSDeploy will not know how to connect to the remote IIS server.
Lastly, the target server where you will be placing your packaged file and uncompressing it will need to have Remote Manager Services installed. Without you will not be able to publish your site with MSDeploy. In addition to that, the MSDeploy (Web Deploy) tool is only for Microsoft platforms. From what I’ve read it will work on an Windows XP, Windows Vista, Windows 7, and even Windows Servers such as Windows 2008. It is not compatible with non-Microsoft platforms such as Linux or Mac.
![]()
A subdomain is an extension of your domain name; a prefix that allows you to use URLs such as blog.HostingAccountDomain.com, forum.HostingAccountDomain.com, etc. A subdomain typically routes traffic to a specific subdirectory within your account.
To create a subdomain, log in to Control Panel, click the “Sites” tab and click the “Manage” link for the domain you wish to work with.
In the Site Tools section, click the “Subdomain Manager” icon or link.

Next, click the “Add” button.

Enter the subdomain and click the “Create” button.

Finally you’ll see confirmation that your subdirectory has been created.
 For tips on redirecting subdomain traffic to a subdirectory, see this Knowledge Base article, or our forum.
![]()
This may be an old topic but it’s worth mentioning.
Ever since SQL 2005 was released, there is a weird setting in SQL Management Studio that prevents you from saving the changes on your database. The error is very misleading because it gives an impression that the security error is coming from the SQL Server itself, when in fact it’s your SQL Management Studio that is generating the error.
I was hoping this would be fixed in SQL 2012 Management Studio, but it still seems to exist.
This is the error you will see in Management Studio:

What will lead to this error is when you create a table, save it, then go back into the table and impose changes such as setting auto increment on a specific column.
The reason is because these types of changes will actually cause Management Studio to delete the table and recreate it. This is done behind the scenes by SQL Management Studio. So I guess SQL Management Studio wants to make sure it has permission before making such life altering changes.
Odd right? Fortunately the fix is really easy. In SQL Management Studio (it does not matter whether you are connected to a database or not) go to Tools/Options/Designers/Table and Database Designers. Make sure you uncheck “Prevent saving changes that require table re-creation.”
Now keep in mind, I’m using SQL 2012 Management Studio, but I believe this should be the same for the older SQL Management Studios, such as 2005 and 2008. And as you can see, since I do not need to connect to the SQL Server to make this change, the setting is associated with Management Studio, not the SQL Server itself.