In some situations, you may not be able to use FTP or Microsoft Web Deploy to upload your applications (workplace FTP restrictions, etc.). To help solve that problem we’ll show you how to install a simple .NET file manager, FileVista, on your site. You can use this tool to upload and download files to your site.
1. Download FileVista from Gleamtech. The single user license is free.
2. On the download page, make sure you select the “Web Deploy Package.”
3. Once you download the zip file, extract it to a temporary location on your computer.
4. Within the extracted directory, you should see a directory named FileVista.
5. Upload the contents to a subdirectory of your site.
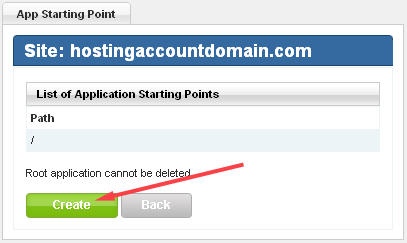
6. Once the upload process is completed, log in to the the Site Tools section of Control Panel and click the Application Starting Point icon.
7. In the App Starting Point tool, click Create.
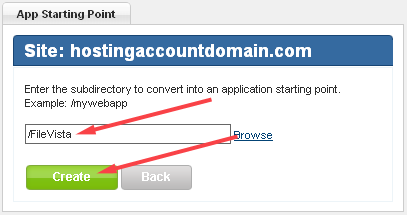
8. Enter the name of the folder to which you uploaded FileVista, and click Create.
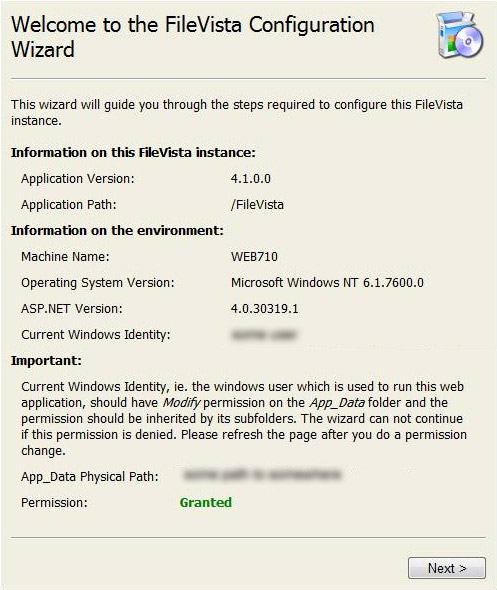
9. Now, on your site, navigate to the location where you installed FileVista, in this case, HostingAccountDomain.com/FileVista. You should see the welcome wizard:
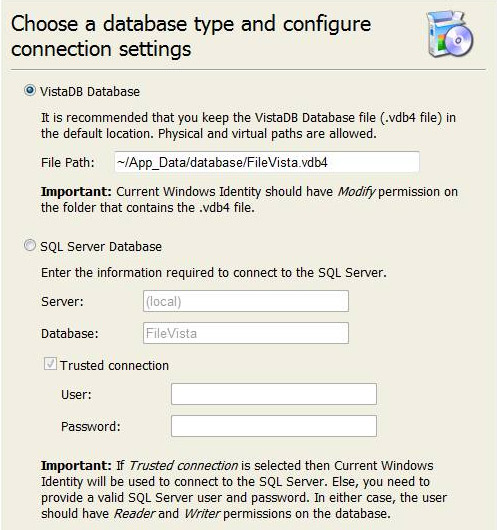
10. Click Next. On the next screen, you can choose whether you want to use a file based database or SQL server. We recommend using the file based database unless you intended to have many users.
11. Click Next. You should see a Pop up displaying the preinstallation test result. Click OK.
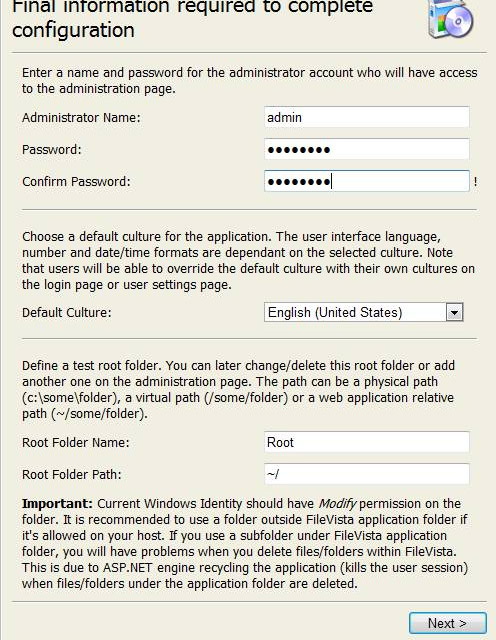
12. On the next page, you’ll configure the following:
a. Set the administrator username and password.
b. Set the default language.
c. Set the Root Folder. The root folder is where the file manager will point when you log in. If you intend to use this tool to manage your entire site, set the root folder to: /
13. Click Next and you’re finished. You’ll be taken to the login screen.
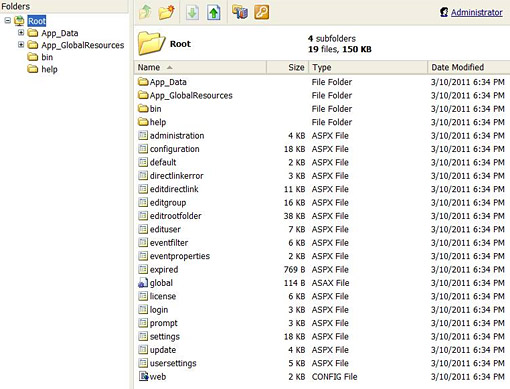
14. Log in with the username/password you specified during installation.
15. You should now see a pop-up asking if you want to use the free version or a commercial version. Select the free license mode unless you have purchased the product.
Did you know that SQL Server Management Studio has an excellent tool to help you export the data contained in your tables to other useful formats? Here’s a guide on how to use the SQL Server Import and Export Wizard.
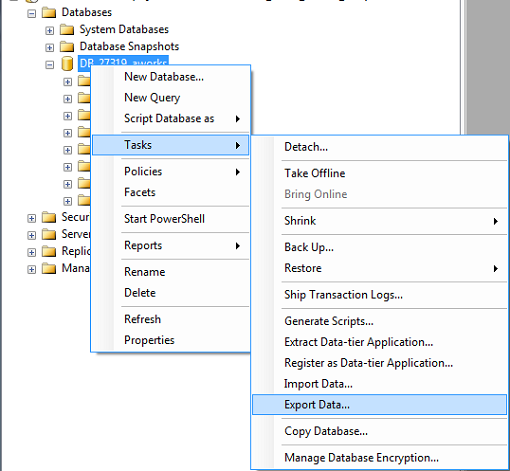
First, connect to your Winhost database using SQL Server Management Studio. For this tutorial, I am using the sample AdventureWorks database provided by Microsoft. Once you have logged into your database, right click on it and select Tasks -> Export Data…
This will launch the SQL Server Import and Export Wizard.
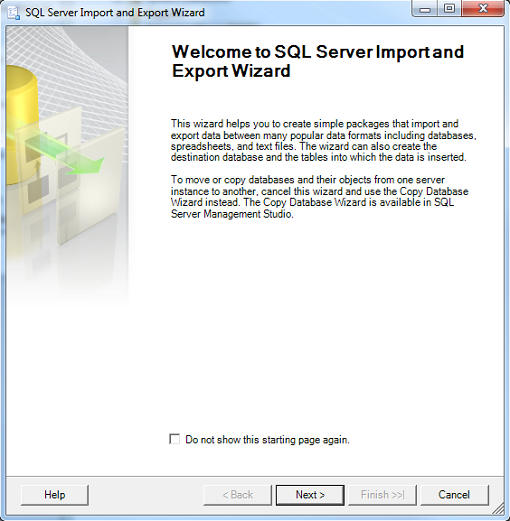
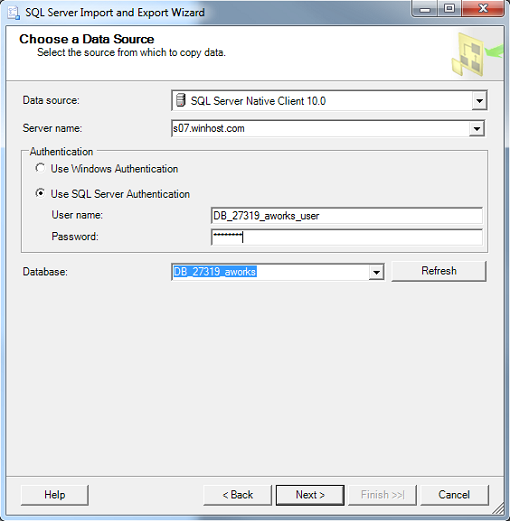
Click on Next to continue. Now, you will need to choose a Data Source. You can leave the Data source as SQL Server Native Client 10.0. Enter the Server name. Check SQL Server Authentication and enter the User Name and Password for your database. For the Database dropdown menu, select the name of your database.
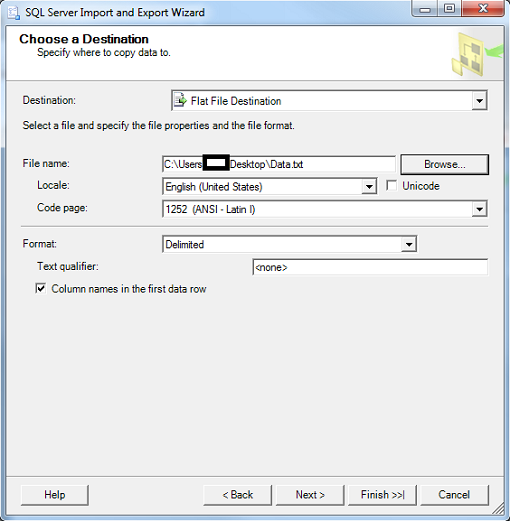
Click on Next to continue. In the Choose a Destination window, you can select a variety of formats to export to including Microsoft Access, Microsoft Excel, and another Microsoft SQL Server database. For this tutorial, I will be showing you how to export your data to a flat file (i.e. .txt and .csv).
 In the Destination dropdown menu, select Flat File Destination. For the File name, click on the Browse button, select Desktop and give the file a name. You can choose either .txt or .csv format by clicking on the dropdown menu next to the file name.
You can leave the Locale as English (United States) and Code page as 1252 (ANSI – Latin I). The Format will be Delimited and check Column names in the first data row. You can set a Text qualifier if you’d like, but I’m not going to.
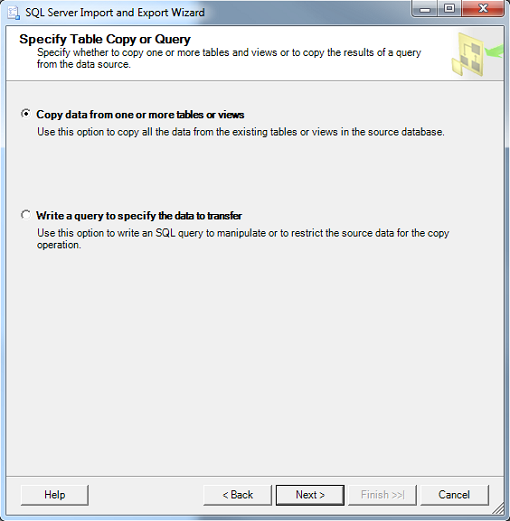
Click on Next to continue. In the Specify Table Copy or Query window, check Copy data from one or more tables or views. If you check the other option, you can write your own SQL query (SELECT statement) to extract the data you want from two or more tables.
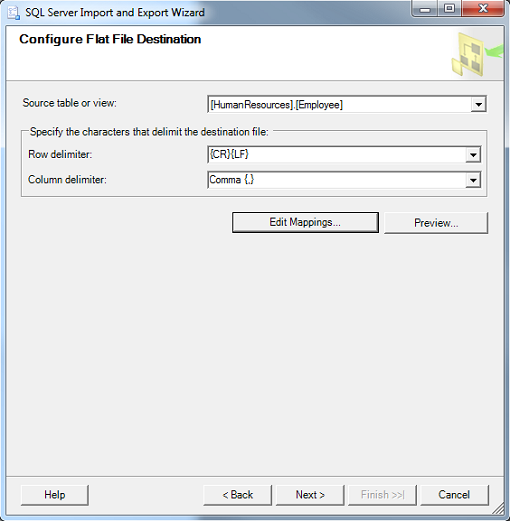
Click on Next to continue. In the Configure Flat File Destination window, I will be drawing data from the Employees table. In Source table or view, select [HumanResources].[Employee]. You can leave the Row delimiter as {CR}{LF} and the Column delimiter as Comma {,}
You may also want to spend some time looking at Edit Mappings. For a flat file, you can choose not to include certain columns to be exported by selecting the Destination column name and choosing <ignore> as shown below.
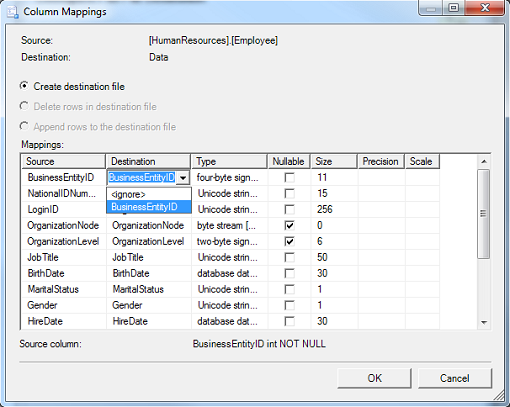
This tool is actually more powerful when you are exporting to an existing file that already has column names in place as you can map a column name from the Source file to a different column name in the Destination file.
For example, you have an Excel file with a column named BEID. You can map BusinessEntityID to BEID. The data will be populated in the BEID field in Excel. Click on Next to continue. This will bring up the Run Package page.
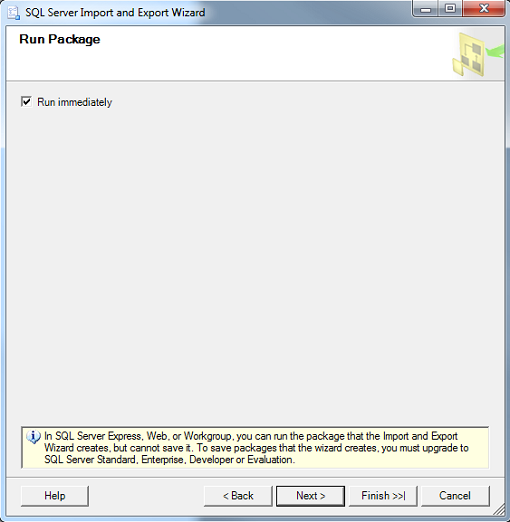
Click on Next to continue. The Wizard is complete and you can click on Finish.
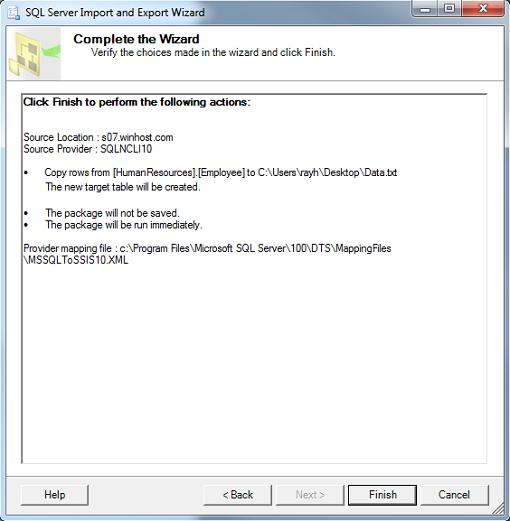
The Wizard will now run through a series of checks prior to exporting the data. If everything goes smoothly, you should get the screen below.
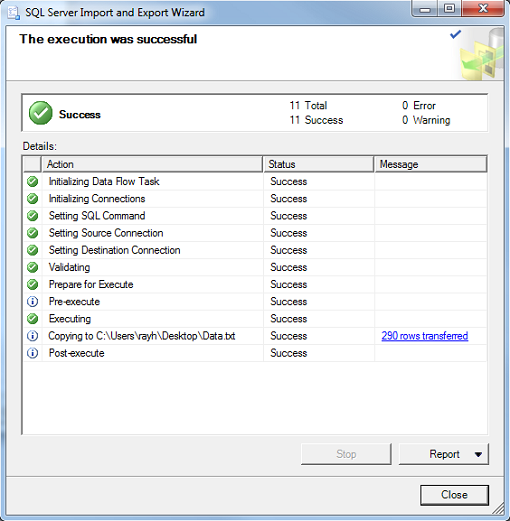
If you run into any errors, there will be a link in red which you can click and review the problem the wizard is having. You can use the Back button to correct the problem and go through the steps again until you are able to successfully export the data.
You may have noticed that not all HTTP Verbs are enabled by default. This is a short tutorial on how to enable them if your application requires it or restrict them for security purposes.
First, you’ll want to connect to your site with IIS7 Manager.
Double click the Handler Mappings module as shown above. This will bring up the Handler Mappings window.
Next, double click the ISAPI extension you want the verb enabled for. This will bring up the Edit Script Map window.
Click on the Request Restrictions… button to bring up the Request Restrictions window and select the Verbs tab.
In this window, you will be able to define which HTTP Verbs you want to allow or restrict. Click OK, and you’re finished!
Have you been deploying (pun intended) your application unsuccessfully and running into an error regarding a missing assembly such as this one?
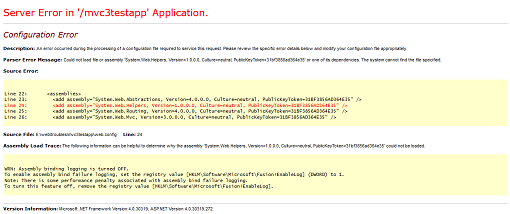
This is because we don’t include many of the assemblies in the Global Assembly Cache due to versioning conflicts. You can resolve the problem by making sure the missing assemblies are included in the /bin directory on your local machine prior to uploading your files to your site account. For MVC3 and Razor applications, you can follow these instructions to copy the missing .dll files to your local /bin folder.
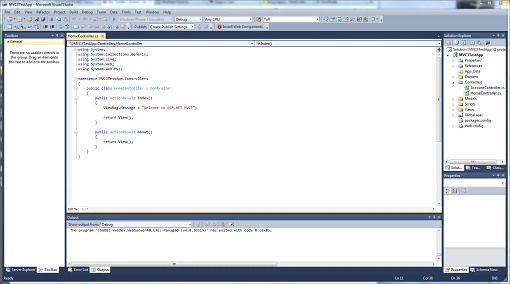
For this tutorial, I created a sample MVC3 application in Visual Studio.
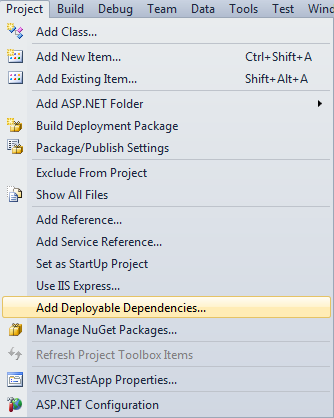
Next, you’ll want to expand the Project Menu and select Add Deployable Dependencies… as shown here.
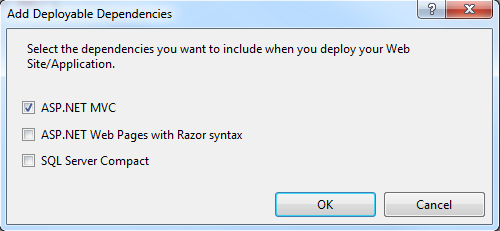
A pop-up window should appear with 3 check box options. Check the appropriate boxes and click on OK.
Then go to Build -> Build Solution (or hit Ctrl+Shift+B), and the missing assemblies will be added to the /bin folder.
An alternative method of adding the missing .dll file(s) is to set the Copy Local Property value to True. In the Solution Explorer window, expand the References folder. If the assembly is missing from the list, right click on References and select Add Reference…
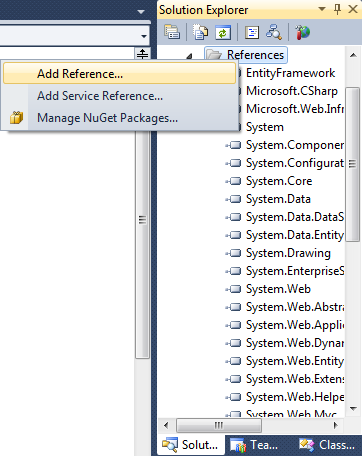
This will open the Add Reference window. Change the tab to .NET, find the missing assembly, and add it to the list by double-clicking on it.
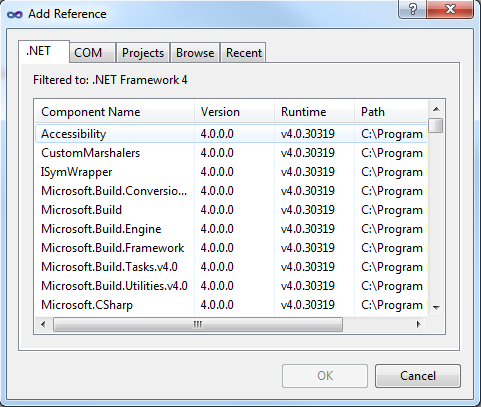
Now, select/highlight the missing assembly.

In the Properties window, change the Copy Local value from False to True. Note that you’ll have to set this for each missing assembly. Remember to go to Build -> Build Solution (or hit Ctrl+Shift+B) to recompile your application. The missing assemblies will then be added to the /bin folder on your local machine. You can use the Copy Local solution when deploying other types of applications and are missing assemblies.
Web Deploy is a fantastic tool to publish your web site to a remote web server. It’s easy, quick, secure, and configurable. However, Web Deploy in conjunction with Visual Studio or in conjunction with MSBuild can alter the account’s permission on the production web server. This is by design. Microsoft believes that a web site is more secure when the web application itself is set to read-only permission. But a lot of functionality is lost with read-only permissions.
First off, let me explain the nature of the problem. Every web site that is hosted on an IIS server will have a specific user to authenticate against the server. The Account Control List will typically have an Anonymous ASPNet IUSR. This is standard for all default web sites. The server does not have to use this user, you can create your own user for the web application to run correctly but let’s stay with the “standard” setup.
Typically the Anonymous ASPNet IUSR will have Read and Write permission to the root and all of the files and subfolders under it. But when you use Web Deploy with Visual Studio or use the MSDeploy command, Microsoft Web Deploy will alter the permission of your Anonymous ASPNet IUSR to have only Read permission. That means any ASP.Net functionality that will perform an upload, file creation, or file modification will fail due to lack of Write permission.
To be honest, Web Deploy itself does not technically alter the permission on the server but one of the properties in MSBuild. So if you use Web Matrix in conjunction with Web Deploy, this is not an issue because Web Matrix does not use MSBuild; Visual Studio does use MSBuild, so with Visual Studio and Web Deploy you can get your permissions skewed.
It is worth noting that if you web deploy your web application to a subfolder this may not be an issue. The reason being is the “Inheritance” feature with NTFS. If the root folder has Read and Write permission, Inheritance will take precedence, and when Web Deploy tries to alter the permission on the subfolder level, the NTFS inherited properties on the root will revert it back to Read and Write. If you decide to Web Deploy directly on the root, then the root folder permission will be altered to Read-only permission and that will get inherited down to the subfolders within that root.
Confusing, I know, but stick with me here. So what is the solution?
There are several ways to fix this problem. One is to get access to the server and reset the permissions manually. If you are using a shared web hosting provider, you’ll need to contact their system administrators to reset it for you. The problem with that is if you use Web Deploy to publish your web application again, then they’ll need to reset the permissions again.
A more viable solution is to alter your project file to prevent Web Deploy from altering the ACL on the remote web server. To accomplish this, simply navigate to your project and find the file with the extension .vbrpoj. If you created your project in C Sharp, look for the project file .csproj. This is outlined in this Winhost Knowledge Base article.
There are still some drawbacks to this. One of the biggest drawbacks and one that tends to confuse developers is where to place the element line in the project. The line you will need to add to your project is
<includesetaclproviderondestination>False</includesetaclproviderondestination>
The project file is grouped to different sections, and you will need to find the section
<propertygroup condition=” ‘$(Configuration)|$(Platform)’ ==’Release|AnyCPU’ “> </propertygroup>
That is where you will include the <includesetaclproviderondestination> element.
Some developers have not been able to get this solution to work. That is due to the ‘Release|AnyCPU’ setting. This setting is for the Configuration and Target Platform. As early as Visual Studio 2005, Microsoft has included the ‘web.config’ Transformation feature. This allows you to create specific elements and values to a web.config file base on the environment. Specific elements may only be suitable for the development environment while the production servers may have different attributes and settings. So depending on how the final build of the project is performed, the project configuration could either be taken from the ‘Release|AnyCPU’ or ‘Debug|AnyCPU’.
If you placed your <includesetaclproviderondestination> within the ‘Release|AnyCPU’ section but built your project within the Debug configuration, then the <includesetaclproviderondestination> attribute may not invoke on the production server. To make sure your permission is not altered create the <includesetaclproviderondestination> attribute on both the ‘Release|AnyCPU’ and ‘Debug|AnyCPU’ group of your project file.
Keep in mind that any for new projects you create, you will need to run through these steps again to keep Web Deploy/MSBuild from altering your permission on the production server. A more permanent solution is to alter the MSBuild publishing settings on your development computer. This will help ensure that any ASP.Net project you create in the future on that specific computer will not alter the permission on the web server when deploying with Web Deploy.
Achieving this is fairly simple and it is a one-time change:
The file you will be modifying is the Microsoft.Web.Publishing.targets file. In Notepad, search for the <includesetaclproviderondestination> element. By default the value is set to True. Set it to False and from that point forward, any ASP.Net projects you create with Visual Studio and initialized the Web Deploy method will not alter the Anonymous ASPNet IUSR’s permission.
Remember, if you are planning to alter and save the Microsoft.Web.Publishing.targets file, you must run Notepad as an administrator.
People often write to support or post in the forum asking us why their php.ini files aren’t working. Well, php.ini is a unix/linux file, so it doesn’t work on Windows servers. The next question is always, “So how do I control php settings?” To which we have always had to answer, “Sorry, you can’t.”
Until now.
With the introduction of PHP 5.3.10, we have provided you with the ability to upload your own user.ini file, in order to specify php settings you wish to change for your account. If you’ve used a php.ini file on a linux server, this is the same concept. You simply create a text file named user.ini in the root of your account. The file can include php settings such as:
upload_max_filesize = 200M
date.timezone = “Europe/London”
These settings will be changed for your site only. While most of these settings are safe to change, the user.ini file does give you a lot of control over how php works for your site, so use your best judgement as to what you change.
If you are the experimental type and wind up making a change that causes problems with your site, simply remove the line(s) causing trouble and re-upload the file. Note that there is a five minute server cache for user.ini changes, so you may not see your changes until a few minutes after uploading.
We’re excited to be able to offer the php flexibility that you’ve been asking for. As always, we want Winhost to be the best host on the planet, so we’re listening to you and working hard to meet your needs every day. Thanks for working with us!
One of the most daunting tasks a webmaster must perform is uploading a large web site to a remote web server. Depending on your Internet connection speed, the task can be tedious as files are uploaded to your root directory one file at a time. If you have 10 or 20 files this is not a big deal. But what if you have hundreds or thousands of files to upload? The files can range from code behind files, to images, audio files, DLL files and more.
Luckily Microsoft has introduced a solution to this problem with MS Web Deploy. Web deploy can be used with IIS 7, Web Matrix, Visual Studio, or through the command prompt MS DOS. The first thing that you will need to do is download MSDeploy. This is the tool that will help you package or zip your web site.
Run through the installation wizard to install the “Web Deployment” tool on your computer. You do not need IIS 7 for this. Although Web Deploy and IIS 7 can work side by side, the Web Deployment Tool can run independently. You can install and run this on Windows 7, Vista, or XP without setting up your own local web server.
One thing you do need to install is the “Remote Manager Service.” This should be part of the Web Deployment Tool installation Wizard, but by default the installation does not install it, therefore you will have to manually install it.
The installation will install the MSDeploy command. This command can be invoked using the MS DOS command prompt. One thing you need to be aware of is that MSDeploy requires administrator rights to run properly. The easiest way this can be done is to navigate to MS DOS using Windows Explorer. Go to C:\Windows\System32 and right click on CMD.EXE. Choose “Run as Administrator”.
Once the command prompt is up, you will navigate to the folder level where MSDeploy.exe exists. On Windows 7, the default installation will place msdeploy.exe in C:\Program Files (x86)\IIS\Microsoft Web Deploy.
msdeploy.exe has an extensive command base. Typing [MSDeploy /?] in the command prompt will yield a large selection of commands and conditions you can run. There are two core tasks that MSDeploy can be used for. One is Archiving and the other Packaging. The two are different and each have their own unique properties. For zipping files and publishing to a remote IIS web server, you will be using the Package Provider. Archive is mainly used for backing up your site for safe storage, where as the packaging method zip up the files for you. For a list of provider settings, you may want to look at this Microsoft site to get your feet wet.
To get started deploying your site with a zip file, one thing you need to know is that you cannot simply use your OS compression tool to zip a website. You will need to use MSDeploy for that. When MSDeploy zips a file, it will also create a couple of xml files. These files are archive.xml and systemInfo.xml. These files describe the properties of your web application. You will need these files to deploy to an IIS server with MSDeploy.
Technically you can manually create these files and then manually zip. However, creating these files from scratch is much more complicated than running MSDeploy. To properly zip your web site, you will first need to navigate to the folder where msdeploy.exe exists. The path to MSDeploy should be C:\Program Files (x86)\IIS\Microsoft Web Deploy V3. Once you are there, run this command in your MSDOS command prompt:
msdeploy.exe -verb:sync -source:iisApp=”C:\ Test_site\Website” -dest:package=c:\Test_site\testsite.zip
You will need to use the provider iisApp so that MSDeploy will know the destination folder will be an application folder. If you are uploading to the root it shouldn’t be a problem since most IIS root folders are already set as an application folder. But if you are going to upload it to a subfolder, zipping the files with the iisApp provider will be important.
Bear in mind that the paths I am using are examples, and it will be up to you to determine the path where your website exists and the path where you want to place the zip file. Once this is done, you can run the MSDeploy command against your remote IIS server:
msdeploy.exe -verb:sync -source:package=”c:\Test_site\testsite.zip” -dest:iisApp=”domain.com/subfolder01″,
wmsvc=domain.com,username=IIS_username,password=IIS_password,
skipAppCreation=false -allowUntrusted=true
The “skipAppCreation” command forces a subfolder to be created as an application folder. By omitting this command the default value will be “true.” If you are uploading directly to your root, you do not need to define this value. You will need to use the iisApp provider as your destination. Otherwise, MSDeploy will not know how to connect to the remote IIS server.
Lastly, the target server where you will be placing your packaged file and uncompressing it will need to have Remote Manager Services installed. Without you will not be able to publish your site with MSDeploy. In addition to that, the MSDeploy (Web Deploy) tool is only for Microsoft platforms. From what I’ve read it will work on an Windows XP, Windows Vista, Windows 7, and even Windows Servers such as Windows 2008. It is not compatible with non-Microsoft platforms such as Linux or Mac.
This may be an old topic but it’s worth mentioning.
Ever since SQL 2005 was released, there is a weird setting in SQL Management Studio that prevents you from saving the changes on your database. The error is very misleading because it gives an impression that the security error is coming from the SQL Server itself, when in fact it’s your SQL Management Studio that is generating the error.
I was hoping this would be fixed in SQL 2012 Management Studio, but it still seems to exist.
This is the error you will see in Management Studio:

What will lead to this error is when you create a table, save it, then go back into the table and impose changes such as setting auto increment on a specific column.
The reason is because these types of changes will actually cause Management Studio to delete the table and recreate it. This is done behind the scenes by SQL Management Studio. So I guess SQL Management Studio wants to make sure it has permission before making such life altering changes.
Odd right? Fortunately the fix is really easy. In SQL Management Studio (it does not matter whether you are connected to a database or not) go to Tools/Options/Designers/Table and Database Designers. Make sure you uncheck “Prevent saving changes that require table re-creation.”
Now keep in mind, I’m using SQL 2012 Management Studio, but I believe this should be the same for the older SQL Management Studios, such as 2005 and 2008. And as you can see, since I do not need to connect to the SQL Server to make this change, the setting is associated with Management Studio, not the SQL Server itself.