
Site hosting news, tutorials, tips, How Tos and more
![]()
Sometimes you want to give someone FTP access to your site, but you don’t want them to have access to all of the site files. So we’re going to go through the steps to set up an FTP user that only has access to a directory that you specify.
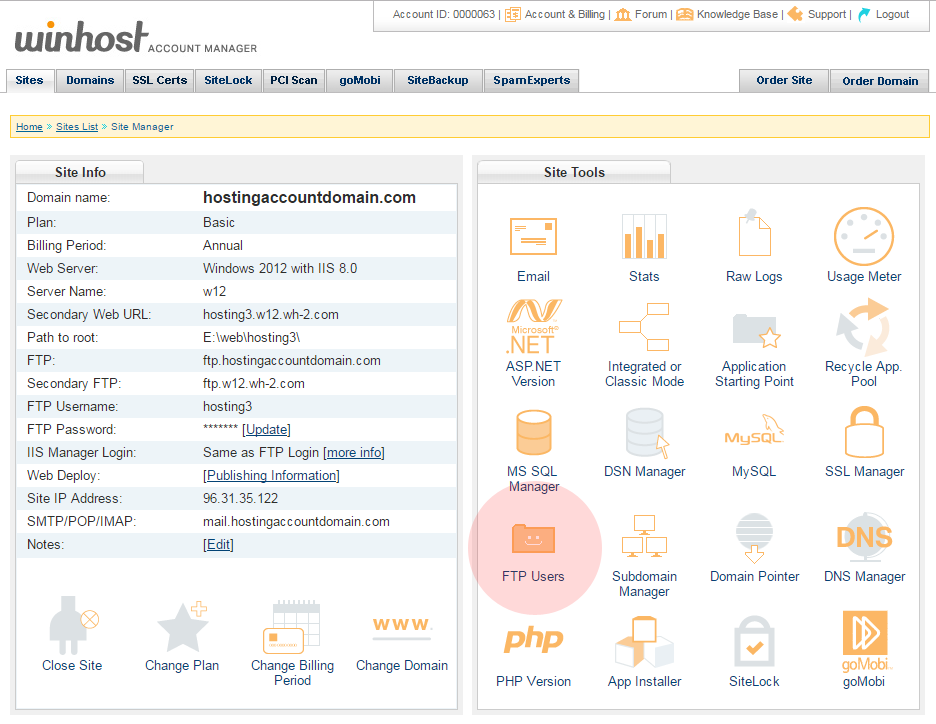
 The first thing we’re going to do is go to the Site Tools section of Control Panel and click on the “FTP Users” icon or link:
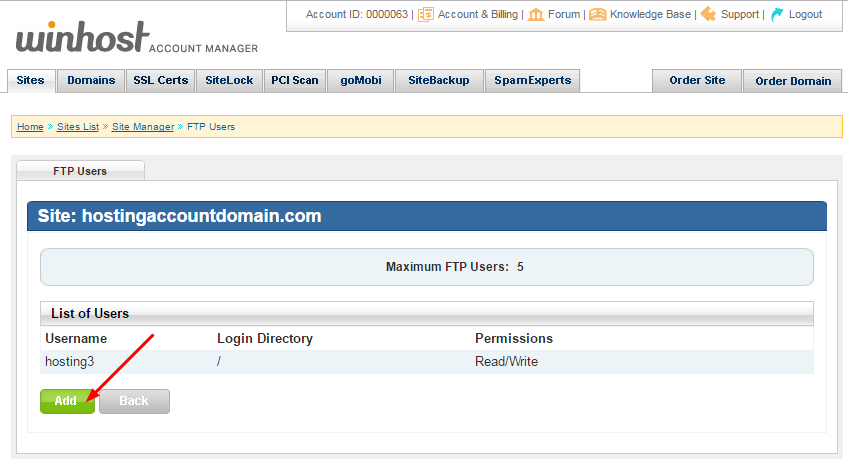
 Click the “Add” button:
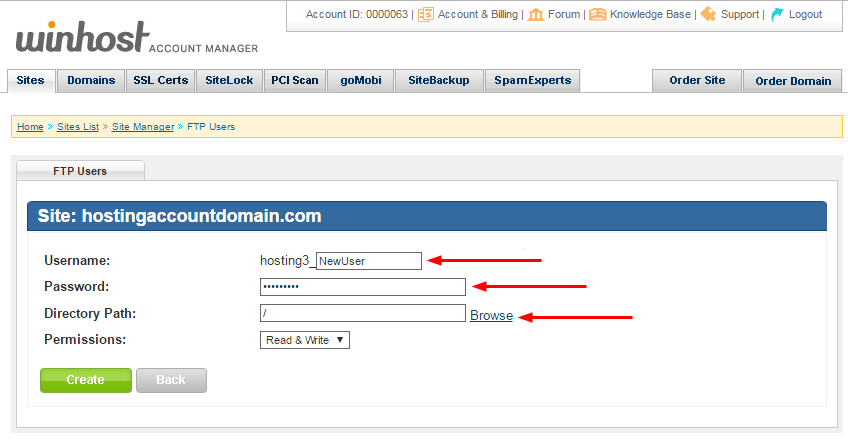
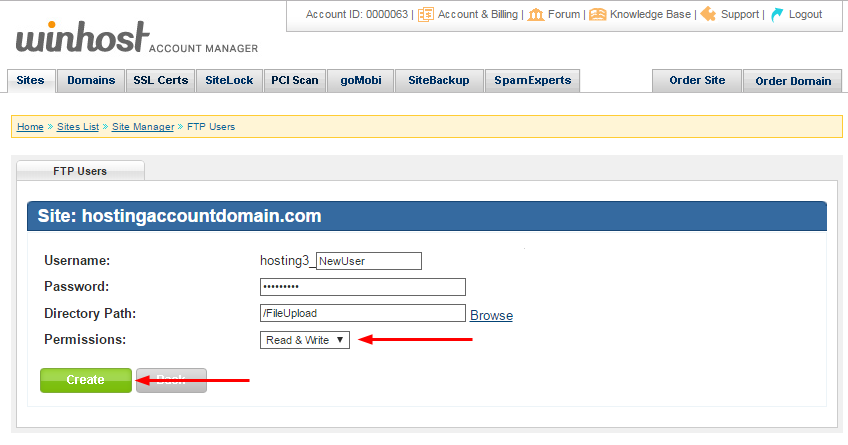
 Enter a username (it will be appended to the primary FTP username, that format can’t be changed) and a password. Enter the directory name or click the “Browse” link to choose from directories on the server:
Note that entering the name of a directory that does not exist does not create that directory on the server. You must enter the name of an existing directory.
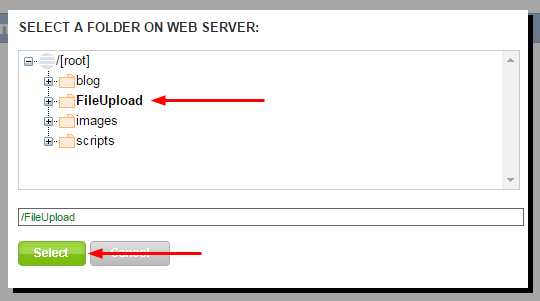
 If you clicked the “Browse” link, select the directory (it will turn bold and the path will be automatically entered in the text field below) and click the “Select” button:
 Make sure you leave the “Permissions” field set to “Read & Write,” since this user will be uploading files (the other option is “Read Only”). Click the “Create” button:
 When the user is added you will see it listed in the FTP Users section. Here you have the option to update the user’s password, or delete the user. The username cannot be edited once the user is created.
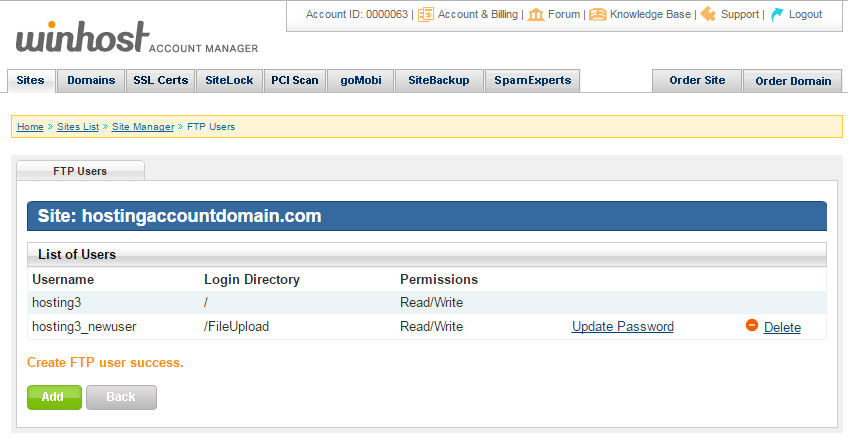
 The new user will log in to the same hostname as your existing user(s), but of course the username and password will be those that you just created.
![]()
Jetpack is one of the most popular plugins available for WordPress (with over 29 million downloads!), created by Automattic – the same people who made the WordPress app itself. It’s a Swiss Army knife for you site with over a dozen different functions all rolled into one plugin.
It includes essential tools like a website stats, subscriptions, social network sharing and a contact form. It will also hookup with WordPress.com to perform related posts and website uptime monitoring. And it’s free!
![]()
If you try to implement Jetpack on Winhost, it won’t work out of the box. By default, we filter requests to the xmlrpc.php file. WordPress.com will try to ping that file during the activation process and it will fail.
One of the reasons we block requests to the xmlrpc.php file is because of an exploit hackers can use to get your WordPress username and password. You can read about the exploit in this excellent Sucuri article.
If you don’t want to bother reading the article, in short, hackers can try thousands of username/password combinations with one request and try to brute force their way into your WordPress site.
But don’t worry, you can still get Jetpack to work by simply overriding our default request filtering. You just have to add this setting in your web.config file:
<configuration>
   <system.webServer>
      <security>
         <requestFiltering>
            <denyUrlSequences>
               <clear />
            </denyUrlSequences>
         </requestFiltering>
      </security>
   </system.webServer>
</configuration>
If you just have a WordPress site on our service, or if you used our App Installer to install WordPress, you might not have a web.config file on your site, so you’ll have to create one. Just follow these instructions:
You should now be able to activate the Jetpack plugin. But before you go, there’s the pesky security issue! Your xmlrpc.php file is now susceptible to that security exploit, which may allow hackers to get your username and password. Let’s fix that!
![]()
The best way to prevent the xmlrpc.php brute force exploit is to get SiteLock with TrueShield CDN. You will need both SiteLock and TrueShield. TrueShield will block those suspicious requests trying to get your username and password, and protect your site from all sorts of other bad stuff not covered in this article. (If hackers were limited to just one exploit, our jobs would be so much easier!) We highly recommend getting SiteLock and TrueShield. It will block malicious bots, comment spammers, and likely make your site faster, too!
Another solution would be to use Jetpack’s own Protect function. You have Jetpack installed, now use it! Just activate the Protect feature in Jetpack in the Admin panel. The Jetpack team confirmed that it works.
Finally, though perhaps foremost: always use a strong password for your site! Please don’t use qwerty123 or pa$$w0rd.
Actually, do all three – get SiteLock with TrueShield, activated Jetpack Protect, and keep those passwords strong!
As if you could. 🙂
 It’s been what you might call a contentious election cycle here in the united states, but if there’s a positive spin to be put on the whole thing, it’s that we’ll likely see a large turnout at the polls. Maybe even record-breaking.
If group dynamics have taught us anything, it’s that a large enough group of people will usually make the right decision. Whatever “right” happens to be for the group at any given moment in time.
Whoever you’re voting for, it’s always an honor and a privilege to participate in a peaceful transfer of power. It isn’t something that everyone in the world gets to enjoy, so be sure to take advantage of it.
Even if a two party system leaves a little something to be desired…
![]()
The SmarterMail system that is set up for your email by default has an array of spam fighting tools available, but admittedly, the settings can be a bit complicated to work with.
Many of you asked us to make a more user-friendly anti-spam option available, but to keep the cost low. So we partnered with SpamExperts to provide high level spam filtering services that are easy to manage and really affordable.
The SpamExperts service receives email addressed to your domain, filters it, then sends it along to the mail servers here at Winhost. The service is distributed across multiple servers all over the world, so it’s fast and reliable.
We’re going to cover the steps necessary to activate SpamExperts for your domain, which, for our purposes here, we’ll assume is hosted at Winhost (though you can set up SpamExperts service for domains hosted elsewhere too).
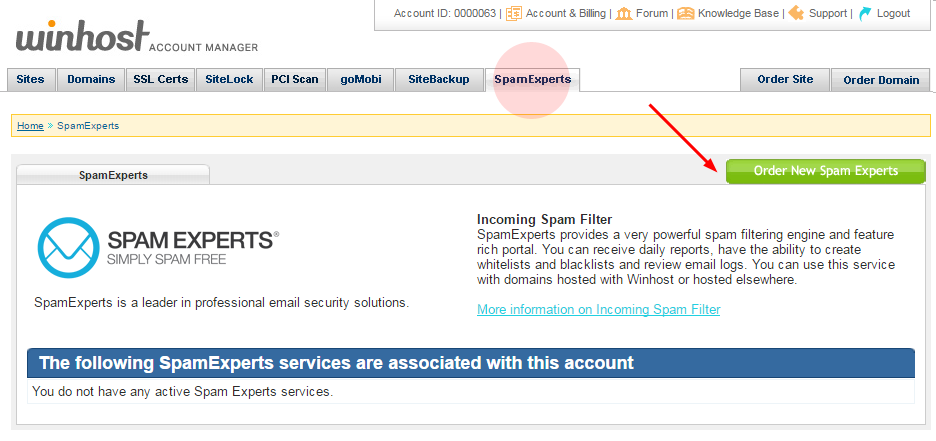
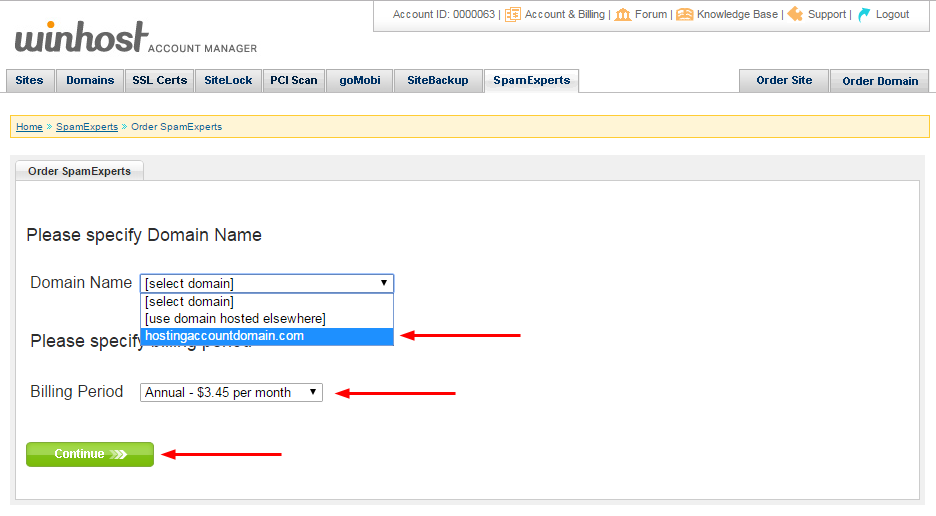
The first thing we’re going to do is go to the SpamExperts section of Control Panel and click the “Order New Spam Experts” button.
Next choose a domain from the dropdown menu (you can also enter a domain hosted elsewhere), choose a billing period and hit the “Continue” button.
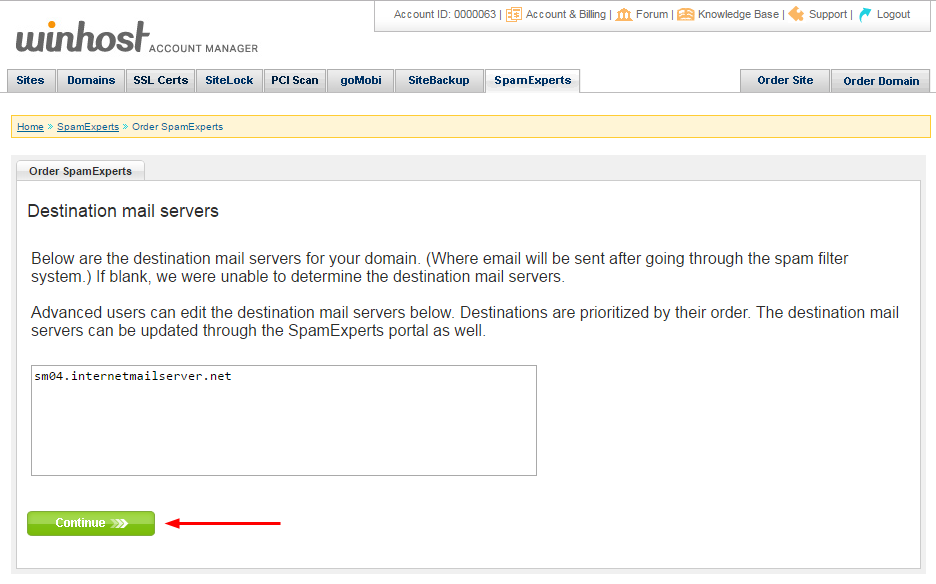
The next page shows the current email server(s) for the domain you selected. Make note of any entries in the box. If you ever cancel the Spam Experts service in the future, you will have to update your DNS MX records to point back to these server(s).
Click the “continue” button.
If everything looks good on the billing page, hit the “Submit My Order” button.

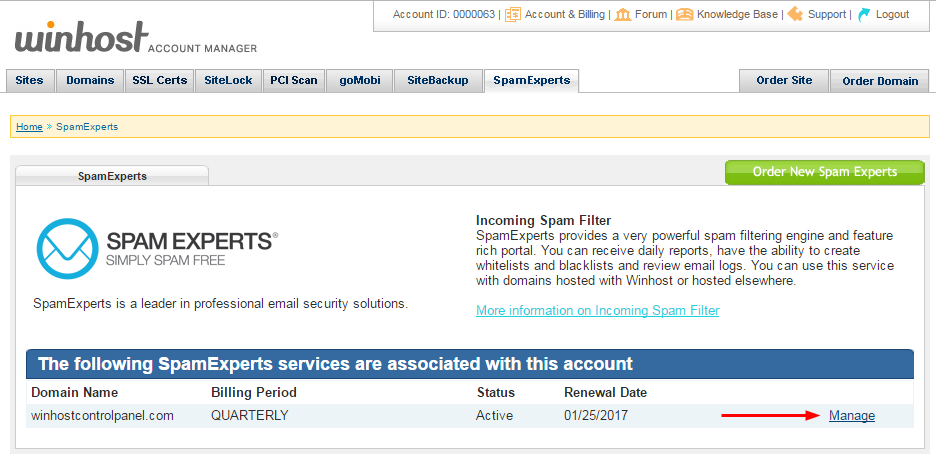
Reload the SpamExperts page and click the “Manage” link.
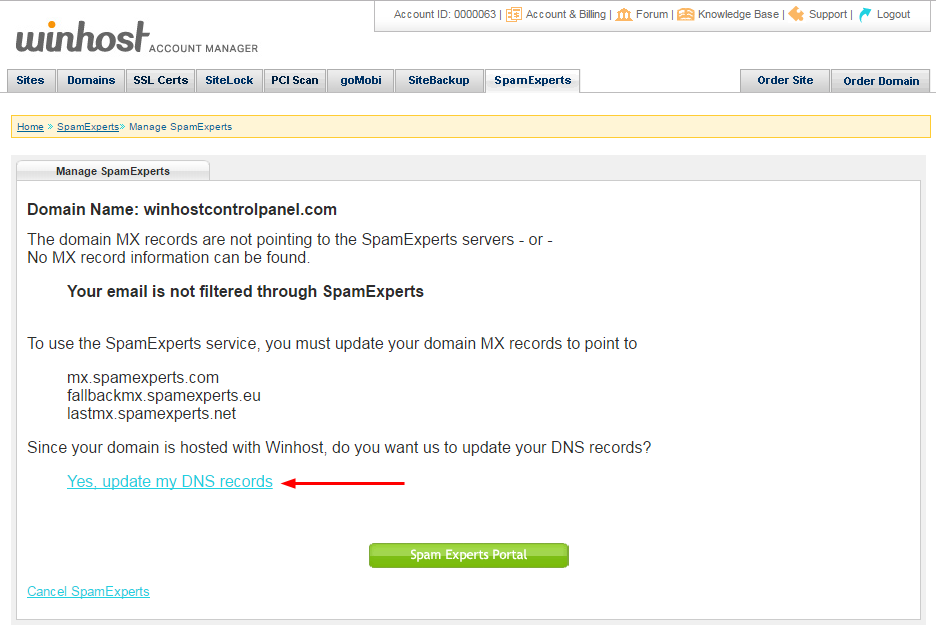
In order for Spam Experts to begin filtering your email, the DNS MX records for your domain have to be updated. If your domain is hosted here, all you have to do to update your MX records is click the “Yes, update my DNS records” link.
If you are setting up SpamExperts for a domain that isn’t hosted at Winhost, this page gives you the MX settings for the domain. You’ll have to go to where the domain is managed to update the MX records.
That’s all there is to it. Your email is now set up to route through the SpamExperts system. Remember, the DNS change may take a few hours to propagate, so you may continue to see spam in your inbox until that happens.
We’ve found that the default SpamExperts settings will stop the vast majority of spam. But if you want to do further tweaking you can access the SpamExperts portal, which contains a number of very powerful tools. Use of the SpamExperts portal is beyond the scope of this article, but you can see the domain-level documentation here and the user-level documentation here.