
Site hosting news, tutorials, tips, How Tos and more

When you are in a bind to find missing website files, the last thing you want to hear from your hosting provider is “Sorry, we don’t have backups of XYZ.”
At Winhost, we do have a backup system in place to backup our customer’s website files and databases nightly. However, this backup system is intended for disaster recovery. We can pull files out of the backup system but this should not be your only backup source.
There have been times when I’ve had customers ask for certain files from our backups, and for one reason or another we didn’t have them because…
In short, there are many different reasons a hosting provider may not have specific backups.
First off, if you haven’t already, download your website to your own computer. If you have any questions about downloading your website files or databases, let us know and we can help. You may want to get on a schedule to download your site every so often. For extra safety, you can copy the files to an external harddrive.
When you are making changes to your site, it’s always best to make the changes on your own computer and then upload the modified files to the webserver. This way you should have the latest copy. Keep in mind that making changes directly on the server may be convenient, but your local copy will be out of sync.
For those that prefer an automated solution for backups over manual methods, we launched our SiteBackup Service.
If you want to make sure your website files and databases are being backed up – nightly, weekly or what ever your heart desires – then our SiteBackup service is a great way of automatically backing up your website and databases. And to protect you further, the backups are not located in the Winhost data center – they are on the Amazon cloud.
In addition, you get a separate control panel for your backups and the backup control panel is located outside of Winhost data center as well.
We have instructions in our knowledge base on how to configure SiteBackup. But if you want our support department to help you set up the SiteBackup service, just let us know after you order. We’ll help you set it up for you.
Below is a screenshot of the SiteBackup configuration options.
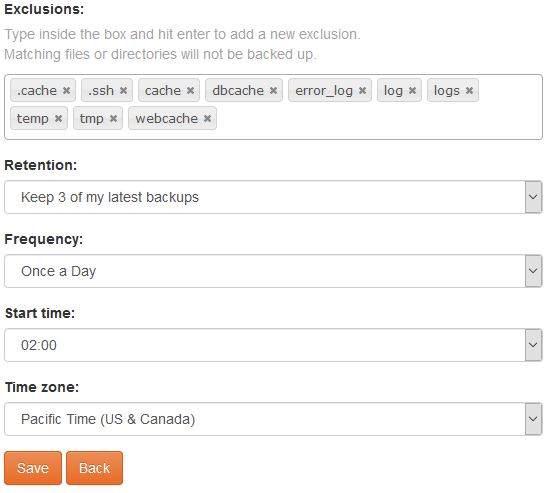
Some of the things you can configure are:
You can backup your MS SQL databases and MySQL database too.
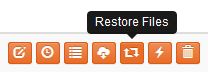
For your site files there is an option to simply restore within the SiteBackup service.
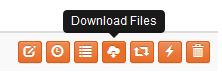
As well as an option to download the site files in zip format.
So the SiteBackup solution is a convenient way to take charge of your site backups. You can sign up for the SiteBackup service through your control panel. If you need help setting it up, just contact our support department. We can help set it up for you.


Email is a vital form of communication and many customers have asked us about Email backups. So we are happy to introduce a new service, EmailBackup!
You Can Automatically Backup Any Email Box
You can easily set up automated backups for your email and attachments. You can backup your email from Winhost email servers or virtually any other email boxes you have elsewhere.
It’s Secure
The email backup storage is secure and encrypted and is also secure during transit.
You Can Easily Search and Restore
Tools are available to search your email archive and you can restore any email messages from your backup.
Manage Your Backups In a Separate Control Panel
The EmailBackup portal is a separate control panel from the Winhost Control Panel and lives outside of Winhost infrastructure. So in the event your Winhost Control Panel is down for any reason, you still have access to your Email backup storage.
A Very Cost-Effective Solution
EmailBackup starts at $1 per month. Peace of mind for less than a cup of coffee! And to sweeten the deal even more, we are offering EmailBackup for 30 days FREE so you can test it out without any risk.
Get Started with EmailBackup Today
30 Days FREE
Click here for more information about EmailBackup from Winhost
![]()
SiteBackup is a set-it-and-forget-it backup service that will automatically backup your website and database. Backups are stored in a remote location and previous versions can be restored to the web server with just a click. Here are instructions on how to order and set up SiteBackup.
You can order SiteBackup through your Winhost Control Panel. We offer three plans, each with different storage amounts. You only need one SiteBackup plan to back up all of your sites, so just pick the plan with enough storage to cover your sites. Click the orange button to select the plan you want, then click the Submit My Order button on the next page.
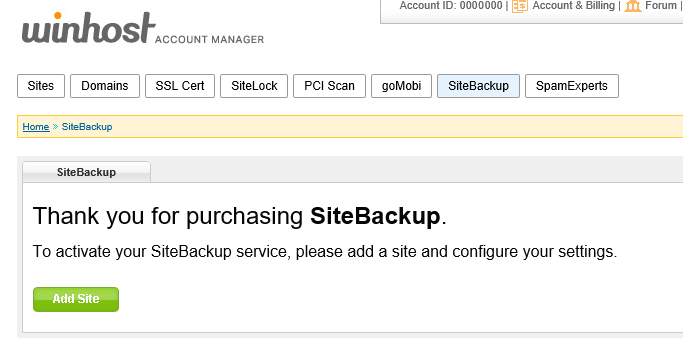
It takes a few minutes for our system to provision the service. You can click the Back button or the SiteBackup tab, and if the service is ready, you’ll see this page, where you can add a site:
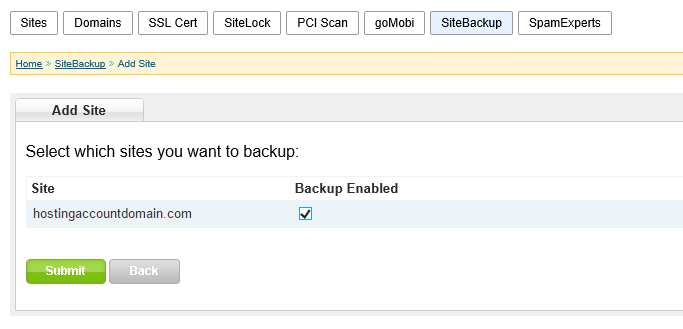
Click the Add Site button and on the next page you can select the sites you want to back up.
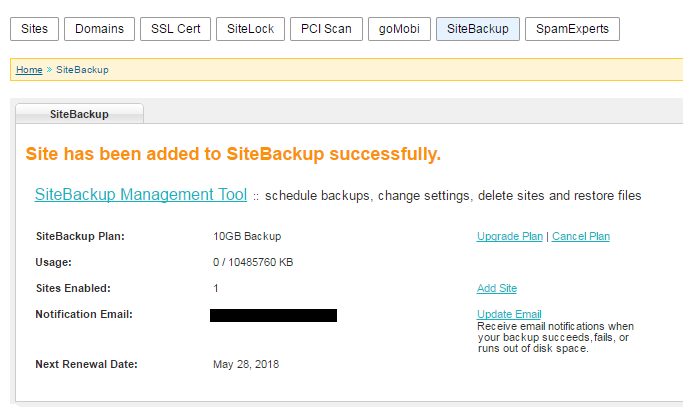
Select which site(s) you want to back up, click the Submit button, and our system will automatically pass along the required info. On the next page, you can click the SiteBackup Management Tool link to get to the SiteBackup Dashboard interface.
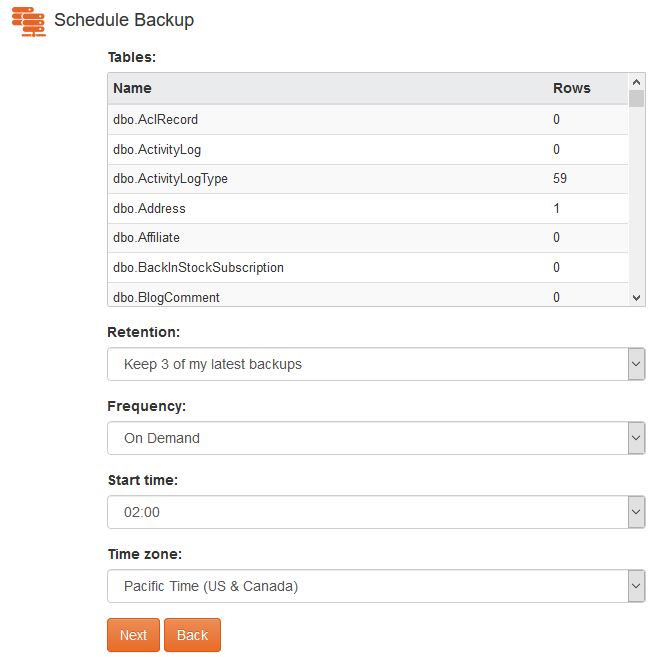
On the SiteBackup Dashboard, you can configure your backup schedule. By default, there will be a daily backup scheduled. You can keep that, change the backup time, change the backup frequency, and run an immediate backup.
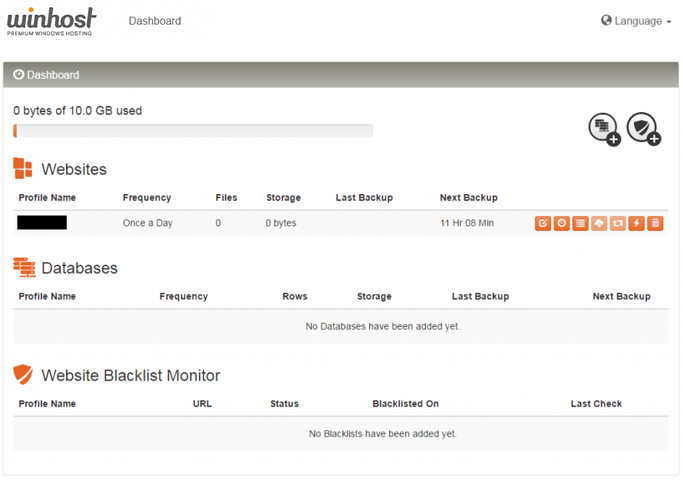
You can also back up your databases (the example in that Knowledge Base article is an MS SQL database, but SiteBackup can also back up your MySQL databases).
The system will email you if a backup fails (like when you change the FTP password). So just keep an eye out for those emails. But other than that, it’s set and you can forget it.
![]()
If you use WordPress and are worried about being hacked or compromised, or you just don’t have time to keep up with the frequent updates and maintenance, we just launched a service made for you.
Our Managed WordPress Hosting service includes:
And if you need it:
You can learn more about Managed WordPress Hosting and find a link to sign up here.
The Managed WordPress Hosting service includes the Winhost Max Plan, so if you are an existing Winhost customer and already have a hosting plan, contact us for pricing or open a helpdesk ticket and we’ll take it from there.
Every day we clean up compromised WordPress sites for our customers. For them it’s an inconvenience and an expense that they weren’t expecting and don’t welcome. But since WordPress is the most popular blog/CMS application in the world, it’s a natural target for hackers. If everything in your WordPress installation is not up to date, you are at risk.
And unfortunately, even if everything is up to date, you can still be vulnerable. That’s why Managed WordPress Hosting includes a WordPress hardening service, to increase security and reduce the chance that you will become a victim.
So if you love WordPress but could live without the constant maintenance and security tasks, let us do it for you!
![]()
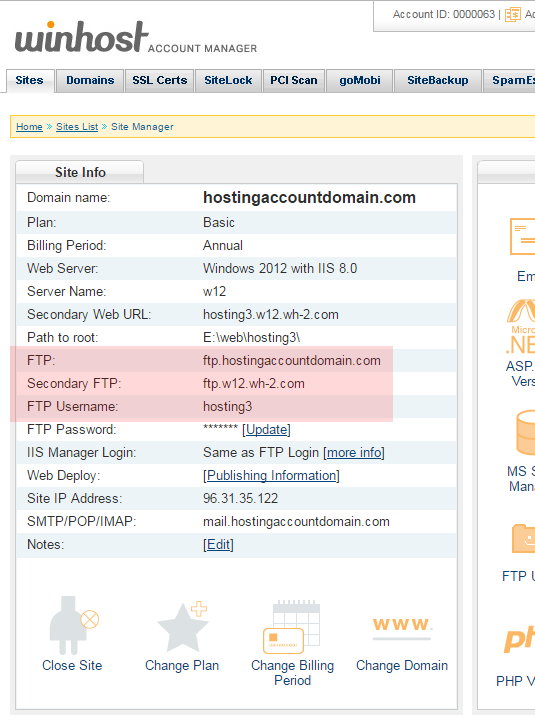
When you open an account at Winhost we set up your website space immediately so you can start uploading files right away. But if you have an existing site hosted elsewhere, you will most likely want to get everything set up here and test the site before you actually point the DNS to Winhost. The Secondary URLs make that possible.
Your permanent FTP URL is ftp.HostingAccountDomain.com (where HostingAccountDomain.com is your domain name). But of course that URL won’t connect to the server here until your domain points to our servers, so we set up the Secondary URLs, both for FTP and web access.
The Secondary URLs can be found in the Site Info section of Control Panel:
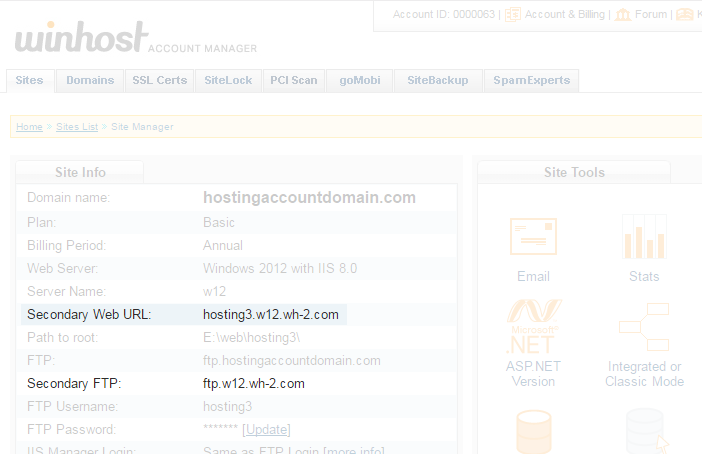
So the Secondary FTP URL (ftp.w12.wh-2.com in the example here, yours may be different) is what you use in the “host” field of your FTP software to make the connection.
Then when you want to view your uploaded files, you would visit the Secondary Web URL, in this example, http://winhostc.w12.wh-2.com.
After your domain’s DNS is pointed to Winhost and your site is up and running, you can use the Secondary Web URL for troubleshooting purposes.
For example, if it seems that your site is unavailable, try entering the Secondary Web URL into your browser. If the site comes up, there’s a good chance that domain registration or DNS issues are the culprit.
When a site is unavailable, domain related-issues aren’t usually the first thing we think of as being the source of the problem, but even the most diligent among us can let a domain registration lapse, or make a mistake in DNS settings that takes our domain off line.
Once your domain has been updated to point to our servers, remember to update your FTP software to use ftp.HostingAccountDomain.com (your domain name) as the host. And you should never use the Secondary Web URL as a link to your site from another site or social media platform, or hard code it anywhere in your site.
We make this recommendation because while it’s unlikely that the Secondary URLs will change, it is possible. They have changed for various reasons in the past. So once your domain points to our servers, only use the Secondary URL for troubleshooting purposes. Never as a link to your site.
![]()
![]()
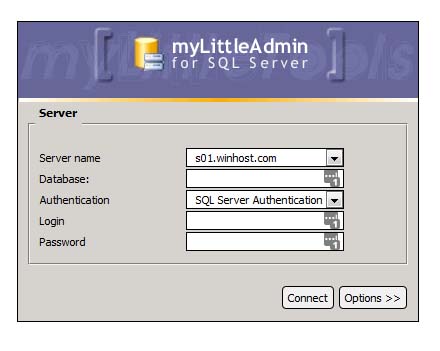
myLittleAdmin is a tool that allows you to manage your SQL database through a web browser. Here at Winhost, we support SQL Server Management Studio (SSMS), which is the preferred method for managing your database (you can find out how to do that in this KB article.)
But sometimes you can’t use SSMS – maybe you’re sitting behind your corporate proxy restrictions, or you’re using a computer without SSMS installed. That’s where myLittleAdmin steps in. It’s a web-based SQL management tool that provides a friendly interface for you to edit tables, work on stored procedures, run queries and much more.
We have a license agreement for myLittleAdmin, so you can use it on our system without having to obtain your own ($590!) license. There’s nothing to install. Just go to https://sqladmin.winhost.com
Log in to your database, and get your SQL on!
![]()
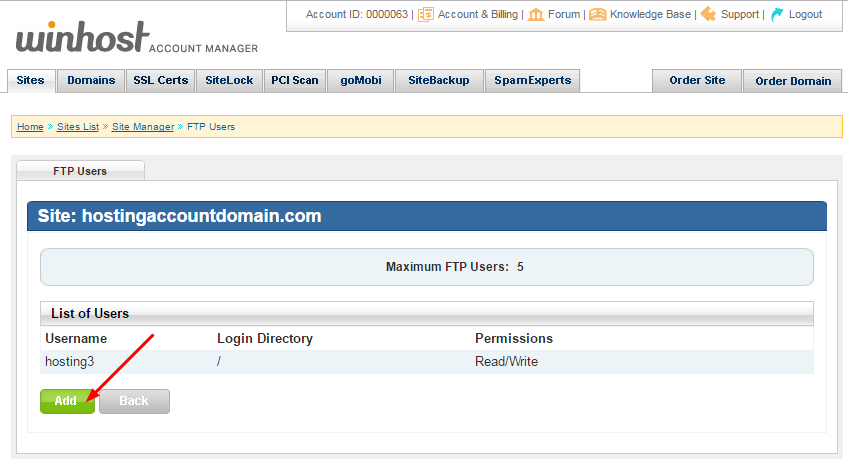
Sometimes you want to give someone FTP access to your site, but you don’t want them to have access to all of the site files. So we’re going to go through the steps to set up an FTP user that only has access to a directory that you specify.
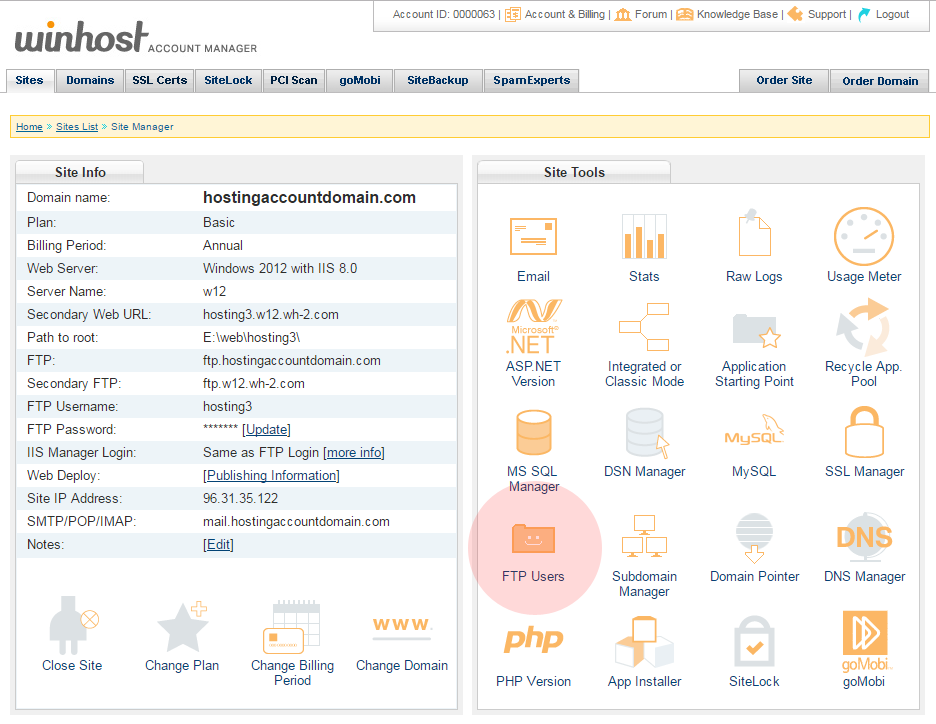
 The first thing we’re going to do is go to the Site Tools section of Control Panel and click on the “FTP Users” icon or link:
 Click the “Add” button:
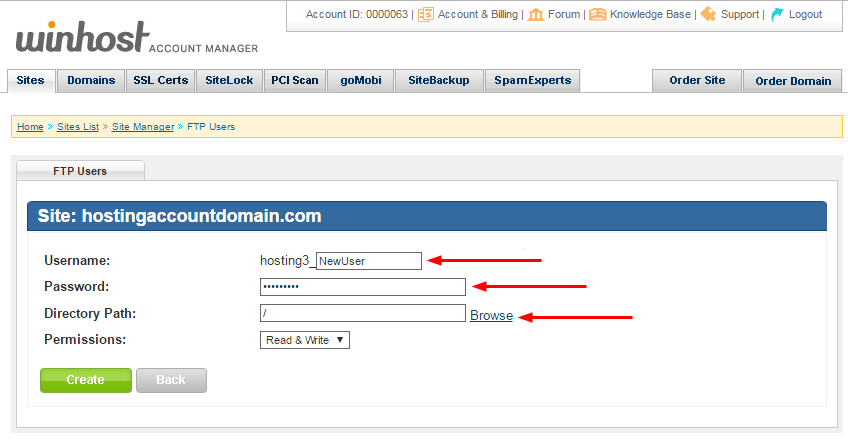
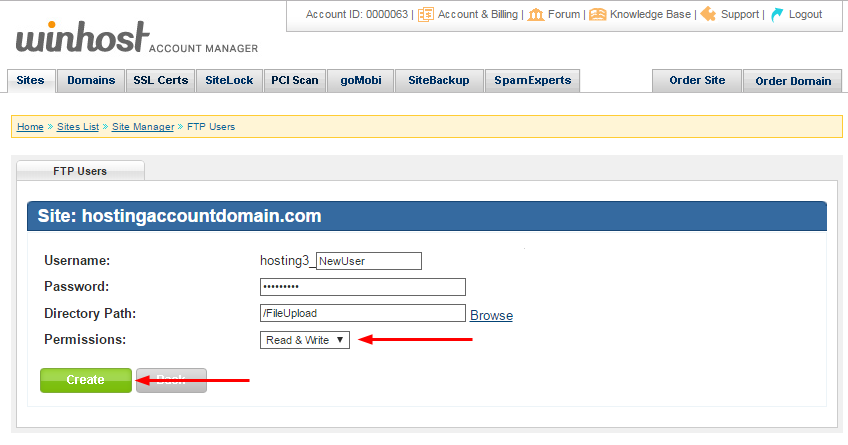
 Enter a username (it will be appended to the primary FTP username, that format can’t be changed) and a password. Enter the directory name or click the “Browse” link to choose from directories on the server:
Note that entering the name of a directory that does not exist does not create that directory on the server. You must enter the name of an existing directory.
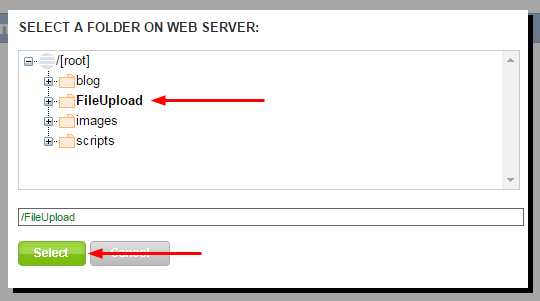
 If you clicked the “Browse” link, select the directory (it will turn bold and the path will be automatically entered in the text field below) and click the “Select” button:
 Make sure you leave the “Permissions” field set to “Read & Write,” since this user will be uploading files (the other option is “Read Only”). Click the “Create” button:
 When the user is added you will see it listed in the FTP Users section. Here you have the option to update the user’s password, or delete the user. The username cannot be edited once the user is created.
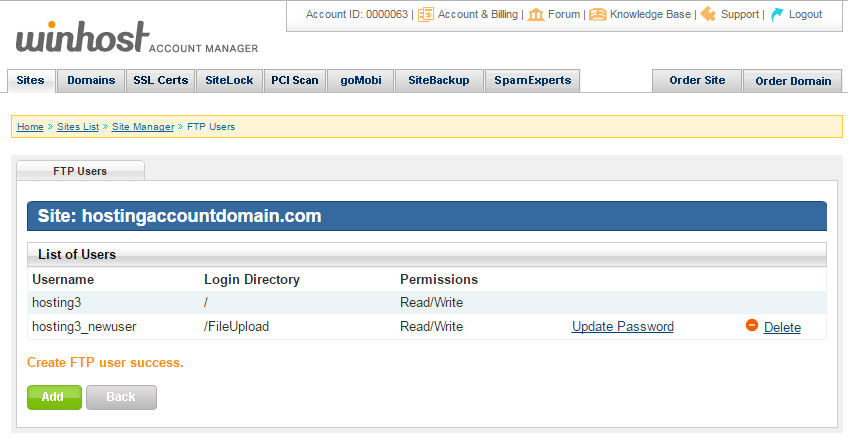
 The new user will log in to the same hostname as your existing user(s), but of course the username and password will be those that you just created.
![]()
Jetpack is one of the most popular plugins available for WordPress (with over 29 million downloads!), created by Automattic – the same people who made the WordPress app itself. It’s a Swiss Army knife for you site with over a dozen different functions all rolled into one plugin.
It includes essential tools like a website stats, subscriptions, social network sharing and a contact form. It will also hookup with WordPress.com to perform related posts and website uptime monitoring. And it’s free!
![]()
If you try to implement Jetpack on Winhost, it won’t work out of the box. By default, we filter requests to the xmlrpc.php file. WordPress.com will try to ping that file during the activation process and it will fail.
One of the reasons we block requests to the xmlrpc.php file is because of an exploit hackers can use to get your WordPress username and password. You can read about the exploit in this excellent Sucuri article.
If you don’t want to bother reading the article, in short, hackers can try thousands of username/password combinations with one request and try to brute force their way into your WordPress site.
But don’t worry, you can still get Jetpack to work by simply overriding our default request filtering. You just have to add this setting in your web.config file:
<configuration>
   <system.webServer>
      <security>
         <requestFiltering>
            <denyUrlSequences>
               <clear />
            </denyUrlSequences>
         </requestFiltering>
      </security>
   </system.webServer>
</configuration>
If you just have a WordPress site on our service, or if you used our App Installer to install WordPress, you might not have a web.config file on your site, so you’ll have to create one. Just follow these instructions:
You should now be able to activate the Jetpack plugin. But before you go, there’s the pesky security issue! Your xmlrpc.php file is now susceptible to that security exploit, which may allow hackers to get your username and password. Let’s fix that!
![]()
The best way to prevent the xmlrpc.php brute force exploit is to get SiteLock with TrueShield CDN. You will need both SiteLock and TrueShield. TrueShield will block those suspicious requests trying to get your username and password, and protect your site from all sorts of other bad stuff not covered in this article. (If hackers were limited to just one exploit, our jobs would be so much easier!) We highly recommend getting SiteLock and TrueShield. It will block malicious bots, comment spammers, and likely make your site faster, too!
Another solution would be to use Jetpack’s own Protect function. You have Jetpack installed, now use it! Just activate the Protect feature in Jetpack in the Admin panel. The Jetpack team confirmed that it works.
Finally, though perhaps foremost: always use a strong password for your site! Please don’t use qwerty123 or pa$$w0rd.
Actually, do all three – get SiteLock with TrueShield, activated Jetpack Protect, and keep those passwords strong!