
Site hosting news, tutorials, tips, How Tos and more
![]()
The first step is to log in to SmarterMail with your Postmaster email account.
Log in to the Winhost Control Panel.
Click the Sites tab at the top.
Now click on Manage next to the site you wish to check the email disk space usage.
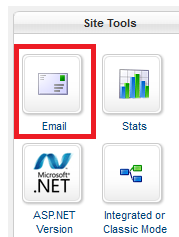
Click the Email icon in the Site Tools section.
On the next page click the SmarterMail Manager link.
This will automatically log you in to the SmarterMail Email system using the Postmaster account.
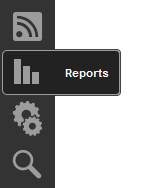
Click on the “Reports” Icon.
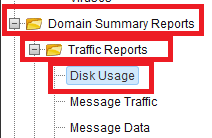
Now Expand the Domain Summary Reports folder. Then Expand the Traffic Reports folder. Click Disk Usage.
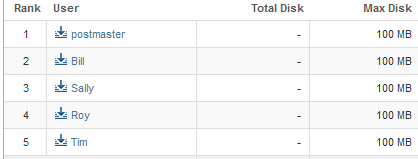
The page will now display how much disk space each email account is using.
![]()
You will need to log in to the SmarterMail system with the postmaster email account first in order to create an email user. To do this please log in to Control Panel on Winhost.
Once you have logged in to Control Panel, click the Sites tab at the top.
Then click on “Manage” next to the site you wish to manage.
Click on the Email box under site tools.
Then click the “SmarterMail Manager” link.
The link will automatically log you into the SmarterMail email system using the Postmaster account.
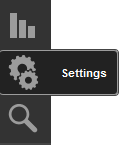
Once you are in the SmarterMail, click the “Settings” button.
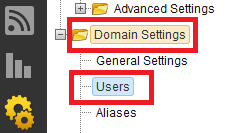
 Then expand the “Domain Settings” folder if it is not already expanded. Then Click on “Users”
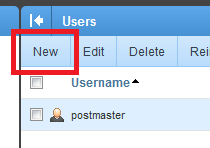
Then you may start adding your email users by clicking on the “New”.
![]()
I know you absolutely love the SmarterMail webmail that we provide with your account. What’s not to love? It’s old fashioned, clunky, confusing – perfect!
But you don’t have to be stuck with it. You can “pop” your email boxes using Gmail. “Pop” is just nerd slang for “check.” What we’re talking about here is reading and replying to mail that comes in to the addresses that you’ve set up on your domain name, but doing it all through the Gmail interface, and that’s pretty cool.
This is not a tutorial for using Google Apps mail with your domain. We already have one of those in our forum. This tutorial will show you how to keep your mail service here at Winhost, but use Gmail as your email program.
You have a Gmail account, right? If not, go set one up, then we can get started.
Log in to Gmail and click the Settings gear and select Settings.

Click Accounts and Import.

Click Add a POP3 mail account you own. In the lovely orange popup window that opens, enter the email address that you want to check using Gmail. Click Next Step.

Next you’ll be on the mail settings page of the popup window. There are a lot of variables here (it’s Google, after all), but we’ll concentrate on the simplest, quickest setup.
Username is your complete email address, not just the part before @.
Password is the POP account password that you entered into Control Panel when you set up the email address.
POP Server should be pre-populated with mail.yourhosteddomainname.com.
Everything else can be left in its default state. If you do not intend to use Gmail exclusively, check the box for “Leave a copy of retrieved message on the server,” that will allow you to pull your mail down from another source in addition to Gmail.
But beware, if you use that option and your Winhost email boxes get full, your mail will bounce. To prevent that ever happening, do not check “Leave a copy of retrieved message on the server.”
Click Add Account.

The next window will verify that your account has been added.
It will also ask if you want to be able to send mail “as” the new address. If you intend to use Gmail as your only email client, or if you ever want to respond to the incoming mail for your newly set up account, select Yes, I want to be able to send mail as…
Click Next Step.

If you selected “No” in the previous window, you’re finished.
The end.
But you didn’t select “No,” did you? Good! You’re going to want to be able to send mail from Gmail “as” yourself.
So in the next window simply enter your name. This is the name you want to appear as the sender. Leave Treat as an alias checked.
Click Next Step.

Next the cheerful Google robots are going to ask if you want to send mail through their SMTP server or if you want to send through your domain. It’s much easier to leave the default Send through Gmail checked. And since this is the easy setup guide, that’s just what we’ll do.
Click Next Step.

Before Gmail will let you send mail as yourself they want to make sure that you are who you say you are. Otherwise you could send mail as me — or someone important like Scott Guthrie or Larry the Cable Guy. To get the verification ball rolling, just click Send Verification.
Now you could log in to your POP account with your desktop email client, or use SmarterMail webmail to pick up the Google verification email. But since you’re already checking mail for your address using Gmail, you should be able to click Inbox on the upper left side of the Gmail window and – through the miracle of modern technology – pick up the verification email right there.
Try it. I’ll wait here.

Once you’ve copied the verification code from the email, just enter it into the box in the popup window and click Verify.

The popup window will disappear and nothing else will happen.
Which is good, because nothing else needs to happen. You’re all set!
Speaking of Google, why not join our circles on Google+? We’re waiting for you.
![]()
In some situations, you may not be able to use FTP or Microsoft Web Deploy to upload your applications (workplace FTP restrictions, etc.). To help solve that problem we’ll show you how to install a simple .NET file manager, FileVista, on your site. You can use this tool to upload and download files to your site.
1. Download FileVista from Gleamtech. The single user license is free.
2. On the download page, make sure you select the “Web Deploy Package.”
3. Once you download the zip file, extract it to a temporary location on your computer.
4. Within the extracted directory, you should see a directory named FileVista.
5. Upload the contents to a subdirectory of your site.
6. Once the upload process is completed, log in to the the Site Tools section of Control Panel and click the Application Starting Point icon.
7. In the App Starting Point tool, click Create.

8. Enter the name of the folder to which you uploaded FileVista, and click Create.

9. Now, on your site, navigate to the location where you installed FileVista, in this case, HostingAccountDomain.com/FileVista. You should see the welcome wizard:

10. Click Next. On the next screen, you can choose whether you want to use a file based database or SQL server. We recommend using the file based database unless you intended to have many users.

11. Click Next. You should see a Pop up displaying the preinstallation test result. Click OK.
12. On the next page, you’ll configure the following:
a. Set the administrator username and password.
b. Set the default language.
c. Set the Root Folder. The root folder is where the file manager will point when you log in. If you intend to use this tool to manage your entire site, set the root folder to: /

13. Click Next and you’re finished. You’ll be taken to the login screen.
14. Log in with the username/password you specified during installation.
15. You should now see a pop-up asking if you want to use the free version or a commercial version. Select the free license mode unless you have purchased the product.

![]()
If you are especially organized there has probably been a time when you wanted to sync your contact information, calendars, tasks, and notes between the online SmarterMail interface that we provide and your own personal Outlook client.
Personally I don’t have a lot of contacts, and I’m still using an old fashioned paper calendar, but I understand that if you are running your own business or are an especially networked individual, manually transferring your information to and from Outlook and SmarterMail can become a chore pretty quickly.
Luckily there is a handy 3rd party plugin for Outlook and SmarterMail that makes synchronizing your information a breeze.
Let me introduce the Funambol Outlook Sync Client!

Once you get this bad lad configured properly, keeping your information between SmarterMail and Outlook homogeneous is as easy as a single click. The rest of this article will walk you through the necessary steps to download, install, and configure the Outlook Sync Client.
First you will need to make sure you have your Outlook configured correctly, being able to send and receive emails is good indicator of this.

Now that we have verified that our Outlook client is in working order we will need to download the Funambol SyncML tool.
Funambol must have been busy; there are a lot of versions to choose from so make sure you download the correct version for you. In this tutorial I’m using the Outlook sync client, version 9.0.1.
After the download is complete, find the executable and run it to start the installation.
You may get a Windows Security Warning, go ahead and select Run anyway.

During the installation process you will need to choose an installation location. Choose whatever you like, it does not have to be the same directory or disk as your instillation of Outlook.
After the installation is complete, make sure the box next to “Run Funambol Outlook Sync Client 9.0.1” is checked and select Finish.

Now the fun part, actually configuring the Sync client itself.
Select Tools and then Options.

Assuming that your domain name is pointing to our name servers, and you are using the standard DNS record configuration that we provided you with at account creation, you will want to use the following format for your Server Location:
http://mail.HostingAccountDomain.com/sync/default.aspx
Make sure that you replace “HostingAccountDomain.com” with your domain’s actual name, but keep the mail. Subdomain and the /sync/default.aspx file path.
For username and password you will want to enter the full email address of the account you are setting up the sync client for, as well as the password associated with this email address.
Here is an example of what the completed fields look like.

Select OK.
Congratulations, your sync client is now configured. You can go ahead and use the “Sync All” button to sync everything, or select one of the other buttons to just sync your Contacts, Calendar, etc.
![]()
You may have noticed that not all HTTP Verbs are enabled by default. This is a short tutorial on how to enable them if your application requires it or restrict them for security purposes.
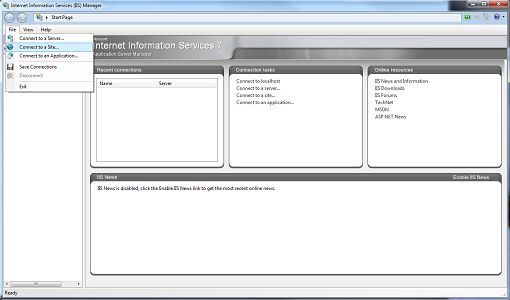
First, you’ll want to connect to your site with IIS7 Manager.
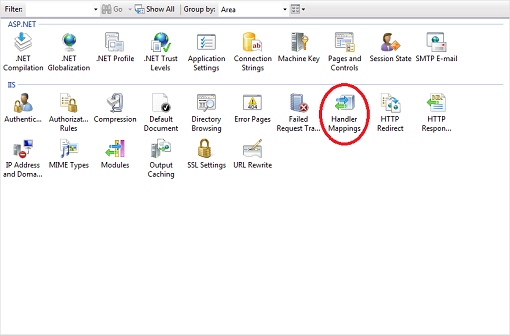
Double click the Handler Mappings module as shown above. This will bring up the Handler Mappings window.

Next, double click the ISAPI extension you want the verb enabled for. This will bring up the Edit Script Map window.
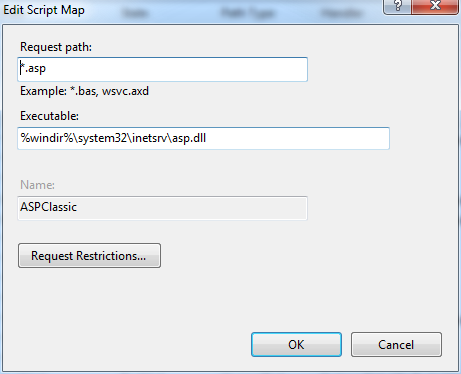
Click on the Request Restrictions… button to bring up the Request Restrictions window and select the Verbs tab.
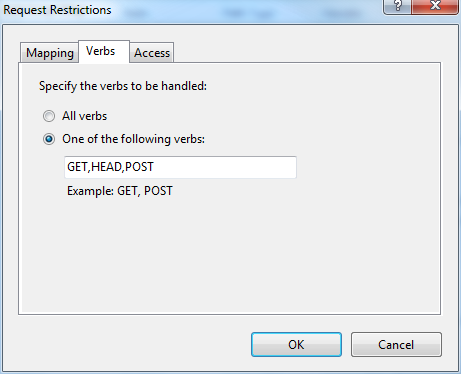
In this window, you will be able to define which HTTP Verbs you want to allow or restrict. Click OK, and you’re finished!
![]()
Web Deploy is a fantastic tool to publish your web site to a remote web server. It’s easy, quick, secure, and configurable. However, Web Deploy in conjunction with Visual Studio or in conjunction with MSBuild can alter the account’s permission on the production web server. This is by design. Microsoft believes that a web site is more secure when the web application itself is set to read-only permission. But a lot of functionality is lost with read-only permissions.
First off, let me explain the nature of the problem. Every web site that is hosted on an IIS server will have a specific user to authenticate against the server. The Account Control List will typically have an Anonymous ASPNet IUSR. This is standard for all default web sites. The server does not have to use this user, you can create your own user for the web application to run correctly but let’s stay with the “standard” setup.
Typically the Anonymous ASPNet IUSR will have Read and Write permission to the root and all of the files and subfolders under it. But when you use Web Deploy with Visual Studio or use the MSDeploy command, Microsoft Web Deploy will alter the permission of your Anonymous ASPNet IUSR to have only Read permission. That means any ASP.Net functionality that will perform an upload, file creation, or file modification will fail due to lack of Write permission.
To be honest, Web Deploy itself does not technically alter the permission on the server but one of the properties in MSBuild. So if you use Web Matrix in conjunction with Web Deploy, this is not an issue because Web Matrix does not use MSBuild; Visual Studio does use MSBuild, so with Visual Studio and Web Deploy you can get your permissions skewed.
It is worth noting that if you web deploy your web application to a subfolder this may not be an issue. The reason being is the “Inheritance” feature with NTFS. If the root folder has Read and Write permission, Inheritance will take precedence, and when Web Deploy tries to alter the permission on the subfolder level, the NTFS inherited properties on the root will revert it back to Read and Write. If you decide to Web Deploy directly on the root, then the root folder permission will be altered to Read-only permission and that will get inherited down to the subfolders within that root.
Confusing, I know, but stick with me here. So what is the solution?
There are several ways to fix this problem. One is to get access to the server and reset the permissions manually. If you are using a shared web hosting provider, you’ll need to contact their system administrators to reset it for you. The problem with that is if you use Web Deploy to publish your web application again, then they’ll need to reset the permissions again.
A more viable solution is to alter your project file to prevent Web Deploy from altering the ACL on the remote web server. To accomplish this, simply navigate to your project and find the file with the extension .vbrpoj. If you created your project in C Sharp, look for the project file .csproj. This is outlined in this Winhost Knowledge Base article.
There are still some drawbacks to this. One of the biggest drawbacks and one that tends to confuse developers is where to place the element line in the project. The line you will need to add to your project is
<includesetaclproviderondestination>False</includesetaclproviderondestination>
The project file is grouped to different sections, and you will need to find the section
<propertygroup condition=” ‘$(Configuration)|$(Platform)’ ==’Release|AnyCPU’ “> </propertygroup>
That is where you will include the <includesetaclproviderondestination> element.
Some developers have not been able to get this solution to work. That is due to the ‘Release|AnyCPU’ setting. This setting is for the Configuration and Target Platform. As early as Visual Studio 2005, Microsoft has included the ‘web.config’ Transformation feature. This allows you to create specific elements and values to a web.config file base on the environment. Specific elements may only be suitable for the development environment while the production servers may have different attributes and settings. So depending on how the final build of the project is performed, the project configuration could either be taken from the ‘Release|AnyCPU’ or ‘Debug|AnyCPU’.
If you placed your <includesetaclproviderondestination> within the ‘Release|AnyCPU’ section but built your project within the Debug configuration, then the <includesetaclproviderondestination> attribute may not invoke on the production server. To make sure your permission is not altered create the <includesetaclproviderondestination> attribute on both the ‘Release|AnyCPU’ and ‘Debug|AnyCPU’ group of your project file.
Keep in mind that any for new projects you create, you will need to run through these steps again to keep Web Deploy/MSBuild from altering your permission on the production server. A more permanent solution is to alter the MSBuild publishing settings on your development computer. This will help ensure that any ASP.Net project you create in the future on that specific computer will not alter the permission on the web server when deploying with Web Deploy.
Achieving this is fairly simple and it is a one-time change:
The file you will be modifying is the Microsoft.Web.Publishing.targets file. In Notepad, search for the <includesetaclproviderondestination> element. By default the value is set to True. Set it to False and from that point forward, any ASP.Net projects you create with Visual Studio and initialized the Web Deploy method will not alter the Anonymous ASPNet IUSR’s permission.
Remember, if you are planning to alter and save the Microsoft.Web.Publishing.targets file, you must run Notepad as an administrator.
![]()
Here’s another tip for those who are new to web hosting or Windows web hosting. Under Windows/IIS, you can specify the default web page that will load up when you enter your site’s domain name. We have preconfigured IIS to automatically load one of these files:
index.html, index.htm, index.asp, default.html, default.htm, default.asp, default.aspx, winhostdefault.htm
And here are the instructions to change these settings:
1. Download and install IIS7 Manager from Microsoft: http://www.iis.net/download/iismanager
2. Configure IIS7 Manager to access your site account. You can follow the instructions in this Knowledge Base article.
Or follow the steps below:
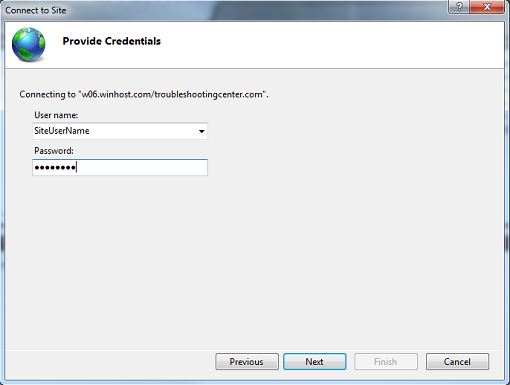
A. Select File -> Connect to a Site…
B. Enter the Server name and Site name. This information can be found in the Winhost Control Panel.
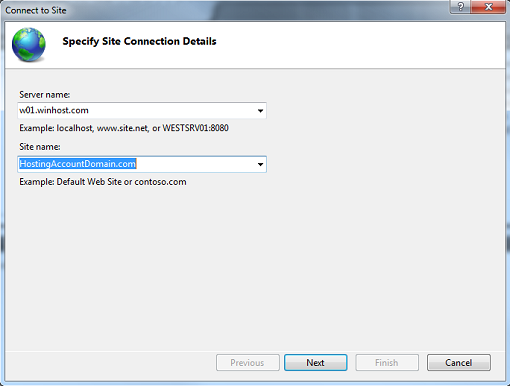 C. Enter the User name and Password for your site.
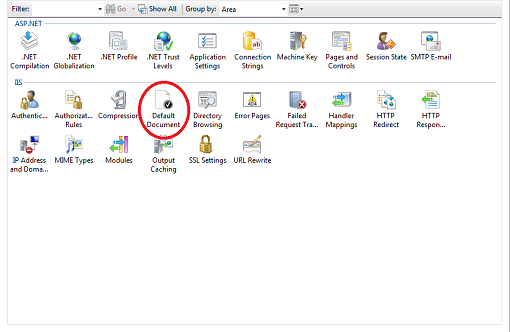
3. You will now see a number of delegated modules. Double click on the Default Document module.
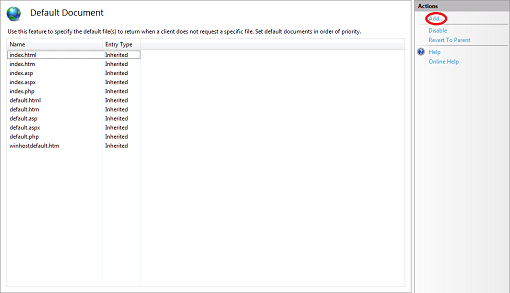
4. To add a page to the Default Document list, click on the Add… link.
5. Here, I have added a page named homepage.html to the list.
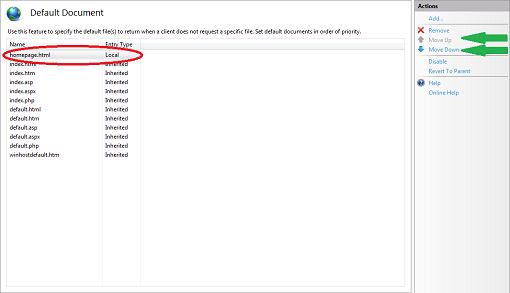
The page that automatically loads is determined by rank from top to bottom. This means if IIS cannot find a homepage.html, it will look for index.htm next and go down the list until the list is exhausted. You can use the Move Up and Move Down links (indicated by the green arrows) to change the rank order. Consequently, you can also Remove pages you do not wish to be on the list.
As a final note, I’ve shown you how to configure the Default Document for the root of your site. You can also configure the Default Document for any subdirectory by selecting it on your left, and then double clicking the Default Document module. Please note that all changes are written immediately to the web.config file in the appropriate directory on the server, and if you know the web.config file well enough, you can also manually add the XML entries using any text editor.