
Site hosting news, tutorials, tips, How Tos and more
![]()
Web Deploy is a fantastic tool to publish your web site to a remote web server. It’s easy, quick, secure, and configurable. However, Web Deploy in conjunction with Visual Studio or in conjunction with MSBuild can alter the account’s permission on the production web server. This is by design. Microsoft believes that a web site is more secure when the web application itself is set to read-only permission. But a lot of functionality is lost with read-only permissions.
First off, let me explain the nature of the problem. Every web site that is hosted on an IIS server will have a specific user to authenticate against the server. The Account Control List will typically have an Anonymous ASPNet IUSR. This is standard for all default web sites. The server does not have to use this user, you can create your own user for the web application to run correctly but let’s stay with the “standard” setup.
Typically the Anonymous ASPNet IUSR will have Read and Write permission to the root and all of the files and subfolders under it. But when you use Web Deploy with Visual Studio or use the MSDeploy command, Microsoft Web Deploy will alter the permission of your Anonymous ASPNet IUSR to have only Read permission. That means any ASP.Net functionality that will perform an upload, file creation, or file modification will fail due to lack of Write permission.
To be honest, Web Deploy itself does not technically alter the permission on the server but one of the properties in MSBuild. So if you use Web Matrix in conjunction with Web Deploy, this is not an issue because Web Matrix does not use MSBuild; Visual Studio does use MSBuild, so with Visual Studio and Web Deploy you can get your permissions skewed.
It is worth noting that if you web deploy your web application to a subfolder this may not be an issue. The reason being is the “Inheritance” feature with NTFS. If the root folder has Read and Write permission, Inheritance will take precedence, and when Web Deploy tries to alter the permission on the subfolder level, the NTFS inherited properties on the root will revert it back to Read and Write. If you decide to Web Deploy directly on the root, then the root folder permission will be altered to Read-only permission and that will get inherited down to the subfolders within that root.
Confusing, I know, but stick with me here. So what is the solution?
There are several ways to fix this problem. One is to get access to the server and reset the permissions manually. If you are using a shared web hosting provider, you’ll need to contact their system administrators to reset it for you. The problem with that is if you use Web Deploy to publish your web application again, then they’ll need to reset the permissions again.
A more viable solution is to alter your project file to prevent Web Deploy from altering the ACL on the remote web server. To accomplish this, simply navigate to your project and find the file with the extension .vbrpoj. If you created your project in C Sharp, look for the project file .csproj. This is outlined in this Winhost Knowledge Base article.
There are still some drawbacks to this. One of the biggest drawbacks and one that tends to confuse developers is where to place the element line in the project. The line you will need to add to your project is
<includesetaclproviderondestination>False</includesetaclproviderondestination>
The project file is grouped to different sections, and you will need to find the section
<propertygroup condition=” ‘$(Configuration)|$(Platform)’ ==’Release|AnyCPU’ “> </propertygroup>
That is where you will include the <includesetaclproviderondestination> element.
Some developers have not been able to get this solution to work. That is due to the ‘Release|AnyCPU’ setting. This setting is for the Configuration and Target Platform. As early as Visual Studio 2005, Microsoft has included the ‘web.config’ Transformation feature. This allows you to create specific elements and values to a web.config file base on the environment. Specific elements may only be suitable for the development environment while the production servers may have different attributes and settings. So depending on how the final build of the project is performed, the project configuration could either be taken from the ‘Release|AnyCPU’ or ‘Debug|AnyCPU’.
If you placed your <includesetaclproviderondestination> within the ‘Release|AnyCPU’ section but built your project within the Debug configuration, then the <includesetaclproviderondestination> attribute may not invoke on the production server. To make sure your permission is not altered create the <includesetaclproviderondestination> attribute on both the ‘Release|AnyCPU’ and ‘Debug|AnyCPU’ group of your project file.
Keep in mind that any for new projects you create, you will need to run through these steps again to keep Web Deploy/MSBuild from altering your permission on the production server. A more permanent solution is to alter the MSBuild publishing settings on your development computer. This will help ensure that any ASP.Net project you create in the future on that specific computer will not alter the permission on the web server when deploying with Web Deploy.
Achieving this is fairly simple and it is a one-time change:
The file you will be modifying is the Microsoft.Web.Publishing.targets file. In Notepad, search for the <includesetaclproviderondestination> element. By default the value is set to True. Set it to False and from that point forward, any ASP.Net projects you create with Visual Studio and initialized the Web Deploy method will not alter the Anonymous ASPNet IUSR’s permission.
Remember, if you are planning to alter and save the Microsoft.Web.Publishing.targets file, you must run Notepad as an administrator.
![]()
 There are a number of companies that offer what they call “SEO Hosting.” Actually though, “SEO hosting” is a misnomer (that’s a polite way of saying “useless advertising gimmick”), because any site hosted at any hosting company has just as much a chance to be ranked well within a search engine as a site hosted with an “SEO Hosting” company.
SEO in its purest form is about optimizing the content on your site so you are found to be relevant by a search engine. So unless these SEO Hosting companies are writing the content for your site, they have no control over how your site is ranked. In fact, as you review the sites of many of these SEO companies you will find that many of the items they list for SEO hosting are actually SEO tips that are completely unrelated to the hosting of your site (i.e. links to your site, unique content).
The one server-side feature that all of these companies tout as an SEO “feature” is providing your site with a unique IP address. While it can be handy to have a unique IP, it doesn’t really address the issue that they provide it for. All search engines look for patterns across the web. These patterns are used to help decide how to rank sites. One pattern that is examined is IP blocks used by sites that have been penalized for shady SEO practices, are SPAM in nature, or contain malware.
When such a pattern is detected, the search engine will penalize an entire IP block, deeming that IP block a “bad neighborhood.” So even though a unique IP is nice, if the whole IP block is penalized, that unique IP can do you much more harm than good. This is less a tip for good SEO ranking and more a tip to avoid penalties.
If you ask Google and other search engines about this, they will tell you that it is very rare that they have to actually penalize IP blocks in this manner. Normally they are penalizing dedicated servers or VPS servers where one person has hosted a number of bad sites in one place.
At Winhost, many of our customers do their own SEO for their sites, with excellent results for their desired search terms. They have developed their own unique content and have received relevant links to their sites without paying for the links (good SEO rule of thumb; never pay for links!). They have properly tagged their sites, created sitemaps, and use the webmaster tools provided by the search engines (Google, Bing) to ensure that they can be crawled properly by the search engine bots. Doing these things—all of which are unrelated to the host or the server your site is on—will normally result in good SEO for your site.
Keep in mind that when a search engine does not rank your site well, it doesn’t mean that the search engine is making a mistake or penalizing you. What it typically means is that the search engine doesn’t currently find your site to be as relevant for a term as you may like. When this happens it is best to review your site and look for ways to improve the content, as “Content is King” when it comes to SEO. This is also where the above mentioned webmaster tools really come in handy. Search engines want to help you rank well for your terms and these tools are there to help you do this.
But there is no “magic bullet” to get your site a high search engine ranking, and—despite what they may tell you—there is no such thing as “SEO hosting.”
![]()
People often write to support or post in the forum asking us why their php.ini files aren’t working. Well, php.ini is a unix/linux file, so it doesn’t work on Windows servers. The next question is always, “So how do I control php settings?” To which we have always had to answer, “Sorry, you can’t.”
Until now.
With the introduction of PHP 5.3.10, we have provided you with the ability to upload your own user.ini file, in order to specify php settings you wish to change for your account. If you’ve used a php.ini file on a linux server, this is the same concept. You simply create a text file named user.ini in the root of your account. The file can include php settings such as:
upload_max_filesize = 200M
date.timezone = “Europe/London”
These settings will be changed for your site only. While most of these settings are safe to change, the user.ini file does give you a lot of control over how php works for your site, so use your best judgement as to what you change.
If you are the experimental type and wind up making a change that causes problems with your site, simply remove the line(s) causing trouble and re-upload the file. Note that there is a five minute server cache for user.ini changes, so you may not see your changes until a few minutes after uploading.
We’re excited to be able to offer the php flexibility that you’ve been asking for. As always, we want Winhost to be the best host on the planet, so we’re listening to you and working hard to meet your needs every day. Thanks for working with us!
![]()
Here’s another tip for those who are new to web hosting or Windows web hosting. Under Windows/IIS, you can specify the default web page that will load up when you enter your site’s domain name. We have preconfigured IIS to automatically load one of these files:
index.html, index.htm, index.asp, default.html, default.htm, default.asp, default.aspx, winhostdefault.htm
And here are the instructions to change these settings:
1. Download and install IIS7 Manager from Microsoft: http://www.iis.net/download/iismanager
2. Configure IIS7 Manager to access your site account. You can follow the instructions in this Knowledge Base article.
Or follow the steps below:
A. Select File -> Connect to a Site…
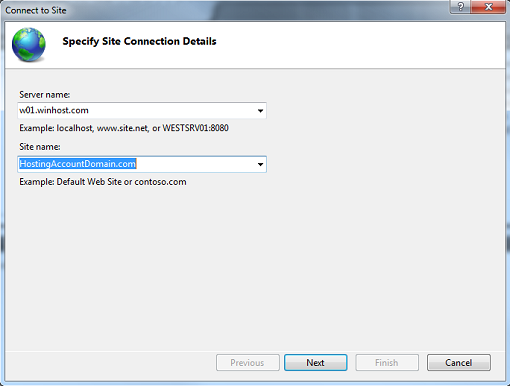
B. Enter the Server name and Site name. This information can be found in the Winhost Control Panel.
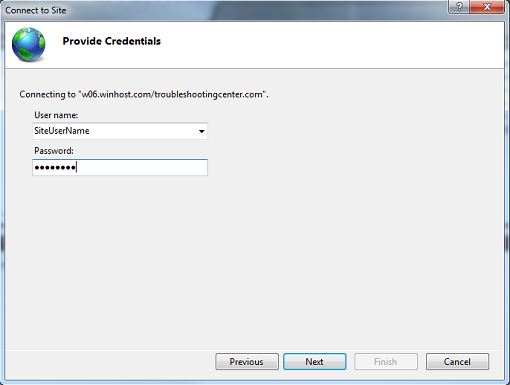
 C. Enter the User name and Password for your site.
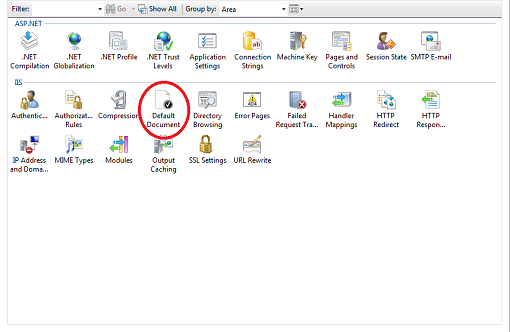
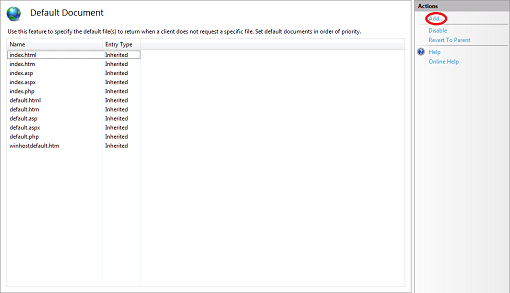
3. You will now see a number of delegated modules. Double click on the Default Document module.
4. To add a page to the Default Document list, click on the Add… link.
5. Here, I have added a page named homepage.html to the list.
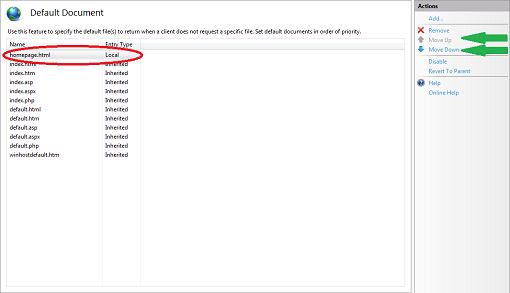
The page that automatically loads is determined by rank from top to bottom. This means if IIS cannot find a homepage.html, it will look for index.htm next and go down the list until the list is exhausted. You can use the Move Up and Move Down links (indicated by the green arrows) to change the rank order. Consequently, you can also Remove pages you do not wish to be on the list.
As a final note, I’ve shown you how to configure the Default Document for the root of your site. You can also configure the Default Document for any subdirectory by selecting it on your left, and then double clicking the Default Document module. Please note that all changes are written immediately to the web.config file in the appropriate directory on the server, and if you know the web.config file well enough, you can also manually add the XML entries using any text editor.
![]()
In this tutorial we will be showing you how to install WordPress using the App Installer feature in the Winhost Control Panel.
You will need a MySQL database, which you can add from within your hosting account.
To get started, log in to the Winhost Control Panel.
Click the “Sites” tab at the top.
Click “Manage” next to the site you wish to install WordPress on.
On the next page you will set up the MySQL database that you will be using for WordPress.
Click the “MySQL” icon:
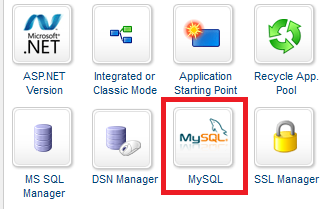
Now create a MySQL database by clicking the “Add” button.
Enter a database name and user name and the amount of disk space you wish to allocate to the MySQL database:
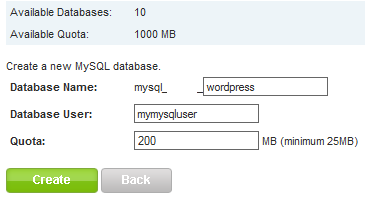
Click “Manage” next to the MySQL database to change the password for the MySQL User you just created:
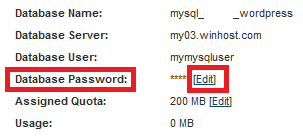
IMPORTANT: Make a note of the MySQL information because we will need this when installing WordPress.
Go back to the “Sites” tab and click “Manage” next to the site you wish to install WordPress on.
Click the “App Installer” icon:
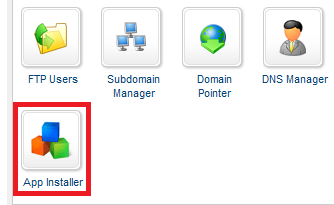
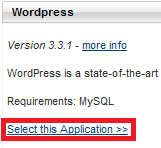
Scroll all the way to the bottom of the page and look for WordPress. Then click “Select this Application”:
For the sake of this tutorial I’ll be installing WordPress on the root of my site. To do this you will need to remove the “wordpress” text in the AppPath field, leaving the text field empty:
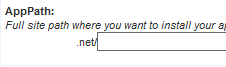
If you wish to install WordPress in a subdirectory, enter the subdirectory in this field. Where you install WordPress depends on how your site is laid out. In most cases the application will be installed in a subdirectory.
WARNING: Installing WordPress on the root of your site will delete everything that is currently on your site’s root. If you install in a subdirectory, the installer will clear the subdirectory and not your root (of course it’s always best to backup your site files first when installing a new web application in case something goes wrong with the installation).
Click the “Install Application” button when you are ready to continue with the installation of WordPress.
If every went according to plan then you should receive the following message.
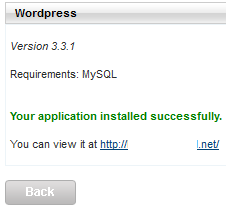
Click on the link after “You can view it at” to continue with the installation.
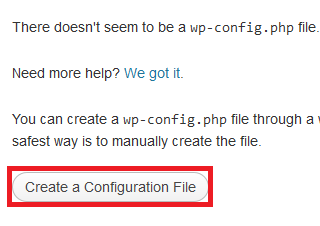
Click the link to go to your WordPress Installation. You’ll see the error message below. Click the “Create a Configuration File” button:
On the next page you will see a list of things you will need in order to install WordPress; Database name, Database username, Database password, and Database Host.
Next, click the “Let’s Go!” button.
Enter the information you made note of when you set up the MySQL database:
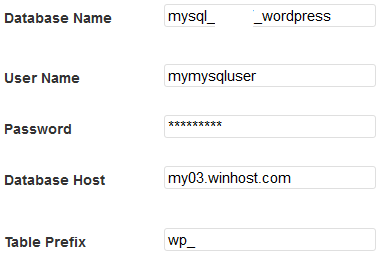
Click the “Submit” button.
Click the “Run the Install” button.
On the next page you will choose the settings that you wish to use for your WordPress application. Be sure to remember the Admin User Name and Password for WordPress. If you forget the user name and password you may need to repeat the installation.
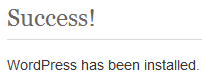
Once you have configured the settings you wish to use, click the “Install WordPress” button. This will bring to the next page confirming you have successfully installed WordPress.
If you run into any issues or have any questions regarding WordPress. Please post your questions in our Community Forum. The Technical Support department is unable to assist with WordPress installation or configuration.
![]()
Many people may not realize this, but there are a few things you can do to help yourself receive a timely resolution when asking for support here at Winhost.
1. Open up a support ticket through the Winhost Support Portal at https://support.winhost.com.
Opening up a support ticket will authenticate your ticket and reduce the amount of time that it takes our support personnel to look up your information or verify that it is a legitimate support request. We cannot provide account-related information unless a ticket is authenticated. It also helps us keep a good ticket history and allows us to find more permanent solutions if there is a re-occurring problem.
 2. Be as specific as possible when you are trying to describe a problem.
If the issue you’re having is generating an error message, please provide it to us along with instructions on how to reproduce it, if possible. If you have screen shots or logs that you think might be helpful, include them as attachments.
Example of a support ticket that is too generic:
“I am having problems with my email.”
Example of a support ticket that is more specific:
“I am having problems with my email account [email protected]. I am unable to send or receive messages using Microsoft Outlook. I have also attached a screen shot of the error that Microsoft Outlook is generating.”
3. Open a different support ticket for separate issues.
For example, if you are having a problem with your database and email, open a support ticket for each issue as they are often unrelated. Please note that billing questions should be directed to our Billing Department and sales questions to our Sales Department.
By following these simple tips, your ticket will be routed correctly and resolved in a timely manner.
![]()
It used to be when choosing a TLD (Top Level Domain – the part of the domain name after the dot) you had very few choices, and most people went with .com. Originally .org and .net were reserved for organizations and networks. So your host or your ISP might have a .net domain, but few “normal” sites did. And if you wanted to register a .org domain you had to jump through hoops that involved actually mailing or faxing documents to the registrar.

But those weird dark ages passed pretty quickly, and in the early 90s people began registering .net and .org domains to use for their personal sites. In those days it was usually done in order to be different and stand out, as .com names were still widely available. When the common (and not-so-common) words were used up in the .com namespace, .net and .org registrations increased, and for several years, those three TLDs – known as generic TLDs – ruled the roost.
Two letter country code TLDs have been around for as long as .com, .net and .org, but in the early days they were typically reserved for residents of the countries they represented. Then a few of those countries struck on the idea of selling domains on their TLDs, so you saw TLDs like .cc and .tv enter the mainstream.
Now there are very few countries that still enforce resident-restrictions on thier TLDs, which is why we have domains like bit.ly and ma.tt. Country codes continue to open up, as we saw recently when .me opened up registration. And while a lot of startups and social media companies are fond of spelling words with country code TLDs, most people still gravitate toward one TLD: .com
For a personal site, or a small startup venture, most people want a .com domain name. And for good reason. Even though there are more than 250 TLDs that you can use to register a domain, the Internet and the web as we know it today still tends to stubbornly rotate around .com. Need proof? If you’re unsure of a company’s domain name, what’s the first thing you try? Okay, the first thing you try is a Google search, I know, but if you are typing a domain, you’ll try the .com.
So you may spend a week trying to brainstorm a .com name that someone else hasn’t thought of, and find yourself frustrated at every turn. It can seem as though every possible .com has been registered. They haven’t, and I’ll give you a tip for finding your .com in a minute, but first I want to blow the whole idea of a “choosing a TLD” post out for the water by saying:
The TLD that you use doesn’t matter.
Five years ago I may not have made that claim, but the trend is clearly toward search and away from typing domains, so as far as being found on the web (a monumental task in itself, and the subject of another post – or book), search rules, and search doesn’t care how your domain name ends. So if you can force yourself to look beyond king .com, it may be in your interest to do so.
It’s a wide world of TLDs out there. One of them may have your name on it. You may have marketing considerations to take into account, and you should always look at which country some of the more popular country code TLDs represent. For example, .ly is extremely popular, but it’s the Libyan country code, and not everyone necessarily wants to be associated with Libya. No offense Libyans.
You’re probably thinking, “Hey, Michael, you guys don’t even register all these different TLDs, why are you telling me to go to someone else?” It’s true, we only provide registration for a few generic TLDs. That’s because that small handful of TLDs are still far and away the ones that people want to use. This article is for those of you who don’t mind stepping out into the great vast void and seeing what there is to find. It’s cold out there, but I’m told the view is spectacular.
Oh, that tip for finding an available domain in the ever-desirable .com namespace? Join two unrelated words. I know it sounds simple and obvious, and it is. But it’s also an endless source of available domain names, and one most people overlook. If you’re creative, you can find a combination that works for your project in a few minutes. I’ve used that little trick to find dozens of domain names for people who thought they could never find a .com domain.
And when you find your .com (or .net, .org, .biz, .cloud, .club, .info, .name, .pro, .store or .xyz) domain, you can easily register it directly from your Winhost Control Panel.
Wikipedia has a useful list of all TLDs, along with information on country code TLD domain registration. If you want to register a country code TLD domain without a lot of research, sites like EuroDNS can be very useful.