Some of us (like me) have at one time or another forgotten the Admin Login for our WordPress site. Maybe you’ve tried using the Lost your password? function, but for whatever reason that doesn’t work.
So what do you do now? Start all over?
Nope. We’re going to modify our user table on the MySQL database by creating a new MD5 hash.
Well, first you need to create a new MD5 hash using this handy web site. Enter your new password in the string field of the site. Now save the MD5 hash text the site created for you and save it in a text file. You might also want to save the password in the text file just in case, but don’t forget to delete it once you’re done.
Now, you’re going to use MySQL Workbench to connect to the WordPress database. To learn how to connect to your MySQL database using Workbench please read our Knowledge Base article.
Once connected with MySQL Workbench expand the database. Expand your tables and right click on the users (this table may also be called wp_users depending on which table prefix you used when you installed WordPress).
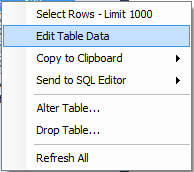
After right clicking on the users tabled select Edit table data.

Find your admin user. Under the user_pass column next to the admin user and enter the MD5 hash you created. It should look like this:

Now click on the Apply button in MySQL Workbench. Click Apply again on the next window. Now click Finish.
After you completed all those steps you should now be able to log in to your admin section with the new password you created.
In this tutorial I’m going to show you how to configure goMobi to work with your WordPress site. Many of our users are using WordPress for their sites, and now you can have a Mobile web site for your WordPress-based site.
If you don’t have goMobi service yet, you can order goMobi through Control Panel. If you don’t have a WordPress site yet, we have a blog post article that shows you how to install WordPress using our Control Panel Application Installer.
Once your WordPress site is up and running and you have ordered goMobi for your site, check out this video on some the different things you can do with goMobi.
When you’re done watching the video you’re ready to configure WordPress with goMobi.
Log in to your goMobi account through our control panel by click on the goMobi tab at the top.
Now click on the blue Launch Mobile Site Builder link to log in. This will open a small window in your web browser.
Creating your mobile site can be relatively simple, or you can take full advantage of everything goMobi offers and spend some time setting up your mobile site. It can be a lot to go through, so we won’t step through it here. We’re primarily concerned with getting your mobile site to work with WordPress.
After you’ve created your goMobi site, you’ll need to create the redirection code that you will install on your WordPress application. This is necessary to properly route mobile traffic to your new mobile site.
In the goMobi window click on the Tools tab at the top.
![]()
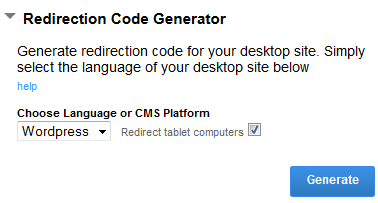
Now expand the Redirection Code Generator section.
Place a check mark next to Redirect tablet computers if you want to redirect tablet computers too.
Select WordPress from the drop down menu and click Generate.

Clicking on the Generate button will create a mredirect.zip file that you will need to download locally onto your computer.
Now extract the .zip file onto your computer and connect to your site via FTP. We are going to upload the file into your WordPress site files directory.
If you don’t have an FTP client, we suggest FileZilla. If you install FileZilla, we have a knowledge base article that shows you how to use it to connect to your site.
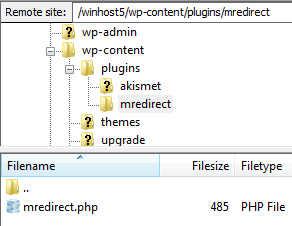
When connected via FTP double click on the wp-content directory folder. Now go in to your plugins folder by double clicking on that too.
You want to upload the exacted mredirect folder containing the mredirect.php file to the plugins directory:

Now simply log in to your WordPress site as the Admin and activate the plug-in.

Once you have activated the plug-in, any mobile traffic to your WordPress application will be redirected to your mobile web site.