
Site hosting news, tutorials, tips, How Tos and more
![]() Broken image links are a common problem when you move your WordPress installation to another domain name or even to another subfolder. WordPress uses absolute paths to link images and objects to the page. The absolute path is usually defined during the initial WordPress setup process when you first configure WordPress. No problem right? You understand and know what absolute paths mean, and WordPress is working with no problems.
Broken image links are a common problem when you move your WordPress installation to another domain name or even to another subfolder. WordPress uses absolute paths to link images and objects to the page. The absolute path is usually defined during the initial WordPress setup process when you first configure WordPress. No problem right? You understand and know what absolute paths mean, and WordPress is working with no problems.
But what happens when you change the domain name for your WordPress site, or you move your WordPress site to a subfolder? Now you call on your WordPress site and some links are broken, images don’t show up, or some of the pages may come up with a 404 not found error. You right click on an image or object on the page and you can see the URL address does not match with the URL address on the address bar.
What a mess. Now what?
Fear not, this is actually a fairly easy fix!
There are a few easy way to fix this. The first thing to try is logging in to the WordPress admin section and changing the values in Settings > General. But sometimes the location change can make logging in to the admin section impossible, in which case you’ll want to try setting the new URL by either defining the SiteURL and Home variables in your configuration file, or going in to the database and changing them there.
Updating the wp-config.php file
Log into your site via FTP and look for the WordPress wp-config.php file. Open the file with a text manager such as NotePad and add these lines. Typically you should be able to add the lines under the connection string section of the configuration file.
/**Manually Define SiteURL and Home */
define(‘WP_HOME’,’http://www.newdomain.com’);
define(‘WP_SITEURL’,’http://www.newdomain.com’);
If you have just moved the WordPress files to a subfolder then the URL would look somewhat like this.
define(‘WP_HOME’,’http://www.newdomain.com/newsubfolder’);
define(‘WP_SITEURL’,’http://www.newdomain.com/newsubfolder’);
In my opinion, this is actually the easiest way to fix this. But some site owners don’t like to hard code values into the page, so the second way to solve the problem is to update the database. WordPress uses MySQL as it’s back end, and the SiteURL and HOME URL values are stored in there in plain text, so they’re easy to change.
Updating your WordPress database:
Log into your WordPress database. The table you will be looking for is wp_options. wp_ is the default prefix that WordPress will use in the initial setup. You may have used a different DB prefix during set up, but in general what you are looking for is the “Options” table.
Run this SELECT command against the Options table.
USE [Database Name];
SELECT option_name, option_value FROM wp_options
WHERE option_name="home" OR option_name="siteurl";
You should see results similar to this.
| option_name | option_value |
| home | http://www.olddomain.com |
| siteurl | http://www.olddomain.com |
To update the option_value column, just run this command against your database.
USE [Database Name];
UPDATE wp_options
SET option_value="http://www.newdomain.com"
WHERE option_name="siteurl" OR option_name="home";
If you are moving the WordPress site to a subfolder, the option_value would include the path to the subfolder:
SET option_value="http://www.newdomain.com/subdomain"
That should be it. Either method will work. But don’t forget, at Winhost we can migrate your WordPress website for you. We’ll create and restore the MySQL database, update your connection string and make sure the absolute path it setup correctly. Simply contact our Support Department for more details on what we will need to migrate your site for you.
![]() I’ve seen this before, a small or medium sized business pays a developer to build a NopCommerce website to run their online store. They pay several hundred – or even thousands – of dollars to get it up and running. Customized design and themes are added to give NopCommerce a custom look unique to the company. Everything goes well, the site is launched and the customer is happy. The developer has done their job and now they’ve moved on to their next project.
I’ve seen this before, a small or medium sized business pays a developer to build a NopCommerce website to run their online store. They pay several hundred – or even thousands – of dollars to get it up and running. Customized design and themes are added to give NopCommerce a custom look unique to the company. Everything goes well, the site is launched and the customer is happy. The developer has done their job and now they’ve moved on to their next project.
Then some months later the unthinkable happens, and the previously happy customer forgets the username or password to the NopCommerce admin account. They try to run through the NopCommerce password recovery process but it’s not working. They either don’t remember, or no longer have access to, the email address to the account. Regardless, the bottom line is that they do not know the credentials to your NopCommerce Admin account and the password recovery process is simply not working.
Luckily, if this ever happens to you there’s a work-around. You’ll need access to the SQL database that NopCommerce is using for the back end data source. You’re going to go directly to the database and change the password in the table that stores the admin account password.
But first you’ll need to create a new registered user in NopCommerce so that you will have a password that you can use to replace the admin account password. Log in to your NopCommerce site and click the “Register” link to set up a new user. You’re going to use the email address and password for this new user in the next steps.
Once the new user is created, log in to the NopCommerce database and search for the new user you just registered by running this SQL command against your database:
use [Database Name]

go

Select ID, Username, Password, PasswordSalt from dbo.Customer WHERE Username='[email protected]'
Replace [email protected] with the actual email address of the new user just registered. From the results of that command, copy the “Password” and “PasswordSalt” values.
Then run this update command:
use [Database Name]

go

Update dbo.Customer

Set Password='<password copied from previous query>', PasswordSalt='<password salt copied from previous query>' WHERE ID='1';
The WHERE clause specifies the admin account, which will have ID value of ‘1’ since it is the first account created when setting up NopCommerce. Now you should be able to log in to the NopCommerce Admin account with the new password.
![]()
One can never underestimate the importance of upkeep and routine maintenance, especially when it comes to web sites and applications. When we do not practice due diligence or neglect our web applications, hackers can find holes, weaknesses, and exploits in our so-called “secure” sites.
That holds even more true when it comes to “canned” applications such as Joomla. We have learned that Joomla version 2.5, and 3.1.x have a security hole that can allow anyone to upload malicious files through your application.
The malicious files can perform cross-site scripting (injecting a string of code to your web pages, which can redirect users to a phishing site), or distribute malware or Trojan files that can affect your visitor’s computers.
The security hole in Joomla is its Media Manager, which offers you a tool to upload files to the website. This is a necessary function in a CMS such as Joomla. Joomla comes with its own filtering mechanism that prevents anyone uploading files with specific extensions that can be malicious in nature. Files with extensions such as .exe or .php should not be uploaded as they can infect your web application.
However, the bug is that a trailing dot on a file name can circumvent the filtering mechanism. Normally Joomla will prevent the upload of files with a .php extension such as document.php. However, include a period at the end, such as document.php., and the file no longer fits the .php criteria.
Nasty bug to say the least. What is more frightening is that you do not have to be a registered user or have administrative privileges to the application to exploit the bug. If the Media Manager was set to be available to the public, anyone can inject your site with a malicious file.
The simplest way to solve this problem is to go to Joomla’s website, download the most recent version, and upgrade. This should have the latest patch to this security threat.
http://joomlacode.org/gf/project/joomla/tracker/?action=TrackerItemEdit&tracker_item_id=31626
http://www.joomla.org/announcements/release-news/5505-joomla-3-1-5-stable-released.html
If an upgrade is not an option for you, you can manually add the code that will prevent users from uploading files to your application with a trailing dot.
Navigate to /Libraries/Joomla/Filesystem and open file.php. Scour the code to find where the makeSafe function starts. Add the line:
// Remove any trailing dots, as those aren’t ever valid file names.
$file = rtrim($file, ‘.’);
If this line already exists then your Joomla application is immune to this specific security hole.
That doesn’t mean that you should not routinely follow up on the most recent news concerning your web applications. To really secure your site it is important to stay informed of the most recent patches for your web application.
Here are links you may want to check to stay up-to-date with Joomla’s security fixes. Keep in mind that some security patches may not apply to you depending on the version you are running.
http://docs.joomla.org/Vulnerable_Extensions_List
Let me lastly say that we here at Winhost take this threat seriously. As of today, we have updated our App Installer to the most recent Joomla version (3.1.5) with the security patch installed. If you installed your Joomla application with this newest release, you are protected from this specific threat, however if you have installed an older version from us you may want to check file.php within Joomla and make sure the appropriate line is added.
![]()
Thousands of WordPress sites are being compromised causing havoc with their site owners and their hosting providers. The method which the hackers are using is an old method known as a Brute Force Attack. This method simply employs the process of submitting passwords until you finally happen across the right one.
The effects on the site can vary, but it will entail a slower WordPress site, and high bandwidth consumption. This will mean you may pay more for the additional bandwidth you consume even if it was caused by your WordPress site being hacked.
To counter this you need to take two basic steps.
If you want to read up on picking a good strong password, I suggest this Microsoft article that explains how to decide what a strong password entails.
An optional feature worth considering is to enable your WordPress site with the WordPress 2 Step Authentication. It is an added security on top of inputting your login and password credentials with a random generated verification code from Google Authenticator App. You can get more details on how to enable this for your WordPress site on this link. http://en.blog.wordpress.com/2013/04/05/two-step-authentication/
If you want to read up more on these recent attacks to WordPress web sites, try looking at these links.
http://www.bbc.co.uk/news/technology-22152296
![]()
Can you believe it? There is a new framework to learn and use. It is called YII Framework. YII stands for Yes It Is (how quaint, I must say). YII is a PHP based MVC framework created specifically for highly active web applications, such as portals, forums, CMS, and e-commerce systems. It is designed to be light-weight, with a sophisticated caching mechanism.
You’ll want to look at the official YII home page to understand more about this framework.
The good news is it works on our shared hosting platform. According to YII’s documentation, the only requirement it needs is to have PHP version 5.1 or higher installed on the server; which we do have (PHP ver 5.3.13). Now, setting up a YII web application on our shared hosting environment does require some specialized steps you’ll need to take.
First you’ll need to download the YII Framework folder. Inside this folder are the YII files and extensions. You can download it here.
The second step you’ll need to incorporate is to modify the path your application will be looking for the YII framework. By default it’s set to look outside the root. A lot of the documentation was for an Apache web server therefore they had one standardized YII Framework folder that everyone accessed. That will be impossible on our shared hosting environment since each application only has permission within its’ own root. You will upload the YII Framework folder on your root and modify your application to search the framework from within.
As an example set the code from:
$yii=dirname(__FILE__).'/../framework/yii.php';
to:
$yii=dirname(__FILE__).'./framework/yii.php';
Next, you may need to modify the default time zone setting. By default it is set to UTC, which may not be the same as the server. The application will throw this error if left unchanged.
PHP Warning: phpinfo(): It is not safe to rely on the system’s timezone settings. You are *required* to use the date.timezone setting or the date_default_timezone_set() function.
In case you used any of those methods and you are still getting this warning, you most likely misspelled the timezone identifier. We selected the timezone ‘UTC’ for now, but please set date.timezone to select your timezone. in E:\ \YII_Framework\testdrive\test.php on line 3
To fix this problem, you’ll need to create a user.ini file. The file name should be user.ini and place it in your root folder. The default time zone should be delegated to the user level. Add this code in your user.ini file:
[DATE]
date.timezone = “GMT”
Save the user.ini file and that should solve it.
Note: I tested this several times and it may not throw this specific time zone error, but regardless, setting up a user.ini file shouldn’t hurt your application. The user.ini file acts like the PHP.INI file which is the basic PHP configuration for all PHP applications. The user.ini file allows for PHP.INI control at the account level. This is very useful in a Windows platform where we can only have one PHP.INI for the entire server. Keep in mind that some PHP elements/settings cannot be delegated to the account level due to security reasons.
One last step you will want to take before you are done is to protect your YII framework files/extensions from being downloaded. Because the framework itself uses PHP files, it can potentially be downloaded by a browser, modify certain configuration settings on the framework and potentially get re-uploaded back to the server. That can open security holes or exploits to your YII Framework application.
What you will want to do is setup the Framework folder with the same security restrictions as an ASP.Net Bin folder, where your application can access it, but no browser can directly navigate to it and download the files. You will use the RequestFiltering Module to protect the folder Framework. Create a web.config file if you don’t already have one, and place it on the root. Add this XML element within the system.webServer section of the web.config file.
<security>
  <requestFiltering>
    <hiddenSegments>
    <add segment="Framework" />
    </hiddenSegments>
  </requestFiltering>
</security>
That’s it, you’re all done. As you can see YII Framework is compatible with our Windows shared hosting platform.
![]()
Have you ever setup your smart phone to connect to a POP3 and/or SMTP server only to get errors? You looked through your email providers’ documentation and spoke with their tech support only to have them tell you that the problem is not on their end.
Frustrating as it is, they are often right. The true culprit is typically your carrier. Often times they either restrict or obstruct certain ports. How to find if your Smart Phone is able to use these ports; you ask?
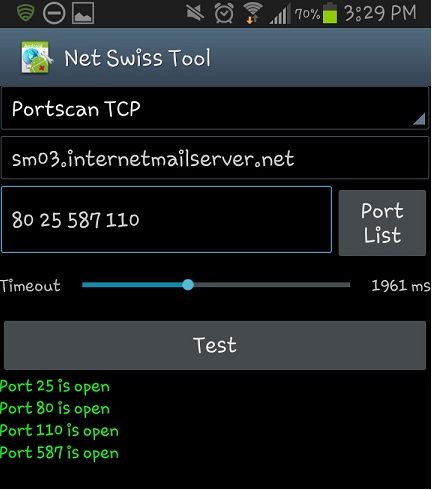
Luckily for Android users, there are some nifty free apps you can download and install to perform some port checks for you. The specific one I would like to point out is the Android Net Swiss Tool (this was tested using a Galaxy S3).
![]() It’s very easy to use and comes in really handy when you’re wondering if the hot spot you are connected to or your phone carrier is obstructing specific ports.
It’s very easy to use and comes in really handy when you’re wondering if the hot spot you are connected to or your phone carrier is obstructing specific ports.
Once you have Net Swiss Tool installed, tap the icon. You will see on the top a drop down list where you can choose Portscan TCP. You have two options on how you can define the ports. The first and easiest method is to tap on the Port List button. The second is to manually input the port numbers in the blank text box. When you manually type the ports you want to test, separate the port numbers by spaces not commas. Also pay close attention to the Timeout setting. Some servers may take longer then usual to respond back to a port check. If you’re Timeout setting is set too low, the app will assume the port is closed if it has not received a reply back within a short period of time.
Tap the Test bar and you will see whether the port is open or not.
 You will need to keep in mind that it will test the current backbone your phone is using at the time. Meaning if you are connected to WiFi, it is testing the ports through that WiFi. If you are away from any hot spots, then your phone is testing through your phone carrier’s backbone.
![]()
For those of you who use Joomla on your web site, here are some tips to maintain the security of your Joomla web application.
Every application is susceptible to exploit. Therefore it is very important to maintain an updated application and install all the latest security patches.
This link will take you to the known vulnerabilities within Joomla. It is a comprehensive list, so you should carefully read through it. If you find that you meet any of these criteria, there should be a link next to the criteria to help you patch up the exploit.
To those who have already had their Joomla site hacked, try downloading a tool to help you clear your site. I found this web tool that will audit your site and clean up your files: http://myjoomla.com/
Now, from my experience the most common exploits to a web site start from the users own personal computer. If your computer contracts a trojan or malware where a key logger is installed, your account login credentials will be recorded. No matter what security patches you have implemented in your web application, it will be compromised because an unauthorized party will have direct access to your web site.
You should always have an antivirus software installed on your computer and the latest updates installed.
![]()
All of us have experienced spam. Spam is unsolicited and unwanted email that arrives in our inboxes. It can range from a minor annoyance to complete disruption of email accounts, or worse yet, can harbor malware, trojans, and viruses.
Some of us go through a period of time where we do not get spam in our inbox, then are suddenly bombarded with it. Some of us even incorporate spam/content filters, often decreasing unwanted and unsolicited email, only to have a renewed surge of spam activity within a year or so.
While our first instinct may be to contact our email administrators to inform them of increased activity and find out if any email server settings have been modified, let’s not forget our own responsibilities to help prevent, diminish, and combat spam from infiltrating our email accounts.
I want to bring up four points that we all need to think about when we want to protect ourselves from these disruptive and intrusive emails.
First, whenever possible, try to avoid using your primary email address when filling out forms. We see it all the time, at the mall or shopping center a booth is offering a free entry to win a prize. We eagerly fill out all the information to win that car or vacation to the Bahamas, and one of the pieces of information they ask for is our email address.
For things like these, try to use an email address that is not your primary email address. Set up a Yahoo or Gmail account that is used solely for these events, and it will help to greatly reduce the amount of spam that arrives in your inbox.
You might think that creating an alternative email address on your primary email domain will solve the problem. For example, your primary email account is [email protected], and you create [email protected]. The problem with this method is that you are disclosing your email domain, and spammers can now bombard @domain.com with “guessed” addresses (such as info@, webmaster@, or even entire dictionaries of usernames) which can eventually spill over to your primary email address.
Second, look at this one as a duty or responsibility: never respond to spam! Delete it, and whenever possible, mark it as spam in your email system so that you build a reputation for what is and isn’t spam. The next time you get a similar spam message it will automatically drop it in your “Trash” or “Junk” folder.
In SmarterMail, if you see an email in your inbox that is spam you can go to Actions/Mark/spam. The more you use this, the more you build up your definition of potential spam.
The third good practice is setting up account level spam and content filtering rules. Many email systems have this feature. In SmarterMail you can go to Settings/Filtering. There you can define your own content filtering and spam filtering rules.
Don’t forget Greylisting! When an email network “greylists” messages, they do not accept the initial incoming message, but rather instruct the sending mail server to try to delivery again later (which most servers will do every few minutes). The assumption being that spam servers will not attempt to send the message again, but legitimate servers will. Greylisting will delay legitimate emails though, so it’s up to you to decide to enable or disable this feature. For the most part, Greylisting is a valuable tool in helping keep your email account clean of unsolicited emails.
Finally, if at all possible, try to avoid “catch-all” email accounts. Catch-all accounts will allow any email address to come through. For example, if you have Catch-all enabled, email addresses that do not exist ([email protected], [email protected]) will make it into your inbox. There may be a business need to have this activated, but this will greatly increase the likelihood of receiving spam, even with a strong spam filtering system.
The last thing that I would like to mention is the necessity of remaining diligent.
Many of us successfully implement the above practices, reducing or even eliminating spam from getting into our inboxes, only to relax our guard, even temporarily, exposing us to a new series of attacks on our email.
Keep in mind that spam is an ongoing threat, and that spam is adaptive and always evolving. Spammers know that they have to constantly update their procedures and techniques to get through to the greatest number of people.
One of the biggest mistakes that we can make is believing that once we have effective anti-spam measures in place, that we do not have to revisit and update those measures. If that were true, spam would have been eliminated a long time ago.
As spammers find new and more sophisticated ways to infiltrate your inbox, you have to remain vigilant and active in combating spam.