
Site hosting news, tutorials, tips, How Tos and more
![]()
In addition to the Spam Filtering tool offered by SmarterMail, you can use Content Filtering to further reduce the amount of spam you receive. The difference between Spam Filtering and Content Filtering is that Spam Filtering filters a message on a more generic basis (think of a wide net) while Content Filtering filters a message specifically based on the rule you set up (think of plugging up a particular hole in the net).
Let’s see this in action. First, let’s access the feature by:
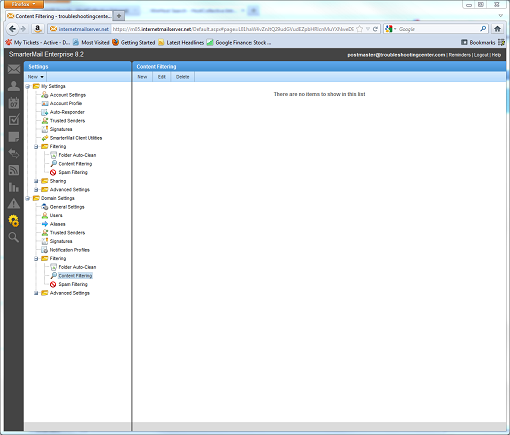
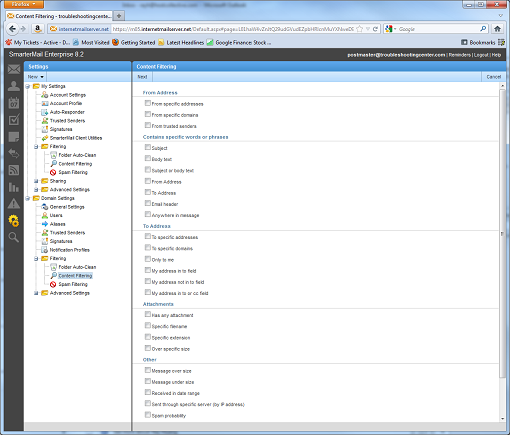
Now, click on the New button to create a new rule. This will start a wizard and bring up the next screen which provides a plethora of specific criteria you can filter messages by. For example, if you notice that a lot of the spam messages are coming from a particular email address, you can filter all messages from that address.
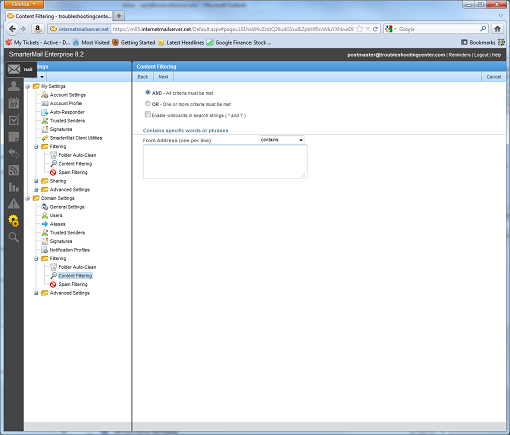
In this tutorial, I will do just that. I will go ahead and check the From Address box and click on Next. This brings up an AND/OR conditional screen which allows you to define more ‘complex’ rules. I will keep it simple by entering a single Gmail address I will be sending a test message from and click on Next to continue.
Now, I will name my rule and select one of 7 actions to take:
Mark as read
Do not deliver
Move message
Prefix subject
Add Header
Copy Message
Reroute message
I have checked the Move message box and in the field, I typed in “Deleted Items” for the name of the folder I want the message placed in. I click on Save to complete the rule. Now, I send a test message from my specific Gmail account, and voila, the message is automatically placed in the Deleted Items folder.

If you notice, there is another message waiting in my Inbox. I discovered on initial testing that the Spam Filtering rules take precedent over any Content Filtering rules. This means if the message was processed by Spam Filtering, it will not trigger any of the rules you’ve setup in Content Filtering. Please keep this in mind when you are setting up new rules. By using a proper combination of Spam Filtering and Content Filtering, you can greatly reduce the amount of spam you receive.
![]()
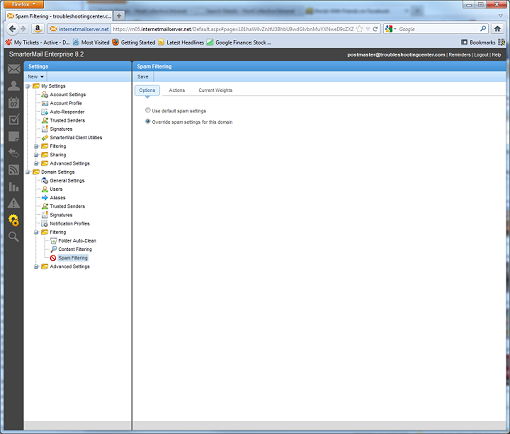
There may be some confusion regarding how to properly configure the spam settings in SmarterMail, so I decided to write this tutorial to give everyone a clearer understanding of how it actually works.
Spam is filtered based on the sum of the weights assigned to a number of predefined criteria. These settings can only be adjusted by the Primary Domain Administrator which is the postmaster account. To gain access to the settings page:
Now we can begin the process of adjusting the spam settings. Under the Options tab, check the Override spam settings for this domain radio button.
Next, click on the Current Weights tab. You’ll notice a list of criteria with text boxes which you can edit now. Here is where you can assign values to each criterion. Please note you can assign both negative and positive values which are important to understand because it affects the total weight of a message. I didn’t adjust the settings for now, but remember if you make any changes to the Spam Filtering window to click on Save so that the changes will be applied.
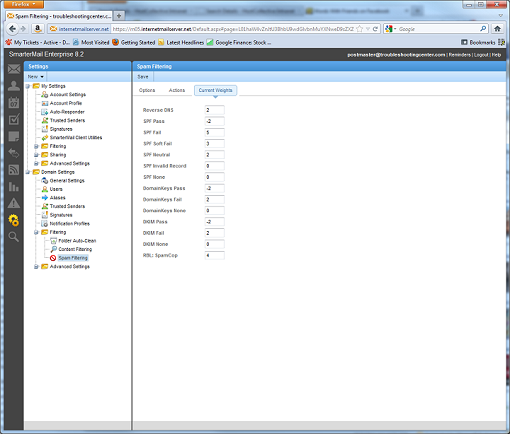
Now, we will take a look at the Actions tab. Here, there are two fields which you can edit. The Weight value here represents the total weight before the spam filter will take action. Any value over this total weight will trigger the action selected in the drop down box. There are only 3 actions you can apply:
Delete Message
Move to Junk E-mail Folder
Add Text to Subject
This will make more sense when we review an email header. Remember to click on Save to save your changes.

For testing purposes and this tutorial, I set the weight for the Low Probability of Being Spam to -5 and set the action to Add Text to Subject with the text “SPAM-LOW:” Then I sent myself a test message from Gmail and voila, the message was filtered.
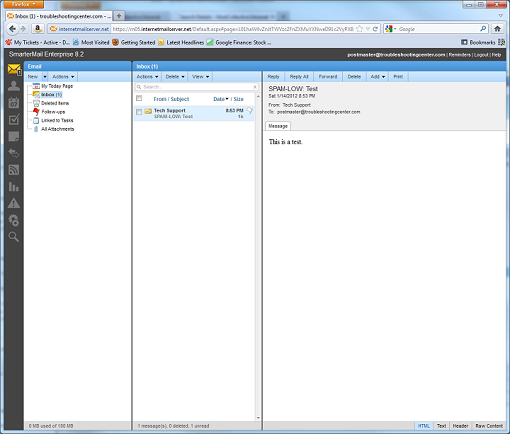
Now, to see which criteria were used to calculate the total weight, we’ll need to look at the header information. On the bottom right hand corner, click on Header. You’ll want to pay attention to these tags:
X-SmarterMail-Spam
X-SmarterMail-TotalSpamWeight
For the test message I sent, this is the complete header information:
X-SmarterMail-Spam: SPF_Pass, SpamAssassin 0 [raw: 0], DK_None, DKIM_Pass
X-SmarterMail-TotalSpamWeight: -4
If you notice, many of the tags correlate directly with the values assigned under Current Weights, so the total weight is the sum of the values you assigned to the criteria. In this case, it was (-2) + (0) + (0) + (-2) which equals -4. Since I set the weight in the Actions pane to be -5, this message was filtered properly because -4 is greater than -5. If you feel you’re receiving too much spam, you can review the spam message’s header information to determine which criteria were used and make adjustments accordingly.
Photoshop is one of the most popular image tools and is my goto tool when I need to work on images. I was on the floor when I saw this:
A lot of you have joined our circles on GooglePlus, and we’re excited about what we may be able to do over there. It might seem like overkill, what with Facebook, Twitter, the Winhost forum, this blog – now another spot to occupy?
The thing is, we enjoy connecting with you in all of these different areas. We’re always anxious to hear what everyone has to say and see what we can contribute.
We don’t have the star power of these guys, but we’re trying:
[Video deleted.]
![]()
I’ve been reading that some registrars make it difficult for a person to leave them. That once you register your domain name, they will do almost anything to keep you. There may be a good reason why you want to jump ship and have your domain name registered with a different registrar. It could be for price, convenience, or simply better support. Regardless of the reason it should not be “rocket science” to change your registrar.

Now, I’m not here to insult anyone, but what I want to make it clear that Winhost has made every effort to allow customers who register their domain name through us to move to another registrar if they wish. Before we proceed with the steps—and you may be surprised how simple it is—let us run through a preliminary check list.
Everyone should check this list before attempting a registrar transfer, regardless of what registrar you are with.
Preliminary Checklist
Now that you’ve gone through the list, transferring a domain name away from us should be fairly easy. Oh, before I forget, make sure you have selected a registrar that you will be transferring the domain to. You will need to set up an account with them before you initiate the transfer. Each registrar has their own steps for registering so I’m not going to go over them in this article.
Here are the steps to transferring a domain name away to another registrar:
That should be it. Pretty easy, right? If anything goes wrong, check with the new registrar to see where the process may have failed. Check your email address in the whois information, and lastly you can always open a ticket to Winhost support to see if anything is stopping the registrar transfer on our end.
While this article has been about how to move your domain away from Winhost, we do hope that you will continue to use our hosting services. We think we provide the best hosting value available anywhere. You may be able to find a lower price, but one thing you will not find at the cut-rate hosts is our level of service and commitment to quality. Those are things we live and breathe, we don’t just talk about them.
If you are at one of those lowest-common-denominator hosts now and you want to come join the Winhost family, stay tuned for an upcoming article on painless host transfer. Yes, it is possible!