
Site hosting news, tutorials, tips, How Tos and more
![]()
2012 has been a great year for us, and we’re glad that you have been along for the ride.
As I mentioned a couple of weeks ago, we have some exciting things on the horizon for 2013, and we look forward to bringing you cool new products and services, and continuing to be your hosting provider of choice!
Because we know that you do have a choice – lots of them, in fact – when it comes to hosting, and we work hard to be the best choice. The only choice!
Thanks again for a great year, and here’s to 2013.

![]()
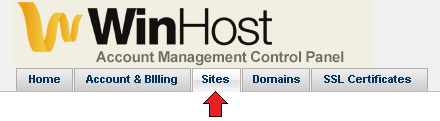
OpenCart is an open source PHP based ecommerce solution, and in this tutorial, I will show you how to get it up and running here at Winhost. First, I suggest you create a MySQL database through the Control Panel.
Click on the Sites tab.
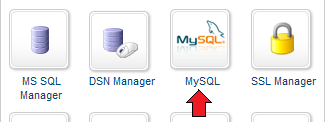
 Click on the Manage link and then click on the MySQL button.
 Click the Add button and enter the values for Database Name, Database User, and Quota. Click the Create button to finish creating the database. Now click on the Manage link and record the connection information (Database Name, Database Server, Database User, and Database Password) on a piece of paper or a text editor such as Notepad.
Next, you’ll need to obtain the source download from the OpenCart website.
Extract the contents using a decompression program such as WinZip or 7-Zip. Navigate to the upload folder of the extracted files. Rename the php.ini file to user.ini and create a web.config file with this configuration:
<?xml version="1.0" encoding="UTF-8"?>
<configuration>
<system.webServer>
<!-- Set the default document -->
<defaultDocument>
<files>
<remove value="index.php" />
<add value="index.php" />
</files>
</defaultDocument>
</system.webServer>
</configuration>
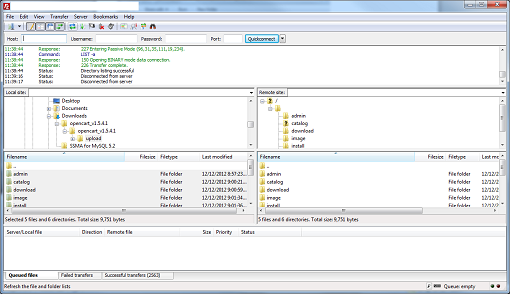
The file structure should look like this:
 We rename the php.ini file to user.ini because the php.ini settings are global and cannot be accessed by an individual user. Please read our other blog for more information. If you want a list of settings that you can manipulate in the user.ini file, please see these links on the official PHP site and look at the Changeable column.
http://php.net/manual/en/configuration.changes.modes.php
http://php.net/manual/en/ini.core.php
We add the web.config file so that “index.php” will load automatically. Now upload the files to the root of your site account, preserving the directory structure as shown here:
 Now browse to your site using either your domain name (if you have already set it up correctly) or Secondary Web URL to start the installation.
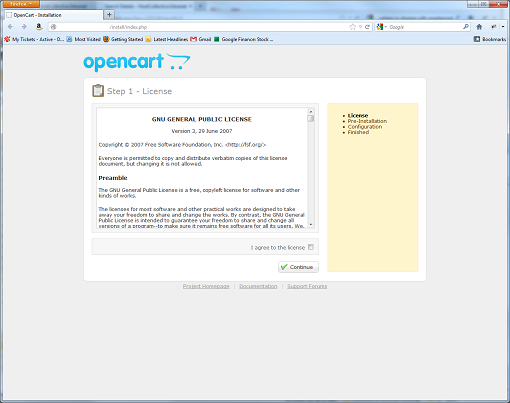 Check I agree to the license and the Continue button to proceed.
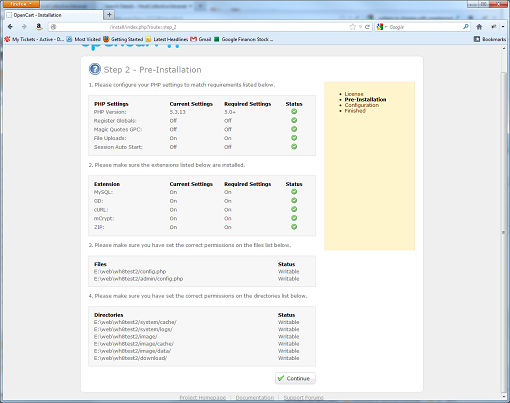 After a PHP check, click on the Continue button to proceed.
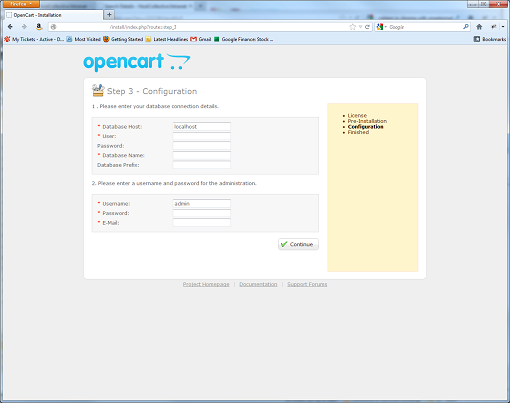 Enter the MySQL connection credentials you recorded earlier and fill out the information for the admin account. Click on the Continue button to proceed.
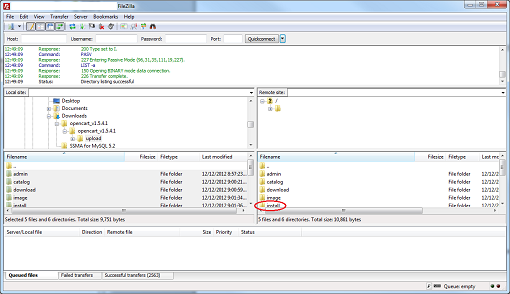
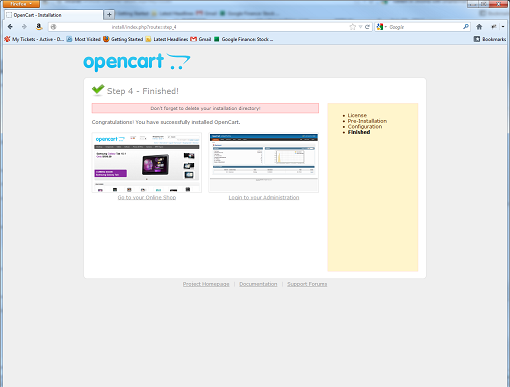 The installation has been completed. The last thing you should do is to delete the /install directory using FTP.
 You can start developing your site or make other configuration changes.
![]()

You may remember that last year around this time we reported that we placed fourth in the DevProConnections Community Choice Awards.
Well I’m proud to announce that this year we placed – fourth!
Again.
And just like last year, we’ll take it, since the top three are the same behemoths that eclipsed us last year (Amazon, GoDaddy and DiscountASP.NET).
We feel pretty good about placing above Rackspace, another monster host that could lose more customers than we have and not even notice it.

But next year – you’ll see – we’re going to crack that top three!
We’re working hard on some cool new stuff (if I tell you about it now, they’ll fire me), but suffice it to say that we’re always working to make Winhost the world’s best hosting platform, and the kind of place where your sites can be proud to live.
Here’s to fourth place, and nipping at the heels of the giants!
![]()
If you’re reading this it’s likely that your email account was recently hacked and now you’re wondering how it happened, why it happened to you. Or maybe you’re just wondering how you can prevent it from happening to you.
Let me start off by saying that there are many different ways an email account can be compromised. In this article I’ll cover three of those methods.
Also note that these aren’t the only way an email account can get compromised. People are always inventing new ways of compromising an email account/system. So by the time you finish reading this article, it’s likely that they will have come up with a few new techniques.
Now lets imagine you’re at the local coffee shop sipping on some hot coffee. You open your laptop and connect to the coffee shop’s WiFi. Why not, it’s free Internet, right?
Now it’s time to check your email messages because you are expecting important news. You open the email client on your computer and start browsing the Internet for, you know, important stuff. An hour passes by and you go on your way to work, home, or school. But did you notice the person sitting across from you with their laptop? He just took your email credentials while you weren’t looking. But how did it happen?
Did it happen while you were in the bathroom?
No.
Did it happen when you went for yet another cup of joe?
Nope.
So how did that person steal your email information with out even coming close to your computer?
 Ever heard of a Man in the Middle attack? To put a MITM attack in simplest terms, some malicious so and so sets up their computer to act like a router and tricks your computer into thinking that the computer actually is the router. Then the router thinks the shady computer – in the middle of the connection – is your computer.
Think of it as someone tapping into your network connection. Once this starts happening they can view all kinds of fun packets coming from your computer to the mail server (or to any server). Each time you make a connection to the mail server you are sending your authentication credentials through the bad guy’s computer.
From there it’s easy to use a program to filter out all packets containing login credentials. This includes your Facebook, Twitter, and bank account login information as well. Everything.
So does that mean it would be better to just stay away from your local coffee shop?
Hey, no need to be drastic! You can still go and you can still surf the Internet but it may be best if you didn’t use the coffee shop’s Internet connection. Personally, I don’t trust any network that I don’t own or control.
A nice work-around would be to use the Internet connection on your smart phone. Most smart phones have the capability of turning into a password protected Wifi “hot spot.” They also have the capability to tether the smart phone to your laptop. But, of course you will be using your phone service provider’s data plan.
So if I protect myself from that shady “man in the middle,” I’m safe, right?
Not exactly.
Another way your email account could be compromised is with a virus/malware being installed on your computer without your knowledge. This method is the most common and likely way that your email account (and everything else on your computer) can be compromised. I’ve seen what some of these viruses and malware are capable of doing, and it’s scary stuff.
Some of the virus/malware infections come with a nice little tool called a keylogger. What it basically does it logs all your key strokes and sends them to a server controlled by whoever infected your computer with the virus/malware. So any time you enter a username and password, the keystrokes are logged before the login request is sent. It doesn’t matter that the connection from your computer to the mail server is encrypted.
So how did this software get onto your system, or how can you prevent it from being installed on your system?
You can start by practicing the following:
The third way an email account can be compromised is by social engineering. Some email systems come with a nifty “Forgot your password?” tool. So what’s the big deal about this feature? Well, when you were setting up your email account you weren’t thinking twice and just answered the security questions truthfully. For example the signup form has the following questions:
You had to pick two of them and answered the two question correctly. No harm done right?
Wrong. The question/answer that you’ve set up with your email account should actually be considered to be your second and third passwords. Why? Because the correct answers to these questions gains access to the email account.
It would be best to answer these questions kind of incorrectly. So, let’s say you chose Which street did grow up on? and What is your mother’s maiden name? and answer to the first question is Main St. and the answer to the next question is Smith.
Instead of using the correct answers, you can add a extra character befor the real answer. For example @Main St. and @Smith. If the system doesn’t allow these type of characters then you can also use a letter before the real answer. For example: QMain St. and QSmith . That way if the malicious person finds out the real information, they will still have a hard time getting into your email account.
You must be wondering how these people even get the information in order to gain access to your email account using the security questions method. The answer is very easy. In this day and age most of us use social media sites Facebook, Twitter, YouTube etc. What’s the problem with social media? Well, the problem is we like to give out to much information.
We all like to share share share. Sometimes we don’t realize it, but we give out too much information. So much information that it makes it easy for a malicious person to gain access to your email account using the security question method.
If you keep these things in mind and think about security in new ways, you will protect yourself from a lot of potential headaches.
![]()
Here is a list of updated applications:
![]()
In this tutorial I’m going to show you how to install nopCommerce using the Winhost App Installer in Control Panel. It’s recommended to be on the Max or Ultimate plan if you plan on using nopCommerce for your site. If you are currently on the Basic plan please read our knowledge base article on how to upgrade your hosting plan.
To get started: You are going to need to create a SQL database in Control Panel first.
Login to Control Panel.
Click the Sites tab.
Click the “Manage” link next to the site you wish to install nopCommerce on.
Now we want to create a SQL database for nopCommerce.
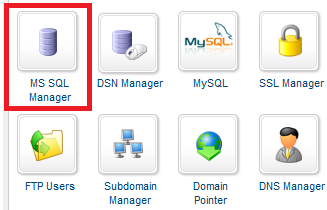
Click the MS SQL Manager box.
Click the green “Add” button.
Now enter a database name and how much SQL disk space you wish to allocate to it.
Click the green “Create” button.
To change the password for the main SQL database user, click “Manage” next to the SQL database.
Click on “Edit” next to password and update it.
Save these settings because we will need them later when we’re installing nopCommerce.
Go back to the “Site Manager” page of Control Panel.
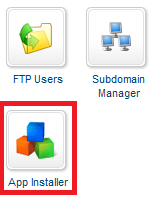
Click the “App Installer” box.
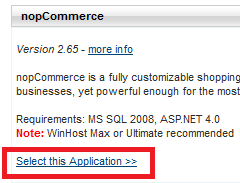
Click the “Select this Application” link.
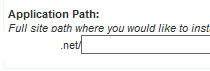
In this tutorial I will be installing nopCommerce in the root directory of my hosting account. If you want to install nopCommerce in a subdirectory you will need to enter the name of the subdirectory in the section below.
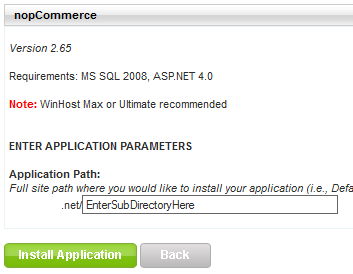
Since I’m installing nopCommerce in the root I will need to remove the text in the box field above. So this field will be empty for me:
WARNING: Using the App Installer tool will delete all files within the Application Path location.
Since I’m installing the web application in the root of my hosting account, everything in my hosting account will be deleted and nopCommerce will be installed.
Click the green “Install Application” button to start the installation on the web server.
Once completed you will receive the a message “Your application installed successfully.” Click the link below this notification (note: If your domain name isn’t pointing to our web servers yet, you will need to use the secondary URL to view your site on our web servers). The secondary URL can be found on the control panel Site Manager page.
Once you’re on the site where nopCommerce was installed, enter the following information:
Admin User Email:
Admin Password:
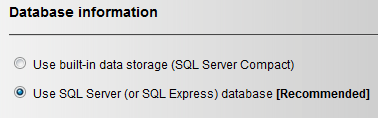
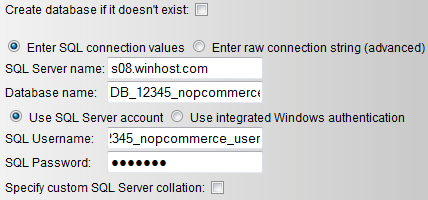
For Database Information we’ll be using the following setting:
Remember the settings you saved for your SQL database? You will now need to enter them in the below section. My example is the following:
Now click the “Install” button.
Wait for the following screen; “Installing nopCommerce…” to finish.
Once its completed you will be brought to the default page of nopCommerce.
You’re now done with the installation. Don’t forget to pat yourself on the back. 🙂
If you run into any issues or have any questions regarding nopCommerce, please post your questions in our Community Forum. The Technical Support department is unable to assist with nopCommerce installation or configuration.
![]()
Sometimes you just want to tear everything down and then build it back up. Maybe you are tired of your old nopCommerce site and want to try out WordPress.
Maybe you have an older version of an app in your hosting space and you want to upgrade, but first you need to remove the current installation.
Whatever the reason, the support department is often asked, “How do I reset my hosting space?”
Well, there isn’t a tool available in Control Panel to do this, so I have provided the following guide for you to use to clean out your hosting space and return it to “factory default” in two broad steps.
Backing up and removing your database
Backing up your site’s files and then removing them
You might have had to mark a few sub directories as application starting points in the past; I recommend that you unmark them first in order to avoid potential permissions issues.
If you cannot delete some of your files and directories at this point, try recycling your application pool. Sometimes web applications do not “let go” of a file or directory properly, and you will not be able to delete a file while it is in use. Recycling your application pool should remove the lock.
If you tried recycling your application pool but still cannot delete a file, open up a ticket with the support department and ask us to manually remove the files from the server.
Make sure to provide us with a copy of your FTP log, just so we know that you tried to delete the files yourself.
And there you have it, we now have a completely clean hosting space.
Your database has been backed up and removed, so we don’t have to worry about old table data conflicting with new.
Also, all of your application starting points have been removed, and you have regained all of your disk space allotment on the web server.
![]()
Here are some small tips you can use to make your WordPress site a bit more secure and slightly increase performance. Make sure the version of WordPress you’re running is the most recent version. This will ensure any security vulnerabilities found in the Content Management System will be addressed.
To perform an in-place upgrade of WordPress:
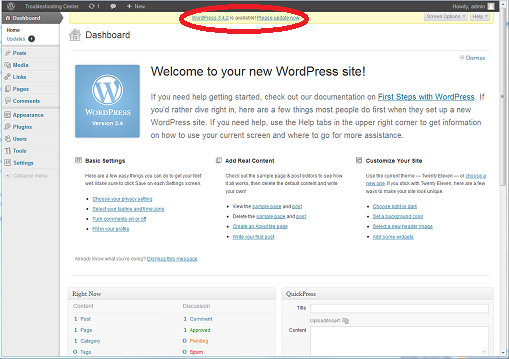
1) Log into WordPress as the admin user.
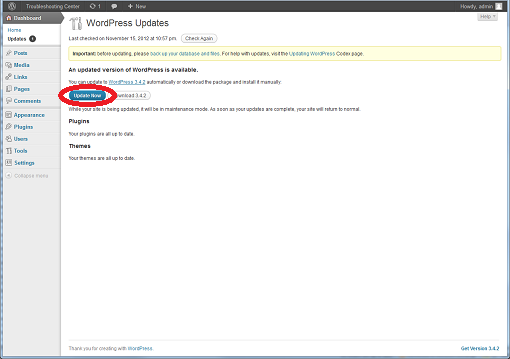
2) On the Dashboard, it should say WordPress x.x.x is available! Click on the Please update now link.
3) Click the Update Now button.
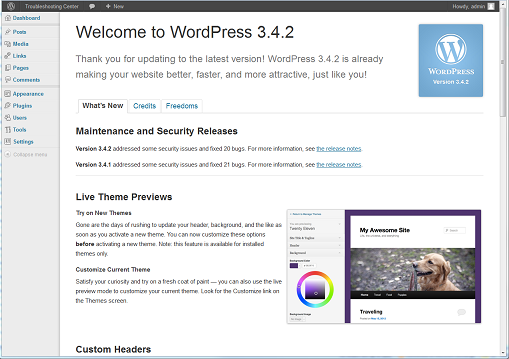
4) Finished!
Alternatively, you can perform a manual upgrade by:
1) Instead of clicking the Upgrade Now button, click Download x.x.x
2) Extract the .zip file’s contents.
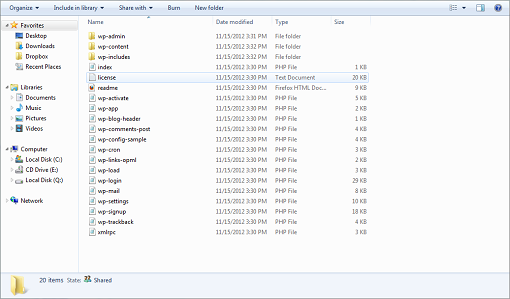
3) Upload the files using FTP, matching the same directory structure.

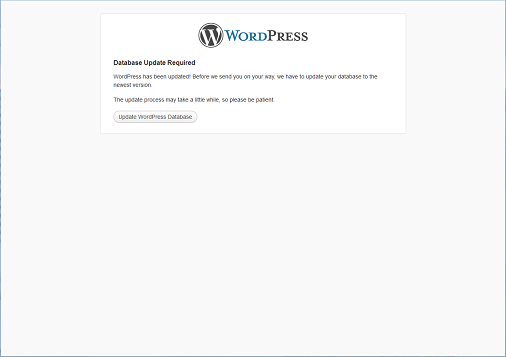
4) Once you refresh the admin screen in the browser, you should get an Update WordPress Database button. Click on it and then the Continue button to complete the process.
You can also add an extra layer of security for the admin section. Ruslan’s Blog shows you how.
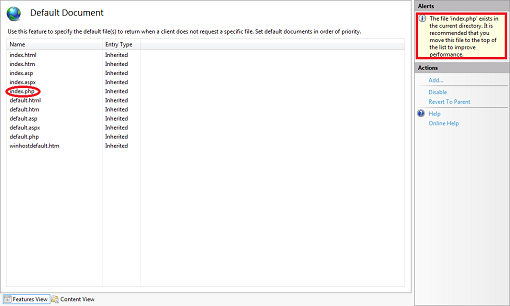
According to IIS7 Manager, you can improve the performance a bit by moving the index.php file to the top of the Default Document list.
I also suggest you disable Directory Browsing.
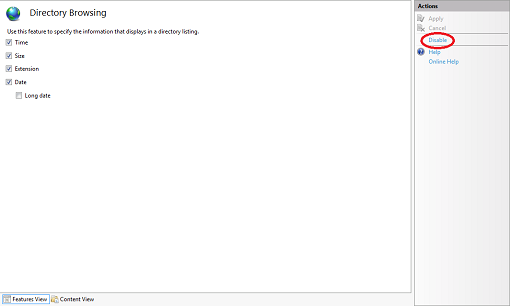
Take note that any changes you make through IIS7 Manager will be written to your web.config file, so you should always make a backup of it before proceeding.