
Site hosting news, tutorials, tips, How Tos and more
![]()
You’ve been telling us that you need more. More everything; space for your files, memory for your applications, so we put our heads together and said, “What can we do to make that happen?” The answer was simple: increase all the quotas! Now! So that’s what we did.
Okay, I’m making it sound a lot easier than it was. But over the past day or so we’ve rolled out new quotas for every Winhost plan. The changes are now in effect on all web and SQL servers.
Here are the details:
Ultimate
Site memory has increased to 500MB, a gain of 200MB
SQL database disk space has increased to 5GB, a gain of 2.5GB
Number of SQL databases is now unlimited
SQL database disk space has increased to 5GB, a gain of 2.5GB
Number of MySQL databases is now unlimited
Max
Site memory has increased to 300MB, a gain of 100MB
SQL database disk space has increased to 2GB, a gain of 1GB
Number of SQL databases is now unlimited
MySQL database disk space has increased to 2GB, a gain of 1GB
Number of MySQL databases is now unlimited
Basic
SQL database disk space has increased to 500MB, a gain of 300MB
MySQL database disk space has increased to 500MB, a gain of 300MB
If you have any questions about these changes, just let us know. We want you to be able to grow at Winhost, and we hope that these quota increases help a lot of you do just that.
Go on now, get busy!
![]()
Did you know you could use a MySQL database to store your ASP.NET Membership Table information rather than Microsoft SQL Server? I’ve written this simple guide to help you get started.
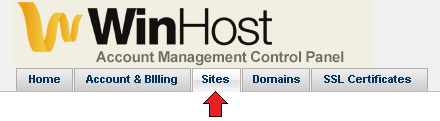
First, create a MySQL database through the Winhost Control Panel. Click on the Sites tab.
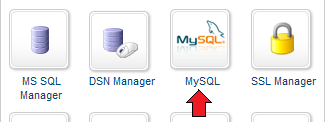
 Click on the Manage link and then click on the MySQL button.
 Click the Add button and enter the values for Database Name, Database User, and Quota. Click the Create button to finish creating the database. Now click on the Manage link and record the connection information (Database Name, Database Server, Database User, and Database Password) on a piece of paper or a text editor such as Notepad.
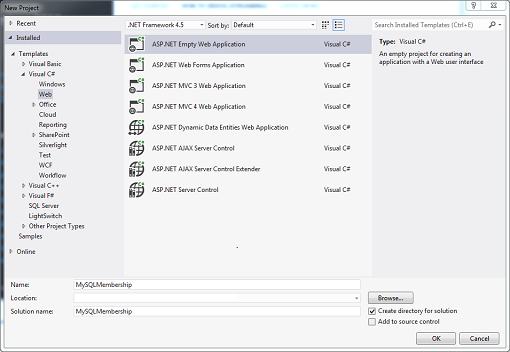
Start Visual Studio and create a New Project by going to File -> New –> Project… (Ctrl+Shift+N).
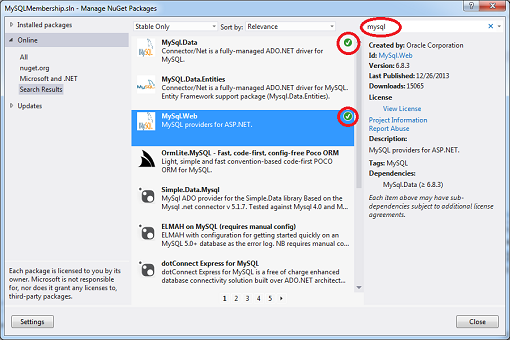
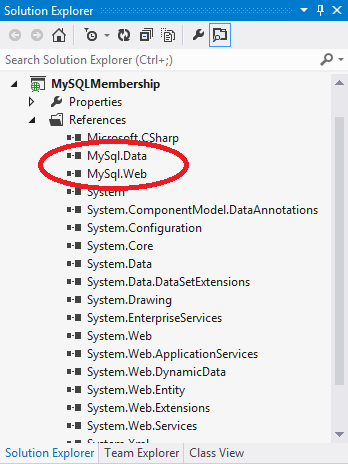
 Add the necessary .NET assemblies to your project using NuGet. Go to TOOLS -> Library Package Manager -> Manage NuGet Packages for a Solution… Type mysql in the Search field and hit Enter. Install both the MySql.Data and MySql.Web assemblies. A check mark will appear to the right when the assemblies have been installed.
 Another way to verify that the assemblies have been installed correctly is that they will appear as References in the Solution Explorer window.
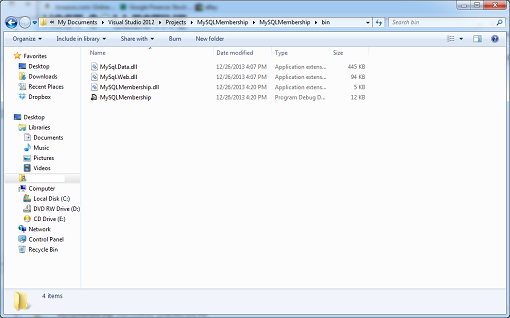
 When you compile your project, a copy of these assemblies will be added to your local /bin folder which you will need to upload to your site account.
 The next step is to modify the Web.config file with this markup:
<?xml version="1.0"?>

<!--
For more information on how to configure your ASP.NET application, please visit
http://go.microsoft.com/fwlink/?LinkId=169433
-->

<configuration>
  <connectionStrings>
    <add name="MySqlMembershipConnection"
         connectionString="Data Source=my02.winhost.com;user id=membership;password=password;database=mysql_48503_membership;"
         providerName="MySql.Data.MySqlClient"/>
  </connectionStrings>
  <system.web>
    <compilation debug="true" targetFramework="4.5" />
    <httpRuntime targetFramework="4.5" />
    <authentication mode="Forms">
      <forms loginUrl="~/Account/Logon"
             timeout="30"
             name=".ASPXFORM$"
             path="/"
             requireSSL="false"
             slidingExpiration="true"
             defaultUrl="Default.aspx"
             enableCrossAppRedirects="false" />
    </authentication>
    <membership defaultProvider="MySqlMembershipProvider">
      <providers>
        <clear/>
        <add name="MySqlMembershipProvider"
             type="MySql.Web.Security.MySQLMembershipProvider, mysql.web"
             connectionStringName="MySqlMembershipConnection"
             enablePasswordRetrieval="false"
             enablePasswordReset="true"
             requiresQuestionAndAnswer="false"
             requiresUniqueEmail="true"
             passwordFormat="Hashed"
             maxInvalidPasswordAttempts="5"
             minRequiredPasswordLength="6"
             minRequiredNonalphanumericCharacters="0"
             passwordAttemptWindow="10"
             applicationName="/"
             autogenerateschema="true"/>
       </providers>
    </membership>
    <roleManager enabled="true" defaultProvider="MySqlRoleProvider">
      <providers>
        <clear />
        <add connectionStringName="MySqlMembershipConnection"
             applicationName="/"
             name="MySqlRoleProvider"
             type="MySql.Web.Security.MySQLRoleProvider, mysql.web"
             autogenerateschema="true"/>
      </providers>
    </roleManager>
    <profile>
      <providers>
        <clear/>
        <add type="MySql.Web.Security.MySqlProfileProvider, mysql.web"
             name="MySqlProfileProvider"
             applicationName="/"
             connectionStringName="MySqlMembershipConnection"
             autogenerateschema="true"/>
      </providers>
    </profile>
  </system.web>
</configuration>
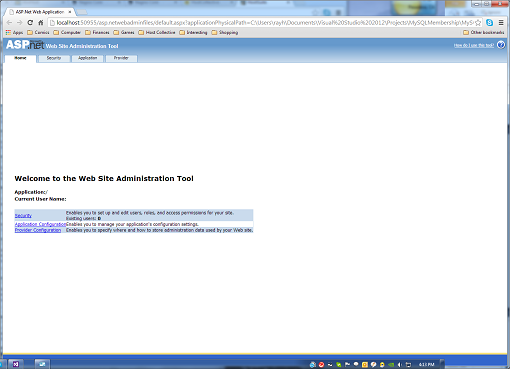
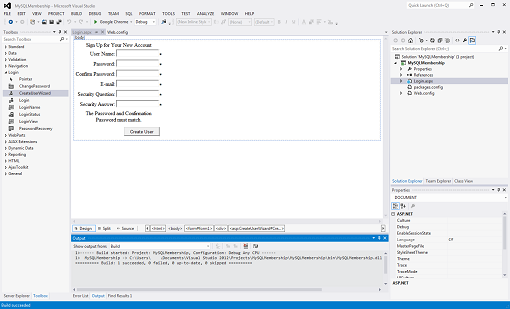
Replacing the connection string section with the Winhost Connection String to your MySQL database. Save the file. The key to creating the tables is this attribute in the XML markup: autogenerateschema=”true” Now, select BUILD -> Build Solution (Ctrl+Shift+B) to compile your application, and then select PROJECT -> ASP.NET Configuration. This will launch the ASP.NET Web Site Administration Tool.
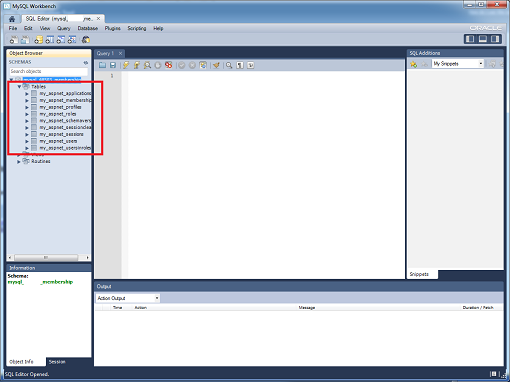
 Once the tool has been launched, the tables will be created, and you can check by logging into your MySQL database using an administration tool like MySQL WorkBench.
 Now, let’s build a very simple ASP.NET application that will allow you to create users. Go back to your project in Visual Studio, right click on your project name in Solution Explorer and select Add -> New Item… (Ctrl+Shift+A). Select Web Form and name the file. Switch to Design Mode. In the Toolbox Window, expand Login of the tree view, and drag and drop the CreateUserWizard control on to the page. Build your application.
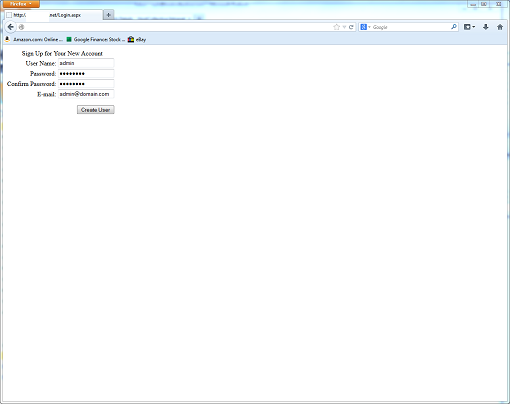
 Deploy your files to the Winhost server using FTP or Web Deploy and then access your site using a browser either with your domain name or Secondary URL. Fill out the create user form and click on the Create User button.
 If you go back and access your database using MySQL WorkBench and query the my_aspnet_users table, you can see that the user was created.
 You can also just use the ASP.NET Web Site Administration Tool to create the users. Of course, none of this information is necessarily new, so I want to thank Nathan Bridgewater’s blog and Oracle for helping me put together this tutorial for our customers at Winhost.
![]()
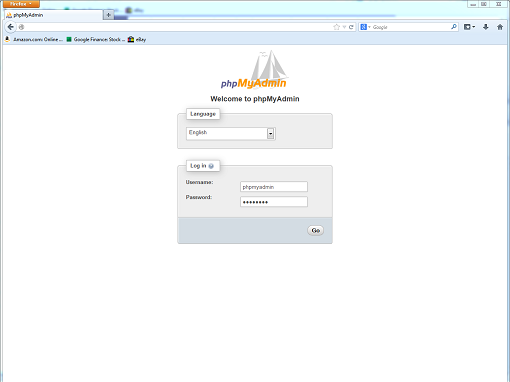
The new year brings us a round of new applications. Note that backups and management of your MySQL databases just got easier with a one click install of phpMyAdmin:
![]()
phpMyAdmin is a free software tool designed to help administrate a MySQL database over the Web, and in this quick tutorial, I will show you how to install it here at Winhost. First, you need to create a MySQL database through the Control Panel.
Click on the Sites tab.
Click on the Manage link and then click on the MySQL button.
Click the Add button and enter the values for Database Name, Database User, and Quota. Click the Create button to finish creating the database. Now click on the Manage link and record the connection information (Database Name, Database Server, Database User, and Database Password) on a piece of paper or a text editor such as Notepad.
Now download the source code from the phpMyAdmin website.
Extract the contents using a decompression program such as 7-Zip. Now make a copy of the config.sample.inc.php file and save the new file as config.inc.php. In the config.inc.php file, alter line 31:
$cfg['Servers'][$i]['host'] = 'localhost';
By changing ‘localhost’ to the database server name. For example:
$cfg['Servers'][$i]['host'] = 'my01.winhost.com';
Now, upload the contents to your Winhost account and access it, adding a Default Document if necessary.
 Voila! You are now ready to manage your MySQL database with phpMyAdmin.