Site hosting news, tutorials, tips, How Tos and more
![]()
When you open an account at Winhost we set up your website space immediately so you can start uploading files right away. But if you have an existing site hosted elsewhere, you will most likely want to get everything set up here and test the site before you actually point the DNS to Winhost. The Secondary URLs make that possible.
Your permanent FTP URL is ftp.HostingAccountDomain.com (where HostingAccountDomain.com is your domain name). But of course that URL won’t connect to the server here until your domain points to our servers, so we set up the Secondary URLs, both for FTP and web access.
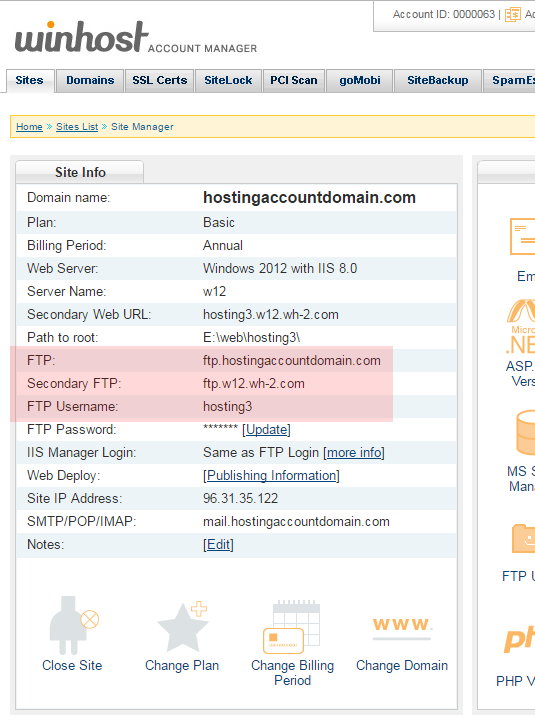
The Secondary URLs can be found in the Site Info section of Control Panel:
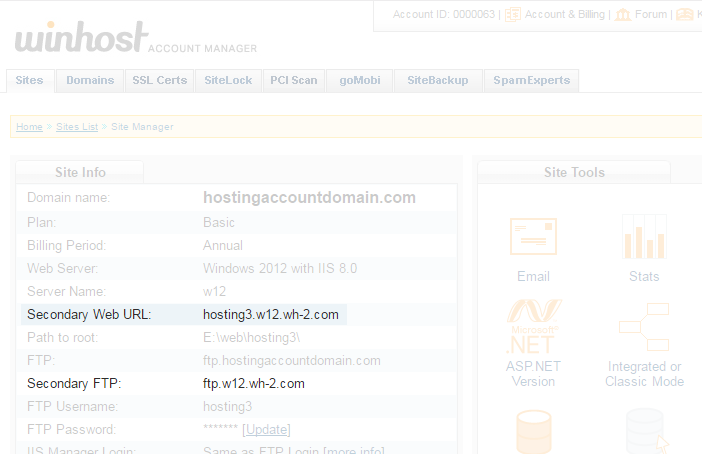
So the Secondary FTP URL (ftp.w12.wh-2.com in the example here, yours may be different) is what you use in the “host” field of your FTP software to make the connection.
Then when you want to view your uploaded files, you would visit the Secondary Web URL, in this example, http://winhostc.w12.wh-2.com.
After your domain’s DNS is pointed to Winhost and your site is up and running, you can use the Secondary Web URL for troubleshooting purposes.
For example, if it seems that your site is unavailable, try entering the Secondary Web URL into your browser. If the site comes up, there’s a good chance that domain registration or DNS issues are the culprit.
When a site is unavailable, domain related-issues aren’t usually the first thing we think of as being the source of the problem, but even the most diligent among us can let a domain registration lapse, or make a mistake in DNS settings that takes our domain off line.
Once your domain has been updated to point to our servers, remember to update your FTP software to use ftp.HostingAccountDomain.com (your domain name) as the host. And you should never use the Secondary Web URL as a link to your site from another site or social media platform, or hard code it anywhere in your site.
We make this recommendation because while it’s unlikely that the Secondary URLs will change, it is possible. They have changed for various reasons in the past. So once your domain points to our servers, only use the Secondary URL for troubleshooting purposes. Never as a link to your site.
It used to be that unless your site accepted payments for products or services, you didn’t really need to concern yourself with an SSL certificate, which allows you to encrypt and secure your site traffic using the https protocol. Those days are quickly coming to an end as web security becomes a larger issue, and giants like Google are making an aggressive push to encrypt all web traffic.
Maybe you have even already received a warning email from Google: “Beginning in January 2017, Chrome (version 56 and later) will mark pages that collect passwords or credit card details as ‘Not Secure’ unless the pages are served over HTTPS.” But what does that mean?
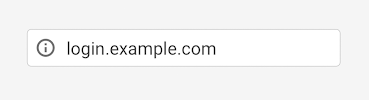
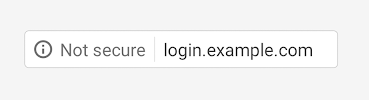
Right now (December, 2016) Chrome shows an “information” icon on all non-https pages (Firefox also uses a similar icon):
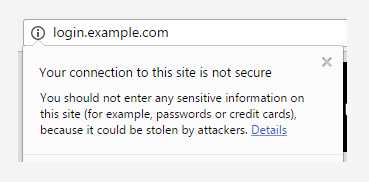
Which seems pretty benign, unless you click that icon and get the insecure site warning:
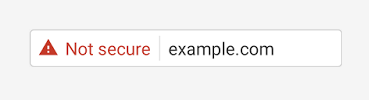
Starting in January of 2017 Chrome is going to take that a step further and add a text warning:
Then “eventually” – which, knowing Google, could be any time – they are going to throw the red flag at non-https pages:
At the moment those warnings only apply to http pages containing password or credit card input fields, but Google definitely plans to extend the Chrome warnings to all http pages, regardless of whether they accept user credit card or authentication input.
Using https encrypts connections to prevent anyone from tapping in to the communication between your website and your visitor’s browsers. It also prevents the bad guys from exploiting your site by injecting malicious code or unwanted advertising into your user’s browser.
The https connection lets your visitors know that they’re securely connected to your site. That what they’re seeing is legitimate information. It also prevents anyone from accumulating of a lot of user data or behavior related to your site traffic. Aggregate data like that can be used for a number of malicious purposes, so blocking access to it is a good thing.
Right about now you may be thinking, “Okay, I get it, but I’m not really concerned about someone listening in to my site traffic.” That’s understandable. Most sites run a pretty low risk of being targeted in that way. But you probably don’t want to see every page of your site displaying a red “Not secure” warning in Chrome (and eventually in other browsers as well).
That’s reason enough to take steps now to make every page of your site available via https (and redirect http requests to https). You might even consider it a priority, since the Chrome browser currently has a 56% market share, and that percentage is increasing.
But aside from avoiding the warning label, there can be other benefits to using https. In their own words:
“Google uses HTTPS as a positive ranking signal. This signal is one amongst many others, and currently carries less weight than high-quality site content; you should not expect a major SEO advantage for moving to HTTPS in the short term. In the longer term, Google may increase the strength of the HTTPS boost.”
Google is making it pretty clear that in the future they are going to give an edge in search result rankings to sites that use https. And who doesn’t want an edge where that’s concerned?
The good news is it isn’t exactly a “move.” Your site stays on the same server, you just add an SSL certificate to your account and make the necessary changes to redirect http traffic to https. This article is already pretty long, so we won’t do a tutorial here, but other than redirecting to https, there are a few other things you’ll want to watch out for:
If you use Google Webmaster Tools, after you’ve made the switch, add the https version of your URL as a new property, set the “preferred version” of that property to https and (re)submit your sitemap. Here’s a Google-centric FAQ on transitioning to https that you may also want to take a look at.
Finally, you may have heard that you can get a free SSL certificate from Let’s Encrypt. That’s true, and you can use those certs here at Winhost. But the Let’s Encrypt certificates come with some drawbacks. Make sure you’re aware of what’s involved in using such a cert before you commit to one.
We’ll have more information on this subject in the coming months. We expect that there will be a lot of questions when Google makes the changes to Chrome, and we’ll do our best to address those questions here and in our Knowledge Base.
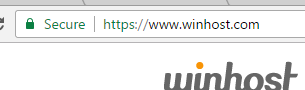
The changes have already begun in the latest version of Chrome (55.x). They aren’t flagging insecure sites yet, but they are spelling out “Secure” now:
Starting today, December 1st, new ICANN rules are in effect that change the way some domain contact information changes are done. The change affects all generic top level domains, such as .com, .net, .org, .biz, .info, etc., (including all of the new domain extensions, like .blog, .photo, etc.). Country code domains (.uk, .TV, .co, etc.) are not affected.
When you change the first name, last name, email address or organization for the registrant (i.e., the domain name owner) you have to acknowledge the change in two separate emails. This applies to changes made to the registrant’s contact information. Changes to the admin, billing and technical contacts are not affected.
Changes to the registrant’s name, organization or email information are now treated the same way a “registrant change” was treated in the past. But in the past the registrant change was assumed to be a change of ownership from one person to another, so emailing both parties was necessary.
Now those emails are triggered any time you update your name or email address, and two emails will go to the same person. You need to approve the change by clicking the link in both emails, or the change will fail.
If you want to learn more about the new policy, check out this Knowledge Base article.
![]()
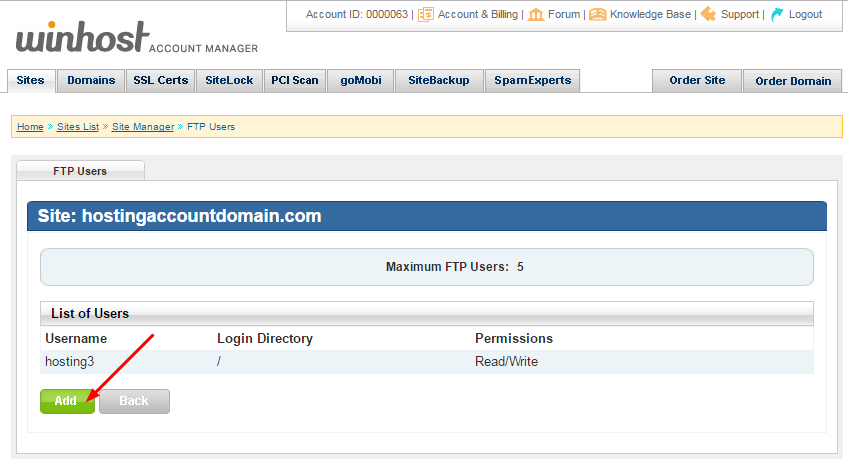
Sometimes you want to give someone FTP access to your site, but you don’t want them to have access to all of the site files. So we’re going to go through the steps to set up an FTP user that only has access to a directory that you specify.
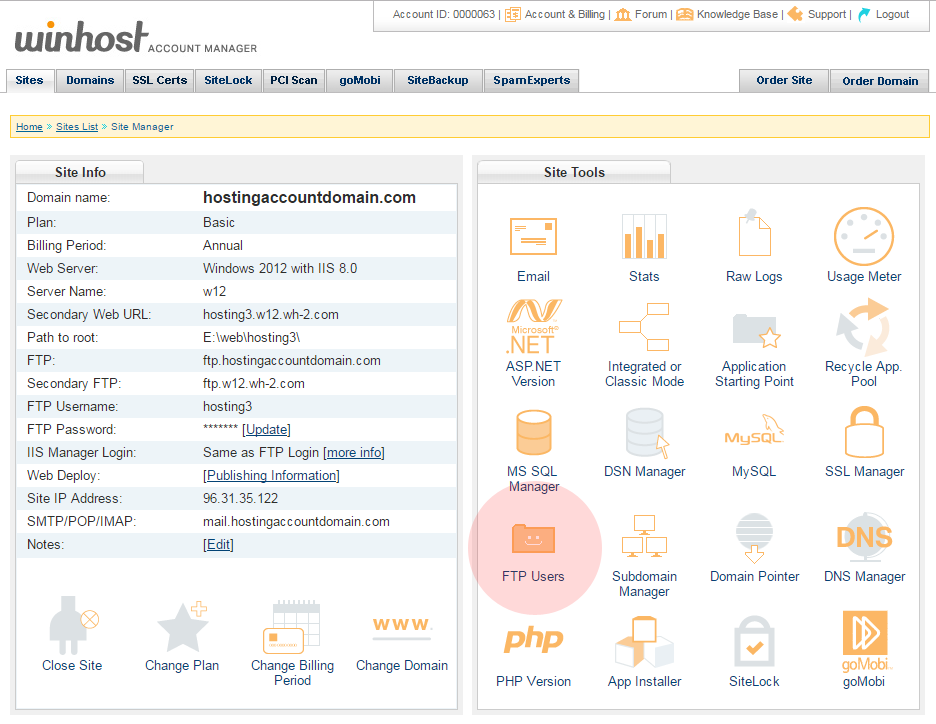
 The first thing we’re going to do is go to the Site Tools section of Control Panel and click on the “FTP Users” icon or link:
 Click the “Add” button:
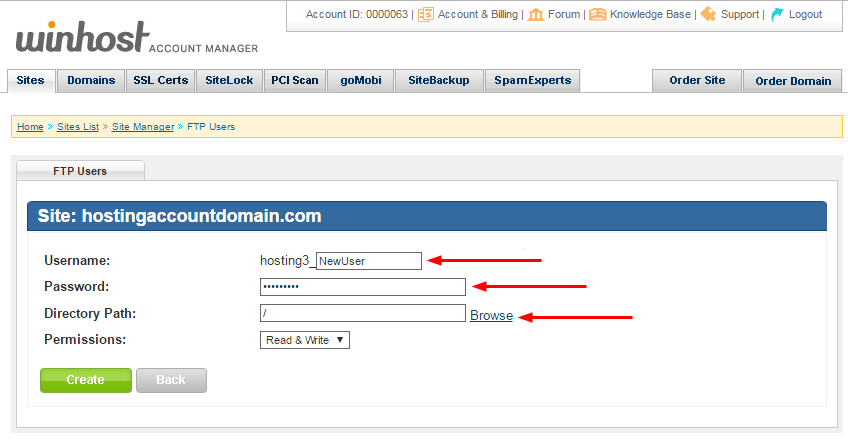
 Enter a username (it will be appended to the primary FTP username, that format can’t be changed) and a password. Enter the directory name or click the “Browse” link to choose from directories on the server:
Note that entering the name of a directory that does not exist does not create that directory on the server. You must enter the name of an existing directory.
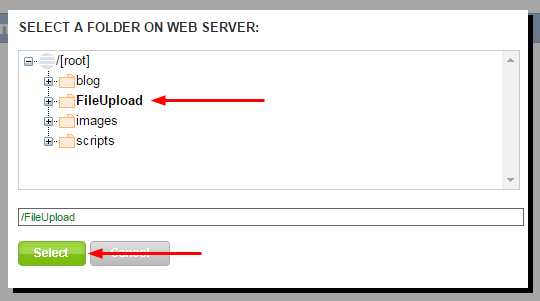
 If you clicked the “Browse” link, select the directory (it will turn bold and the path will be automatically entered in the text field below) and click the “Select” button:
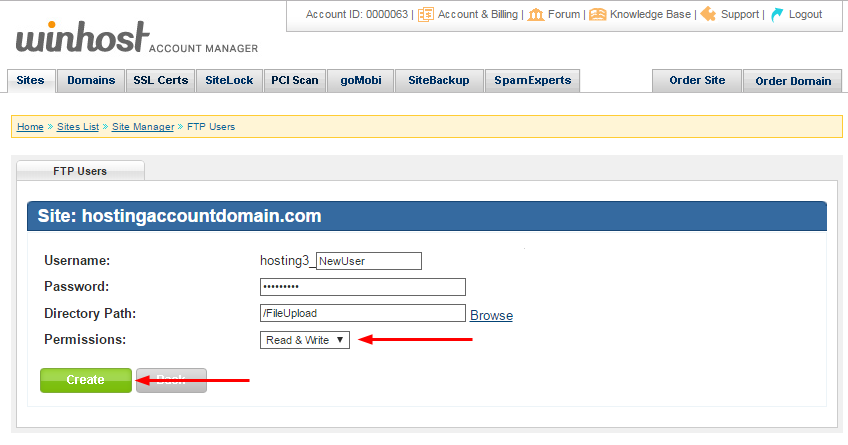
 Make sure you leave the “Permissions” field set to “Read & Write,” since this user will be uploading files (the other option is “Read Only”). Click the “Create” button:
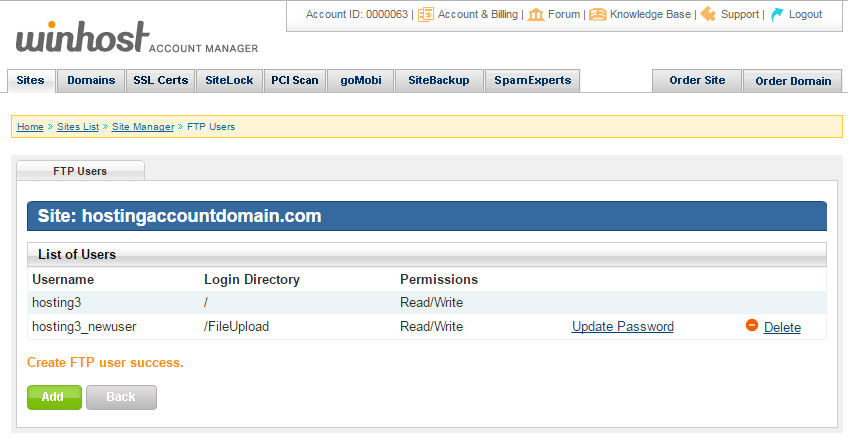
 When the user is added you will see it listed in the FTP Users section. Here you have the option to update the user’s password, or delete the user. The username cannot be edited once the user is created.
 The new user will log in to the same hostname as your existing user(s), but of course the username and password will be those that you just created.
As if you could. 🙂
 It’s been what you might call a contentious election cycle here in the united states, but if there’s a positive spin to be put on the whole thing, it’s that we’ll likely see a large turnout at the polls. Maybe even record-breaking.
If group dynamics have taught us anything, it’s that a large enough group of people will usually make the right decision. Whatever “right” happens to be for the group at any given moment in time.
Whoever you’re voting for, it’s always an honor and a privilege to participate in a peaceful transfer of power. It isn’t something that everyone in the world gets to enjoy, so be sure to take advantage of it.
Even if a two party system leaves a little something to be desired…
![]()
The SmarterMail system that is set up for your email by default has an array of spam fighting tools available, but admittedly, the settings can be a bit complicated to work with.
Many of you asked us to make a more user-friendly anti-spam option available, but to keep the cost low. So we partnered with SpamExperts to provide high level spam filtering services that are easy to manage and really affordable.
The SpamExperts service receives email addressed to your domain, filters it, then sends it along to the mail servers here at Winhost. The service is distributed across multiple servers all over the world, so it’s fast and reliable.
We’re going to cover the steps necessary to activate SpamExperts for your domain, which, for our purposes here, we’ll assume is hosted at Winhost (though you can set up SpamExperts service for domains hosted elsewhere too).
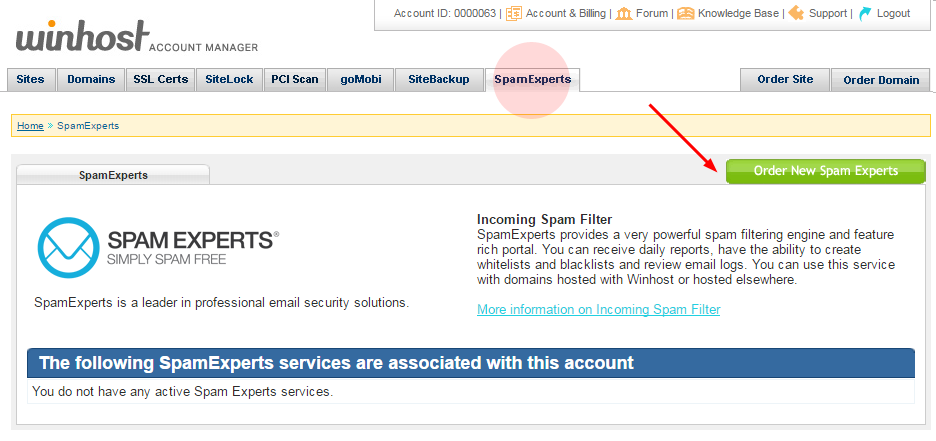
The first thing we’re going to do is go to the SpamExperts section of Control Panel and click the “Order New Spam Experts” button.
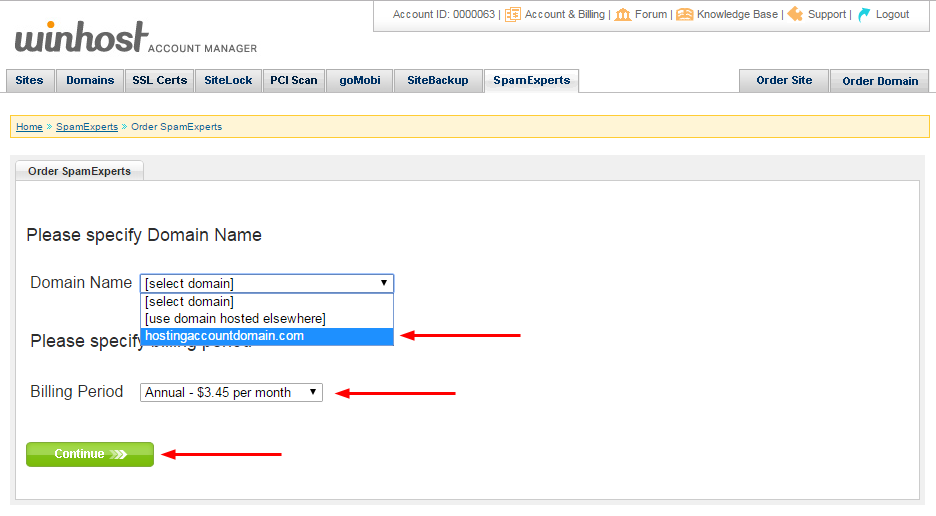
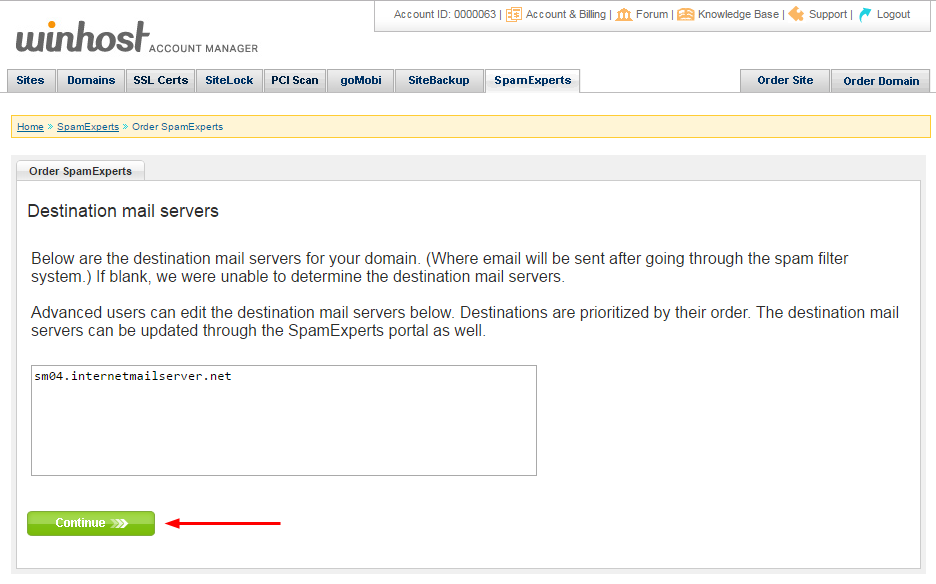
Next choose a domain from the dropdown menu (you can also enter a domain hosted elsewhere), choose a billing period and hit the “Continue” button.
The next page shows the current email server(s) for the domain you selected. Make note of any entries in the box. If you ever cancel the Spam Experts service in the future, you will have to update your DNS MX records to point back to these server(s).
Click the “continue” button.
If everything looks good on the billing page, hit the “Submit My Order” button.

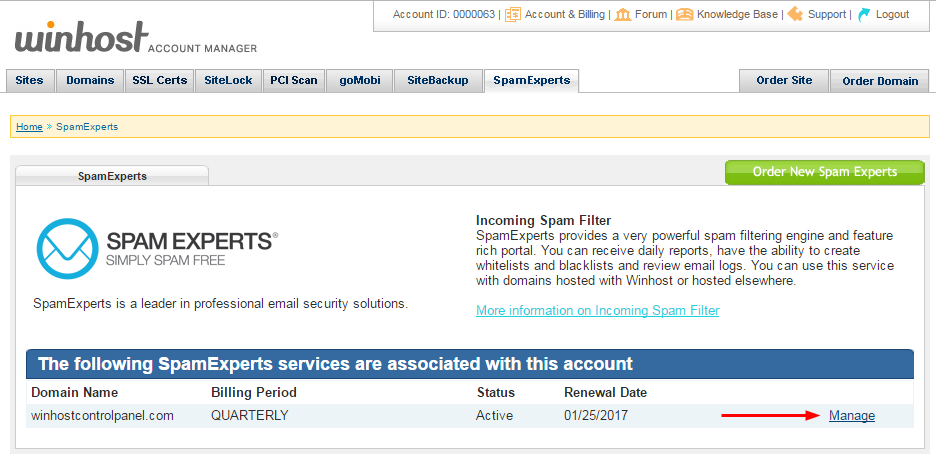
Reload the SpamExperts page and click the “Manage” link.
In order for Spam Experts to begin filtering your email, the DNS MX records for your domain have to be updated. If your domain is hosted here, all you have to do to update your MX records is click the “Yes, update my DNS records” link.
If you are setting up SpamExperts for a domain that isn’t hosted at Winhost, this page gives you the MX settings for the domain. You’ll have to go to where the domain is managed to update the MX records.
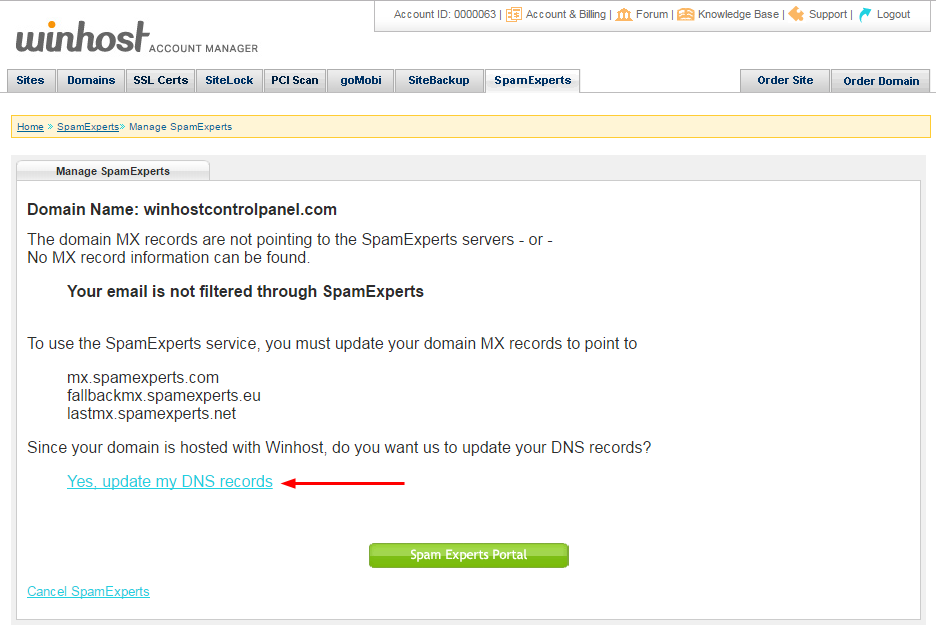
That’s all there is to it. Your email is now set up to route through the SpamExperts system. Remember, the DNS change may take a few hours to propagate, so you may continue to see spam in your inbox until that happens.
We’ve found that the default SpamExperts settings will stop the vast majority of spam. But if you want to do further tweaking you can access the SpamExperts portal, which contains a number of very powerful tools. Use of the SpamExperts portal is beyond the scope of this article, but you can see the domain-level documentation here and the user-level documentation here.
![]()
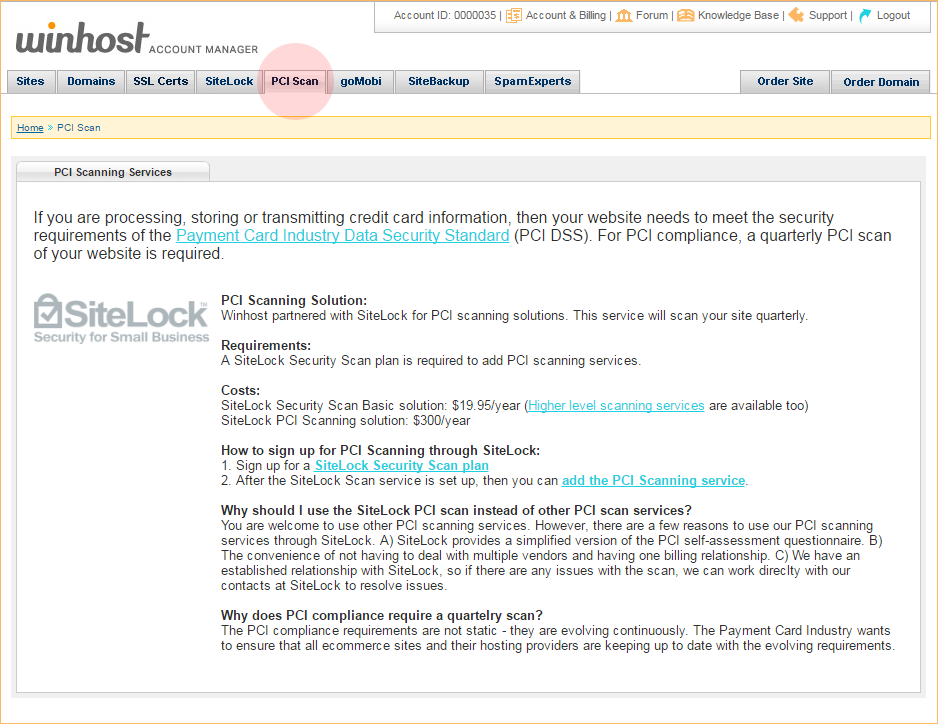
Did you know you could order Payment Card Industry (PCI) scanning service from your Winhost Control Panel?
If you accept credit card payments – or plan to in the future – you will have to have regular PCI scans of your site and a review of your data handling procedures. The SiteLock PCI service can make that process much easier.
To use the SiteLock PCI scanning service, you have to first open a SiteLock Basic account. The PCI scanning will be a child service of the SiteLock Basic account. The SiteLock account comes with a bunch of great non-PCI features, so you can definitely benefit from both services.
To get started you can click on the PCI Scan tab in Control Panel:
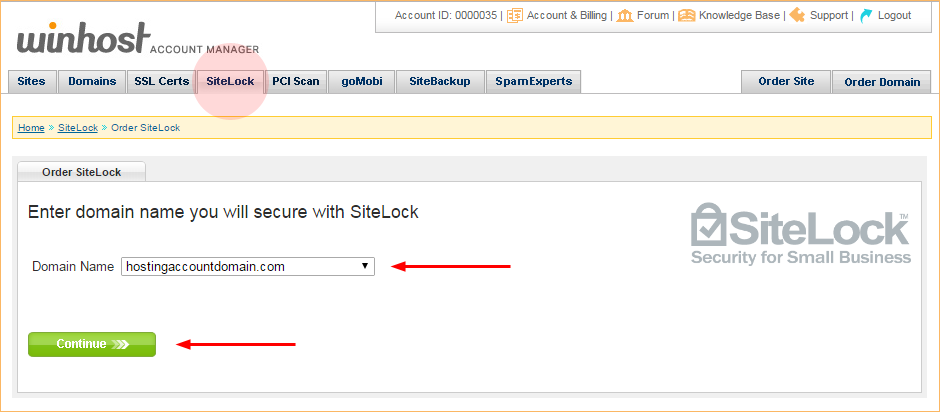
Or go straight to the SiteLock page. Select the domain you wish to apply SiteLock to, then hit the “Continue” button:
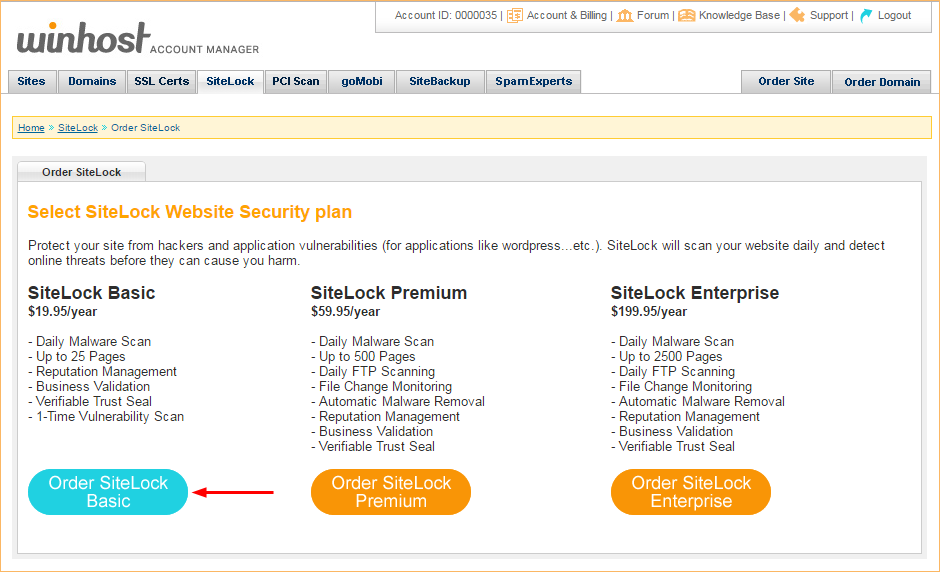
Choose which SiteLock plan you want to use. Basic is the minimum that’s needed for the PCI service, but the other SiteLock plans have benefits you may want to take advantage of:
After selecting your plan, click the “Skip Adding TrueShield Plan” link on the next page:
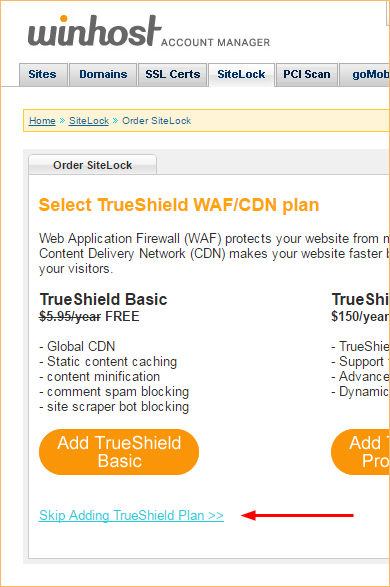
(We’re skipping TrueShield in the interest of keeping this focused on the PCI scanning service, but TrueShield is also a very useful service, and you can read more about it here.)
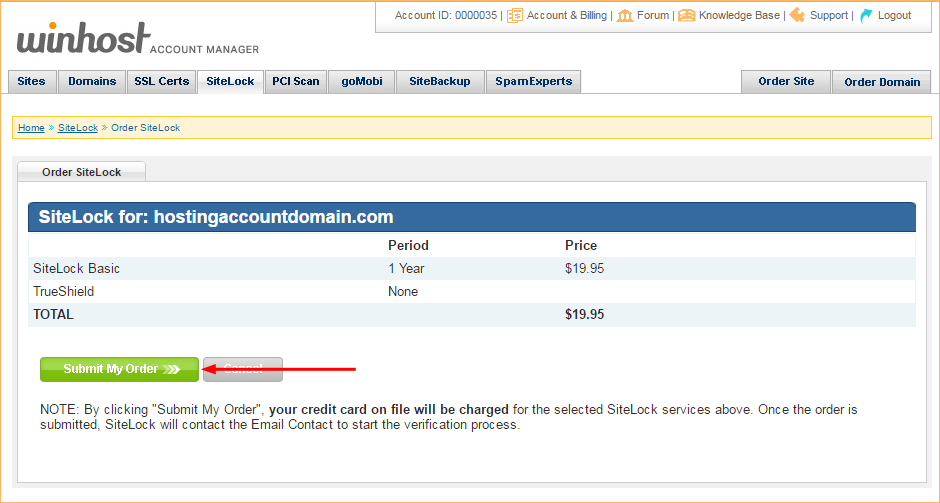
The next page will display a summary of your SiteLock order. Click the “Submit My Order” button:
The next step is adding the PCI scanning service to your SiteLock account. Go back to the SiteLock tab and click the “Add” link in the PCI column:
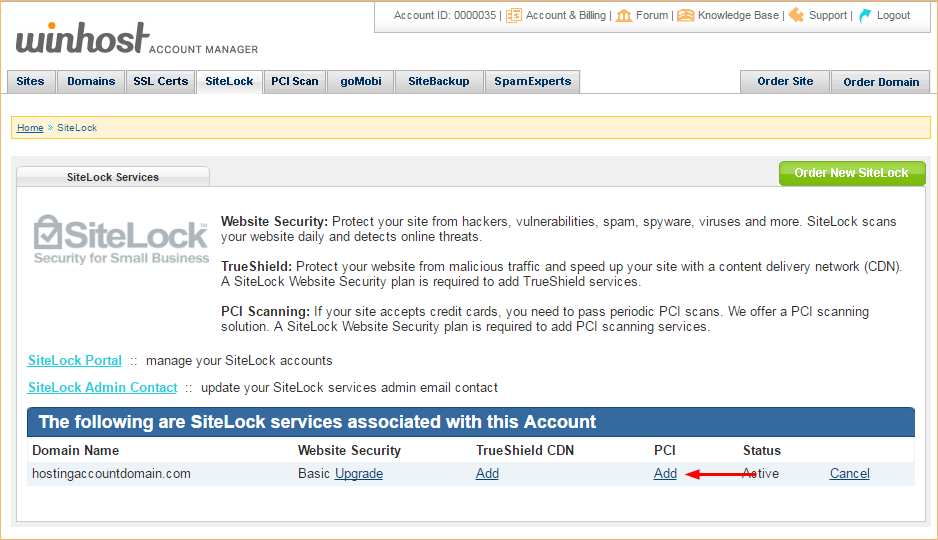
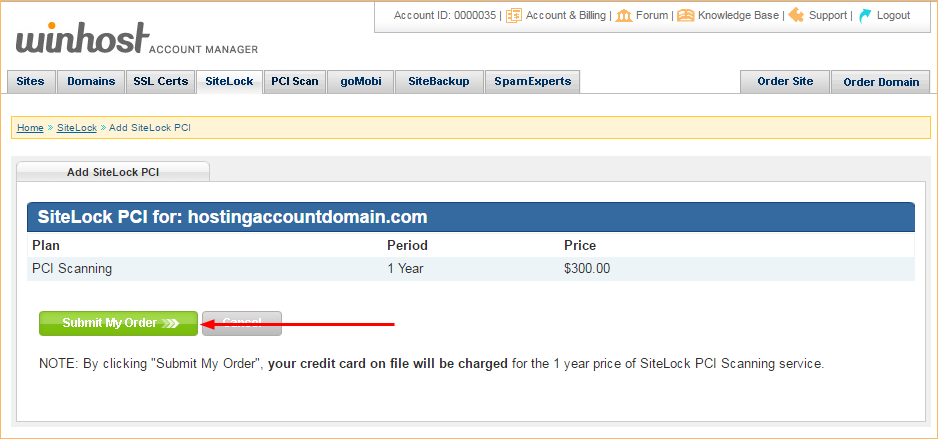
The next page will display a summary of your PCI scanning service order. Click the “Submit My Order” button:
When PCI service is activated, you can access the SiteLock dashboard from the SiteLock tab in Control Panel:
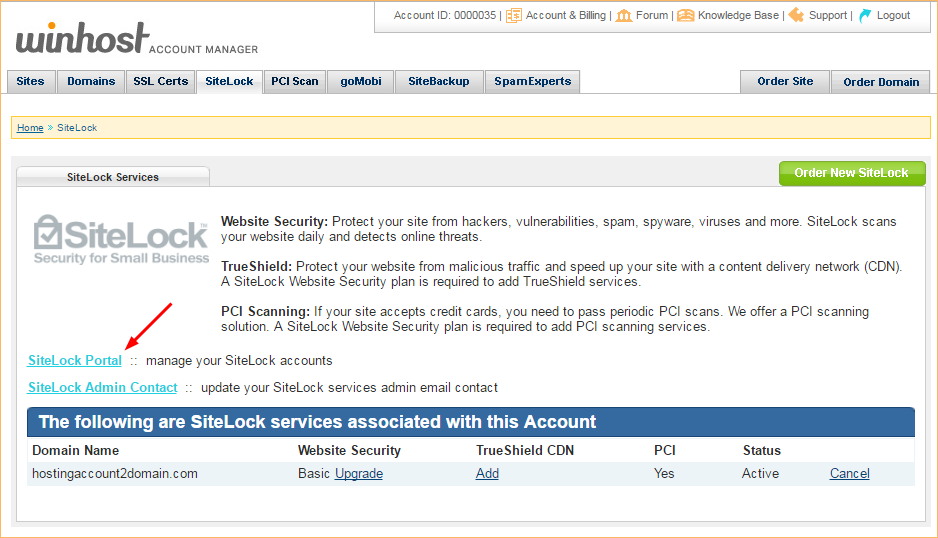
SiteLock will also send you an email that includes their phone number, if you should need to call them during any part of the PCI verification/scanning process. This article covers the account set up only, the actual PCI scanning and verification process is a bit more complicated than we can get in to here. But you’ll find plenty of information on how to proceed in the SiteLock portal.
If you don’t accept credit card payments, the SiteLock service can still protect your site from hackers, vulnerabilities, spam, spyware and viruses. It can scan your site daily to detect threats, and also offers TrueShield service that can protect your website from malicious traffic while speeding it up with a Content Delivery Network (CDN)
![]()
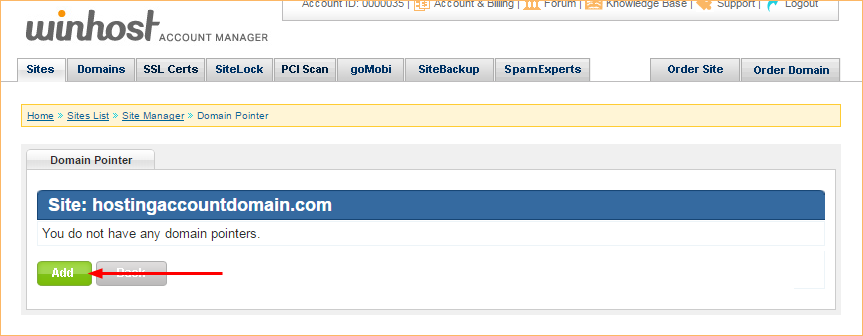
A domain pointer is an additional domain name that points to the root of your site.
So, for example, if you own domain.net and want it to point to your domain.com site, you can add domain.net as a domain pointer and anyone entering domain.net in a browser will see the domain.com website.
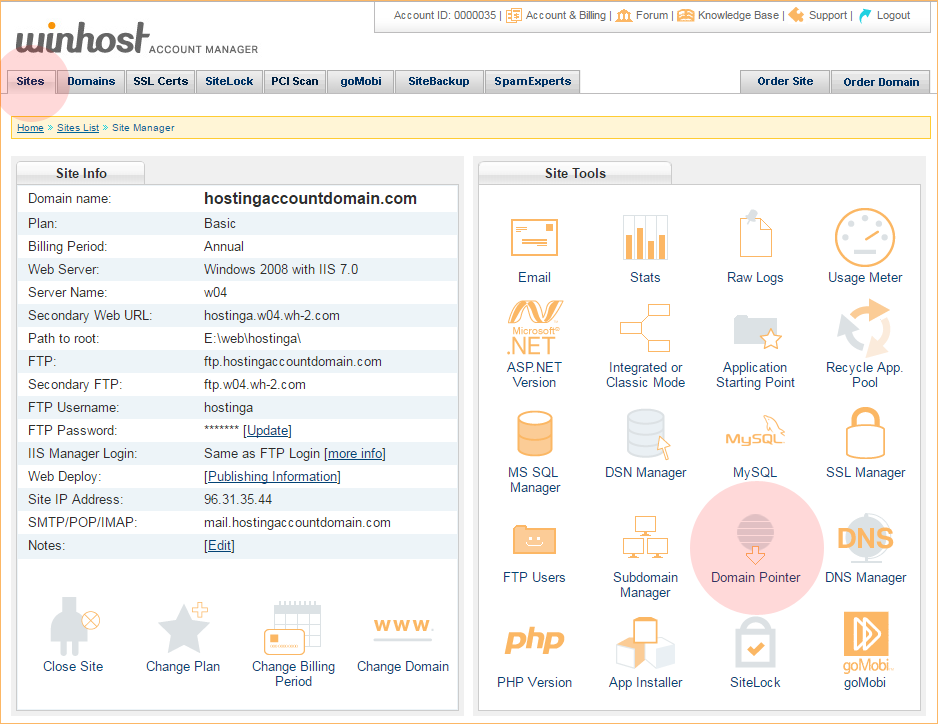
It’s easy to set up a domain pointer, just go to the Site Tools section of Control Panel and click on the “Domain Pointer” icon or link:
On the Domain Pointer page, click the “Add” button:
Enter the domain you want to add as a pointer in the “Domain Pointer” field.
Domain pointers do not get full email service, but you can set up aliases (forwarding addresses) for the domain pointer. To set up forwarding addresses, just check the “Enable Email Alias” box.
Click the “Create” button:
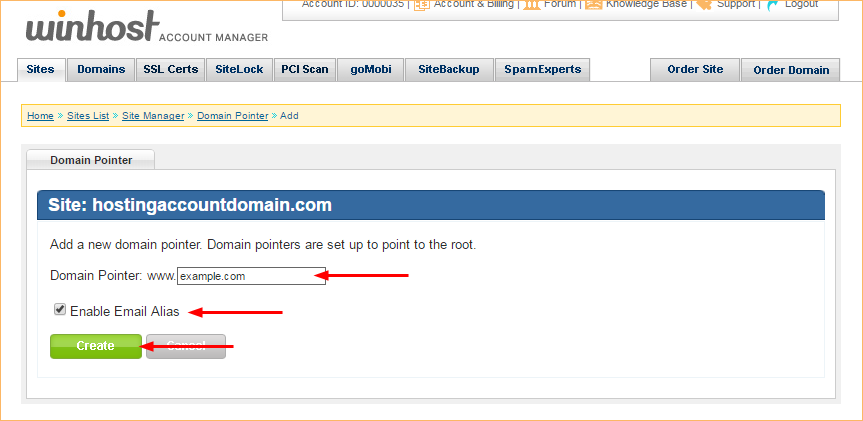
That’s all there is to it, the domain pointer is now set up.
About domain pointer name server records: The name servers for the new domain pointer have to be set to use the Winhost name servers:
ns1.winhost.com
ns2.winhost.com
ns3.winhost.com
How you make that change varies depending on where your domain is registered, so check with your domain registrar for details.
If your domain was registered through Winhost, your name servers should already be set and the domain pointer should start to work in a few minutes. If you have to change the name servers for the domain pointer, DNS propagation may take several hours.
About domain pointer email aliases: When domain pointer Email Alias service is activated, an MX (mail) record is added to the pointer domain’s DNS record. If the domain has a preexisting MX record, it will not be removed when you activate Domain Pointer Email Aliases.
So you must ensure that you remove any preexisting MX records through the Control Panel DNS Manager (or wherever you manage the DNS for the domain) to avoid possible conflicts with the Domain Pointer Email Alias service.
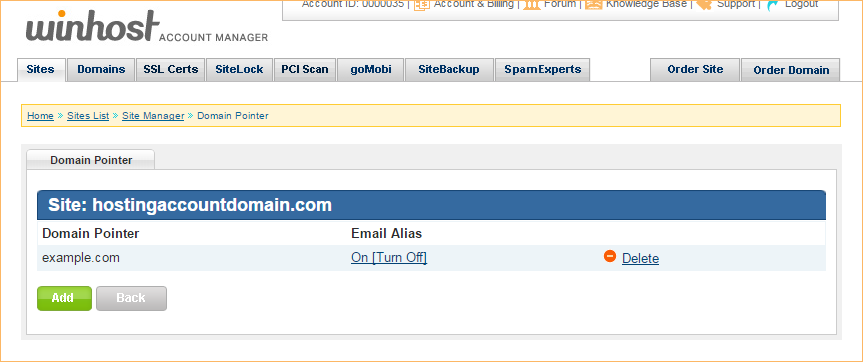
How domain pointer email aliases work: Domain pointer email aliases are forwarded to the corresponding email address of your primary email account. So if you set up the email address [email protected], that mailbox will also accept mail for [email protected].
If the same message is sent to [email protected] and [email protected] you will receive two copies of the message in the [email protected] mailbox.
You can disable domain pointer email aliasing in Control Panel. Go to Site Manager > Domain Pointer and click the “On [Turn Off]” link. You can activate domain pointer email aliasing the same way when it is disabled. On this page you can also delete the domain pointer completely: