
Site hosting news, tutorials, tips, How Tos and more
![]()
The following instructions apply to both our Windows 2008 IIS 7 servers & our Windows 2012 IIS 8 Servers.
In this tutorial I’m going to show you how to back up your SQL database and web site files. Then we’ll use the IIS Manager to back up your site and SQL Databases all in one shot. These instructions will place a .zip file locally on your computer for safe keeping. The .zip file will contain the .bak file of your SQL database.
Step 1: Use our SQL backup tool in Control Panel to back up your SQL Database. When using this tool the .bak file will be stored in your App_data directory. Please read our knowledge base article on how to use the backup SQL Tool in our control panel.
Step 2: Once you’ve created the .bak file in your App_data directory on your site account using the SQL backup tool in our control panel, you’re ready to connect to your site using IIS Manager. Please read our knowledge base article about Using the Microsoft IIS Manager.
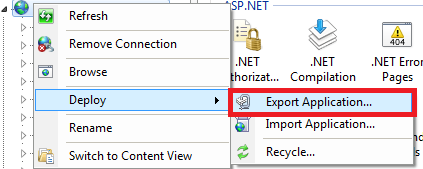
Step 3: In IIS Manager Right click on your site. Selected Deploy and click on Export Application…
Step 4: In the Export Application Package window click the Next button (do not change any settings).
Step 5: Click the Next button in the Select Parameters window (again, do not changing any settings).
Step 6: Click the Browse… button and select a directory on your local computer (this is where the backup .zip file containing your site’s web files will be placed on your local computer). Select a file name with today’s date for your reference. Now click the Save button.
Step 7: Click the Next button in the Save Package box and wait for your site to be saved locally on your computer. Now click the Finish button when you receive the notice “The package was created successfully.”
The .zip file that you saved locally will also contain the SQL database backup (.bak) file that you created when you used the SQL Backup tool in the control panel. It’s important to back up your SQL database at the same time as your web site files to maintain consistency for your site.
If you ever need to fall back and restore your web site to a previous state from a certain date, you can use the same tool in IIS Manager, but this time you will need to select Import Application in the Deploy option in IIS Manager.
Instructions for restoring your site:
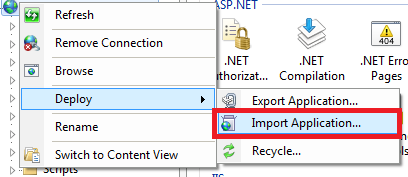
Step 1: Right click on your site in IIS Manager. Select Deploy and click Import Application.
Step 2: Click the Browse… button and select the .zip file located on your computer of the web site backup you created in IIS Manager. Then click Next.
Step 3: Do not change any settings in the Select The Contents of the Package box and click the Next button.
Step 4: On the next page Enter Application Package Information you will need to remove the text from the box so the backup is restored to the root of your hosting account. So you should only see:
HostingAccountDomain.com/ [Empty Text Box]
Now click the Next button.
Step 5: You will receive the following warning from IIS Manager: “This application will be installed into “HostingAccountDomain.com”. Most applications are usually installed into a folder beneath the root, such as “HostingAccountDomain.com/Blog” Are you sure?” Go ahead and click the OK button.
Step 6: In the next box, Overwrite Existing Files, choose the option, “Yes, delete all extra files and folders on the destination that are not in the application package.” This will delete any extra files or folders that don’t exist in the backup .zip folder (we’re choosing this option because you want to restore the entire site as it existed on the date that you created the .zip files).
If you don’t wish to delete the extra files then select the option: “No, just append the files in the application package to the destination.” Now click the Next button.
IIS Manager will now restore your site files to the state they were in when you created the .zip file. It will also contain your .bak file too, if you created the SQL backup first using the SQL Backup tool in the control panel on the day you created the .zip file in IIS Manager. To restore the database, read our knowledge base article on how to restore your .bak file to the SQL database.
If you need instructions on backing up your MySQL database please read our blog post article: Using mysqldump to backup and restore your MySQL database/tables.
One really cool thing about this tool in IIS Manager is that you can also use it to transfer your site to our Winhost web servers. Granted, that is only if your current host provides you with the ability to Export your site using IIS Manager. If they don’t, you should be at Winhost!
I’d like to do this once per week at this point, maybe once per day eventually. Instead of doing this manually, can this be automated?
I’m afraid this can not be automated. It will need to be done manually each time you wish to export and import through IIS Manager.
Can we also back the SQL Server database up connected via SSMS on our local PC? I guess I could automate that from my end, am I on the right path there?
Technically you can use SQL Server Management Studio to backup your SQL database locally onto your computer but not by using the “Backup Up…” feature. You will need to use: Tasks > Generate Scripts
This will generate a .sql file locally on your computer. But in all honesty I think it would be a whole lot better and easier if you used our SQL Backup tool in the control panel as stated in this blog post. This will make sure you have a complete backup of your SQL database.
As far as automating it you will need to ask a SQL Management Studio expert unless you already know how to automate it.
OK, thank you Moises. I think I will do it via the hosting control panel as you suggest.
Nice post Moises.
Thanks for sharing this.
Thank you!
I didn’t get farther than clicking Export Application and got an error window.
“Object of type ‘contentPath’ and path \(namegoeshere).com’ cannot be created. An error occurred when the request was processed on the remote computer. The server experienced an issue processing the request. Contact the server administrator for more information.”
The Export Application Package opens but the main window is empty and the Next button deactivated.
I’d like to get into the habit of using IIS for backup packages. Is it more reliable in getting every last file than an FTP download or upload?