For those customers who just absolutely have to have the latest and greatest, here’s a list of updated applications available from the Winhost Control Panel:
You’ve been telling us that you need more. More everything; space for your files, memory for your applications, so we put our heads together and said, “What can we do to make that happen?” The answer was simple: increase all the quotas! Now! So that’s what we did.
Okay, I’m making it sound a lot easier than it was. But over the past day or so we’ve rolled out new quotas for every Winhost plan. The changes are now in effect on all web and SQL servers.
Here are the details:
Ultimate
Site memory has increased to 500MB, a gain of 200MB
SQL database disk space has increased to 5GB, a gain of 2.5GB
Number of SQL databases is now unlimited
SQL database disk space has increased to 5GB, a gain of 2.5GB
Number of MySQL databases is now unlimited
Max
Site memory has increased to 300MB, a gain of 100MB
SQL database disk space has increased to 2GB, a gain of 1GB
Number of SQL databases is now unlimited
MySQL database disk space has increased to 2GB, a gain of 1GB
Number of MySQL databases is now unlimited
Basic
SQL database disk space has increased to 500MB, a gain of 300MB
MySQL database disk space has increased to 500MB, a gain of 300MB
If you have any questions about these changes, just let us know. We want you to be able to grow at Winhost, and we hope that these quota increases help a lot of you do just that.
Go on now, get busy!
![]()
Did you know you could use a MySQL database to store your ASP.NET Membership Table information rather than Microsoft SQL Server? I’ve written this simple guide to help you get started.
First, create a MySQL database through the Winhost Control Panel. Click on the Sites tab.
 Click on the Manage link and then click on the MySQL button.
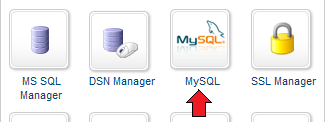 Click the Add button and enter the values for Database Name, Database User, and Quota. Click the Create button to finish creating the database. Now click on the Manage link and record the connection information (Database Name, Database Server, Database User, and Database Password) on a piece of paper or a text editor such as Notepad.
Start Visual Studio and create a New Project by going to File -> New –> Project… (Ctrl+Shift+N).
 Add the necessary .NET assemblies to your project using NuGet. Go to TOOLS -> Library Package Manager -> Manage NuGet Packages for a Solution… Type mysql in the Search field and hit Enter. Install both the MySql.Data and MySql.Web assemblies. A check mark will appear to the right when the assemblies have been installed.
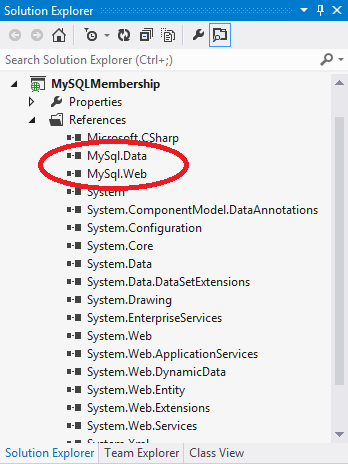
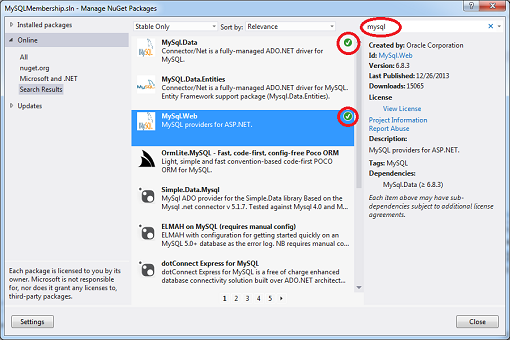 Another way to verify that the assemblies have been installed correctly is that they will appear as References in the Solution Explorer window.
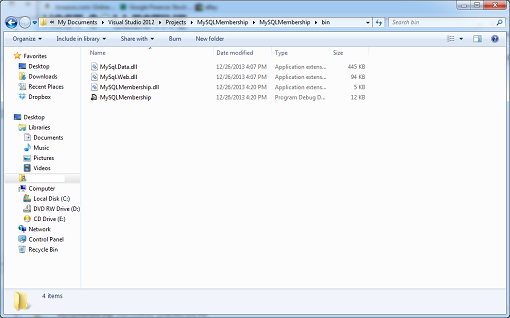
 When you compile your project, a copy of these assemblies will be added to your local /bin folder which you will need to upload to your site account.
 The next step is to modify the Web.config file with this markup:
<?xml version="1.0"?>

<!--
For more information on how to configure your ASP.NET application, please visit
http://go.microsoft.com/fwlink/?LinkId=169433
-->

<configuration>
  <connectionStrings>
    <add name="MySqlMembershipConnection"
         connectionString="Data Source=my02.winhost.com;user id=membership;password=password;database=mysql_48503_membership;"
         providerName="MySql.Data.MySqlClient"/>
  </connectionStrings>
  <system.web>
    <compilation debug="true" targetFramework="4.5" />
    <httpRuntime targetFramework="4.5" />
    <authentication mode="Forms">
      <forms loginUrl="~/Account/Logon"
             timeout="30"
             name=".ASPXFORM$"
             path="/"
             requireSSL="false"
             slidingExpiration="true"
             defaultUrl="Default.aspx"
             enableCrossAppRedirects="false" />
    </authentication>
    <membership defaultProvider="MySqlMembershipProvider">
      <providers>
        <clear/>
        <add name="MySqlMembershipProvider"
             type="MySql.Web.Security.MySQLMembershipProvider, mysql.web"
             connectionStringName="MySqlMembershipConnection"
             enablePasswordRetrieval="false"
             enablePasswordReset="true"
             requiresQuestionAndAnswer="false"
             requiresUniqueEmail="true"
             passwordFormat="Hashed"
             maxInvalidPasswordAttempts="5"
             minRequiredPasswordLength="6"
             minRequiredNonalphanumericCharacters="0"
             passwordAttemptWindow="10"
             applicationName="/"
             autogenerateschema="true"/>
       </providers>
    </membership>
    <roleManager enabled="true" defaultProvider="MySqlRoleProvider">
      <providers>
        <clear />
        <add connectionStringName="MySqlMembershipConnection"
             applicationName="/"
             name="MySqlRoleProvider"
             type="MySql.Web.Security.MySQLRoleProvider, mysql.web"
             autogenerateschema="true"/>
      </providers>
    </roleManager>
    <profile>
      <providers>
        <clear/>
        <add type="MySql.Web.Security.MySqlProfileProvider, mysql.web"
             name="MySqlProfileProvider"
             applicationName="/"
             connectionStringName="MySqlMembershipConnection"
             autogenerateschema="true"/>
      </providers>
    </profile>
  </system.web>
</configuration>
Replacing the connection string section with the Winhost Connection String to your MySQL database. Save the file. The key to creating the tables is this attribute in the XML markup: autogenerateschema=”true” Now, select BUILD -> Build Solution (Ctrl+Shift+B) to compile your application, and then select PROJECT -> ASP.NET Configuration. This will launch the ASP.NET Web Site Administration Tool.
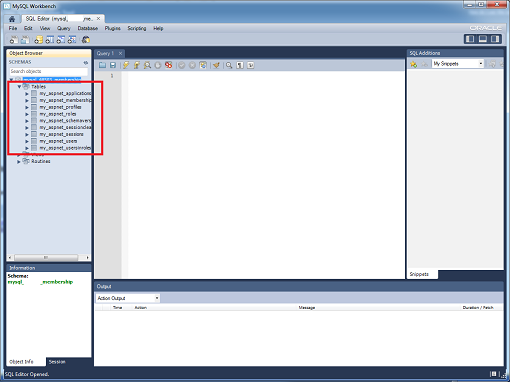
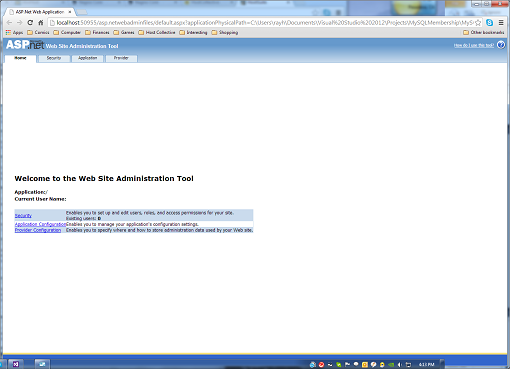 Once the tool has been launched, the tables will be created, and you can check by logging into your MySQL database using an administration tool like MySQL WorkBench.
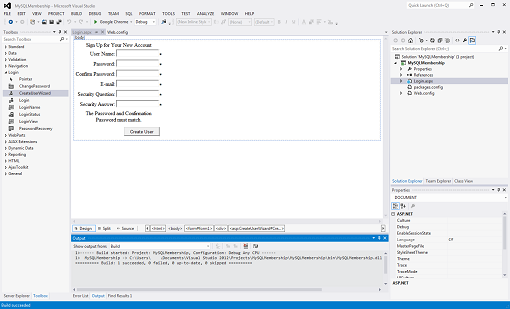
 Now, let’s build a very simple ASP.NET application that will allow you to create users. Go back to your project in Visual Studio, right click on your project name in Solution Explorer and select Add -> New Item… (Ctrl+Shift+A). Select Web Form and name the file. Switch to Design Mode. In the Toolbox Window, expand Login of the tree view, and drag and drop the CreateUserWizard control on to the page. Build your application.
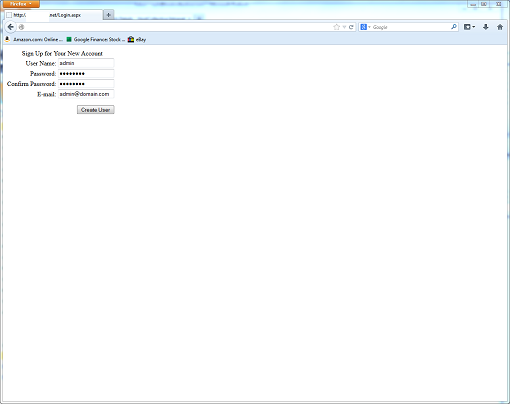
 Deploy your files to the Winhost server using FTP or Web Deploy and then access your site using a browser either with your domain name or Secondary URL. Fill out the create user form and click on the Create User button.
 If you go back and access your database using MySQL WorkBench and query the my_aspnet_users table, you can see that the user was created.
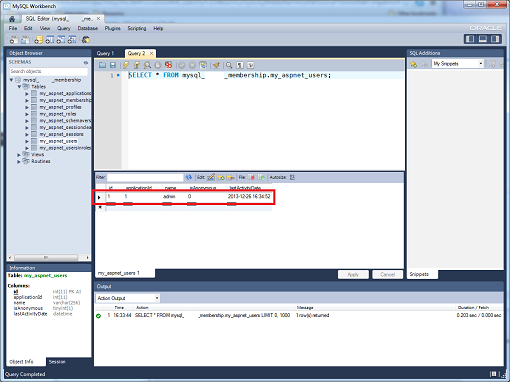 You can also just use the ASP.NET Web Site Administration Tool to create the users. Of course, none of this information is necessarily new, so I want to thank Nathan Bridgewater’s blog and Oracle for helping me put together this tutorial for our customers at Winhost.
The new year brings us a round of new applications. Note that backups and management of your MySQL databases just got easier with a one click install of phpMyAdmin:
phpMyAdmin is a free software tool designed to help administrate a MySQL database over the Web, and in this quick tutorial, I will show you how to install it here at Winhost. First, you need to create a MySQL database through the Control Panel.
Click on the Sites tab.
 Click on the Manage link and then click on the MySQL button.

Click the Add button and enter the values for Database Name, Database User, and Quota. Click the Create button to finish creating the database. Now click on the Manage link and record the connection information (Database Name, Database Server, Database User, and Database Password) on a piece of paper or a text editor such as Notepad.
Now download the source code from the phpMyAdmin website.
Extract the contents using a decompression program such as 7-Zip. Now make a copy of the config.sample.inc.php file and save the new file as config.inc.php. In the config.inc.php file, alter line 31:
$cfg['Servers'][$i]['host'] = 'localhost';
By changing ‘localhost’ to the database server name. For example:
$cfg['Servers'][$i]['host'] = 'my01.winhost.com';
Now, upload the contents to your Winhost account and access it, adding a Default Document if necessary.
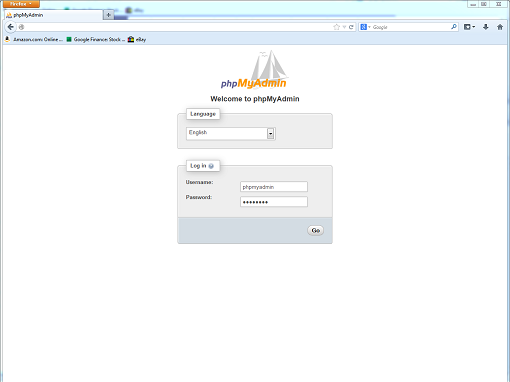 Voila! You are now ready to manage your MySQL database with phpMyAdmin.
From your desktop to our servers there are a lot of technical issues that can potentially have a negative impact on your web site. What we would like to talk about in this article are interruptions or outages related to our servers or network. The things that happen on our end of the wire.
Most web hosts avoid discussing these kinds of things, which is understandable. No one wants to draw attention to an unpleasant aspect of something they are trying to sell to you. But whenever an outage occurs many of you will ask us, “What are you going to do to make sure this never happens again?” We think that’s a reasonable question, and one that deserves an honest and detailed answer.
There are essentially three different forms these outages take; maintenance and upgrades, server-specific problems, and provider problems or malicious attacks. What we can do to alleviate or prevent the problems varies depending on which type of outage we’re talking about.
Since the Winhost platform is primarily made up of servers running the Windows operating system, a certain amount of downtime for maintenance and upgrades is unavoidable in order to maintain security and provide you with current technology.
We do planned maintenance (when necessary) on Wednesdays, and a general Windows update every month. There is also occasional unplanned maintenance, which is usually an update or fix for a security issue or a problem that is having an immediate negative effect on a group of servers, so the fix is made outside the normal maintenance window.
Our servers are consistent across the entire network, so for example, all mail servers have the same configuration, all SQL 2008 servers are the same, all SQL 2012 servers are the same, etc.
However, all of the users on the servers are different, and the number of users per server varies, so even though all Windows 2012 web servers have the same configuration, they can experience different problems.
Additionally, all servers run on hardware, and all hardware is susceptible to component failure. We use only top-of-the-line Dell servers, but no matter how much you pay for them, electronic and mechanical parts still fail. Using virtual servers (which we do in some cases) reduces the likelihood of mechanical failure to a certain extent, but virtual servers still run on physical machines.
So while server-specific problems are bound to happen occasionally, we do a few things to prevent unnecessary issues, such as extensive monitoring of the live servers (via giant monitors in the support and system administration offices, and immediate text messaging to all of the system administrators telephones), and controlling and balancing density, so that the servers always have roughly similar numbers of users and loads.
We also retire all hardware that is past a certain age. So your site, database or email will never be running on a 10 year old server that everyone expects to fail at any minute.
When a specific server fails or is showing signs of stress, our administrators take action immediately, and make things right as quickly as they can.
I should take this opportunity to let you know that every member of the Winhost staff is local, and we all work out of offices in the same building here in Los Angeles. We do not employ remote staff or offshore third-party staff. Communication is easy and efficient in the event of a problem.
These are usually the most severe of the issues we’re discussing, having an impact on the largest number of users. Unfortunately they are also typically the most difficult to deal with.
A provider problem usually means an issue with one of our Internet backbone connection providers. These are the companies (Internap and Savvis) that provide the connection from the routers in our data center to the Internet backbone.
It is not technically necessary to have multiple connections, but because these giant providers are not perfect (and they need to do maintenance and repairs sometimes too), we have multiple connections to prevent a complete network blackout due to provider issues. We split and balance traffic between the two, and most of the time, all is well.
Then there are the other times.
When one of our two connections goes down unexpectedly, we recalibrate and direct traffic to the connection that is working and do everything we can to insure that all incoming traffic can be accommodated.
The problem is, when a backbone connection goes down, some traffic is not going to route around it properly. It’s certainly supposed to. The Internet was built on the theory that traffic would easily and automatically route itself around unresponsive nodes. But in actual practice, things don’t always work the way they do in theory.
Long story short, if your connection doesn’t route around the dead backbone connection, there won’t be anything we can do on our end to remedy the situation.
That doesn’t happen often and it doesn’t affect everyone. But it will inevitably affect some of you, and if it does happen, from your perspective everything will be down. Everything may in fact be up, but anyone whose request is stopping at the dead backbone connection won’t be able to access our network.
I should also mention that it is theoretically possible for both providers to go down at the same time. The odds of that happening are very slim, but it is possible.
You might wonder, “Well, if that’s a possibility, why not have a dozen backbone connections?” and that’s a reasonable thing to wonder. But the cost for even one additional backbone connection would not come close to the potential, “freak-occurrence” benefit. Not to mention the fact that it wouldn’t improve your service on a day to day basis. We would just be sitting on top of (and paying for) a lot of idle, unused bandwidth.
Speaking of bandwidth, I saved DDoS for last.
DDoS is an acronym for distributed denial of service attack. They are brute force attacks that send so much data to a site or server that they effectively “knock it off line.”
The truth of the matter is we cannot prevent a large DDoS attack because we can never know what might trigger a large DDoS attack.
In the old days, a very large DDoS would throw hundreds of megabits of data at a site every second – or at the most, a gigabit (Gbit/s) – and that was usually enough to take it down. But providers got wise and started using DDoS mitigation services (like we do) that temporarily provide huge amounts of bandwidth which make a one or two Gbit/s DDoS ineffective.
But now with exponentially larger and higher bandwidth botnets, the attacks can be so large that we can’t even measure how much traffic the DDoS is sending. 10 Gbit/s hardware switches are saturated and paralyzed, and even larger switches that are used by the backbone providers are swamped and slow to a crawl (which is how a recent DDoS on a Winhost customer slowed down traffic for part of Yahoo!).
Since the methods we used to deal with DDoS in the past are no longer effective, what we do now is try to determine the target site or sites and remove them from our network (by null routing the IP address), then wait for the DDoS to taper off after the site disappears.
In order to locate the target site, our system administrators coordinate with our upstream providers to get the necessary target IP information. Once they have that, they start going through that IP manually, site by site, looking for something that might attract a DDoS.
That is as unscientific as it sounds, and as a result, locating the target can take anywhere from 30 minutes to several hours. And unfortunately, even after we have identified the target, chances are it will continue to affect a number of sites even after the DDoS has ended, because the IP address those sites live on has temporarily been removed from our network.
I’ll wrap this up by saying that while it isn’t possible for us to prevent outages completely, we are always working on improving our communication when they do occur. Every outage is different (if they were all the same, this would be easy) and they each teach us something new.
But if you need quick information, and the outage is server-specific (and not generally crippling our network), your best bet is to check the forum for updates. The forum is the first line of public communication for the tech support staff, so it is typically the first place you’ll see information.
For outages that do affect our network, we post information on Twitter, Google+ and Facebook. We may not be able to respond to your questions or comments on social media while the outage is in progress, but we do our best to keep those sources updated.
We do not have a “social media team,” as some larger companies do, so despite our best efforts, you may see spotty updates on any given service during any given outage. That doesn’t mean we don’t care. It usually means the outage is happening at a time of day when we are not all in the office, so the people who are here are dealing with the outage and answering helpdesk tickets (and haven’t called to wake me up yet).
We’ll always do our best to keep you in the loop so you know what’s happening. If you have any suggestions you’d like us to consider, we encourage you to comment on this post and let us know.
 We’ve made a few changes to the Control Panel that should make life easier for some of you power users out there.
First, if you have a large number of sites in an account, we have significantly sped up the
Order New Site and Order New Domain Name functions. Now there is no need to go make a sandwich while those pages load. Though, if you think about it, it’s almost always a good time for a sandwich.
Next, if you’ve ever entered a DNS TXT record in Control Panel, you may have run into a 128 character limitation. We have increased the TXT record limit to 512 characters (the maximum the DNS system will accept).
Finally, if you like to mess around with DNS records in general (and really, who doesn’t?), there may have been a time when you thought, “Well, that was fun, but I wish I could just dump all these cool experiments that have made my site redirect to altavista.com and somehow caused my email forward to the White House and just start over with a clean slate…” Well, now there is a Reset DNS button that does just what it claims to do – resets the DNS record for the site to our default settings. It’s cool, it’s powerful, and it will completely remove any customizations you’ve ever made, so use it carefully.
That’s it for now, but we’re always hard at work over here making the world a better place, so let us know if there is something we can do just for you.