Winhost is pleased to announce that the applications offered through our App Installer tool have been updated. Here’s a list of the changes:
Some of the newer versions require the ASP.NET 4.5 Framework in order to run. If you have a hosting account that is on the Windows 2008/IIS7 platforum and want to install one of these applications, please open a support ticket to have your account migrated to Windows 2012/IIS8.
We are always looking for ways to offer more value in your Winhost account, and we think that we deliver the highest quality hosting in our price class. But (you knew there was a “but,” didn’t you!) unfortunately there are some costs that we cannot control, and domain registration and renewal is one of them.
We are subject to ever-increasing domain registration and renewal prices, and while we have absorbed those increases up to now, we find ourselves at a point where we are charging you less for domain registration or renewal than we are paying for those services.
 So in order to continue providing the service, we have to raise domain name registration and renewal prices. On August 30th the price will go from $10 to $12.95. We sent you an email notification of the increase and changes to our terms of service that are now required for domain name resellers.
So why are we mentioning it again here in the blog? Because we wanted to let you know that there is a way to save some money on your upcoming renewals. We have updated the Control Panel so we can now offer multi-year renewals – up to a maximum of 10 years. So if you love your domain name (and who doesn’t?) and want to secure it for a long time to come, you can do it now at the current domain renewal price of $10.
In the past you could only renew for a year at a time, but in anticipation of the price increase, we wanted to offer you a way to renew for a longer period at the current price. Remember, on August 30th that price increases, so if you want to lock in the lower price, you have to make your move in the next six weeks.
We know you have a seemingly infinite number of choices for domain renewal (and web site hosting), and we really appreciate that you have chosen Winhost. We work hard every day to earn your loyalty. Thanks!
Today, we’re talking to David Harney, who created the Ozaukee, Wisconsin bike routes site bikex.net.
Hi, Dave. Tell us a bit about yourself and your site.
My name is David Harney and I’m a retired software developer who recently volunteered to create a website for our local county government – Ozaukee County, Wisconsin. The mission of the site is to encourage local citizens and tourists to travel by bicycle when visiting our many villages, parks and nature preserves. Our county has 30 miles of Lake Michigan shoreline, historic villages, and numerous other scenic attractions. The website is Ozaukee Bike Routes (www.bikex.net) and features bicycle routes that use trails and quiet country roads to visit our attractions.
What was your career in software development like?
I was hired in 1968 for my first programming position and retired in 2003 as a software development manager in the transportation logistic field. I was an early adopter of using a PC frontend for UNIX servers. In the mid 90s I started with Win 95 and IE 3 for some limited business applications. When I retired, I was using XP/IE6 for many business applications. After that, I only programmed a small personal website until I was approached last year to create the Ozaukee Bike Routes website.
What are you using to run bikex.net now?
Visual Studio, ASP.NET, VB, Javascript, JQuery, MSSQL with Entity Framework and LINQ
Why did you choose Winhost and what do you like about our hosting?
The hosting service I used for my personal website did not stay current with the MS technologies I needed for my new project. I evaluated several alternatives for MS technology availability, support and cost. Winhost was the clear choice.
Winhost is sincere with its commitment to current MS technologies and support. The cost is also a major factor for me as I foot the bill for this volunteer project. Also, my site does not use a lot of storage nor does it have a high transaction volume – I didn’t want to pay for more than I needed. Support is also a delicate balancing act at the low price point of my plan. I fully understand the business economics involved and appreciate the need for limits to the scope of support services provided at this price point. However, my experience with Winhost support for startup and a few other issues has been very positive – really an excellent value.
What do you when you’re not working on the site or biking around Ozaukee?
Besides bicycling, I have an interest in passive solar housing and might someday do a website of my experience in that area.
Is there anything you would like to say to our readers?
I would just encourage anyone with a passion in some area to share their experiences in a website. Chances are that the rewards in terms of new friendships will greatly outweigh the effort to build the site. My site has been a very rewarding experience.
Thank you very much for your time, Dave. Happy riding!
Dave is committed to updating his site each winter (not much cycling in January in Wisconsin). He welcomes comments and technical suggestions to improve his site, so if you have any, please leave them in the Comments section below.
In this tutorial I’m going to show you how to migrate your email messages to Winhost using the SmarterMail’s Mailbox Migration tool.
Prerequisites
Let’s Start
Log in to your SmarterMail interface via Control Panel.
You will need to use our mail server’s URL to access the email system since your domain name isn’t pointing to us yet.
First log in to the Control Panel on Winhost.
Next you will see a link on the Email Manager page called SmarterMail Manager. Click on it and it will automatically log you into the SmarterMail interface. This step helps you complete two things:
After you’re done creating the email users using the postmaster email account, log out at the upper right hand corner and log back in with one of the email users you just created, one of the addresses whose mail you want to migrate.
Once logged in on SmarterMail with the new email user
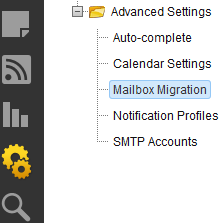
This will pop up a new window for the Mailbox Migration.
As you can see you have different options to choose from but in this tutorial we’re going to use the option Other.
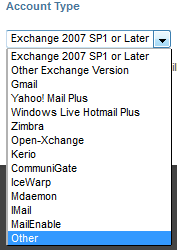
Remember that you will need to log out of SmarterMail and log back in with each user you wish to migrate. It would be very unfortunate to migrate all the email messages from all the email users on a single email account on SmarterMail. So please be careful when migrating and make sure you migrate the correct email messages to the correct user.
Some of us (like me) have at one time or another forgotten the Admin Login for our WordPress site. Maybe you’ve tried using the Lost your password? function, but for whatever reason that doesn’t work.
So what do you do now? Start all over?
Nope. We’re going to modify our user table on the MySQL database by creating a new MD5 hash.
Well, first you need to create a new MD5 hash using this handy web site. Enter your new password in the string field of the site. Now save the MD5 hash text the site created for you and save it in a text file. You might also want to save the password in the text file just in case, but don’t forget to delete it once you’re done.
Now, you’re going to use MySQL Workbench to connect to the WordPress database. To learn how to connect to your MySQL database using Workbench please read our Knowledge Base article.
Once connected with MySQL Workbench expand the database. Expand your tables and right click on the users (this table may also be called wp_users depending on which table prefix you used when you installed WordPress).
After right clicking on the users tabled select Edit table data.
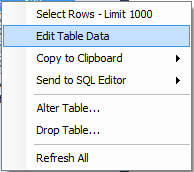
Find your admin user. Under the user_pass column next to the admin user and enter the MD5 hash you created. It should look like this:

Now click on the Apply button in MySQL Workbench. Click Apply again on the next window. Now click Finish.
After you completed all those steps you should now be able to log in to your admin section with the new password you created.
In this tutorial I’m going to show you how to configure goMobi to work with your WordPress site. Many of our users are using WordPress for their sites, and now you can have a Mobile web site for your WordPress-based site.
If you don’t have goMobi service yet, you can order goMobi through Control Panel. If you don’t have a WordPress site yet, we have a blog post article that shows you how to install WordPress using our Control Panel Application Installer.
Once your WordPress site is up and running and you have ordered goMobi for your site, check out this video on some the different things you can do with goMobi.
When you’re done watching the video you’re ready to configure WordPress with goMobi.
Log in to your goMobi account through our control panel by click on the goMobi tab at the top.
Now click on the blue Launch Mobile Site Builder link to log in. This will open a small window in your web browser.
Creating your mobile site can be relatively simple, or you can take full advantage of everything goMobi offers and spend some time setting up your mobile site. It can be a lot to go through, so we won’t step through it here. We’re primarily concerned with getting your mobile site to work with WordPress.
After you’ve created your goMobi site, you’ll need to create the redirection code that you will install on your WordPress application. This is necessary to properly route mobile traffic to your new mobile site.
In the goMobi window click on the Tools tab at the top.
![]()
Now expand the Redirection Code Generator section.
Place a check mark next to Redirect tablet computers if you want to redirect tablet computers too.
Select WordPress from the drop down menu and click Generate.
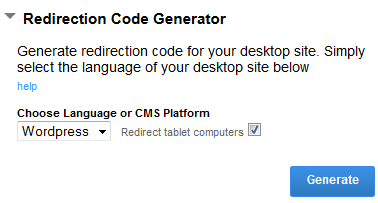
Clicking on the Generate button will create a mredirect.zip file that you will need to download locally onto your computer.
Now extract the .zip file onto your computer and connect to your site via FTP. We are going to upload the file into your WordPress site files directory.
If you don’t have an FTP client, we suggest FileZilla. If you install FileZilla, we have a knowledge base article that shows you how to use it to connect to your site.
When connected via FTP double click on the wp-content directory folder. Now go in to your plugins folder by double clicking on that too.
You want to upload the exacted mredirect folder containing the mredirect.php file to the plugins directory:
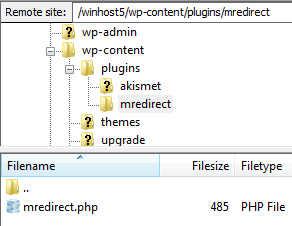
Now simply log in to your WordPress site as the Admin and activate the plug-in.

Once you have activated the plug-in, any mobile traffic to your WordPress application will be redirected to your mobile web site.
On April 24th we had a brief interruption on one of our backbone connections that made it appear as if Winhost had dropped off the map.
That interruption, outage, glitch or whatever you want to call it, raised a lot of questions that I thought I could use this opportunity to answer.
Every data center is connected to the Internet through high capacity connections called backbone connections. The “backbone” of the Internet is a group of high capacity providers called tier 1 providers.
Tier 1 providers are pretty reliable, they have to be or the Internet wouldn’t work. But they still have problems from time to time. A cut fiber on a construction site, a natural disaster or power outage, someone flipping the wrong switch – all of these things can cause an outage on a backbone connection.
We do. We have two backbone connections to our servers, provided by different companies. Normally the traffic in and out of the servers is balanced between those two connections using a number of network analyzing tools and a lot of routers and switches.
So if one connection is dropped, everyone whose traffic has been routed through that connection is cut off. The other half of the traffic, coming in on the other backbone connection, doesn’t experience a problem. That’s what happened on the 24th.
If there was an extended outage on one of the connections we could switch all traffic to the working connection. Making that switch (and then switching back when the problem is solved) is not a trivial matter though, so we wouldn’t do it unless we anticipated a long outage on the connection that was down.
A long outage on a backbone connection is rare though, so rerouting all the traffic is usually unnecessary.
Anyone affected by the outage wouldn’t be able to see our site or the forum, since they can’t access anything on our network.
We reacted and responded on Google Plus, Twitter and Facebook, which is probably more effective than an outage post somewhere on our site or on a status site somewhere (that no one knows how to get to).
Things like this are part and parcel of life on the Internet. Any provider who tells you they can host your site and there will never be an outage of any kind isn’t telling you the truth. All of these things (even the mighty, mystical cloud) run on hardware. And hardware is just machines and machines don’t run perpetually without problems.
When they invent machines that do run forever without problems, we’ll be first in line to buy them. I can guarantee that. 😉
Until then, we’ll continue to provide the best service your money can buy, and be open and honest about actual and potential problems.
Thousands of WordPress sites are being compromised causing havoc with their site owners and their hosting providers. The method which the hackers are using is an old method known as a Brute Force Attack. This method simply employs the process of submitting passwords until you finally happen across the right one.
The effects on the site can vary, but it will entail a slower WordPress site, and high bandwidth consumption. This will mean you may pay more for the additional bandwidth you consume even if it was caused by your WordPress site being hacked.
To counter this you need to take two basic steps.
If you want to read up on picking a good strong password, I suggest this Microsoft article that explains how to decide what a strong password entails.
An optional feature worth considering is to enable your WordPress site with the WordPress 2 Step Authentication. It is an added security on top of inputting your login and password credentials with a random generated verification code from Google Authenticator App. You can get more details on how to enable this for your WordPress site on this link. http://en.blog.wordpress.com/2013/04/05/two-step-authentication/
If you want to read up more on these recent attacks to WordPress web sites, try looking at these links.
http://www.bbc.co.uk/news/technology-22152296