If you’ve looked at your web site statistics lately you may have noticed a pretty dramatic increase in visitors on mobile devices. With 45% of American adults owning smartphones, the increase shouldn’t be a surprise.
Maybe you have been thinking that it’s time for you to provide a mobile version of your site. If so, you’re absolutely right. But if you’re like me, you don’t relish the idea of writing the responsive code for a mobile version of your site — or worse yet, a mobile version of several sites.
Well, as it happens, we have just started to offer something that may make your life a lot easier: goMobi.
goMobi is a mobile web site builder that provides a way to create a mobile version of your site with a ton of great, essential mobile features, all with a few mouse clicks.
Okay, there are more than a few clicks involved, but it’s ridiculously easy to use.
Your mobile site is hosted on goMobi’s servers, so there’s nothing to upload or configure. All you do is drop a few lines of automatically generated code into your main web site that detects mobile visitors and redirects them to the mobile version of your site.
It’s pretty cool, and we’ve partnered with goMobi to make it extra-affordable. Check out the goMobi page on our site, or order in your Winhost Control Panel right now.
Added bonus: you can buy goMobi service for a site that we host or ala carte, for use on a site hosted anywhere.
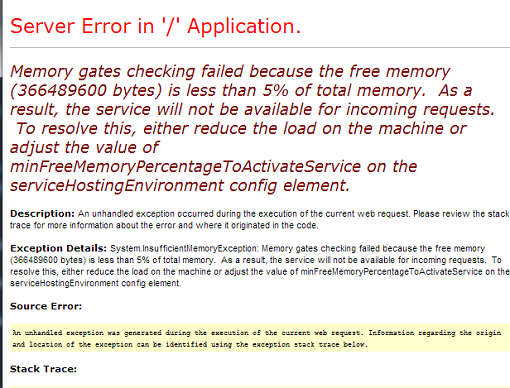
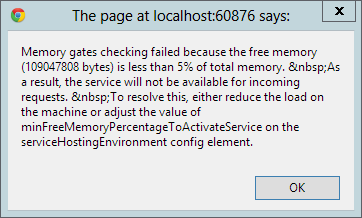
Recently, a few of our customers ran into this error when hosting their WCF service with us on our IIS8 servers; Memory gates checking failed because the free memory is less than 5% of total memory.


Before you panic, this does not mean that our servers are overloaded or running out of memory as this check is performed on the total amount of memory available on the server. 5% in our hosting environment still means a lot of memory free. Instead, you need to make sure ‘Full’ trust is enabled and that you add this to your web.config file:
<configuration>
<system.serviceModel>
<serviceHostingEnvironment ... minFreeMemoryPercentageToActivateService="0" />
</system.serviceModel>
</configuration>
The attribute to modify is minFreeMemoryPercentageToActivateService. Setting it to 0 will bypass the check and allow the service to run. For more information on the attribute, please see this link.
Can you believe it? There is a new framework to learn and use. It is called YII Framework. YII stands for Yes It Is (how quaint, I must say). YII is a PHP based MVC framework created specifically for highly active web applications, such as portals, forums, CMS, and e-commerce systems. It is designed to be light-weight, with a sophisticated caching mechanism.
You’ll want to look at the official YII home page to understand more about this framework.
The good news is it works on our shared hosting platform. According to YII’s documentation, the only requirement it needs is to have PHP version 5.1 or higher installed on the server; which we do have (PHP ver 5.3.13). Now, setting up a YII web application on our shared hosting environment does require some specialized steps you’ll need to take.
First you’ll need to download the YII Framework folder. Inside this folder are the YII files and extensions. You can download it here.
The second step you’ll need to incorporate is to modify the path your application will be looking for the YII framework. By default it’s set to look outside the root. A lot of the documentation was for an Apache web server therefore they had one standardized YII Framework folder that everyone accessed. That will be impossible on our shared hosting environment since each application only has permission within its’ own root. You will upload the YII Framework folder on your root and modify your application to search the framework from within.
As an example set the code from:
$yii=dirname(__FILE__).'/../framework/yii.php';
to:
$yii=dirname(__FILE__).'./framework/yii.php';
Next, you may need to modify the default time zone setting. By default it is set to UTC, which may not be the same as the server. The application will throw this error if left unchanged.
PHP Warning: phpinfo(): It is not safe to rely on the system’s timezone settings. You are *required* to use the date.timezone setting or the date_default_timezone_set() function.
In case you used any of those methods and you are still getting this warning, you most likely misspelled the timezone identifier. We selected the timezone ‘UTC’ for now, but please set date.timezone to select your timezone. in E:\ \YII_Framework\testdrive\test.php on line 3
To fix this problem, you’ll need to create a user.ini file. The file name should be user.ini and place it in your root folder. The default time zone should be delegated to the user level. Add this code in your user.ini file:
[DATE]
date.timezone = “GMT”
Save the user.ini file and that should solve it.
Note: I tested this several times and it may not throw this specific time zone error, but regardless, setting up a user.ini file shouldn’t hurt your application. The user.ini file acts like the PHP.INI file which is the basic PHP configuration for all PHP applications. The user.ini file allows for PHP.INI control at the account level. This is very useful in a Windows platform where we can only have one PHP.INI for the entire server. Keep in mind that some PHP elements/settings cannot be delegated to the account level due to security reasons.
One last step you will want to take before you are done is to protect your YII framework files/extensions from being downloaded. Because the framework itself uses PHP files, it can potentially be downloaded by a browser, modify certain configuration settings on the framework and potentially get re-uploaded back to the server. That can open security holes or exploits to your YII Framework application.
What you will want to do is setup the Framework folder with the same security restrictions as an ASP.Net Bin folder, where your application can access it, but no browser can directly navigate to it and download the files. You will use the RequestFiltering Module to protect the folder Framework. Create a web.config file if you don’t already have one, and place it on the root. Add this XML element within the system.webServer section of the web.config file.
<security>
  <requestFiltering>
    <hiddenSegments>
    <add segment="Framework" />
    </hiddenSegments>
  </requestFiltering>
</security>
That’s it, you’re all done. As you can see YII Framework is compatible with our Windows shared hosting platform.
We have partnered with SiteLock to help protect your web site from hackers and other attackers. SiteLock delivers a comprehensive web site security service that scans your site to detect vulnerabilities, malware, sql injections, search engine blacklisting, cross-site scripting vulnerabilities, and more.
 The Basic plan provides a daily malware scan and allows you to display the SiteLock “seal” on your site, but for really impressive protection, check out the Premium and Enterprise plans.
They provide everything the Basic plan does, but in addition, they do daily FTP scanning, automatic malware removal and file change monitoring! If you have been searching for easy-to-implement site protection, it’s here.
If you’ve looked at SiteLock before and thought it was interesting but perhaps a bit too pricey, we’ve got you covered there. The deal we’ve made allows our SiteLock pricing to be extremely low — starting at only $19.95 for a full year of Basic coverage! $79 less than buying directly from SiteLock.
We can offer equally great deals on the Premium and Enterprise plans, saving you up to $299. What are you waiting for? Log in to Control Panel to sign up for SiteLock today.
Do you have an Android mobile device? If so, have you installed the Amazon App Store? Why not?!
Every day you can get a free app, which normally sells for $0.99 to $9.99. Each day the app changes, so it is best to check back often.
First, you need to allow your device to install application from unknown sources (not the normal Play Store).
Open up your settings and go to either applications or security (this depends on what software version you are running, I am showing this to you in version 4.2), in my case it was security.
Next, you want to check the box for Unknown Sources.
Once you have done this, you can proceed to the next step which is downloading and installing the application!
To install this awesome application, in your mobile device’s browser go to http://www.amazon.com/getappstore or use your favorite search engine and search, “Amazon app store.”
Click on the link to Download the Amazon Appstore.
Once the download is complete, click on the AmazonApps-release.apk and click install.
Now you can check this app every day and see what is available for free! At the time I wrote this article, Osmos HD was the free application, a very fun game!
Enjoy!
The following instructions apply to both our Windows 2008 IIS 7 servers & our Windows 2012 IIS 8 Servers.
In this tutorial I’m going to show you how to back up your SQL database and web site files. Then we’ll use the IIS Manager to back up your site and SQL Databases all in one shot. These instructions will place a .zip file locally on your computer for safe keeping. The .zip file will contain the .bak file of your SQL database.
Step 1: Use our SQL backup tool in Control Panel to back up your SQL Database. When using this tool the .bak file will be stored in your App_data directory. Please read our knowledge base article on how to use the backup SQL Tool in our control panel.
Step 2: Once you’ve created the .bak file in your App_data directory on your site account using the SQL backup tool in our control panel, you’re ready to connect to your site using IIS Manager. Please read our knowledge base article about Using the Microsoft IIS Manager.
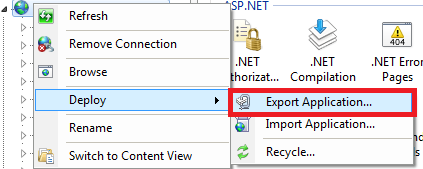
Step 3: In IIS Manager Right click on your site. Selected Deploy and click on Export Application…

Step 4: In the Export Application Package window click the Next button (do not change any settings).
Step 5: Click the Next button in the Select Parameters window (again, do not changing any settings).
Step 6: Click the Browse… button and select a directory on your local computer (this is where the backup .zip file containing your site’s web files will be placed on your local computer). Select a file name with today’s date for your reference. Now click the Save button.
Step 7: Click the Next button in the Save Package box and wait for your site to be saved locally on your computer. Now click the Finish button when you receive the notice “The package was created successfully.”
The .zip file that you saved locally will also contain the SQL database backup (.bak) file that you created when you used the SQL Backup tool in the control panel. It’s important to back up your SQL database at the same time as your web site files to maintain consistency for your site.
If you ever need to fall back and restore your web site to a previous state from a certain date, you can use the same tool in IIS Manager, but this time you will need to select Import Application in the Deploy option in IIS Manager.
Instructions for restoring your site:
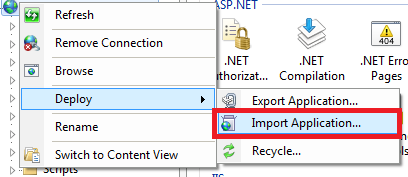
Step 1: Right click on your site in IIS Manager. Select Deploy and click Import Application.

Step 2: Click the Browse… button and select the .zip file located on your computer of the web site backup you created in IIS Manager. Then click Next.
Step 3: Do not change any settings in the Select The Contents of the Package box and click the Next button.
Step 4: On the next page Enter Application Package Information you will need to remove the text from the box so the backup is restored to the root of your hosting account. So you should only see:
HostingAccountDomain.com/ [Empty Text Box]
Now click the Next button.
Step 5: You will receive the following warning from IIS Manager: “This application will be installed into “HostingAccountDomain.com”. Most applications are usually installed into a folder beneath the root, such as “HostingAccountDomain.com/Blog” Are you sure?” Go ahead and click the OK button.
Step 6: In the next box, Overwrite Existing Files, choose the option, “Yes, delete all extra files and folders on the destination that are not in the application package.” This will delete any extra files or folders that don’t exist in the backup .zip folder (we’re choosing this option because you want to restore the entire site as it existed on the date that you created the .zip files).
If you don’t wish to delete the extra files then select the option: “No, just append the files in the application package to the destination.” Now click the Next button.
IIS Manager will now restore your site files to the state they were in when you created the .zip file. It will also contain your .bak file too, if you created the SQL backup first using the SQL Backup tool in the control panel on the day you created the .zip file in IIS Manager. To restore the database, read our knowledge base article on how to restore your .bak file to the SQL database.
If you need instructions on backing up your MySQL database please read our blog post article: Using mysqldump to backup and restore your MySQL database/tables.
One really cool thing about this tool in IIS Manager is that you can also use it to transfer your site to our Winhost web servers. Granted, that is only if your current host provides you with the ability to Export your site using IIS Manager. If they don’t, you should be at Winhost!
As fearless Winhost technical support specialists, we often encounter problems involving web sites that suddenly “broke,” seemingly out of nowhere. The owner of the site opens a support ticket, presents the issue, and invariably concludes their description of the issue with a plaintive variation on “And I haven’t touched the code in 2 years!”
Although by telling us this you may mean to indicate that there must be something wrong on our end, it actually puts up red flags for us that it’s more likely there’s something wrong on your end–because updating your code is absolutely essential to maintaining a functioning website.
Why? Let’s take your operating system as a case study. We’ve all experienced the annoyance of Windows running those automatic updates at night and waking up to find our computer has rebooted and all of our open windows have been unceremoniously closed. But Windows not updating would, ultimately, be even more annoying than waking up to your programs closed.
Windows updates because bugs are constantly being discovered and fixed, exploits are found and patched, new functionality is added, third-party vendors release new, better drivers… the list of “whys” is pretty long. If you never got those updates, what would happen? Your computer might be subject to an attack, you may not be able to take advantage of a new feature offered (like, say, the new, even buggier version of Internet Explorer), or maybe a new program you install won’t run properly because it depends on a service pack update.
As you may know, your Winhost website is actually running on Windows — Windows Server 2008 or 2012, to be specific. On that server are many components that contribute to keeping your website up and running. The two you might be most familiar with are IIS and the .NET framework.
Venture over to our community forum and check out the post on monthly maintenance. We are regularly performing updates, too–just like your desktop Windows OS. So as you can probably deduce by now, our server environment changes regularly. Therefore, what you coded 2 years or even 2 months ago may start acting funny after a while.
As the responsible webmaster we know you are, it’s part of your job to make sure your code keeps up with the changing environment it’s running on. Remember, these are web applications you’ve written. Just like applications on your desktop, updates are crucial to ensuring they function optimally.
Most of the web applications we offer in our App Gallery release regular updates. It is vital that you keep up with the updated versions, because they not only add functionality, they also fix bugs that were discovered. You can avoid your site being rendered nonfunctional by regularly checking for updates.
Some of the applications will alert you to new versions being released–do not ignore these alerts! The same is true for plugins (such as in WordPress), blog themes, etc. Any component of your web application requires monitoring for updates and patches.
However, it’s not just the server environment that changes, and it’s not always bug fixes or exploits that compel updating applications. As your site becomes more popular, or your business grows (which, I think you’ll agree, is a Good Thing), more people are going to be visiting your site. That means that the application you wrote to accommodate 10 users at a time may now be straining under the load of 50+ concurrent users.
You may start noticing more 503 errors, which, understandably, makes you think something is wrong with our servers, when in fact it may just be due to your successful business practices or your scintillating blog posts. Try doing a little gardening–make sure your application is scalable so you can revel in your new found success and popularity error-free.
I hope I’ve convinced you to re-analyze your fear of updating your code. Of course, if you really are experiencing problems with a web application that is updated, scalable and now apparently completely broken due to something on our end, as your friendly Winhost technical support specialists, we’re here and happy to help.
Just be sure to let us know you’ve been touching your code on a regular basis.
Here is a list of updated applications for the Winhost Control Panel App Installer: