
Site hosting news, tutorials, tips, How Tos and more
SSL certificates are necessary if you do credit card transactions on your site, or if you simply want to make your site available via an HTTPS URL (such as: https://example.com). If you visit that URL without the HTTPS prefix, you’ll notice that there’s no security “lock” displayed in your browser. That lock icon means your connection to a site is encrypted.
If you’ve never cared about HTTPS, it’s probably time to start. The days when you could avoid using HTTPS are rapidly coming to an end, and Google and the other big web browser makers are more or less forcing the change on everyone. So it’s a change we’re all going to have to make, or one day in the not-too-distant future, security warnings could be greeting every visitor who loads our sites.
With that in mind, here’s a high level overview of what SSL is and how it’s implemented. Think of it as an introduction to the concepts and a peek at the inner workings for anyone who is new to the subject.
Technical note: modern web servers don’t really use the SSL (Secure Socket Layer) protocol anymore, but the name has stuck to the certificates as kind of a generic identifier, so we use “SSL” in this article. The TLS (Transport Layer Security) protocol has replaced SSL for most uses. We’re also using the example of a web browser connecting to a web server, but the concept is the same no matter what kind of client is making a secure connection to a server.
An SSL certificate is really just a text file that is installed on the web server. It ensures that the domain name in the certificate matches the domain name of the site, and enables a visitor’s browser to make a secure connection to the site, so that the traffic back and forth is encrypted and no third-party can listen in on the conversation.
The reason for encrypting transferred data may be obvious where financial transactions are concerned, but even if you’re not sending financial data across the web, quite a bit of private data can be passed between your site and a visitor’s browser (like usernames and passwords). That private data is valuable to unscrupulous types, so encrypting the connection protects the data. Without an SSL certificate and the HTTPS connection, that encryption doesn’t happen.
It’s worth noting here that an HTTPS connection doesn’t prevent someone from finding out which domains you’ve visited. It just makes it (theoretically) impossible for them to see any of the data that was exchanged during the visit.
An SSL certificate contains information about your business or organization (or simply you as a person), and a cryptographic key unique to your domain or certificate. That key is used to establish the encrypted connection. Your website presents the key to the visitor’s browser, and if the browser determines the key is valid (more on that in a minute), the encrypted connection is established.
The entire SSL system is based on trust. When the HTTPS protocol was established, everyone agreed to trust certain organizations (and later companies) to issue legitimate certificates. Those organizations and companies are called certificate authorities. The certificate authority verifies who you are when they issue the certificate and the browser trusts the that the certificate authority has done that verification.
You might see a bit of a problem there if you’ve ever requested a “domain validated” SSL certificate and noticed that no one actually checked anything other than the fact that you had an email address on the domain. It wasn’t always that way. In the early days of SSL, the certificate authority did verify that you were who you said you were, and the owner of the domain you were requesting a certificate for. But as you might imagine, that time-consuming kind of validation quickly became impossible, so now that level of manual human validation is only done for expensive “extended validation” certificates.
Every certificate authority issues a “root certificate,” which is like a master certificate for that authority. If the authority operates under different names or resells certificates through other companies, they issue “intermediate certificates” that are related or connected to the root certificate. Then the certificate for your domain is associated with the intermediate or root certificate, and that makes up a certificate chain. So the browser trusts the certificate for your domain because it’s associated with a root certificate.
Your certificate, any intermediate certificates and the root certificate are all installed on the web server. The same root certificates are also pre-installed in web browsers and many computer operating systems, so the browser can validate the root certificate on the web server. There are actually a few checks and validations that take place between the different certificates, but her’s a simplified diagram of the chain:
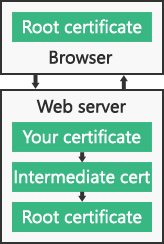
The connection is trusted if:
It’s pretty easy to get lost in the tall weeds here, because the underlying system that handles HTTPS encryption between a client (browser) and a server (your site) is quite complicated (and to add to the complication, the system is always changing, as better and stronger encryption methods are introduced).
But in a nutshell:
– The browser makes a TCP (standard Internet) connection to the site on the web server.
– The browser starts an SSL “handshake,” which is a transfer of data to the server about which version of SSL/TLS the browser is running, and which encryption methods it wants to use.
– The web server determines the highest SSL/TLS version that is supported by both the server and the browser, then sends its certificate(s) to the browser.
– If the certificate(s) meet all the criteria described above (in the “connection is trusted if” section), a cryptographic key is then exchanged and the browser tells the server that all further communication will be encrypted, and sends an encrypted authentication message to the server.
– The server verifies that the message is correct, then returns a similar message that the browser verifies.
– That’s the end of the “handshake,” and until it is broken, the browser and server can communicate securely.
Luckily all of those steps typically take place in a fraction of a second, and the browser and web serer don’t have to do them again (unless the secure connection is broken).
Well, that’s a lot of words for a “simplified” explanation, isn’t it. Sorry about that. But hopefully this has helped you to better understand what an SSL certificate is and what it does.
Still curious about SSL/HTTPS? Check out these other articles:
Ready or Not, It’s Time to Consider HTTPS
Let’s (not) Encrypt. But let’s not ignore https either.
How to Secure Your Primary Domain for Free When Ordering an SSL Certificate
Google Chrome, SSL certificates, SHA-1, SHA-2 and the “obsolete cryptography” message
![]()
This little factoid should freak you out: More than 80,000 websites are hacked every day.
That’s almost one every second, or about 29 million every year. Those numbers translate to a lot of pain and inconvenience for a lot of people. Count yourself lucky if you’ve never been one of them.
There are a quarter of a billion domains with active websites. If 29 million sites are hacked every year, that means we’re living in a world where more than 1 in 10 websites are likely to be compromised. Every year.
How does this happen?
Security starts at home. It’s an old saying, but it applies to a lot of website compromises. We see a lot of hacks that aren’t actually website hacks at all, because the perpetrator is using valid FTP login credentials that were harvested by logging keystrokes or reading log files on a home computer or laptop that has been infected with a virus or malware.
But perhaps the most common way in to a website or server is through old, unpatched third-party software. And a large percentage of that old, unpatched third-party software is WordPress, or WordPress plugins.
Before I give you some tips on locking up your WordPress site, I’d be remiss if I didn’t mention that Winhost has a fully managed WordPress hosting, security and hardening service. The service includes WordPress hardening for maximum security, WordPress-specific support and personalized assistance, and maybe most importantly, monthly updates of WordPress core, Plugins and Themes. The monthly updates consist of one of our in-house WordPress security experts personally examining your WordPress installation for malicious files and signs of compromise. If we discover that your WordPress installation is compromised or hacked, we’ll clean up the mess.
Okay, that’s it for the sales pitch. But if you’ve ever had to clean up a WordPress compromise, I’m pretty sure that you’ll be able to see the value in that service.
The first step in WordPress security doesn’t have anything to do with WordPress itself, but rather site backups. If you always have a current backup, it’s much easier to bounce back from a compromise. Simply identify your most recent “clean” backup, delete everything on your site and upload the clean backup.
We do periodic backups of our entire network for disaster recovery purposes, so if you are compromised you could just request a backup from us. The problem with that approach is we back up every day, and we only retain one copy of those backups. So if you don’t notice that your site has been compromised for a few days, our backup will likely be a copy of the compromised site. That’s not going to be of much help.
So we recommend a cloud backup service. There are a lot of them out there, or you can set one up from your Winhost Control Panel with a few clicks. Our SiteBackup service backs up your website files and databases on a schedule that you choose, retaining as many versions of the backup as you want to keep.
Okay, so that’s a good place to start, with a daily backup of your WordPress site and database. Next are a number of things that you should do to prevent a compromise of your WordPress site.
Update, update, update
How often do you log in to the admin section of your WordPress site? If it’s less than every week – or even every month – you need to start checking in more regularly and updating both the core WordPress files and all of your plugins. If you use a plugin and can’t remember ever updating it, check out the plugin’s page on WordPress.org and make sure it hasn’t been abandoned. If it seems like it has, uninstall it. Chances are there’s a well-maintained plugin out there that will do the same thing.
Kill the admin user
If you installed WordPress some time ago, it may have created a user named “admin” by default. Most brute-force WordPress hacks attempts are on the “admin” username, so you don’t want it to be there. To check, go to your Users page (/wp-admin/users.php) and see if admin is listed there. If it is, create another user or give another existing user the administrator role and delete the default admin user.
Don’t use the default WordPress MySQL table prefix
If the bad guys do manage to find a vulnerability within your site and one of their attempts is to query a table or insert into a table and you used the default table prefix, you could be in trouble. When you’re installing WordPress it’s best to change the table prefix from the default “wp_” to something different. One easy way to do that is to insert random characters after “wp_” – for example wp1od02l_ or wp5434fs_.
Change the WordPress login error
By default, WordPress gives hints about your login when a login fails. One of the steps in our hardening service is to change the login error to “You have entered the wrong Username or Password!” That way someone trying to compromise your site will never know if the username or password is incorrect, making it much more difficult to force or guess a login.
Remove the WordPress version information
It really helps the bad guys to know which WordPress version you’re using. Once they know the version, they can try known vulnerabilities giving them a better chance of getting into your site. They’ll also use Google to find WordPress blogs running a specific version of WordPress that’s easily hackable. You can use a plugin to remove version information.
Disabling Theme and Plugin Editing
The theme editor within WordPress is there to allow you to make quick changes to the code within a theme’s files. Chances are you won’t ever use that feature, but you can be pretty sure that the bad guys will make use of it to enter malicious code. In fact, that is how a lot of WordPress sites get hacked. To prevent that, enter the following rule in your Wp-config.php file, right before the “Stop Editing” tag:
/** Disable File Theme and Plugin Editing */ define('DISALLOW_FILE_EDIT', true);What else?
The Winhost hosting environment goes the extra mile by disabling executable files from running within the uploads folder, as well as IP restriction of the wp-admin directory. That way the wp-admin directory can only be accessed from IP addresses you specify.Last but not least, install a Security plugin
If you haven’t already done so, we would highly recommend installing one of the WordPress security plugins. As part of our hardening service we make the security plugin a “Must Use” plugin. That means the plugin can’t be disabled from the admin section of WordPress. The only way to disable it is by deleting the plugin via FTP.That’s a lot to install, configure and keep track of, but following these recommendations will make your WordPress installation much less susceptible to compromise. If it all sounds good but you don’t really have the time or inclination to do it yourself, let us do it for you.
The great thing about ASP.NET Core is that it’s portable, allowing you to run your Core application on any OWIN-compatible server. So, even if a particular version of .NET Core is not installed on the server, you can still deploy your Core app in “self-contained” mode.
In this example, we’re going to use the Orchard Core application. Orchard Core is a re-write of the original Orchard application (the thing that runs all the MSDN blogs) in ASP.NET Core. As of the time of this writing, Orchard Core is using ASP.NET Core 2.0. And, at the time of this writing, we have not yet updated our servers with the newest .NET Core to support ASP.NET Core 2.0 natively, but, to repeat: you can still deploy your Core app in “self-contained” mode.
First, some house-keeping. Make sure you have the .NET Core 2.0 SDK installed and Visual Studio is updated.
Orchard Core supports different databases, SQL, SQLite, MySQL and Postgres. I’m going to use SQL, which is included with all Winhost plans. This is a good time to create the SQL database in your Winhost control panel.
Onto the instructions:
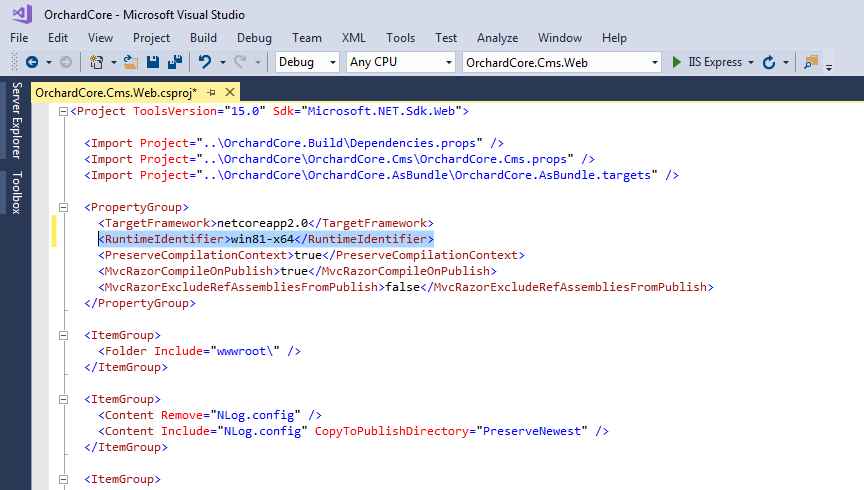
By default, Orchard Core is Framework-dependent. We have to change that to make it self-contained. We have to specify the target platform (tell the application what kind of server it’s going to be running on). In my case, my Winhost site is running on Windows 2012/IIS 8. You can find this information in your Winhost control panel, under the Site Info section. The Runtime Identifier for Windows 2012/IIS 8 is: win8-x64. If you’re site is running on a different server, you can check out the full catalog of Runtime Identifiers here.
<RuntimeIdentifier>win8-x64</RuntimeIdentifier>
Now we’re just about ready to publish. This would be a good time to remove the parts of Orchard Core that you’re not going to use. (For this example site, I didn’t remove anything.)
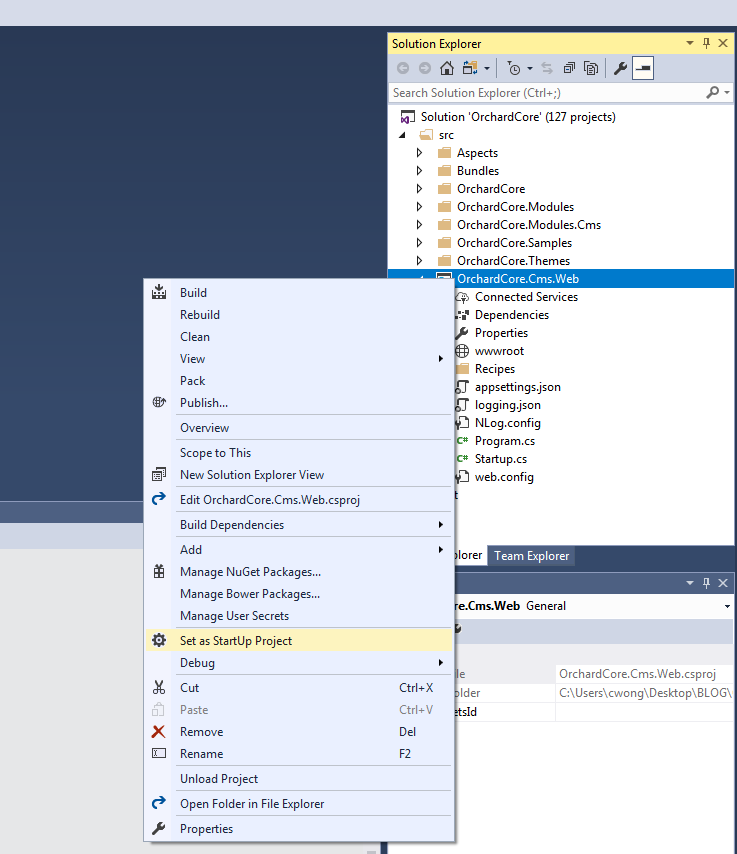
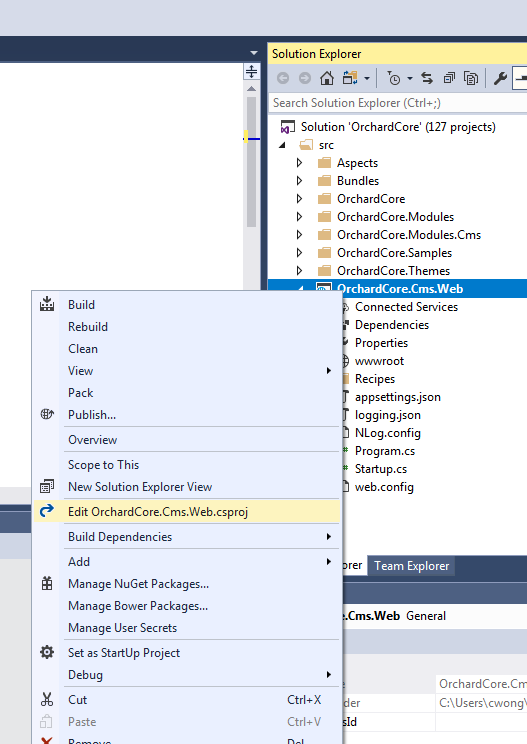
Before, pre-2.0, we would have run the dotnet restore and dotnet build commands at this point. But now, those are implicit commands with publish. So you can just run the publish command (right-click OrchardCore.Cms.Web and select “Publish…”). I used FTP to publish the project directly onto the Winhost servers. Instructions for different deployment methods are available here.
Wait for the project to publish, then navigate to your site and you should see the Orchard Core setup page:
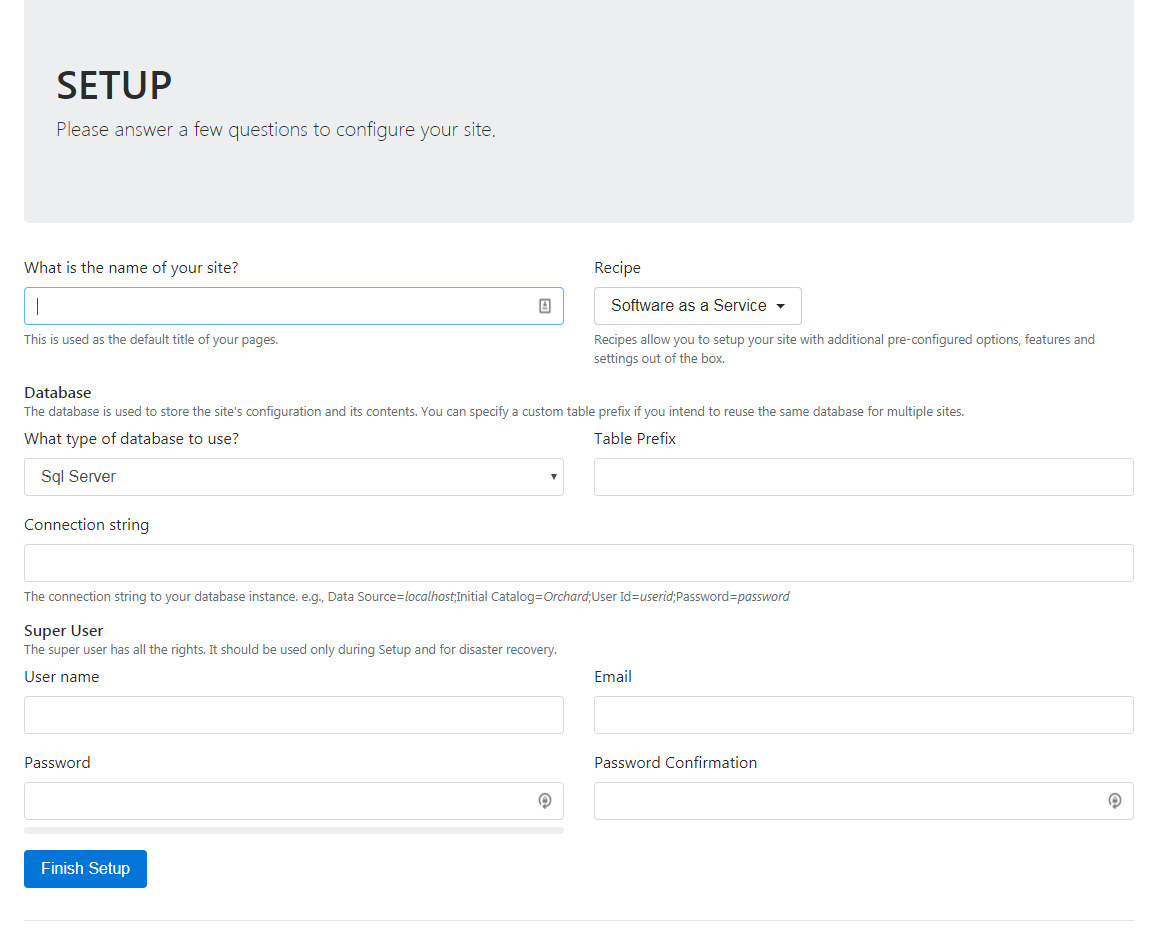
I picked the Agency Recipe. Fill out all the fields, click the Finish Setup button and you should see your new site:

The latest version of these apps are now available:
 From now through the end of the year, you will receive a 25% discount on all new sites ordered through Control Panel. The discount applies to whichever plan term you select, so the longer the term, the more you’ll save.
To get started, go to the “Sites” section of Control Panel and click the “Order New Site” button. Your discount will be automatically applied.
If you’ve been putting off purchasing a new site for that special project, now is a great time to get started. This discount is for current Winhost customers only. It’s our way of saying thank you for being a loyal customer. We appreciate your continued support!
The discount applies to hosting fees only for the first payment term. Subsequent terms will renew at the regular price. Domain registration and other third party services are not included.
![]()
SpamExperts is a great anti-spam service. It’s easy to use, and relatively inexpensive because you just need one service to cover your entire domain. (Most other spam services require you to buy one service for each of your email addresses.) Our SmarterMail email service (included with all of our plans) comes with some spam-fighting features that allow you to set your own weights and filters. But a lot of our customers were not comfortable with tweaking those weights and filters on their own and risk losing important emails.
SpamExperts is highly effective out-of-the-box. Simply set-it-and-forget-it. In fact, we found it so effective that we switched over to using it for our own corporate emails.
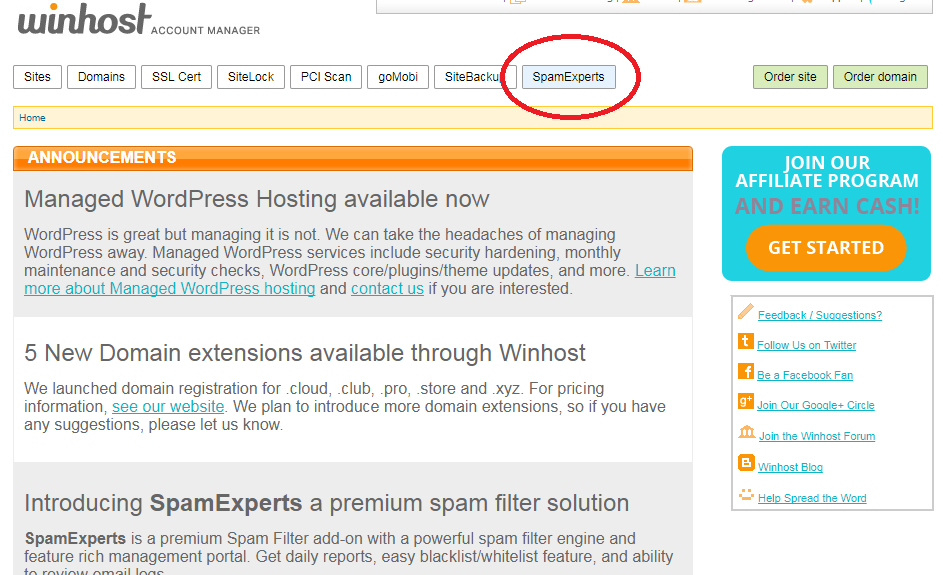
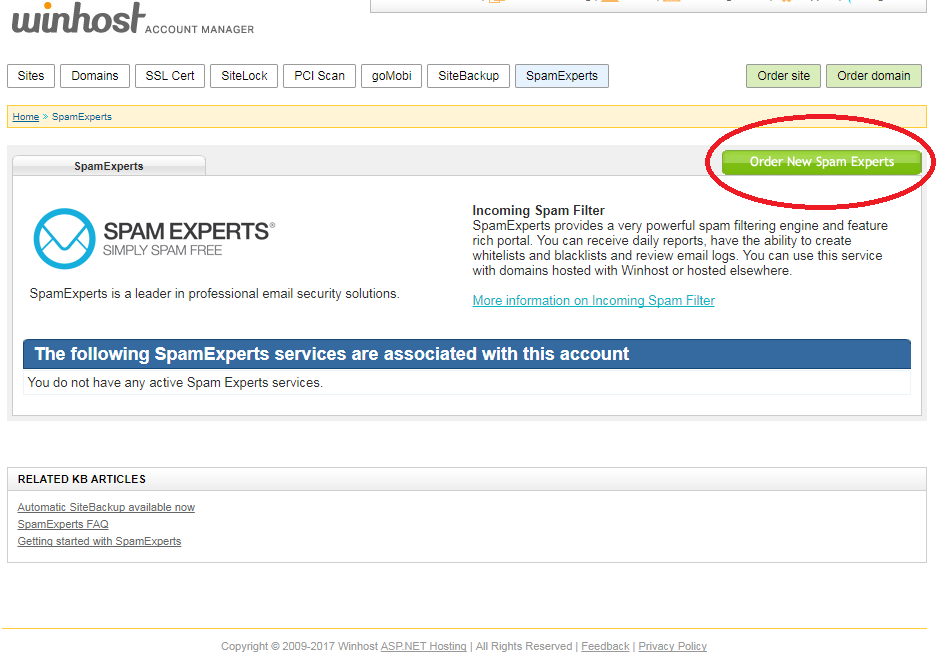
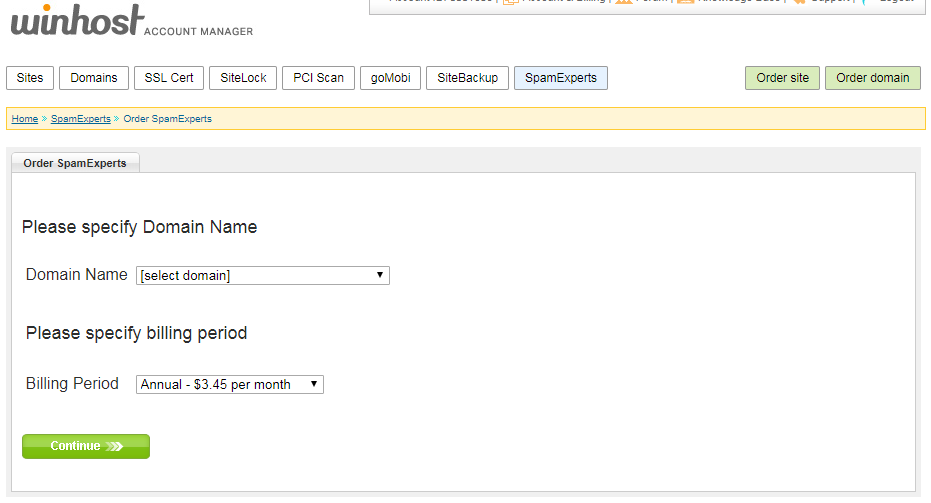
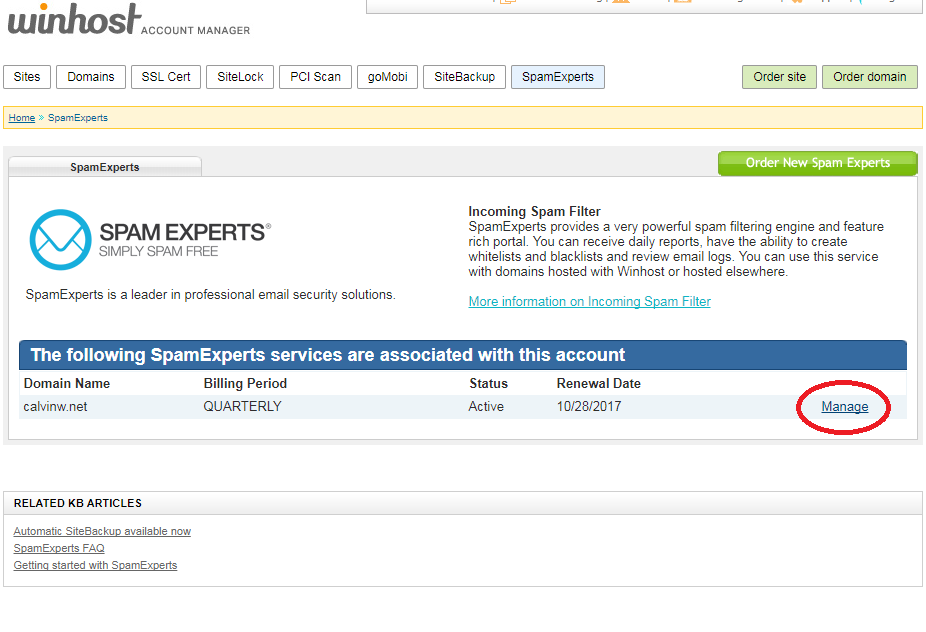
This articles explains how to set up your SpamExperts service.
On the next page, you can set where SpamExperts will send your email after filtering. Our system will look up the current email servers for your domain. This will be the correct setting for most users.
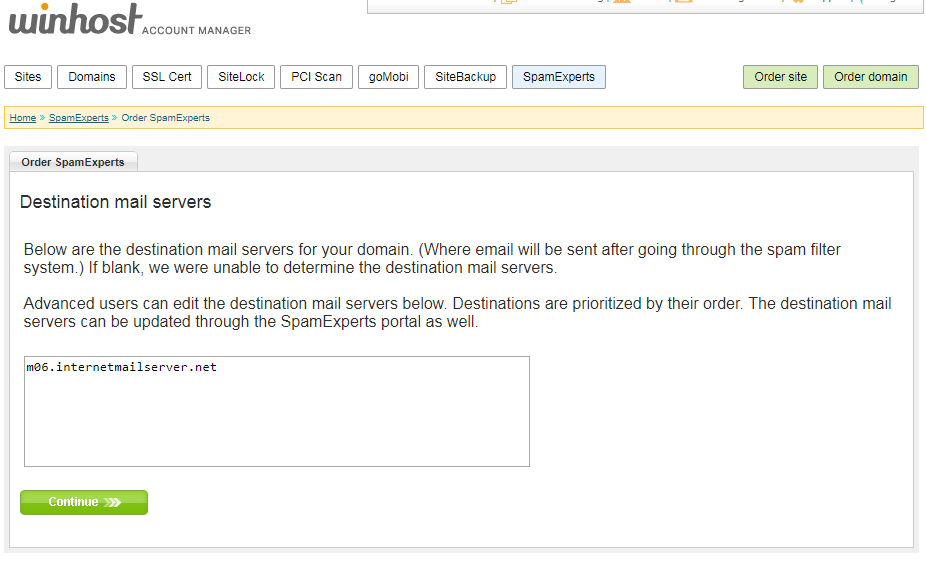
The service will only take a few seconds to set up. Now you have to set up your domain mail records (MX Records) to point to the SpamExperts service.
On the next page, you’ll see the SpamExperts MX Records to use. If you are using our nameservers, our system will automatically set up the MX Records for you.
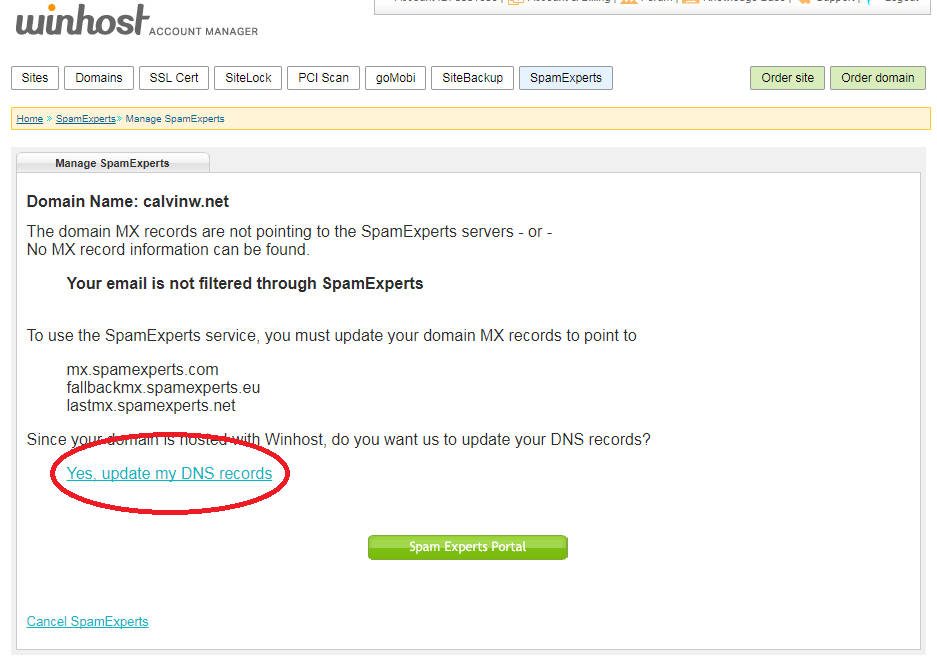
And you’re all set! Again, SpamExperts works great out of the box. If you’re so inclined, you can click the green SpamExpert Portal button to get the SpamExperts interface to make changes to the service settings.
A note about Greylisting: Greylisting is an effective anti-spam function that we enable in SmarterMail by default. Greylisting can delay when you receive new emails. Disabling Greylisting gets rid of the delay, but likely results in much getting more spam. With SpamExperts filtering out spam, you can disable Greylisting in SmarterMail. No spam, no delay. Yay!
![]()
SiteBackup is a set-it-and-forget-it backup service that will automatically backup your website and database. Backups are stored in a remote location and previous versions can be restored to the web server with just a click. Here are instructions on how to order and set up SiteBackup.
You can order SiteBackup through your Winhost Control Panel. We offer three plans, each with different storage amounts. You only need one SiteBackup plan to back up all of your sites, so just pick the plan with enough storage to cover your sites. Click the orange button to select the plan you want, then click the Submit My Order button on the next page.
It takes a few minutes for our system to provision the service. You can click the Back button or the SiteBackup tab, and if the service is ready, you’ll see this page, where you can add a site:
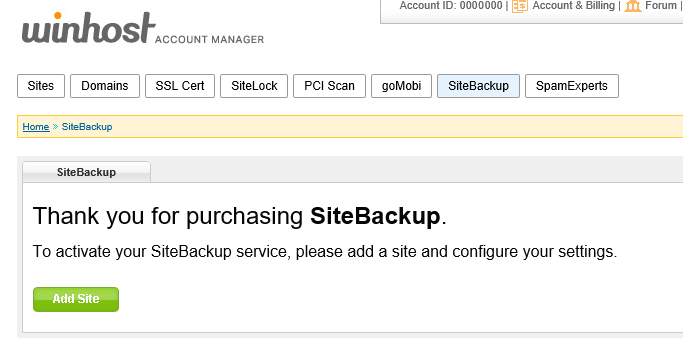
Click the Add Site button and on the next page you can select the sites you want to back up.
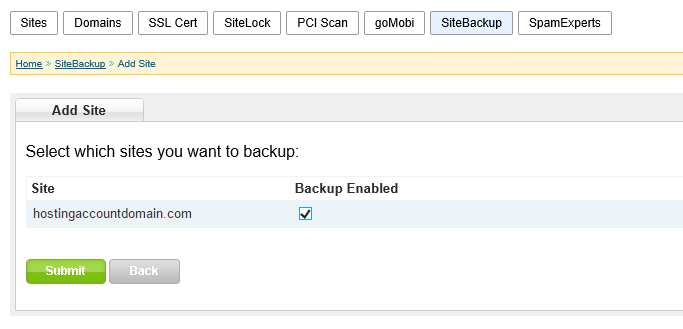
Select which site(s) you want to back up, click the Submit button, and our system will automatically pass along the required info. On the next page, you can click the SiteBackup Management Tool link to get to the SiteBackup Dashboard interface.
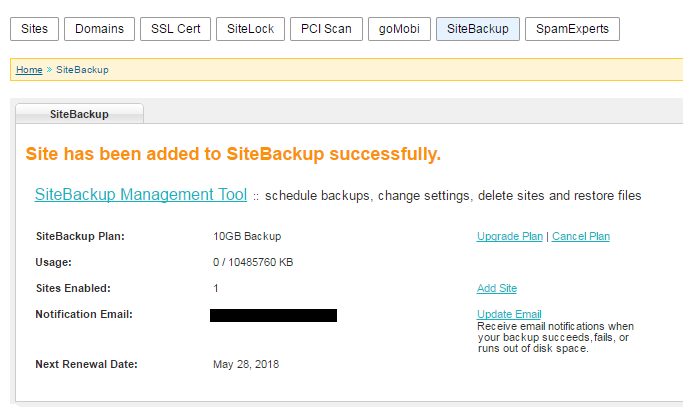
On the SiteBackup Dashboard, you can configure your backup schedule. By default, there will be a daily backup scheduled. You can keep that, change the backup time, change the backup frequency, and run an immediate backup.
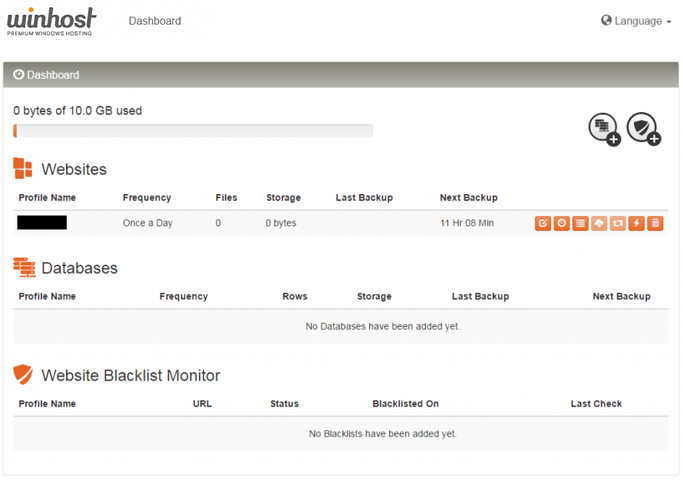
You can also back up your databases (the example in that Knowledge Base article is an MS SQL database, but SiteBackup can also back up your MySQL databases).
The system will email you if a backup fails (like when you change the FTP password). So just keep an eye out for those emails. But other than that, it’s set and you can forget it.
We apologize for a lack of updates. It’s just been busy here at Winhost. Here’s a list of what was updated: