
Site hosting news, tutorials, tips, How Tos and more
The latest versions of the following applications are now available through our App Installer tool in Control Panel:
It used to be that unless your site accepted payments for products or services, you didn’t really need to concern yourself with an SSL certificate, which allows you to encrypt and secure your site traffic using the https protocol. Those days are quickly coming to an end as web security becomes a larger issue, and giants like Google are making an aggressive push to encrypt all web traffic.
Maybe you have even already received a warning email from Google: “Beginning in January 2017, Chrome (version 56 and later) will mark pages that collect passwords or credit card details as ‘Not Secure’ unless the pages are served over HTTPS.” But what does that mean?
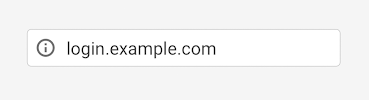
Right now (December, 2016) Chrome shows an “information” icon on all non-https pages (Firefox also uses a similar icon):
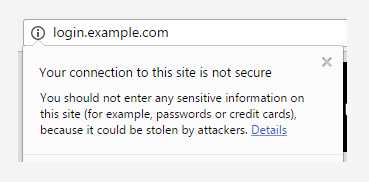
Which seems pretty benign, unless you click that icon and get the insecure site warning:
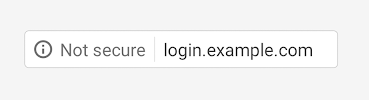
Starting in January of 2017 Chrome is going to take that a step further and add a text warning:
Then “eventually” – which, knowing Google, could be any time – they are going to throw the red flag at non-https pages:
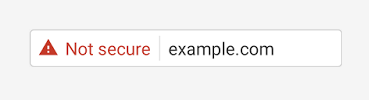
At the moment those warnings only apply to http pages containing password or credit card input fields, but Google definitely plans to extend the Chrome warnings to all http pages, regardless of whether they accept user credit card or authentication input.
Using https encrypts connections to prevent anyone from tapping in to the communication between your website and your visitor’s browsers. It also prevents the bad guys from exploiting your site by injecting malicious code or unwanted advertising into your user’s browser.
The https connection lets your visitors know that they’re securely connected to your site. That what they’re seeing is legitimate information. It also prevents anyone from accumulating of a lot of user data or behavior related to your site traffic. Aggregate data like that can be used for a number of malicious purposes, so blocking access to it is a good thing.
Right about now you may be thinking, “Okay, I get it, but I’m not really concerned about someone listening in to my site traffic.” That’s understandable. Most sites run a pretty low risk of being targeted in that way. But you probably don’t want to see every page of your site displaying a red “Not secure” warning in Chrome (and eventually in other browsers as well).
That’s reason enough to take steps now to make every page of your site available via https (and redirect http requests to https). You might even consider it a priority, since the Chrome browser currently has a 56% market share, and that percentage is increasing.
But aside from avoiding the warning label, there can be other benefits to using https. In their own words:
“Google uses HTTPS as a positive ranking signal. This signal is one amongst many others, and currently carries less weight than high-quality site content; you should not expect a major SEO advantage for moving to HTTPS in the short term. In the longer term, Google may increase the strength of the HTTPS boost.”
Google is making it pretty clear that in the future they are going to give an edge in search result rankings to sites that use https. And who doesn’t want an edge where that’s concerned?
The good news is it isn’t exactly a “move.” Your site stays on the same server, you just add an SSL certificate to your account and make the necessary changes to redirect http traffic to https. This article is already pretty long, so we won’t do a tutorial here, but other than redirecting to https, there are a few other things you’ll want to watch out for:
If you use Google Webmaster Tools, after you’ve made the switch, add the https version of your URL as a new property, set the “preferred version” of that property to https and (re)submit your sitemap. Here’s a Google-centric FAQ on transitioning to https that you may also want to take a look at.
Finally, you may have heard that you can get a free SSL certificate from Let’s Encrypt. That’s true, and you can use those certs here at Winhost. But the Let’s Encrypt certificates come with some drawbacks. Make sure you’re aware of what’s involved in using such a cert before you commit to one.
We’ll have more information on this subject in the coming months. We expect that there will be a lot of questions when Google makes the changes to Chrome, and we’ll do our best to address those questions here and in our Knowledge Base.
The changes have already begun in the latest version of Chrome (55.x). They aren’t flagging insecure sites yet, but they are spelling out “Secure” now:
This is the season when everyone is doing their annual recaps, so I figured we should do one too. We had a busy year on a lot of fronts, and here are just a few of the new features and services that we introduced in 2016.
 ASP.NET Core (ASP.NET 5)
After a long wait and a naming convention change, Microsoft finally released their highly anticipated ASP.NET Core (formerly known as ASP.NET 5), and you didn’t have to wait for us to support it. We support ASP.NET Core on all our hosting plans that run on Windows 2012.
 Microsoft SQL 2016
In 2016, Microsoft released their next SQL version and, of course, we made it available for you to use.
SpamExperts Email Spam Filter
You told us that you were frustrated with increasing spam, so we partnered with SpamExperts to bring you a cost-effective premium spam filter solution.
 PHP 7
PHP 7
This year we introduced support for PHP 7. Even though we are a Microsoft-based host, we are keeping up with PHP too, so you can stay on the cutting edge of all aspects of web development.
New Top Level Domains
There are tons of new domain extensions available now, so we revamped our old domain registration system and introduced a handful of new domain extensions. We’ll be introducing even more in the future, and in the meantime we’re open to your feedback regarding other domain extensions you would like to see us offer.
Free Website Migration Services
We understand that moving a website can be a painful process and the prospects of moving can keep you stuck with a less than desirable host for longer than you’d like. We are making it easier to move your site to Winhost by offering free website migration services. Make it your new year’s resolution to finally rid yourself of your tired old host!
Have a great holiday season and a happy new year.

![]() If you’re using the anti-virus application Kaspersky Endpoint Security 10 for Windows and Filezilla for FTP, you might have encountered an ENETUNREACH “Network unreachable” error when trying to upload your files to the server. Or, perhaps you updated Filezilla to version 3.11.0 (or above) and it stopped working, giving you the same ENETUNREACH error.
If you’re using the anti-virus application Kaspersky Endpoint Security 10 for Windows and Filezilla for FTP, you might have encountered an ENETUNREACH “Network unreachable” error when trying to upload your files to the server. Or, perhaps you updated Filezilla to version 3.11.0 (or above) and it stopped working, giving you the same ENETUNREACH error.
![]() This is a known issue between Filezilla and Kaspersky. It happens because of the new way Filezilla binds IP addresses to prevent data connection stealing. You can read about the details in this forum post.
This is a known issue between Filezilla and Kaspersky. It happens because of the new way Filezilla binds IP addresses to prevent data connection stealing. You can read about the details in this forum post.
You can fix this issue by either reverting back to an earlier version of Filezilla (version 3.10) or by adding an exclusion to the Kaspersky firewall.
Follow these directions to add an exclusion for Filezilla:
You should be able to connect to the server with Filezilla now.
Of course, there are lots of other reasons why you may get an FTP error. If you do, we offer free (and excellent) technical support for our customers. You can always reach our Support team 24/7 at [email protected] or through our support portal at support.winhost.com.
Starting today, December 1st, new ICANN rules are in effect that change the way some domain contact information changes are done. The change affects all generic top level domains, such as .com, .net, .org, .biz, .info, etc., (including all of the new domain extensions, like .blog, .photo, etc.). Country code domains (.uk, .TV, .co, etc.) are not affected.
When you change the first name, last name, email address or organization for the registrant (i.e., the domain name owner) you have to acknowledge the change in two separate emails. This applies to changes made to the registrant’s contact information. Changes to the admin, billing and technical contacts are not affected.
Changes to the registrant’s name, organization or email information are now treated the same way a “registrant change” was treated in the past. But in the past the registrant change was assumed to be a change of ownership from one person to another, so emailing both parties was necessary.
Now those emails are triggered any time you update your name or email address, and two emails will go to the same person. You need to approve the change by clicking the link in both emails, or the change will fail.
If you want to learn more about the new policy, check out this Knowledge Base article.
![]()
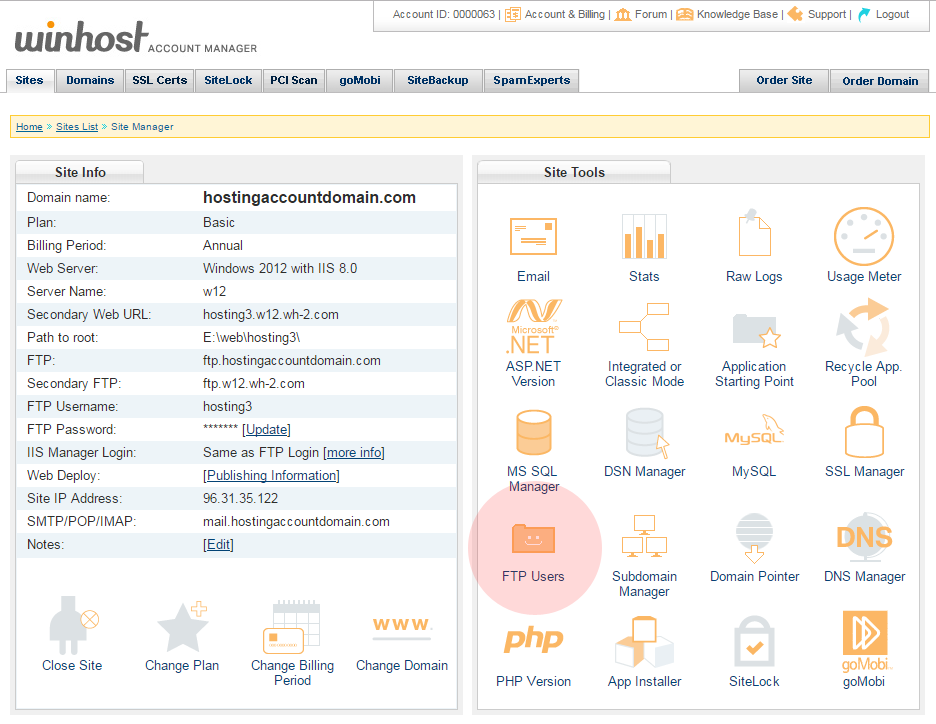
Sometimes you want to give someone FTP access to your site, but you don’t want them to have access to all of the site files. So we’re going to go through the steps to set up an FTP user that only has access to a directory that you specify.
 The first thing we’re going to do is go to the Site Tools section of Control Panel and click on the “FTP Users” icon or link:
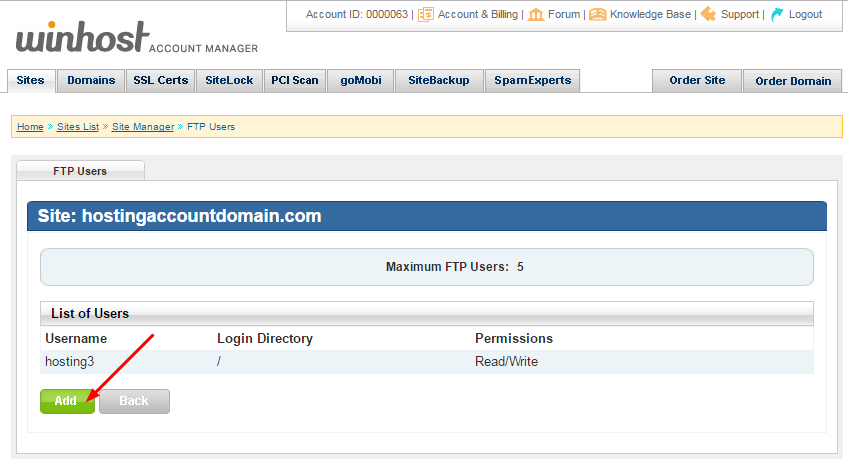
 Click the “Add” button:
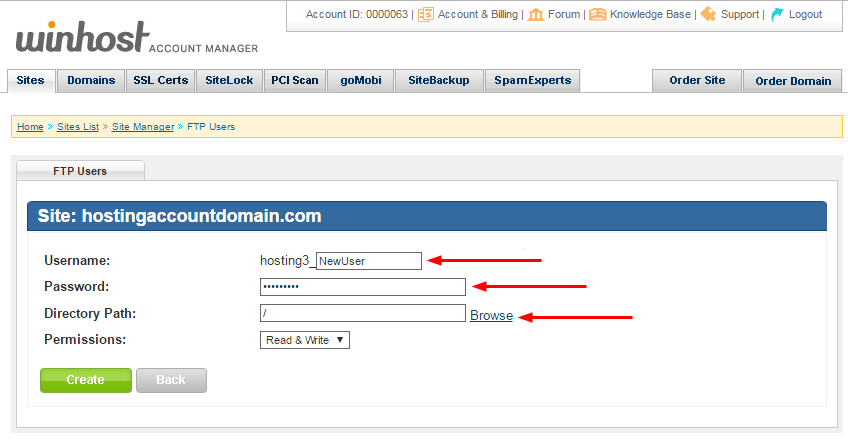
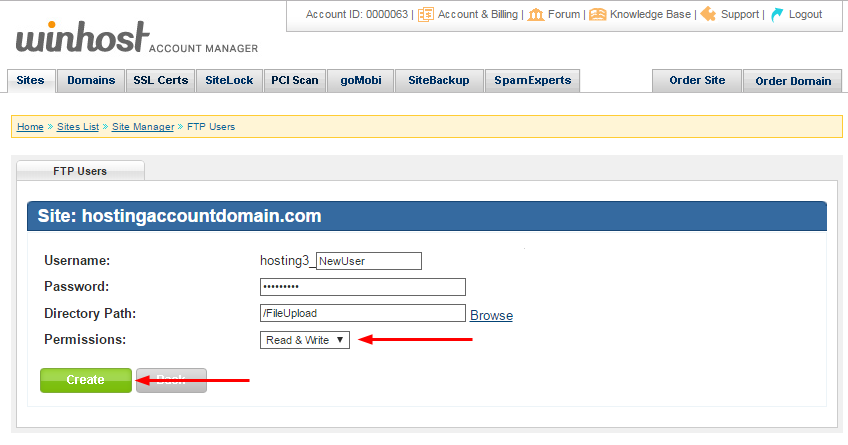
 Enter a username (it will be appended to the primary FTP username, that format can’t be changed) and a password. Enter the directory name or click the “Browse” link to choose from directories on the server:
Note that entering the name of a directory that does not exist does not create that directory on the server. You must enter the name of an existing directory.
 If you clicked the “Browse” link, select the directory (it will turn bold and the path will be automatically entered in the text field below) and click the “Select” button:
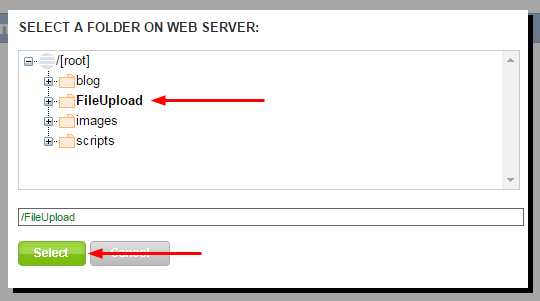
 Make sure you leave the “Permissions” field set to “Read & Write,” since this user will be uploading files (the other option is “Read Only”). Click the “Create” button:
 When the user is added you will see it listed in the FTP Users section. Here you have the option to update the user’s password, or delete the user. The username cannot be edited once the user is created.
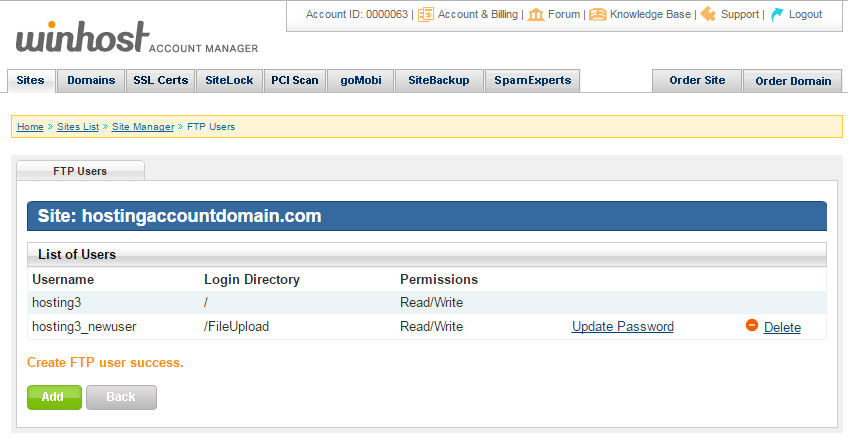
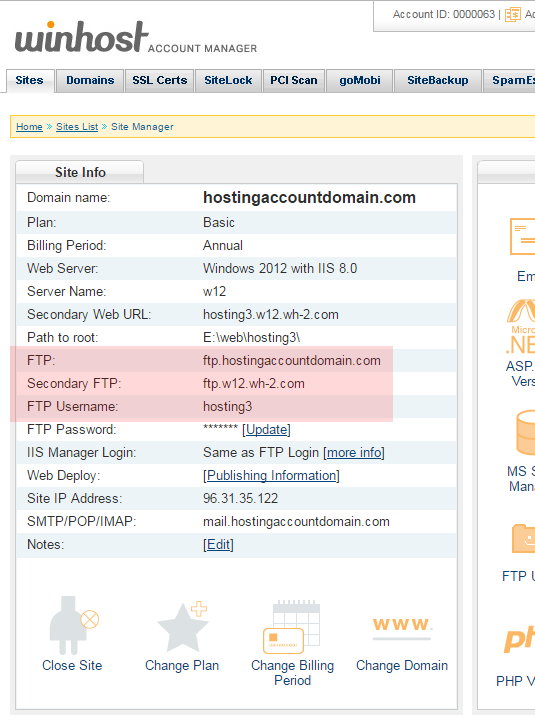
 The new user will log in to the same hostname as your existing user(s), but of course the username and password will be those that you just created.
![]()
Jetpack is one of the most popular plugins available for WordPress (with over 29 million downloads!), created by Automattic – the same people who made the WordPress app itself. It’s a Swiss Army knife for you site with over a dozen different functions all rolled into one plugin.
It includes essential tools like a website stats, subscriptions, social network sharing and a contact form. It will also hookup with WordPress.com to perform related posts and website uptime monitoring. And it’s free!
![]()
If you try to implement Jetpack on Winhost, it won’t work out of the box. By default, we filter requests to the xmlrpc.php file. WordPress.com will try to ping that file during the activation process and it will fail.
One of the reasons we block requests to the xmlrpc.php file is because of an exploit hackers can use to get your WordPress username and password. You can read about the exploit in this excellent Sucuri article.
If you don’t want to bother reading the article, in short, hackers can try thousands of username/password combinations with one request and try to brute force their way into your WordPress site.
But don’t worry, you can still get Jetpack to work by simply overriding our default request filtering. You just have to add this setting in your web.config file:
<configuration>
   <system.webServer>
      <security>
         <requestFiltering>
            <denyUrlSequences>
               <clear />
            </denyUrlSequences>
         </requestFiltering>
      </security>
   </system.webServer>
</configuration>
If you just have a WordPress site on our service, or if you used our App Installer to install WordPress, you might not have a web.config file on your site, so you’ll have to create one. Just follow these instructions:
You should now be able to activate the Jetpack plugin. But before you go, there’s the pesky security issue! Your xmlrpc.php file is now susceptible to that security exploit, which may allow hackers to get your username and password. Let’s fix that!
![]()
The best way to prevent the xmlrpc.php brute force exploit is to get SiteLock with TrueShield CDN. You will need both SiteLock and TrueShield. TrueShield will block those suspicious requests trying to get your username and password, and protect your site from all sorts of other bad stuff not covered in this article. (If hackers were limited to just one exploit, our jobs would be so much easier!) We highly recommend getting SiteLock and TrueShield. It will block malicious bots, comment spammers, and likely make your site faster, too!
Another solution would be to use Jetpack’s own Protect function. You have Jetpack installed, now use it! Just activate the Protect feature in Jetpack in the Admin panel. The Jetpack team confirmed that it works.
Finally, though perhaps foremost: always use a strong password for your site! Please don’t use qwerty123 or pa$$w0rd.
Actually, do all three – get SiteLock with TrueShield, activated Jetpack Protect, and keep those passwords strong!
As if you could. 🙂
 It’s been what you might call a contentious election cycle here in the united states, but if there’s a positive spin to be put on the whole thing, it’s that we’ll likely see a large turnout at the polls. Maybe even record-breaking.
If group dynamics have taught us anything, it’s that a large enough group of people will usually make the right decision. Whatever “right” happens to be for the group at any given moment in time.
Whoever you’re voting for, it’s always an honor and a privilege to participate in a peaceful transfer of power. It isn’t something that everyone in the world gets to enjoy, so be sure to take advantage of it.
Even if a two party system leaves a little something to be desired…