
Site hosting news, tutorials, tips, How Tos and more
Too funny. Just saw this new Microsoft ad campaign.
[Video deleted.]
A recent Twitter virus has re-surfaced, and we were sent the link via a direct message on Twitter:
@jkruessel to Winhost dm: Someone is posting a pic of you all over twitter ;( link2pic here http://no.thanks/yZkg August 24, 2011 at 11:37 AM
Don’t let the bad guys hook you!
Clicking that link (which we’ve changed, of course) takes you to a Twitter login page that is really a phishing site. Once the bad guys have your Twitter login, they use it to phish in more of your friends and contacts and spam moneymaking schemes all over Twitter.
We’re all used to being cautious where email attachments and links are concerned, but these newer social media exploits rely on people being less suspicious of links that show up via Twitter or Facebook. But of course you should still be wary when clicking any link that comes to you out of the blue, especially when it’s been cloaked using a URL shortening service. One way to check on such links is to use a site like http://real-url.org, which shows you the real URL behind the shortened version.
Since we’re talking about Twitter, be sure to follow @Winhost. We’ll never steer you wrong!

Did you know that Winhost has an affiliate program? Well, now you do!
If you aren’t familiar with affiliate or referral programs, what they do is pay you for referring customers to a business. You usually refer people using a link on your site, or if it’s a service that you use and enjoy yourself (like Winhost!), you can refer people you know personally.
The more customers you can refer to us, the more money you can make per referral. If you have a busy site, or know a lot of people who can use hosting, why not let us pay you for sending them our way?
You don’t have to be a Winhost customer to join our affiliate program. The affiliates page should answer all your questions, but feel free to let us know if you have any questions that aren’t covered.
![]()
Note: The manual methods in this tutorial are great, but if you’re looking for a “set-it-and-forget-it” automated backup solution, we now offer a site backup service that can also back up your MS SQL and MySQL databases. Read more about it on our site, or activate it in Control Panel. It’s easy, it’s inexpensive and it’s cool. What more could you ask for?
A lot of people seem to have a problem doing backup and restoration of a MySQL database easily and quickly. However, I am going to show you how to do just that using MySQL’s built in mysqldump.exe utility through a Windows MS-DOS prompt.
There are some limitations to this utility given that Winhost customers cannot add and drop databases when trying to restore a backup, so the restore section is only recommended for new empty databases. My local environment also consisted of using MySQL version 5.5.13 so that this information would be as up to date as possible. You can find additional features, commands, and details on this tool straight from the MySQL site.
First you are going to want to download the latest version of MySQL from the MySQL site.
Note: If you are not sure whether to download the MSI installer file or the .zip archive I would recommend to downloading MSI package. This file provides you with everything you need including a Configuration Wizard which is not included in the No-install Archive.
 Now install MySQL on your local machine in the default directory
 C:\Program Files\MySQL\MySQL Server 5.5 since this is what Oracle recommends. Here is the installation documentation for both the MSI Installer package and the ZIP Archive:
Installer – http://dev.mysql.com/doc/refman/5.5/en/windows-using-installer.html
Archive – http://dev.mysql.com/doc/refman/5.5/en/windows-install-archive.html
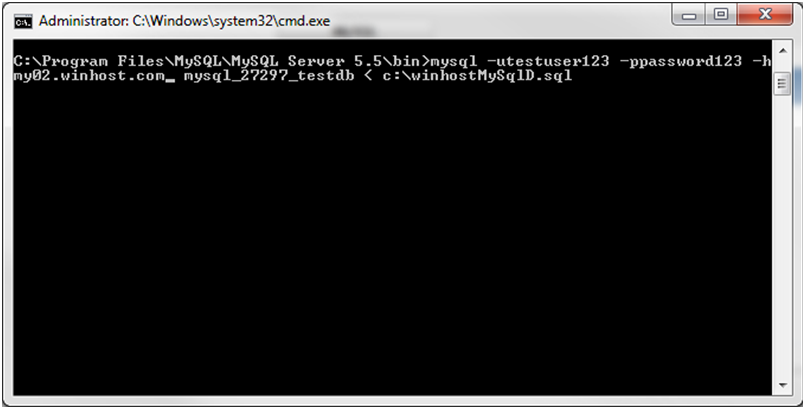
Here is an example of the command line syntax:

Note: The following command will only write the data that is in the .sql file. This will not drop and create the database or truncate any of your other tables in your database. The command will script all the table data in the .sql file to your Winhost database. If you have a table name present in your Winhost database that matches a table name in the .sql file, the table will be overwritten with the new data. Otherwise the script will create a new table and populate it with the new data.
There are many other features and commands available if you would like to dig a little deeper into this useful utility, including setting character sets, changing ports, and selectively choosing tables to dump. In case you missed it earlier I have included the link below:
http://dev.mysql.com/doc/refman/5.5/en/mysqldump.html
Jaime
Winhost Technical Support
![]()
It’s easy, it’s fast, what are you waiting for?
Connecting to your Winhost server using Expression Web Designer
Note: Expression Web Designer uses the Internet Explorer engine to connect via FTP. To establish an FTP connection in Expression Web Designer you will need to go to Internet Explorer Tools/Internet Options/Advanced and ensure that “Use Passive FTP (for firewall and DSL compatibility)” is checked.