 We’ve added php 7 to the mix, it’s available to use now.
We’ve also updated the 5.3, 5.4, 5.5 and 5.6 php versions to the latest (and in some cases final) builds.
You might notice that we’ve labeled php 7 as “beta,” and that’s because it’s still pretty new and there are a lot of known compatibility issues with older code or applications. But if you’re bold and adventurous type, it’s there for you.
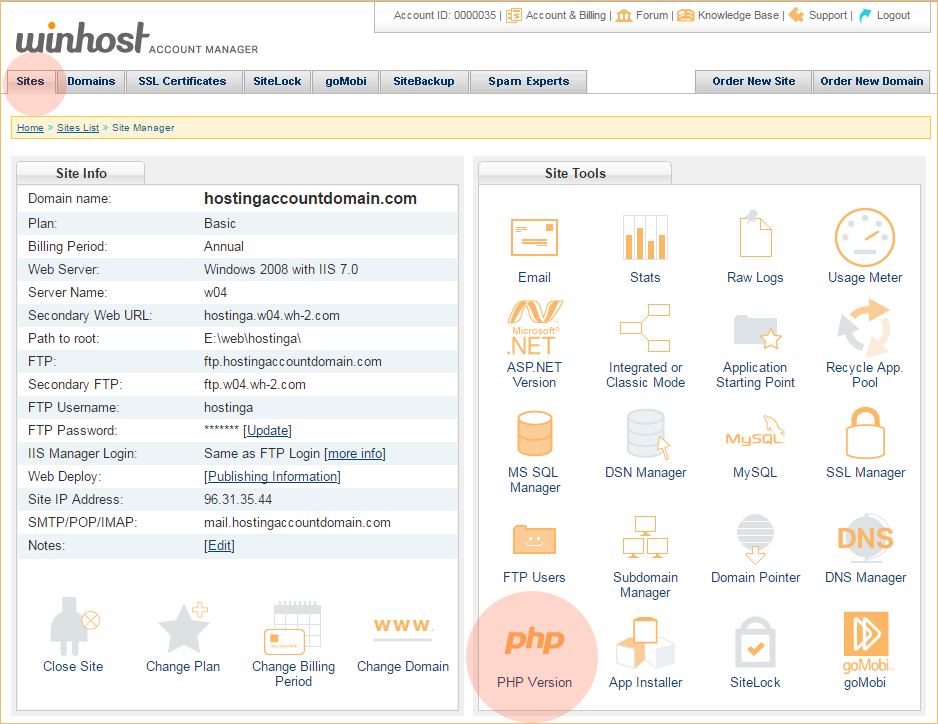
To change the php version for your site, log in to the Site Tools section of Control Panel, and click on the PHP Version icon.
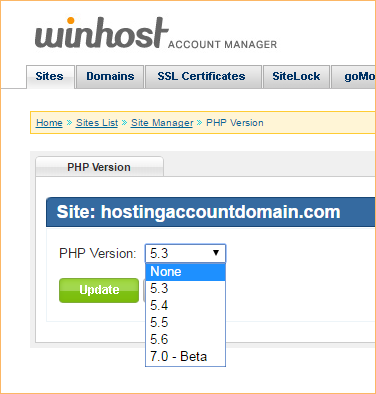
Use the handy dropdown to select the version, click the “Update” button, and you’re done.
![]()
Every Winhost account includes traditional website statistics, but there are occasions where you may need to see the raw server logs for your site. Luckily it’s easy to get your logs, here’s how to do it.
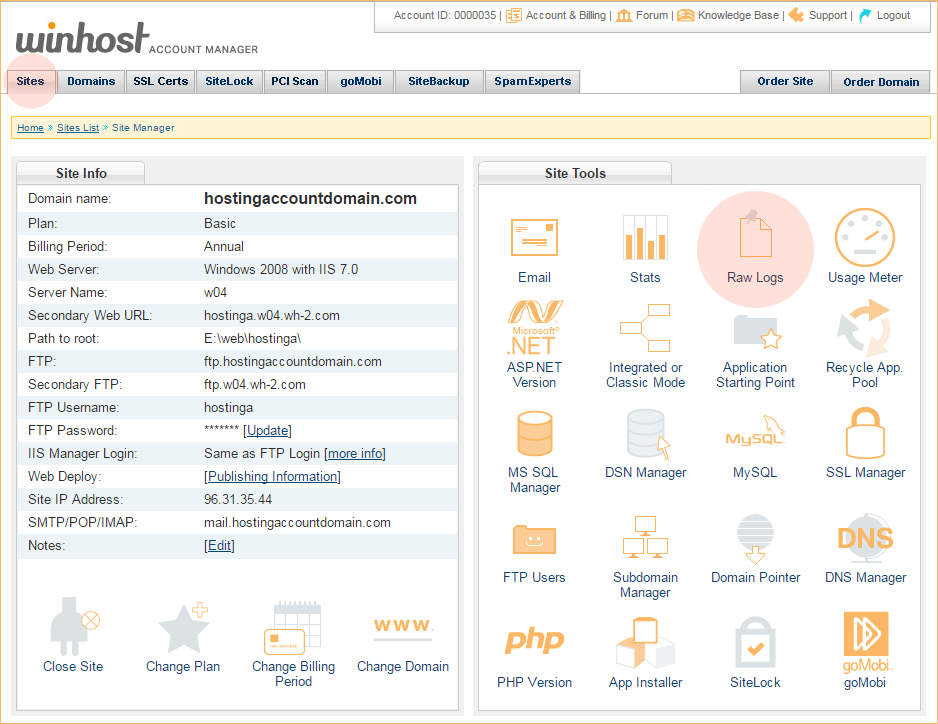
In the Site Tools section of Control Panel, click on the Raw Logs icon.
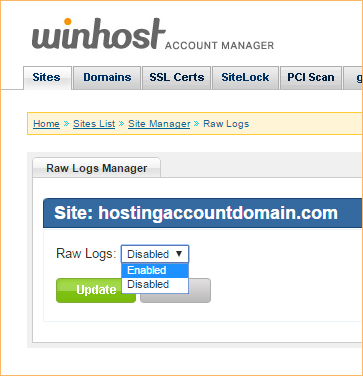
In the dropdown, select “Enabled,” and click the “Update” button.
Your raw log files won’t appear immediately, but they will be available within 24 hours and updated nightly thereafter. The log files are compressed into a .zip archive. To download the logs, log in via FTP and go to the /httplog directory.
Note that the log file directory is a hidden directory so it will not be visible when you log in via FTP. After logging into your root directory you have to use the change directory function in your FTP client to change to the log file directory. You have to use your default FTP username to access the /httplog folder. You will not be able to access the hidden /httplog directory using an additional FTP user that you’ve created.
Log files more than 30 days old will be automatically deleted.
There is a lot of talk around using https “everywhere” these days, even on websites that do not do any financial transactions or accept user data input. Google already uses https as a factor in search results (though it’s a small factor, and not universally used in results everywhere in the world). But they have made it clear that their intention is to expand the use of https as a search results ranking factor next year.
All of which has a lot of people who may have never considered using an SSL certificate before looking in to making the move to SSL/https. The main barrier for a lot of people isn’t the technical issues around implementing an SSL certificate, but rather the price. SSL certificates cost money. Some of them (like those with “Extended Validation”) cost a considerable amount of money.
A group of security-minded people thought there should be a free alternative, so they got together and the open source Let’s Encrypt project was started (by the Internet Security Research Group, with support from the Electronic Frontier Foundation, the Mozilla Foundation, Akamai, and Cisco Systems). Let’s Encrypt is now up and running, issuing free SSL certificates to anyone who wants one.
Pretty great, right? Well, yes and no.

For instance, if you want one of those Extended Validation certificates, you can’t get it from Let’s Encrypt. Organization Validation, Extended Validation and wildcard certificates are not available. Let’s Encrypt does not verify sites, so if you want a security “seal” to put on your site or order form, you can’t get it from Let’s Encrypt.
That’s right, Let’s Encrypt does not verify sites, which means hackers are building malicious sites using Let’s Encrypt certificates because they’re free and the bad guys can remain anonymous. Wait a minute, though – isn’t validation the whole reason for a security certificate in the first place? And what will become of the Let’s Encrypt certificates if their system becomes overrun with malware and phishing sites?
Even if you don’t care about any of those things, the Let’s Encrypt certificates have a major convenience drawback, because the certificates are only valid for 90 days. That means that every three months you have to request a new Let’s Encrypt certificate and install it on the server, and that process is no fun. Especially on Windows servers (like those at Winhost), since there is not any server-side automation available.
But increasing security is never a bad thing. And don’t forget, Google is going to look more favorably on https sites very soon, so an SSL certificate should be on your to-do list, no matter what kind of site you run. If you want to use Let’s Encrypt on your Winhost site, you certainly can. We support it. We don’t recommend it – for the reasons we just mentioned – but if you’re up for going through the process every 90 days, you can.
But if you’re more of a set-it-and-forget it type, we offer a full range of SSL certificates, starting at as little as $39 a year. You can register a certificate for two years as well, meaning it’s not something you have to think about every 90 days, or even every year. If you want to secure your site (and don’t want to see your Google ranking drop) you may want to get yourself an SSL certificate soon.
![]()
php is such a popular and widely used scripting language that sometimes it seems as if it’s always been part of website development. It hasn’t, of course, but it’s wide use in many popular third party “canned apps,” and the fact that a lot of people continue to use very old versions, makes it a prime target for hackers.
So if you don’t use php in your site, or an application that is php based, you may want to disable php as a preventative security measure. The bad guys can’t exploit something that’s not there, right?
The good news is disabling php is easy and you can do it in about 30 seconds. Here’s how:
In the Site Tools section of Control Panel, click on PHP Version.

In the dropdown, select “None,” and click the “Update” button.

And that’s all there is to it.
See, maybe even less than 30 seconds. 😉
For what it’s worth, php isn’t inherently less secure than any other web technology. It’s popularity is what makes it a frequent target. But it’s certainly possible to safely run any php application, even those third part applications that are the favorite targets of hackers. We’ll be posting more security-related articles in the future.
If you want to take a look at other security measures that are available right now, check the website.
Finally, if you run a WordPress blog – one of the hackers favorite targets – and are concerned about security but don’t necessarily have the time or inclination to tackle all the details, we offer a WordPress Hardening Service that buttons up your WP installation and lets you carry on with your life worry-free. Well, at least you won’t have to worry about WordPress. Log in to the Support Portal and open up a tech support ticket, they can give you all the details.
![]()
As if everything related to domain name registration and maintenance wasn’t already screwy enough, there is a new change on the horizon that promises to make updating your domain names even screwier.
After December 1, 2016, when you change the first name, last name, contact email or organization field for your domain, it will trigger something called the “trade process.” Without going into too much technical detail, what that means is those previously minor ownership information changes will now be treated the same way a domain transfer is treated.
The problem with that is now the domain owner will have to approve those changes via two separate – but similar – emails. That’s because the “current” and “previous” owner – which are the same person in this case – need to explicitly approve the change, or it will not be made.
So if you update your name or the name of your organization, you’ll have to approve that change in two emails. If you update the email address associated with a domain name, you’ll have to approve that change at the old and the new email address. You can probably already see some potential problems, can’t you.

So why are these changes happening? Well, ICANN started reviewing the transfer process almost 10 years ago, when potential issues with the existing transfer policies were identified. So they began looking at “special provisions” for change of registrant during a transfer in order to prevent domain hijacking.
Which sounds like a good thing, but now, a decade later, what we ended up with is a process that may make it slightly more difficult to hijack a domain, but definitely makes a lot of day-to-day maintenance tasks more difficult and confusing.
Every registrar has some leeway in how they implement the changes, so we’re not sure yet exactly how it’s going to work for domains registered through Winhost. We’ll do everything we can to keep the confusion to a minimum, and we’ll post an update here when we have more information on how things shake out.
![]()
The latest versions of the following applications are now available through our App Installer tool in Control Panel:
![]()
Now that we support it, here’s a quick tutorial on how to deploy an ASP.NET Core 1.0 Application to Winhost using Web Deploy.
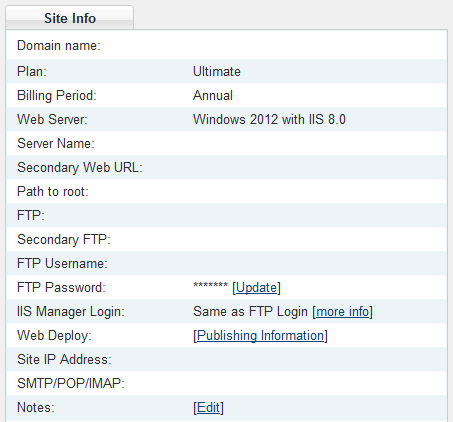
Please note that you cannot publish to a sub-directory using Web Deploy at this time due to a bug which Microsoft will correct at a later date. If you want to publish your application to a sub-directory, you will need to use FTP.
![]()
Note: The manual methods in this tutorial are great, but if you’re looking for a “set-it-and-forget-it” automated backup solution, we offer a site backup service that can also back up your MS SQL and MySQL databases. Read about it on our site, or activate it in Control Panel. It’s easy, it’s inexpensive and it’s cool. What more could you ask for?
Making a backup in MySQL workbench is a pretty easy task once you know what to do, but it can be a little confusing the first time around. Allow us to save you some time with these simple instructions.
Version 6.3.7 is shown here, and of course future versions may differ. Download MySQL Workbench here (you’ll need a free Oracle account if you don’t already have one – just click the “Register” link in the upper right corner of that download page).
First thing you’ll need to do in Workbench is connect to your database.
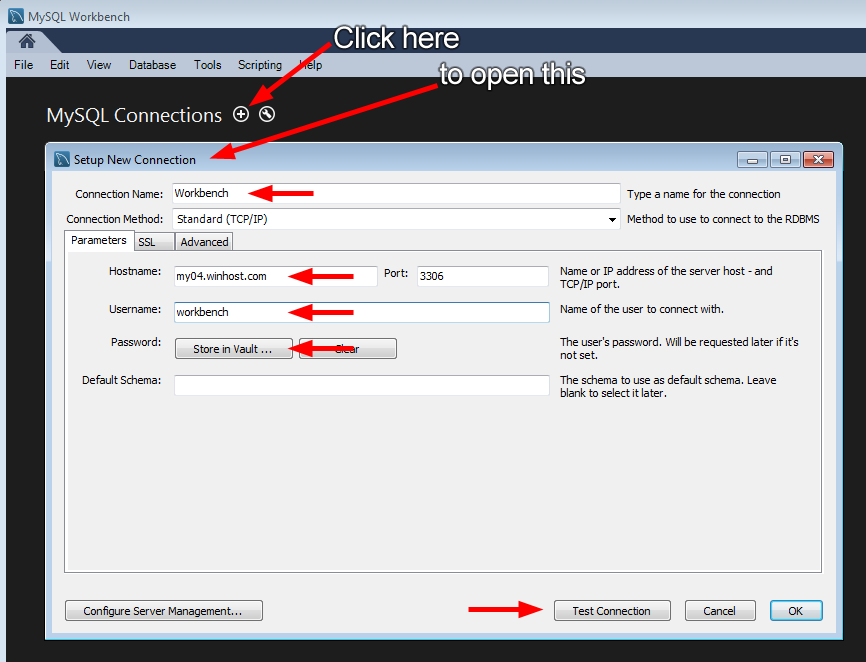
If everything is correct you’ll see the successful connection box.
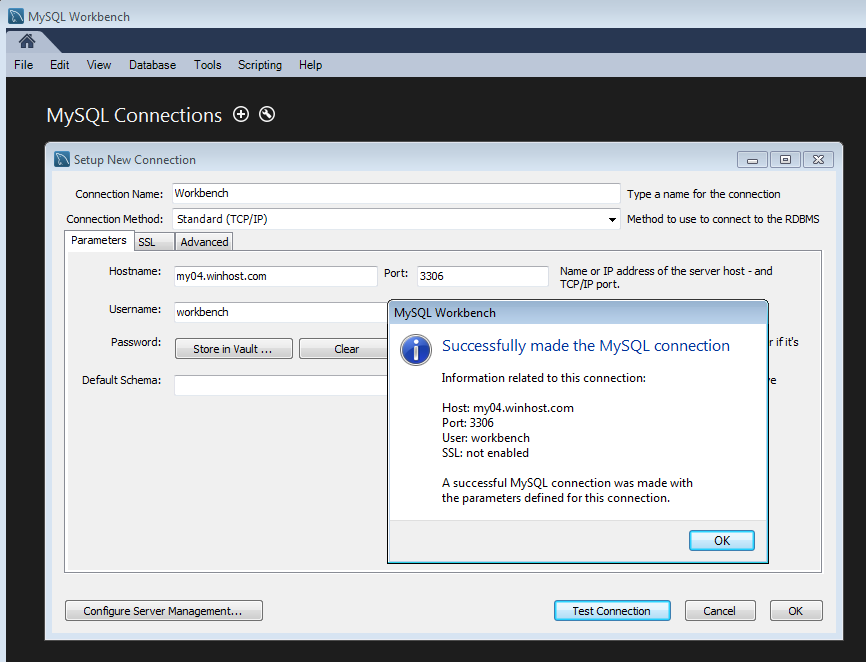
Go ahead and close that, and click the connection that you just set up.
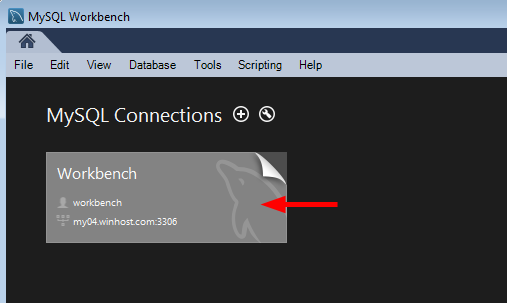
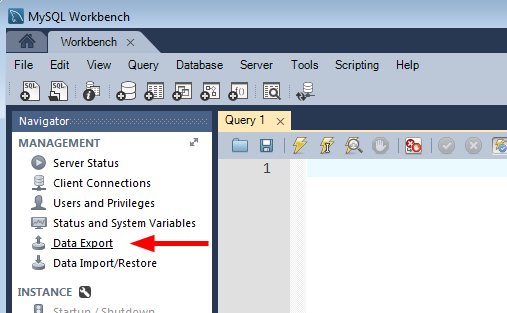
Click “Data Export.”
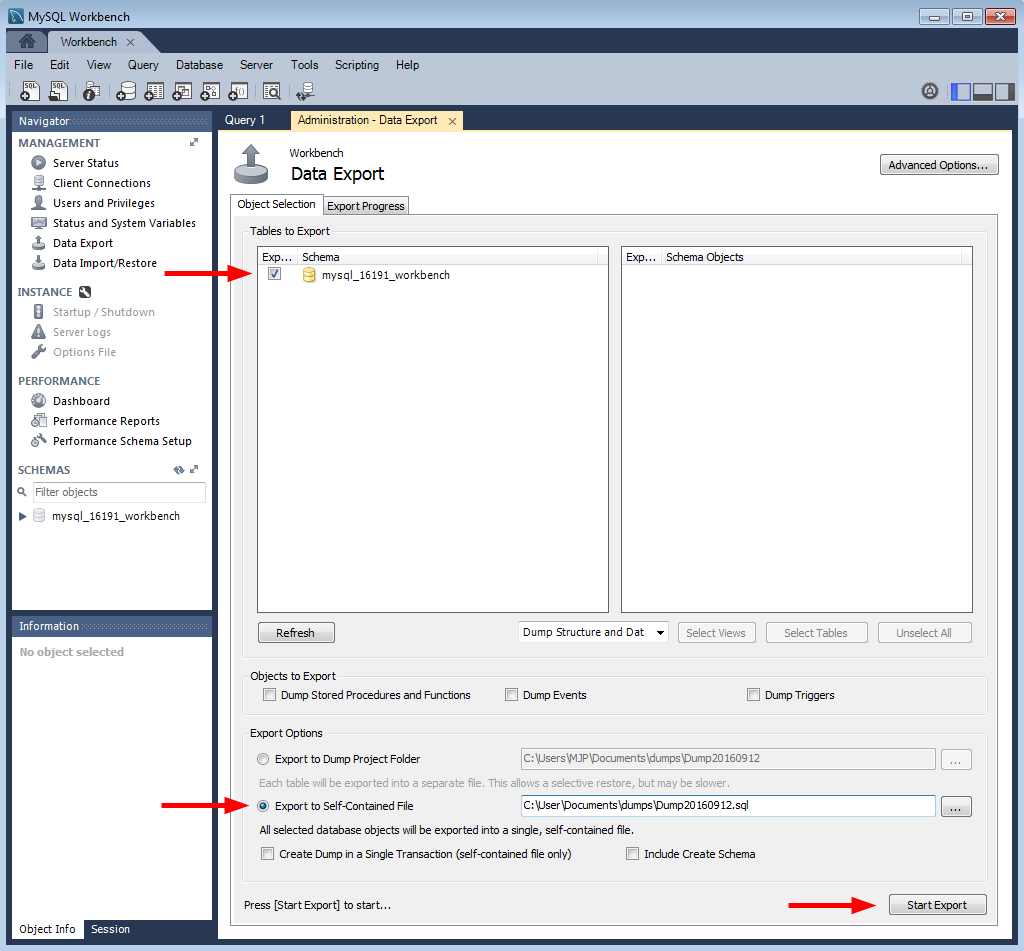
There are a lot of options on the next screen. For the purposes of this how-to we’re just making a simple backup of the entire existing database, so we’re not going to use most of those options. But as you can see, you can do a lot more than just a simple database dump here.
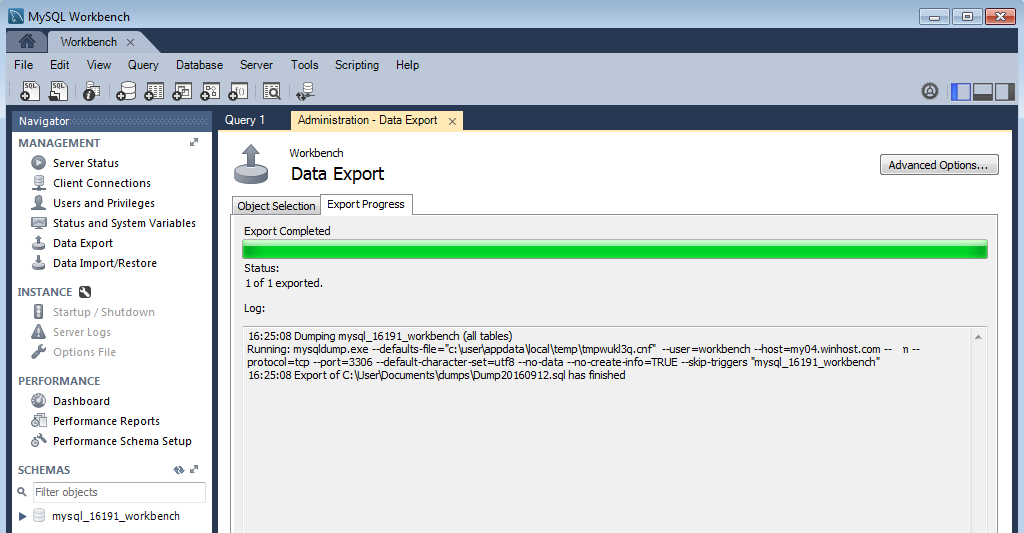
If everything goes according to plan you’ll see the “Export competed” dialog, and you’ll be all set. Your database is backed up for development use or simply for safe keeping.
That’s all there is to making a backup.
But check out the “Data Import/Restore” link right under the “Data Export” link. As you might have guessed, you use that link to restore a locally stored backup up to the MySQL server here at Winhost. We’ll talk about that in a future article.