![]() Did you know that a single company owns more than 90 hosting company brands?
Did you know that a single company owns more than 90 hosting company brands?
Most of them are linux hosts, but in the Windows hosting world they own Arvixe, HostGator, WebHost4Life, EasyCGI, ReadyHosting and a few others.
The corporation that owns all of these hosts is a publicly traded holdings company (NASDAQ: EIGI). Now, theoretically, a huge corporation could provide the world’s greatest hosting experience. After all, they have hundreds of millions of dollars to spend on infrastructure and staff. Theoretically.
That’s not the way it works though, at least not in the website hosting world. Which isn’t really surprising, since most publicly traded companies are primarily interested in one thing: making their investors happy. Which they do by maximizing profits, not necessarily by making customers happy.
Winhost is 100% employee owned and operated. We all work out of the same Los Angeles offices, including our technical support staff, many of whom have been here since day one. We show up every day because we love what we do: providing the best Windows server hosting available anywhere. We don’t answer to investors, we answer to our customers.
We’re not suggesting that all huge corporations are bad. But some of us have been in the web hosting industry for a long time, and have seen first hand how the quality of service and support typically decreases for the customer when their hosting company is gobbled up by the big fish in the pond. Sometimes dramatically so.
Which is a shame, since most of us only want a couple of simple things when it comes to our websites: reliability and a competent person to talk to when we have a problem.
If you miss “the old days” when you knew who your host was, we welcome you to join us here at the last of the independents: Winhost. Think of us as a lifeboat rowing away from a sinking ocean liner. Climb aboard. We always have room for one more.
![]() Prompted by a few customers who are boldly going where no programmer has gone before, I’m proud to say that you can deploy an ASP.NET 5 (vNext) application to Winhost. Even though it’s in Beta right now, and this article will show you how.
Prompted by a few customers who are boldly going where no programmer has gone before, I’m proud to say that you can deploy an ASP.NET 5 (vNext) application to Winhost. Even though it’s in Beta right now, and this article will show you how.
ASP.NET 5 (vNext) represents a fundamental shift in how applications are going to be developed in the future as you will be able to deploy the application in any environment (Linux, Mac, or Windows). It no longer requires a Global Assembly Cache (GAC) as all the assemblies and runtime libraries are obtained using NuGet and then packaged with your application making it self-contained. They are placed in a special approot folder which also contains your source code. The approot folder replaces the functionality of the App_Code or Bin folders. Another folder named wwwroot is also created which contains static files (e.g. html, css, images, etc) and is where your application is launched from.
Because it’s in Beta, I highly recommend that you pay attention to Microsoft’s Roadmap for the release schedule as I’m sure things will have changed by the time it’s officially released. And for the same reason, I can only say these instructions are applicable up to Beta6 in case things change in the future. I’m afraid this guide only covers the publishing portion. If you need help with developing an ASP.NET 5 (vNext) application and don’t know where to start, please make sure you visit the Official Website. I’m also sorry to say that Web Deploy publishing is not supported at this time, only FTP publishing.
Publishing to a sub-directory at Winhost:
A vNext application can only be created using Visual Studio 2015 Professional or higher, so you’ll need to obtain a copy, install it, and then launch the program.
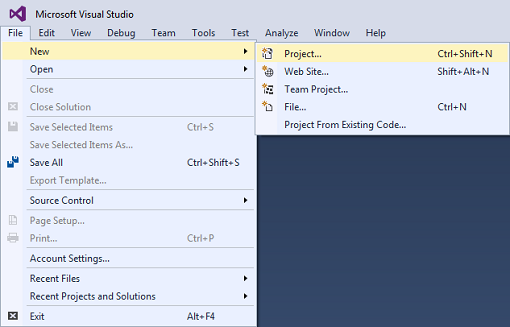
A) Create a new project by selecting File -> New -> Project…
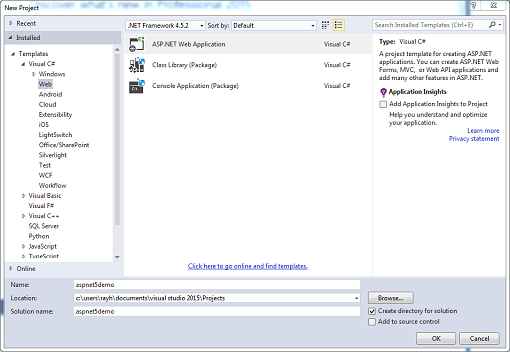
B) Under Visual C# (or the language of your choice), select Web and to the right, select ASP.NET Web Application. Give your project a name if you’d like.
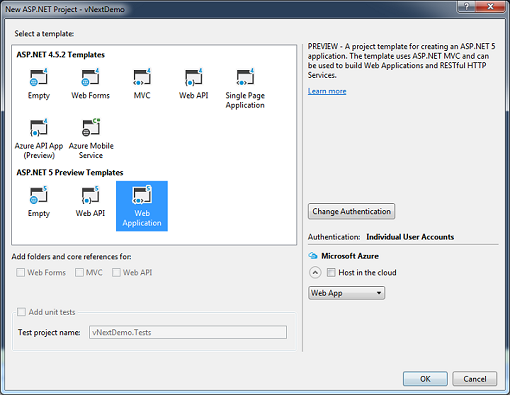
C) In the New ASP.NET Project window, select Web Application for the ASP.NET 5 Preview Template and uncheck Host in the cloud under Microsoft Azure. Click OK continue.
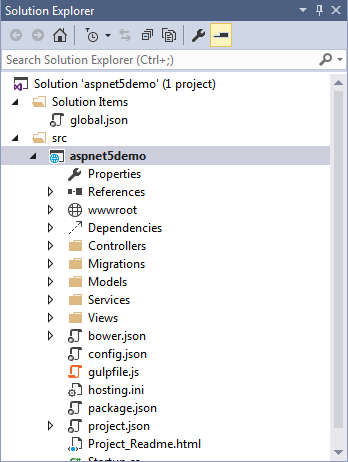
D) If you take a look at the Solution Explorer window, you’ll notice that the file structure is very different from that of a web forms or MVC application. One key change is that the configuration details are no longer stored in .config files. They are stored in JSON (JavaScript Object Notation) format. Again, this tutorial won’t cover any of the programming aspects, but if you’d like to learn more, you can read the official ASP.NET 5 documentation.
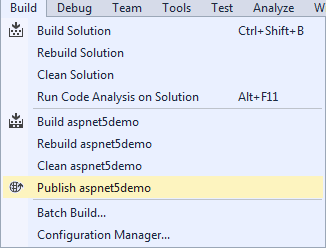
E) Since this is sample application, we can just publish it without making any changes. Select Build -> Publish on the menu bar.
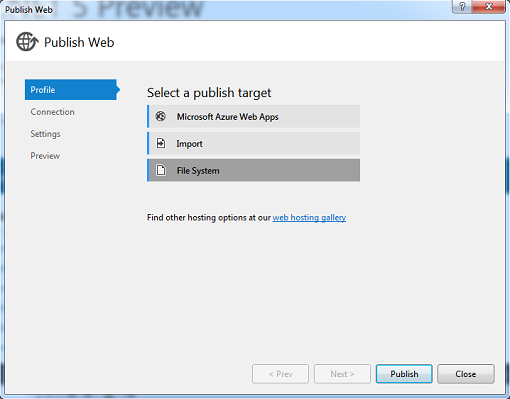
F) In the Profile section, select File System.
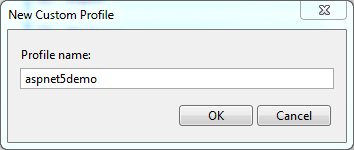
G) Name the profile.
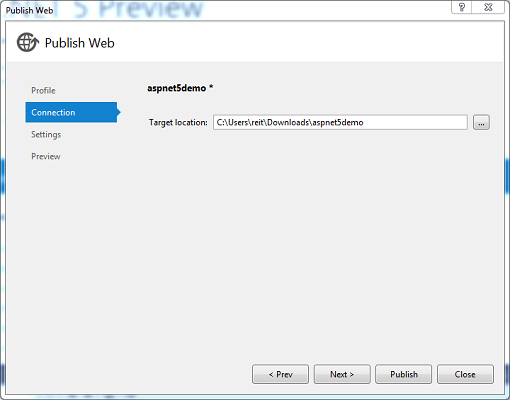
H) In the Connection section, set the Target location to a directory that is easily accessible and click on the Next> button.
I) In the Settings section, set the Configuration to Release. For the Target DNX Version, it should match the framework your application is written in. DNX stands for .NET Execution Environment which allows your application to be deployed across different platforms (Windows, Mac and Linux). For more information, you can consult the DNX documentation.
If you plan to use the 64 bit versions of the CLRs, you’ll need to open up a support ticket to request that we disable 32-bit support for your application pool, otherwise, it won’t work properly. Uncheck Publish using Powershell script and click on the Next> button.

J) Click the Publish button to start.

K) Once the publishing has finished, you will see the two folders I mentioned earlier, approot and wwwroot. In the wwwroot folder, there is a web.config file that is used to direct the application on how to start. To protect the approot folder from being viewed, we’ll use Request Filtering, create a web.config file with the following markup, and place it in the root level of the site. Some applications require “Full” trust in order to run, so we’ll go ahead and add that to the web.config file as well.
<?xml version="1.0" encoding="UTF-8"?>
<configuration>
  <system.web>
    <trust level="Full" />
  </system.web>
  <system.webServer>
    <security>
      <requestFiltering>
        <hiddenSegments>
          <add segment="approot" />
        </hiddenSegments>
      </requestFiltering>
    </security>
  </system.webServer>
</configuration>
L) Upload these two folders to your site and ignore the other files. Create an Application Starting Point for the wwwroot folder using the tool in the Winhost Control Panel.
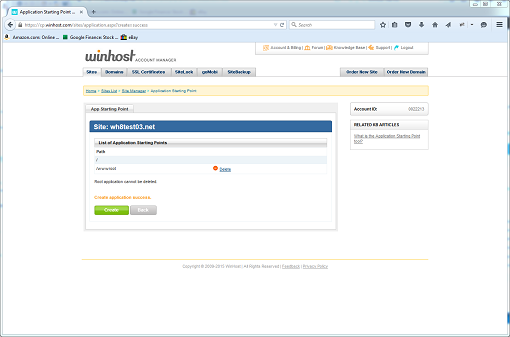
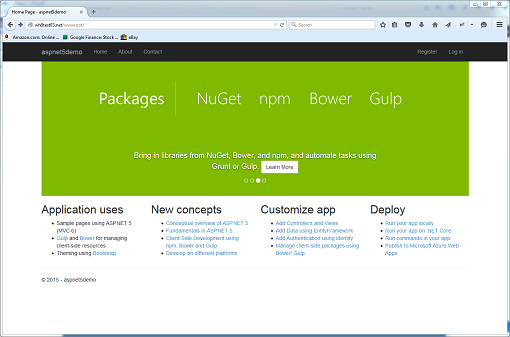
Voila! Your application works but only from a sub-directory (i.e. http://www.mysite.com/wwwroot).
Publishing to the root at Winhost:
If you want your application to run from the root of your site, you just need to make a few modifications post publishing. Locate the project.json file in /approot/src/projectname directory and open it. Change the second line from “webroot”: “../../../wwwroot” to “webroot”: “../../..” Move the contents of the wwwroot directory up one file level. You’ll also need to merge the two web.config files and change the following lines:
<add key=”runtime-path” value=”..\approot\runtimes” />
To:
<add key=”runtime-path” value=”.\approot\runtimes” />
And
<add key=”dnx-app-base” value=”..\approot\src\aspnet5demo” />
To:
<add key=”dnx-app-base” value=”.\approot\src\aspnet5demo” />
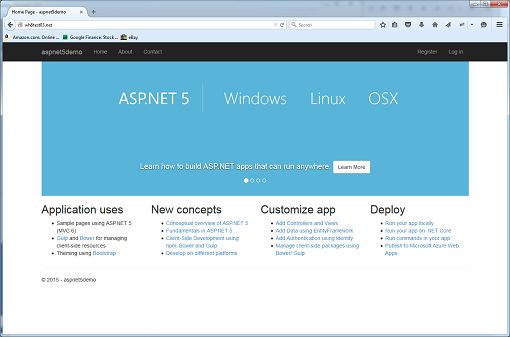
Your application now works from the root.
Ftp’ing through Visual Studio
You can also use FTP to publish your files within Visual Studio by creating a publishing profile. Take any text editor, create a file and name it with a .publishsettings extension (e.g. my.publishsettings), and paste the following XML markup into the page:
<?xml version="1.0" encoding="utf-8"?>
<publishData>
  <publishProfile
    profileName="FTP"
    publishMethod="FTP"
    publishUrl="ftp://ftpaddress"
    userName="username"
    userPWD="password"
    destinationAppUrl="http://httpaddress"
    />
</publishData>
Replace ftpaddress, username, password, and httpaddress with the appropriate values. Save the file. At Step F, instead of choosing File System, select the Import option instead and load the my.publishsettings file. Follow the rest of the steps to finish configuring the application. I wouldn’t recommend this method since you’ll need to download some files to make edits and then re-upload them, however, I wanted to make you aware that it is possible.
Please also take note that an ASP.NET 5 (vNext) application must be deployed to an IIS 7.5 or higher server.
![]() On July 14, 2015, Microsoft ended their support of Windows 2003. That means they won’t be issuing any more security patches or updates.
On July 14, 2015, Microsoft ended their support of Windows 2003. That means they won’t be issuing any more security patches or updates.
If your website is still hosted on a Windows 2003 server, it’s time to move away from that unsupported technology, and Winhost is here as a Windows hosting option for you.
Winhost has never offered hosting on Windows 2003 servers, so we have no legacy O/S servers to contend with. We support all the modern Windows Stack including ASP.NET and SQL database, but we also continue to support legacy technologies like Classic ASP and Access databases.
It’s the best of both worlds, so come and enjoy it.
![]()
The latest versions of the following applications are now available through our App Installer tool:
![]()
Our SiteBackup service can now automatically back up your MS SQL databases to the cloud. You’ve always had the ability to back up site files and MySQL databases, but we’re excited to add the ability to back up MS SQL databases.
You can order SiteBackup in Control Panel.
SiteBackup is inexpensive (starting at only $2.95 per month for 10 GB of space!) and easy to use. You choose how often you want to back up and how long to retain the backups. Set it and forget it, your backups will be reliably and safely kept in secure cloud storage outside of the Winhost network.
We have also added Blacklist Monitoring
If your site is ever compromised, Google will flag it and our Blacklist Monitoring service will alert you and stop your site and database backups (to prevent making a backup of compromised files).
If you run third-party applications on your site, Blacklist Monitoring is a valuable tool to help you recover from common compromises. Even if you wrote all of the code on your site, Blacklist Monitoring is a great tool to have at your disposal. Even better, Blacklist Monitoring is available as part of the SiteBackup service at no extra charge.
We’re really excited about these new additions to SiteBackup because we believe they are going to make your life easier. Let us know if you have any questions about SiteBackup or anything else.
Things to note: SQL backup is available for SQL 2012 and later databases, and it only works for SQL databases that are on Winhost servers. Each backup is a full backup, not incremental. Blacklist Monitoring is only available for sites that are being backed up by the SiteBackup service. Read our Knowledge Base article for instructions on using SQL database backup and Blacklist Monitoring.
![]()
Did your current host drop support for Active Server Pages, or Classic ASP? (We’re looking at you, GoDaddy!) Well, we support it! And we’re committed to continuing support for Classic ASP sites on modern servers.
We also support using Access databases with your Classic ASP site. Here is a Knowledge Base article to get you up and running:
How to query an Access database with ASP using a DSN-less connection
Classic ASP, Access and the Persits components are available on all of our plans.
![]()
Note: beginning with Chrome version 46 the yellow caution triangle has been removed from the https URL when Chrome encounters minor errors such as those described in this article.
If you use an SSL certificate (https) on your site, you may have seen a couple of new things happening in Google Chrome.
When you upgrade the Google Chrome browser to version 41 or later, you may see various warning messages such as, “The identity of this website has not been verified,” “Your connection to <domain> is not encrypted,” or other visual indications that the https connection is not secure.
Those indications can appear when your SSL certificate uses a SHA-1 signature (most SSL certificates issued before 2015 use SHA-1).
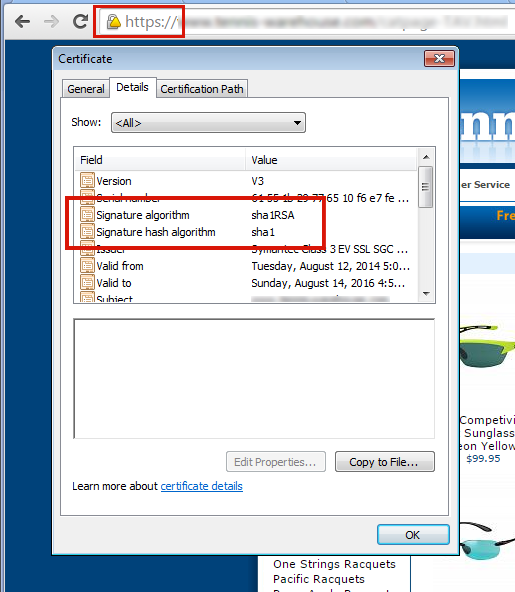
To fix the problem of browser security warnings you must get your SSL certificate re-keyed for SHA-2. If you don’t see those warnings in Chrome and you purchased your certificate recently, it may already be SHA-2. You can verify using this test site.
1) Contact us and we will re-generate and re-submit the CSR.
2) You’ll then get an email from GeoTrust with a link to complete the process. When completing the re-key on the GeoTrust site, be sure that SHA-2 is selected as the “Hashtag Algorithm.” You can find step-by-step instructions (and a video) here.
3) After you’ve completed the reissuing process, you’ll receive an email with the new certificate. Go to Control Panel and paste the new certificate into the SSL manager and you’re finished.
1) Contact us and we will re-generate the CSR and email it to you. Then you’ll have to contact the issuer of your certificate to get your certificate re-keyed for SHA-2.
2) When you receive the re-keyed certificate, go to Control Panel and paste the new certificate into the SSL manager and you’re finished.
There is another potential problem after you’ve re-keyed your SSL certificate. While the address bar will show the green lock icon, if visitors dig deeper in Chrome, they may see an “Obsolete Cryptography” message.
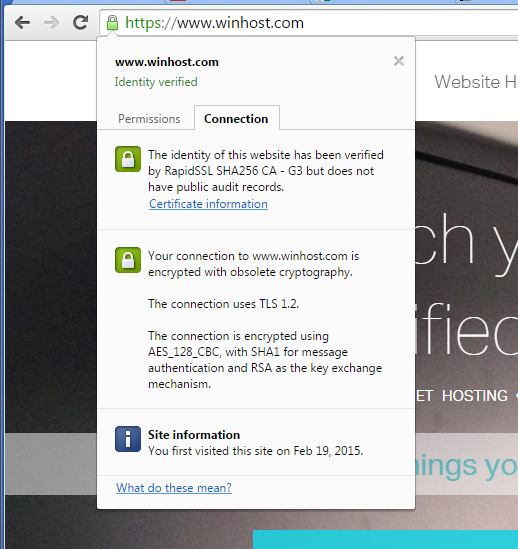
Basically what’s happening now is they are ignoring the cipher preference we use on the server (which includes their preferred ciphers) and pointing out any “weak ciphers” they find. You might notice that many large corporate sites (such as Apple) are also insecure according to Chrome, for similar reasons.
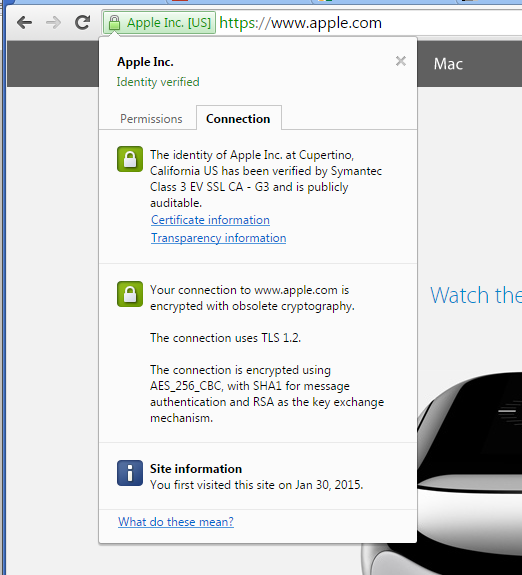
That “obsolete cryptography” message may be with us for a while because Google is not providing any information (yet) on exactly what they want from the server to stop calling it insecure. It would seem that what Google would like to see is every server everywhere removing support for all older cryptographic methods.
The problem with that is removing some of those methods will shut out visitors using some older browsers and operating systems that don’t support newer methods (i.e. Windows XP). Since our servers are shared by many customers, it isn’t really an option for us to make global changes that prevent some visitors – even a small number – from accessing our customer’s sites.
We do run some special servers that do not support any of the older cryptography methods, they are primarily used by customers who need a “hardened” server to pass a PCI compliance scan. But the added security comes at a cost, as older browsers can’t connect to sites on those servers via https. Additionally, a few other things that you may take for granted now may not work, or may require adjustment or a work-around on your part. But if you’d like to move your site to such a server, just let us know.
And of course we continue to monitor information from Google on recommended server configuration, as well as continuing to test various configurations ourselves to prevent the “obsolete cryptography” message.
If you have any trouble re-keying a certificate, or if you have any questions about these ongoing changes, drop us a line and we’ll do our best to help.
![]()
The latest versions of the following applications are now available through our App Installer tool: