
Site hosting news, tutorials, tips, How Tos and more
![]()
Did you know that Mozilla Firefox and Google Chrome like to display your passwords in plain text? No? Well, they sure do.
If you want to see what I’m talking about, follow the steps below.
Open Firefox.
Click on the Firefox Menu at the top left corner.
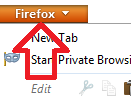
Select Options, then click on Options.
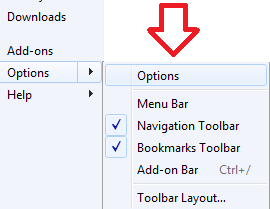
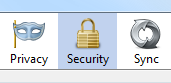
Click on the Security tab at the top.
Click the Saved Passwords… button. This will open up the Saved Passwords box. Now click on Show Passwords Button.
Example Below:
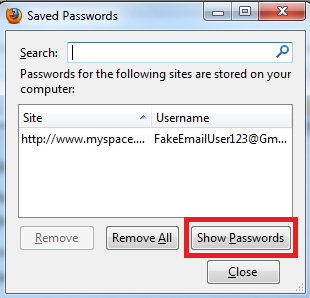
Surprise!
Did your jaw just hit the floor? I know mine did the first time I saw what Firefox was hiding from me all this time.
Now let’s open up Google Chrome and click Settings.
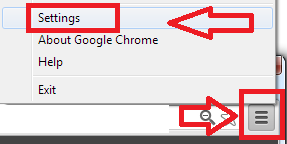
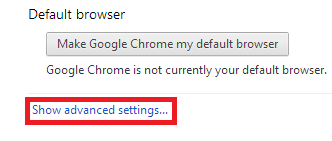
Once you get into your settings, scroll all the way to the bottom and click on Show advance settings…
Look for the section Passwords and forms and click the Manage saved passwords link.
Select the site where you saved your password and click Show button.

Okay, I’m done with the surprises.
So how did Firefox and Google Chrome get my passwords in the first place?
To get the answer you must also answer this question: Have you ever seen the following notification in your web browser?
Mozilla Firefox:
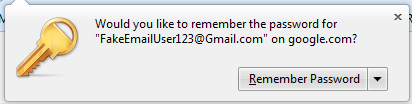
Google Chrome:

Whenever you clicked on the shiny button “Remember Password” in Firefox or “Save Password” in Chrome, the site username and password are saved within the web browser – and as you also saw – displayed in plain simple text.
Anyone can walk up to your computer and take a quick look at your web browsers history/settings. Just imagine you’re at the office and you step away from your computer and a nosy/curious coworker gets the chance to take a look. That is why it’s important to always lock down your computer before you step away from your desk.
Additionally, say you’re unlucky enough to have some malicious software installed on your computer which happens to allow the hacker gain remote control of your desktop. The hacker will only have to wait until you are away from your computer to check your saved passwords.
What if you sent your computer out to a repair shop and they “just happened to” take a look at your saved passwords? It only takes a few seconds for them to snoop around on your computer and do who-knows-what with your credentials. There are a lot of different ways these passwords can be intercepted. This just happens to be one method of interception that can be avoided.
So what’s the work-around and how do I keep my passwords safe? Fortunately there are plenty of third party plug-ins people use with their web browsers. Perhaps you can recommend what plug-in works best for you in the comment section below.
I found a plugin called LastPass. With 254,540 users and 827 reviews just for the Firefox plugin alone seems to be a great alternative. Best thing about this plugin is that it also works with the Google Chrome web browser.
![]()
If you’re reading this it’s likely that your email account was recently hacked and now you’re wondering how it happened, why it happened to you. Or maybe you’re just wondering how you can prevent it from happening to you.
Let me start off by saying that there are many different ways an email account can be compromised. In this article I’ll cover three of those methods.
Also note that these aren’t the only way an email account can get compromised. People are always inventing new ways of compromising an email account/system. So by the time you finish reading this article, it’s likely that they will have come up with a few new techniques.
Now lets imagine you’re at the local coffee shop sipping on some hot coffee. You open your laptop and connect to the coffee shop’s WiFi. Why not, it’s free Internet, right?
Now it’s time to check your email messages because you are expecting important news. You open the email client on your computer and start browsing the Internet for, you know, important stuff. An hour passes by and you go on your way to work, home, or school. But did you notice the person sitting across from you with their laptop? He just took your email credentials while you weren’t looking. But how did it happen?
Did it happen while you were in the bathroom?
No.
Did it happen when you went for yet another cup of joe?
Nope.
So how did that person steal your email information with out even coming close to your computer?
 Ever heard of a Man in the Middle attack? To put a MITM attack in simplest terms, some malicious so and so sets up their computer to act like a router and tricks your computer into thinking that the computer actually is the router. Then the router thinks the shady computer – in the middle of the connection – is your computer.
Think of it as someone tapping into your network connection. Once this starts happening they can view all kinds of fun packets coming from your computer to the mail server (or to any server). Each time you make a connection to the mail server you are sending your authentication credentials through the bad guy’s computer.
From there it’s easy to use a program to filter out all packets containing login credentials. This includes your Facebook, Twitter, and bank account login information as well. Everything.
So does that mean it would be better to just stay away from your local coffee shop?
Hey, no need to be drastic! You can still go and you can still surf the Internet but it may be best if you didn’t use the coffee shop’s Internet connection. Personally, I don’t trust any network that I don’t own or control.
A nice work-around would be to use the Internet connection on your smart phone. Most smart phones have the capability of turning into a password protected Wifi “hot spot.” They also have the capability to tether the smart phone to your laptop. But, of course you will be using your phone service provider’s data plan.
So if I protect myself from that shady “man in the middle,” I’m safe, right?
Not exactly.
Another way your email account could be compromised is with a virus/malware being installed on your computer without your knowledge. This method is the most common and likely way that your email account (and everything else on your computer) can be compromised. I’ve seen what some of these viruses and malware are capable of doing, and it’s scary stuff.
Some of the virus/malware infections come with a nice little tool called a keylogger. What it basically does it logs all your key strokes and sends them to a server controlled by whoever infected your computer with the virus/malware. So any time you enter a username and password, the keystrokes are logged before the login request is sent. It doesn’t matter that the connection from your computer to the mail server is encrypted.
So how did this software get onto your system, or how can you prevent it from being installed on your system?
You can start by practicing the following:
The third way an email account can be compromised is by social engineering. Some email systems come with a nifty “Forgot your password?” tool. So what’s the big deal about this feature? Well, when you were setting up your email account you weren’t thinking twice and just answered the security questions truthfully. For example the signup form has the following questions:
You had to pick two of them and answered the two question correctly. No harm done right?
Wrong. The question/answer that you’ve set up with your email account should actually be considered to be your second and third passwords. Why? Because the correct answers to these questions gains access to the email account.
It would be best to answer these questions kind of incorrectly. So, let’s say you chose Which street did grow up on? and What is your mother’s maiden name? and answer to the first question is Main St. and the answer to the next question is Smith.
Instead of using the correct answers, you can add a extra character befor the real answer. For example @Main St. and @Smith. If the system doesn’t allow these type of characters then you can also use a letter before the real answer. For example: QMain St. and QSmith . That way if the malicious person finds out the real information, they will still have a hard time getting into your email account.
You must be wondering how these people even get the information in order to gain access to your email account using the security questions method. The answer is very easy. In this day and age most of us use social media sites Facebook, Twitter, YouTube etc. What’s the problem with social media? Well, the problem is we like to give out to much information.
We all like to share share share. Sometimes we don’t realize it, but we give out too much information. So much information that it makes it easy for a malicious person to gain access to your email account using the security question method.
If you keep these things in mind and think about security in new ways, you will protect yourself from a lot of potential headaches.
![]()
In this tutorial I’m going to show you how to install nopCommerce using the Winhost App Installer in Control Panel. It’s recommended to be on the Max or Ultimate plan if you plan on using nopCommerce for your site. If you are currently on the Basic plan please read our knowledge base article on how to upgrade your hosting plan.
To get started: You are going to need to create a SQL database in Control Panel first.
Login to Control Panel.
Click the Sites tab.
Click the “Manage” link next to the site you wish to install nopCommerce on.
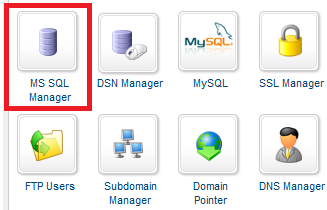
Now we want to create a SQL database for nopCommerce.
Click the MS SQL Manager box.
Click the green “Add” button.
Now enter a database name and how much SQL disk space you wish to allocate to it.
Click the green “Create” button.
To change the password for the main SQL database user, click “Manage” next to the SQL database.
Click on “Edit” next to password and update it.
Save these settings because we will need them later when we’re installing nopCommerce.
Go back to the “Site Manager” page of Control Panel.
Click the “App Installer” box.
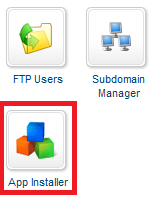
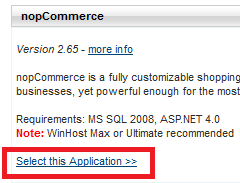
Click the “Select this Application” link.
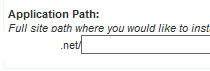
In this tutorial I will be installing nopCommerce in the root directory of my hosting account. If you want to install nopCommerce in a subdirectory you will need to enter the name of the subdirectory in the section below.
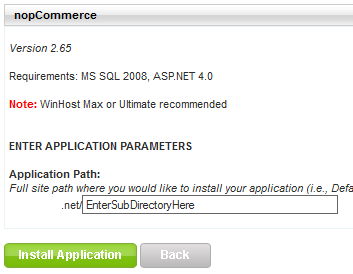
Since I’m installing nopCommerce in the root I will need to remove the text in the box field above. So this field will be empty for me:
WARNING: Using the App Installer tool will delete all files within the Application Path location.
Since I’m installing the web application in the root of my hosting account, everything in my hosting account will be deleted and nopCommerce will be installed.
Click the green “Install Application” button to start the installation on the web server.
Once completed you will receive the a message “Your application installed successfully.” Click the link below this notification (note: If your domain name isn’t pointing to our web servers yet, you will need to use the secondary URL to view your site on our web servers). The secondary URL can be found on the control panel Site Manager page.
Once you’re on the site where nopCommerce was installed, enter the following information:
Admin User Email:
Admin Password:
For Database Information we’ll be using the following setting:
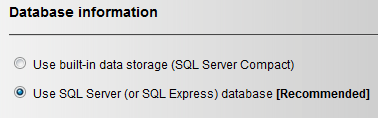
Remember the settings you saved for your SQL database? You will now need to enter them in the below section. My example is the following:
Now click the “Install” button.
Wait for the following screen; “Installing nopCommerce…” to finish.
Once its completed you will be brought to the default page of nopCommerce.
You’re now done with the installation. Don’t forget to pat yourself on the back. 🙂
If you run into any issues or have any questions regarding nopCommerce, please post your questions in our Community Forum. The Technical Support department is unable to assist with nopCommerce installation or configuration.
![]()
The first step is to log in to SmarterMail with your Postmaster email account.
Log in to the Winhost Control Panel.
Click the Sites tab at the top.
Now click on Manage next to the site you wish to check the email disk space usage.
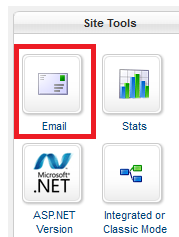
Click the Email icon in the Site Tools section.
On the next page click the SmarterMail Manager link.
This will automatically log you in to the SmarterMail Email system using the Postmaster account.
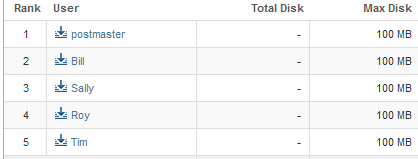
Click on the “Reports” Icon.
Now Expand the Domain Summary Reports folder. Then Expand the Traffic Reports folder. Click Disk Usage.
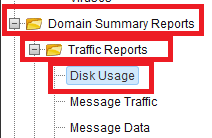
The page will now display how much disk space each email account is using.
![]()
You will need to log in to the SmarterMail system with the postmaster email account first in order to create an email user. To do this please log in to Control Panel on Winhost.
Once you have logged in to Control Panel, click the Sites tab at the top.
Then click on “Manage” next to the site you wish to manage.
Click on the Email box under site tools.
Then click the “SmarterMail Manager” link.
The link will automatically log you into the SmarterMail email system using the Postmaster account.
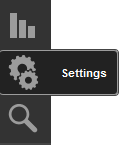
Once you are in the SmarterMail, click the “Settings” button.
 Then expand the “Domain Settings” folder if it is not already expanded. Then Click on “Users”
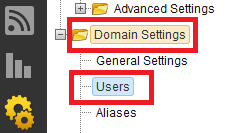
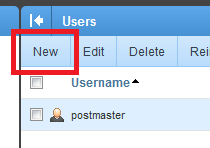
Then you may start adding your email users by clicking on the “New”.
![]()
In this tutorial we will be showing you how to install WordPress using the App Installer feature in the Winhost Control Panel.
You will need a MySQL database, which you can add from within your hosting account.
To get started, log in to the Winhost Control Panel.
Click the “Sites” tab at the top.
Click “Manage” next to the site you wish to install WordPress on.
On the next page you will set up the MySQL database that you will be using for WordPress.
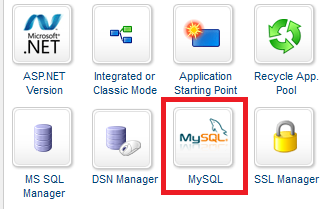
Click the “MySQL” icon:
Now create a MySQL database by clicking the “Add” button.
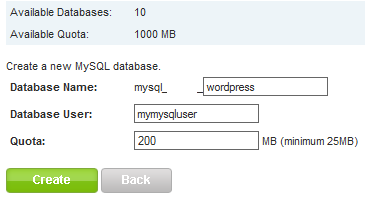
Enter a database name and user name and the amount of disk space you wish to allocate to the MySQL database:
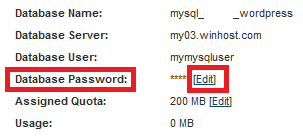
Click “Manage” next to the MySQL database to change the password for the MySQL User you just created:
IMPORTANT: Make a note of the MySQL information because we will need this when installing WordPress.
Go back to the “Sites” tab and click “Manage” next to the site you wish to install WordPress on.
Click the “App Installer” icon:
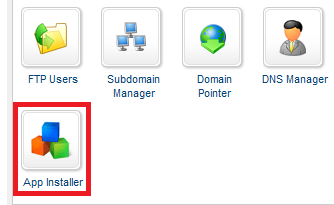
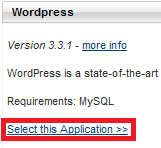
Scroll all the way to the bottom of the page and look for WordPress. Then click “Select this Application”:
For the sake of this tutorial I’ll be installing WordPress on the root of my site. To do this you will need to remove the “wordpress” text in the AppPath field, leaving the text field empty:
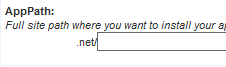
If you wish to install WordPress in a subdirectory, enter the subdirectory in this field. Where you install WordPress depends on how your site is laid out. In most cases the application will be installed in a subdirectory.
WARNING: Installing WordPress on the root of your site will delete everything that is currently on your site’s root. If you install in a subdirectory, the installer will clear the subdirectory and not your root (of course it’s always best to backup your site files first when installing a new web application in case something goes wrong with the installation).
Click the “Install Application” button when you are ready to continue with the installation of WordPress.
If every went according to plan then you should receive the following message.
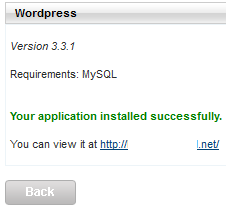
Click on the link after “You can view it at” to continue with the installation.
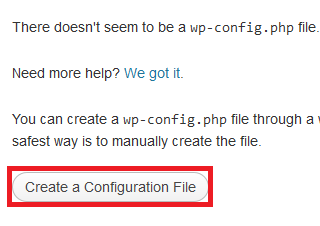
Click the link to go to your WordPress Installation. You’ll see the error message below. Click the “Create a Configuration File” button:
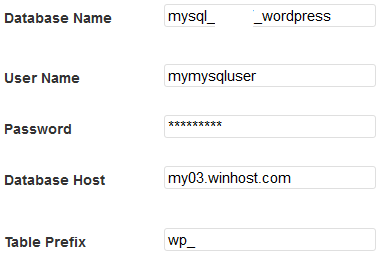
On the next page you will see a list of things you will need in order to install WordPress; Database name, Database username, Database password, and Database Host.
Next, click the “Let’s Go!” button.
Enter the information you made note of when you set up the MySQL database:
Click the “Submit” button.
Click the “Run the Install” button.
On the next page you will choose the settings that you wish to use for your WordPress application. Be sure to remember the Admin User Name and Password for WordPress. If you forget the user name and password you may need to repeat the installation.
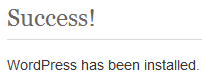
Once you have configured the settings you wish to use, click the “Install WordPress” button. This will bring to the next page confirming you have successfully installed WordPress.
If you run into any issues or have any questions regarding WordPress. Please post your questions in our Community Forum. The Technical Support department is unable to assist with WordPress installation or configuration.