
Site hosting news, tutorials, tips, How Tos and more
PHP 7.3 that’s been recently installed on all of our IIS 8 and IIS 10 servers. One major difference is the speed of PHP sites running on PHP 7.3. Reading the buzz around the internet you’ll see claims that PHP 7.3 being 31% faster than PHP 7.0 and 3 times faster than PHP5.

Curious about this myself, I decided to check to see how much better the speed was for a based WordPress site running on our Windows 2012 IIS 8 Servers.
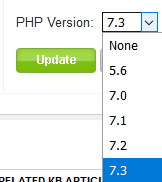
Users can easily change the PHP version of their site account within the Winhost control panel.
Sites > Site Account > PHP Version
I used Google’s PageSpeed Insights Tool to test a website. And sure enough, I got a lot better results while using 7.3. While just using a base WordPress install with the canned plugins it comes shipped with, 7.3 did in fact preform better than PHP 5.6.


Please note that your results will vary depending on how large your site is and what plugins and themes you are using.
If you’re using an older version of WordPress. Please be sure to update to the latest version before changing your PHP version within the control panel. You should also upgrade all plugins and themes your site is using as well. Otherwise, your WordPress site could break until you switch it back to the old PHP version you were using before. Contact our technical support team if you run into any issues.
If you’re still currently on our Windows 2008 IIS 7 servers. You can contact our support department and asked to be migrated to the newer servers.
Visit Winhost to learn more about our Windows hosting plans supporting PHP 7.3.
Having an email message to take forever to arrive can be very annoying and sometimes it leaves people wondering why is this even happening. In this article I’ll show you how to analyze email headers of an email message.
What is an email header?
An email header is a timeline of where the email message went through to get to you and the different email systems it touched during the delivery process. It’s sort of like looking at the tracking information of your UPS delivery. The only way to find out where the slowness is happening is to review the email header of that sluggish email message.
Where can I find the email header?
First, the email message must arrive at the destination before you can review the headers. We have instructions on how to view email headers in our knowledge base. There are multiple ways of viewing the headers. Here is another list that can help you find your email headers.
How to analyze the email header
Email headers can look ugly and hard to understand. Luckily there is a email header analyzing tool provided by MxToolBox.com that can help with that.

Copy and paste that ugly looking email header into the empty field and click on Analyze Header.
In the results, the email server with the longest bar graph is going to be the email server that is causing the most delay.
Why is this occurring?
There are many different reasons why an email message could be slow. One common reason is that the email server that caused the most delay had a large amount of email messages to process. If you see that the latency is happening in one of our email servers, we will gladly check our system for you and the logs to see what might be happening. Please contact our support department via our support portal for assistance.
For the most part most email servers are temporarily handling large volume of emails and will go back to normal performance on their own. However, if you’re seeing this issue keeps happening at a particular email server, you can contact the email administrator of that email system and provide them with the email header as proof.
Visit Winhost to learn more about our Windows hosting solution
In this tutorial we’ll be using an empty ASP.NET Core application within Visual Studio 2017 and show you how to deploy an ASP.NET Core 2.2 application that is running in InProcess on a Windows IIS Server.
ASP.NET Core 2.2 was recently released and with some new cool features. You are now able to use InProcess with your ASP.NET Core application. By default older versions of ASP.NET Core used OutOfProcess. When using InProcess the ASP.NET Core application only uses the IIS Worker process (w3wp.exe) whereas the OutOfProcess Core application uses the Kestrel server along with the IIS Worker process.
Kestrel is used in ASP.NET Core because it’s supported on different web servers like Apache, IIS, and Nginx. In a Windows server environment, OutOfProcess uses the Kestrel process (dotnet.exe) and IIS Worker process as a reverse proxy to handle the HTTP requests and other various requests normally handled by the IIS Worker Process.
When using InProcess hosting the IIS worker process handles all of the HTTP requests without Kestrel. No more reverse proxies being utilized meaning for a quicker result and a boost in performance.
On Winhost we support both InProcess hosting and OutOfProcess hosting with ASP.NET Core 2.2. If you want to test this on Winhost try to find our hidden promo code within this blog post. (Hint: It’s not a clickable link.)
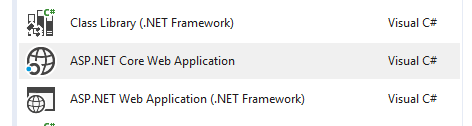
Open a new Visual Studio Project as shown below:

Select ASP.NET Core Web Application.
Click OK and on the next window select Empty making sure ASP.NET Core 2.2 is selected from the drop down menu as well. Click Okay again.
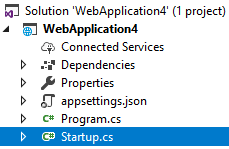
In this project we’re only interested to focus on what process the ASP.NET Core 2.2 is running on. To do this we need to edit the Startup.cs file from the Solution Explorer page.
Go to Line 30 and replace the following code:
await context.Response.WriteAsync("Hello World!");
With the following:
await context.Response.WriteAsync(System.Diagnostics.Process.GetCurrentProcess().ProcessName);
The above code replaces the typical “Hello World!” text from the empty application and displays the process name the application is running on. This step isn’t necessary if you want your application to use InProcess hosting model. We are doing this here just to see what process is being used once it’s been deployed onto the web server.
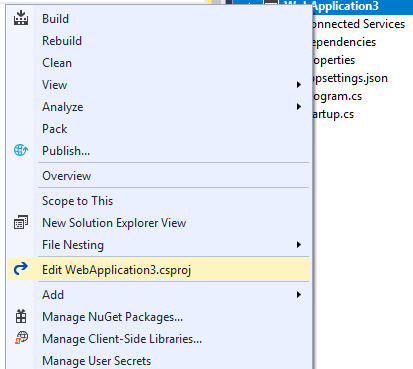
When selecting a new ASP.NET Core 2.2 project in Visual Studio 2017 the defaults to InProcess within the Application’s Project file. However, you have the ability to check what hosting model your core application is going to use by checking the Project file. See below example:
In the project file on line 5 you should see the following:
<AspNetCoreHostingModel>InProcess</AspNetCoreHostingModel>
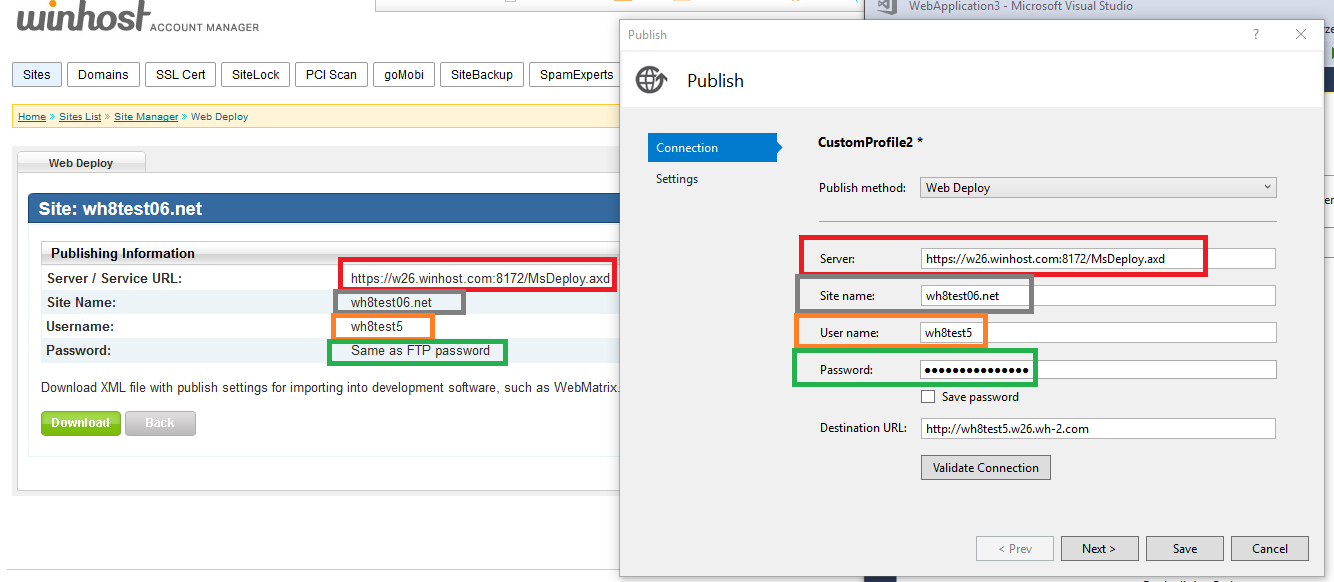
Log into your Winhost control panel if you haven’t done so already.
In the Publishing information section you will need these settings within Visual Studio when doing a Web Deployment. See below:
If your application is on a IIS server and it’s running InProcess the text you will see in the web browser is: w3wp
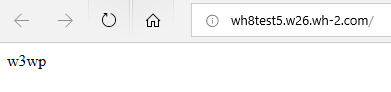
If your Core application is running OutOfProcess then it will return: dotnet

In closing, InProcess according to Microsoft is, quicker compared to OutOfProcess. Nicely done Microsoft… Nicely done, indeed.
Visit Winhost to learn more about our ASP.NET Core hosting solution
![]() It’s important to keep your web applications up-to-date. This prevents known vulnerabilities from being exploited and wreaking havoc on your site. That goes for any third-party software you might use on your site, but today we’re going to talk about updating DotNetNuke.
It’s important to keep your web applications up-to-date. This prevents known vulnerabilities from being exploited and wreaking havoc on your site. That goes for any third-party software you might use on your site, but today we’re going to talk about updating DotNetNuke.
The most important thing before upgrading is to back up your current DotNetNuke site. Also, if you are using any third-party themes or modules, please contact the author(s) before upgrading to make sure they are still supported in the latest version of DNN.
Backing up the MS SQL database
This will place the backup of your MS SQL database within the App_Data directory with the file extension “.bak.”
Backing up your web site files via FTP
Downloading the upgrade files and Extracting
Important: you must know your SuperUser account login in order to upgrade.
You can download the Upgrade files through DNN’s download page.
Uploading the updated files
Upgrading
![]()
In this tutorial I’m going to show you how to migrate your email messages to Winhost using the SmarterMail’s Mailbox Migration tool.
Prerequisites
Let’s Start
Log in to your SmarterMail interface via Control Panel.
You will need to use our mail server’s URL to access the email system since your domain name isn’t pointing to us yet.
First log in to the Control Panel on Winhost.
Next you will see a link on the Email Manager page called SmarterMail Manager. Click on it and it will automatically log you into the SmarterMail interface. This step helps you complete two things:
After you’re done creating the email users using the postmaster email account, log out at the upper right hand corner and log back in with one of the email users you just created, one of the addresses whose mail you want to migrate.
Once logged in on SmarterMail with the new email user
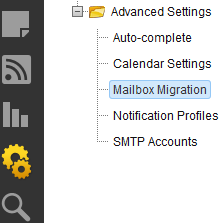
This will pop up a new window for the Mailbox Migration.
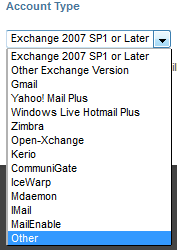
As you can see you have different options to choose from but in this tutorial we’re going to use the option Other.
Remember that you will need to log out of SmarterMail and log back in with each user you wish to migrate. It would be very unfortunate to migrate all the email messages from all the email users on a single email account on SmarterMail. So please be careful when migrating and make sure you migrate the correct email messages to the correct user.
![]()
Some of us (like me) have at one time or another forgotten the Admin Login for our WordPress site. Maybe you’ve tried using the Lost your password? function, but for whatever reason that doesn’t work.
So what do you do now? Start all over?
Nope. We’re going to modify our user table on the MySQL database by creating a new MD5 hash.
Well, first you need to create a new MD5 hash using this handy web site. Enter your new password in the string field of the site. Now save the MD5 hash text the site created for you and save it in a text file. You might also want to save the password in the text file just in case, but don’t forget to delete it once you’re done.
Now, you’re going to use MySQL Workbench to connect to the WordPress database. To learn how to connect to your MySQL database using Workbench please read our Knowledge Base article.
Once connected with MySQL Workbench expand the database. Expand your tables and right click on the users (this table may also be called wp_users depending on which table prefix you used when you installed WordPress).
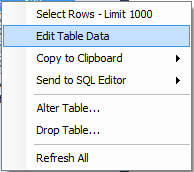
After right clicking on the users tabled select Edit table data.
Find your admin user. Under the user_pass column next to the admin user and enter the MD5 hash you created. It should look like this:

Now click on the Apply button in MySQL Workbench. Click Apply again on the next window. Now click Finish.
After you completed all those steps you should now be able to log in to your admin section with the new password you created.
![]()
In this tutorial I’m going to show you how to configure goMobi to work with your WordPress site. Many of our users are using WordPress for their sites, and now you can have a Mobile web site for your WordPress-based site.
If you don’t have goMobi service yet, you can order goMobi through Control Panel. If you don’t have a WordPress site yet, we have a blog post article that shows you how to install WordPress using our Control Panel Application Installer.
Once your WordPress site is up and running and you have ordered goMobi for your site, check out this video on some the different things you can do with goMobi.
When you’re done watching the video you’re ready to configure WordPress with goMobi.
Log in to your goMobi account through our control panel by click on the goMobi tab at the top.
Now click on the blue Launch Mobile Site Builder link to log in. This will open a small window in your web browser.
Creating your mobile site can be relatively simple, or you can take full advantage of everything goMobi offers and spend some time setting up your mobile site. It can be a lot to go through, so we won’t step through it here. We’re primarily concerned with getting your mobile site to work with WordPress.
After you’ve created your goMobi site, you’ll need to create the redirection code that you will install on your WordPress application. This is necessary to properly route mobile traffic to your new mobile site.
In the goMobi window click on the Tools tab at the top.
![]()
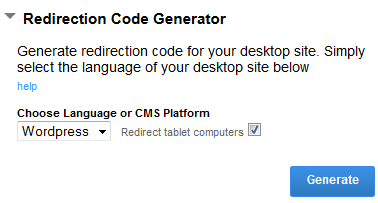
Now expand the Redirection Code Generator section.
Place a check mark next to Redirect tablet computers if you want to redirect tablet computers too.
Select WordPress from the drop down menu and click Generate.
Clicking on the Generate button will create a mredirect.zip file that you will need to download locally onto your computer.
Now extract the .zip file onto your computer and connect to your site via FTP. We are going to upload the file into your WordPress site files directory.
If you don’t have an FTP client, we suggest FileZilla. If you install FileZilla, we have a knowledge base article that shows you how to use it to connect to your site.
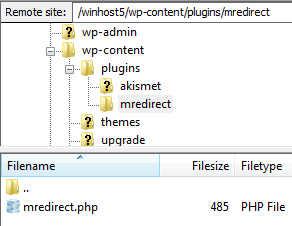
When connected via FTP double click on the wp-content directory folder. Now go in to your plugins folder by double clicking on that too.
You want to upload the exacted mredirect folder containing the mredirect.php file to the plugins directory:
Now simply log in to your WordPress site as the Admin and activate the plug-in.
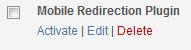
Once you have activated the plug-in, any mobile traffic to your WordPress application will be redirected to your mobile web site.
![]()
The following instructions apply to both our Windows 2008 IIS 7 servers & our Windows 2012 IIS 8 Servers.
In this tutorial I’m going to show you how to back up your SQL database and web site files. Then we’ll use the IIS Manager to back up your site and SQL Databases all in one shot. These instructions will place a .zip file locally on your computer for safe keeping. The .zip file will contain the .bak file of your SQL database.
Step 1: Use our SQL backup tool in Control Panel to back up your SQL Database. When using this tool the .bak file will be stored in your App_data directory. Please read our knowledge base article on how to use the backup SQL Tool in our control panel.
Step 2: Once you’ve created the .bak file in your App_data directory on your site account using the SQL backup tool in our control panel, you’re ready to connect to your site using IIS Manager. Please read our knowledge base article about Using the Microsoft IIS Manager.
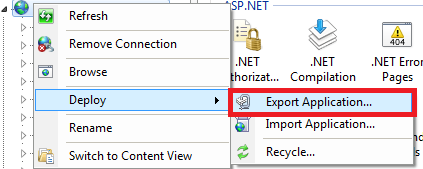
Step 3: In IIS Manager Right click on your site. Selected Deploy and click on Export Application…
Step 4: In the Export Application Package window click the Next button (do not change any settings).
Step 5: Click the Next button in the Select Parameters window (again, do not changing any settings).
Step 6: Click the Browse… button and select a directory on your local computer (this is where the backup .zip file containing your site’s web files will be placed on your local computer). Select a file name with today’s date for your reference. Now click the Save button.
Step 7: Click the Next button in the Save Package box and wait for your site to be saved locally on your computer. Now click the Finish button when you receive the notice “The package was created successfully.”
The .zip file that you saved locally will also contain the SQL database backup (.bak) file that you created when you used the SQL Backup tool in the control panel. It’s important to back up your SQL database at the same time as your web site files to maintain consistency for your site.
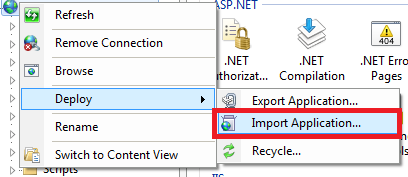
If you ever need to fall back and restore your web site to a previous state from a certain date, you can use the same tool in IIS Manager, but this time you will need to select Import Application in the Deploy option in IIS Manager.
Instructions for restoring your site:
Step 1: Right click on your site in IIS Manager. Select Deploy and click Import Application.
Step 2: Click the Browse… button and select the .zip file located on your computer of the web site backup you created in IIS Manager. Then click Next.
Step 3: Do not change any settings in the Select The Contents of the Package box and click the Next button.
Step 4: On the next page Enter Application Package Information you will need to remove the text from the box so the backup is restored to the root of your hosting account. So you should only see:
HostingAccountDomain.com/ [Empty Text Box]
Now click the Next button.
Step 5: You will receive the following warning from IIS Manager: “This application will be installed into “HostingAccountDomain.com”. Most applications are usually installed into a folder beneath the root, such as “HostingAccountDomain.com/Blog” Are you sure?” Go ahead and click the OK button.
Step 6: In the next box, Overwrite Existing Files, choose the option, “Yes, delete all extra files and folders on the destination that are not in the application package.” This will delete any extra files or folders that don’t exist in the backup .zip folder (we’re choosing this option because you want to restore the entire site as it existed on the date that you created the .zip files).
If you don’t wish to delete the extra files then select the option: “No, just append the files in the application package to the destination.” Now click the Next button.
IIS Manager will now restore your site files to the state they were in when you created the .zip file. It will also contain your .bak file too, if you created the SQL backup first using the SQL Backup tool in the control panel on the day you created the .zip file in IIS Manager. To restore the database, read our knowledge base article on how to restore your .bak file to the SQL database.
If you need instructions on backing up your MySQL database please read our blog post article: Using mysqldump to backup and restore your MySQL database/tables.
One really cool thing about this tool in IIS Manager is that you can also use it to transfer your site to our Winhost web servers. Granted, that is only if your current host provides you with the ability to Export your site using IIS Manager. If they don’t, you should be at Winhost!