
Site hosting news, tutorials, tips, How Tos and more
![]()
Give thanks for updated applications! Here are the App Installer updates for November:
![]()
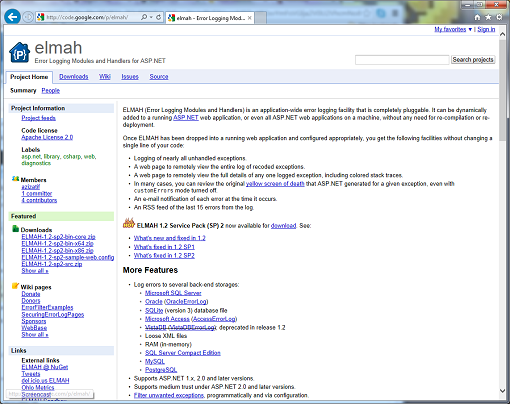
Prompted by a forum post, here are instructions on how to install Elmah, an application-wide Error Logging Module and Handler for ASP.NET on your hosting account here at Winhost. First, you’ll need to download Elmah at this link. For this tutorial, I downloaded ELMAH-1.2-sp2-bin-x64.zip.
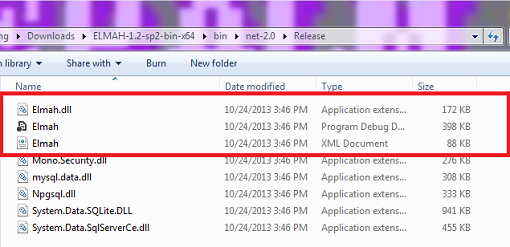
After you have downloaded the .zip file, extract its contents. Open the /bin directory and find the .NET Framework libraries you want to use. Most likely you will be using the assemblies in the net-2.0 -> Release folder. Upload only the Elmah assemblies (i.e. Elmah.dll, Elmah.pdb, and Elmah.xml) to the /bin folder of your web application.
You can configure Elmah to store the exception information in different types of databases, but for this tutorial, I will only be showing you how to set it up with Microsoft SQL Server. If you don’t have a database setup already, follow these instructions to create one:
1) Log into the Winhost Control Panel at https://cp.winhost.com
2) Click on the Sites tab.
3) Click on the Manage link next to the site you want to manage.
4) Click on the MS SQL Manager button.
5) Click on the Add button.
6) Select the database version in the drop down list, name the database, set the quota, and then click on the Create button.
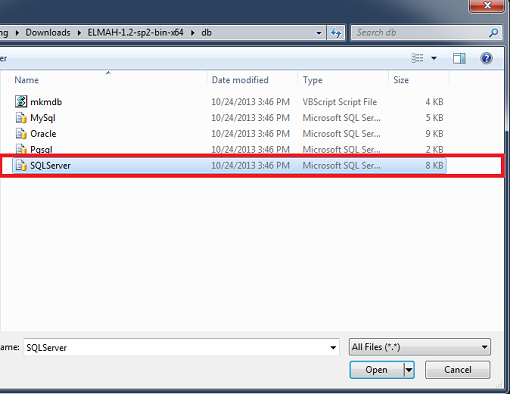
Then log into your database using SQL Server Management Studio. Select File -> Open -> File… (or hit CTRL-O) and navigate to the /db directory of your Elmah extracted files. Select the SQLServer.sql file and click on Open.
Hit F5 to execute the script. This will create the error logging database objects in your database. The final step is to configure your web.config file. The configuration will depend on what type Application Pool Pipeline mode you use. For Classic mode, add the following XML markup to your web.config file to enable Elmah, only substituting Winhost_Database_Connection_String with your actual database connection string.
<configuration>
  <configSections>
    <sectionGroup name="elmah">
      <section name="security" requirePermission="false" type="Elmah.SecuritySectionHandler, Elmah" />
      <section name="errorLog" requirePermission="false" type="Elmah.ErrorLogSectionHandler, Elmah" />
      <section name="errorMail" requirePermission="false" type="Elmah.ErrorMailSectionHandler, Elmah" />
      <section name="errorFilter" requirePermission="false" type="Elmah.ErrorFilterSectionHandler, Elmah" />
    </sectionGroup>
  </configSections>
  <elmah>
    <security allowRemoteAccess="yes" />
    <errorLog type="Elmah.SqlErrorLog, Elmah" connectionStringName="Elmah" />
  </elmah>
  <connectionStrings>
    <clear />
    <add name="Elmah" connectionString="Winhost_Database_Connection_String" />
  </connectionStrings>
  <system.web>
    <httpHandlers>
      <add verb="POST,GET,HEAD" path="elmah.axd" type="Elmah.ErrorLogPageFactory, Elmah" />
    </httpHandlers>
    <httpModules>
      <add name="ErrorLog" type="Elmah.ErrorLogModule, Elmah" />
    </httpModules>
  </system.web>
</configuration>
For Integrated mode, use the following XML markup:
<configuration>
  <configSections>
    <sectionGroup name="elmah">
      <section name="security" requirePermission="false" type="Elmah.SecuritySectionHandler, Elmah" />
      <section name="errorLog" requirePermission="false" type="Elmah.ErrorLogSectionHandler, Elmah" />
      <section name="errorMail" requirePermission="false" type="Elmah.ErrorMailSectionHandler, Elmah" />
      <section name="errorFilter" requirePermission="false" type="Elmah.ErrorFilterSectionHandler, Elmah" />
    </sectionGroup>
  </configSections>
  <elmah>
    <security allowRemoteAccess="yes" />
    <errorLog type="Elmah.SqlErrorLog, Elmah" connectionStringName="Elmah" />
  </elmah>
  <connectionStrings>
    <clear />
    <add name="Elmah" connectionString="Winhost_Database_Connection_String" />
  </connectionStrings>
  <system.webServer>
    <handlers>
      <add name="Elmah" verb="POST,GET,HEAD" path="elmah.axd" type="Elmah.ErrorLogPageFactory, Elmah"/>
    </handlers>
    <modules>
      <add name="ErrorLog" type="Elmah.ErrorLogModule, Elmah" />
      <add name="ErrorMail" type="Elmah.ErrorMailModule, Elmah" />
    </modules>
  </system.webServer>
</configuration>
You can find your Winhost database connection string by:
1) Log into the Winhost Control Panel at https://cp.winhost.com
2) Click on the Sites tab.
3) Click on the Manage link next to the site you want to manage.
4) Click on the MS SQL Manager button.
5) Click on the Manage link next to the database you want to manage.
The connection string information will appear at the bottom. Remember to replace the ****** in the password section with your actual database password. If you have forgotten it, use the Edit link next to Database Password to change it. If you need more details on other Elmah settings, refer to the sample web.config file in the /samples directory.
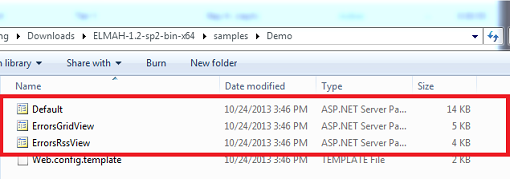
That’s it! Elmah is now configured to trap exceptions from your web application. It also comes with some sample reporting pages in the /samples/Demo directory which you can upload to review the errors trapped.
![]()
Here’s our newest round of updates for our App Installer tool in the Winhost Control Panel:
![]()
Winhost is pleased to announce that the applications offered through our App Installer tool have been updated. Here’s a list of the changes:
Some of the newer versions require the ASP.NET 4.5 Framework in order to run. If you have a hosting account that is on the Windows 2008/IIS7 platforum and want to install one of these applications, please open a support ticket to have your account migrated to Windows 2012/IIS8.
![]()
Recently, a few of our customers ran into this error when hosting their WCF service with us on our IIS8 servers; Memory gates checking failed because the free memory is less than 5% of total memory.
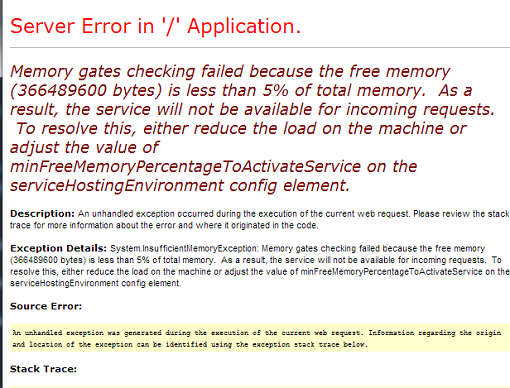
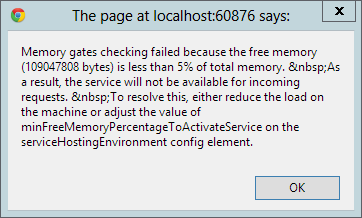
Before you panic, this does not mean that our servers are overloaded or running out of memory as this check is performed on the total amount of memory available on the server. 5% in our hosting environment still means a lot of memory free. Instead, you need to make sure ‘Full’ trust is enabled and that you add this to your web.config file:
<configuration>
<system.serviceModel>
<serviceHostingEnvironment ... minFreeMemoryPercentageToActivateService="0" />
</system.serviceModel>
</configuration>
The attribute to modify is minFreeMemoryPercentageToActivateService. Setting it to 0 will bypass the check and allow the service to run. For more information on the attribute, please see this link.
![]()
Here is a list of updated applications for the Winhost Control Panel App Installer:
![]()
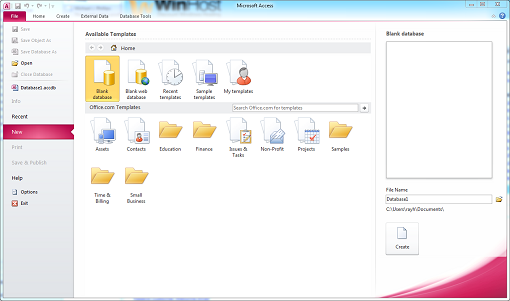
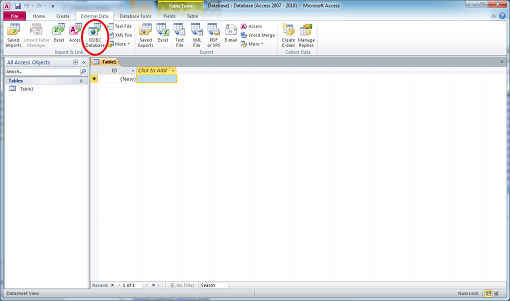
Here’s a short tutorial on how to link your Microsoft Access database to your Microsoft SQL Server database. (Note: Screenshots from Microsoft Access 2010)
1. First, you will need to create an Access database or open up an existing one.
2. Next, you’ll want to click on the External Data tab and then ODBC Database icon which will start a wizard.
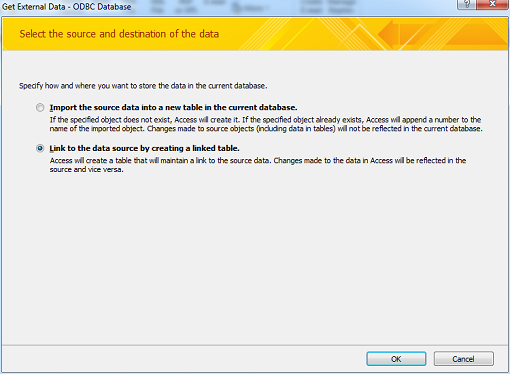
3. Select Link to the data source by creating a linked table and click on OK.
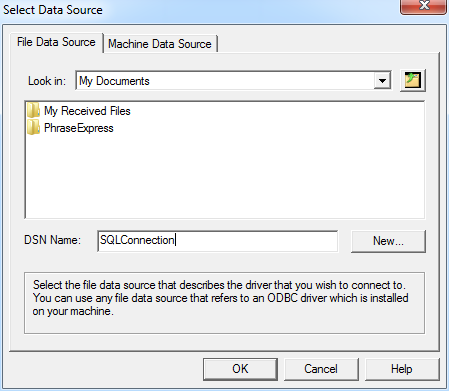
4. In the Select Data Source window, type in the DSN Name and click on the New button.
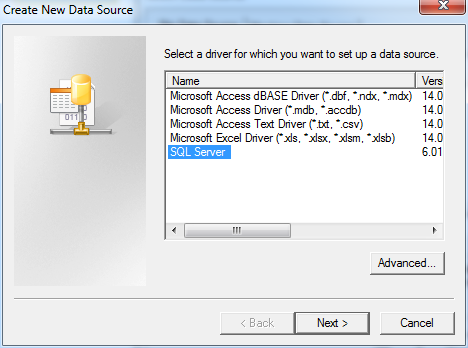
5. In the Create New Data Source window, select SQL Server and click on the Next button.
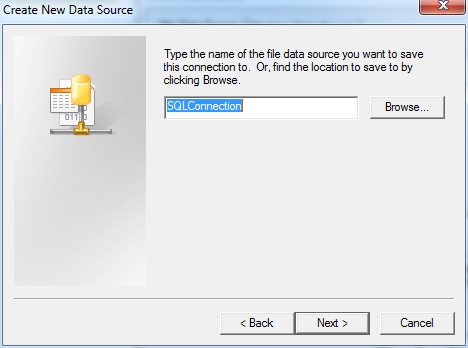
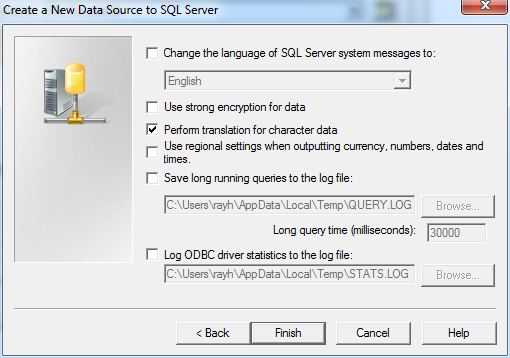
6. In the Create New Data Source window, type in the file name and click on the Next button.
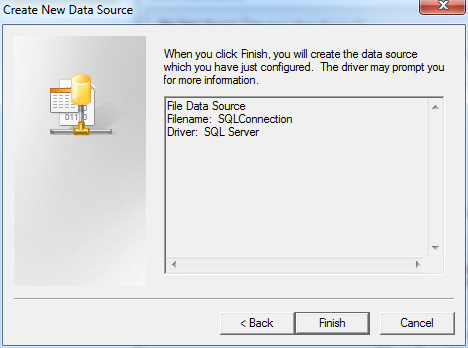
7. In the Create New Data Source window, click on the Finish button.
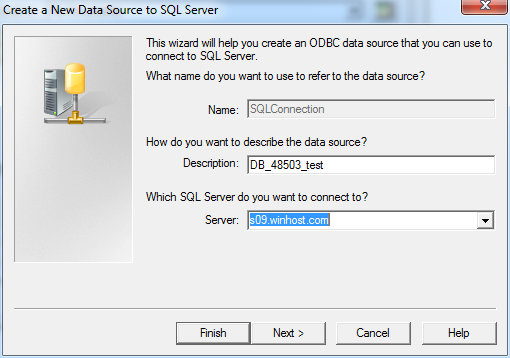
8. In the Create a New Data Source to SQL Server window, type in the name of the database for the Description and enter the fully qualified domain name for the Server.
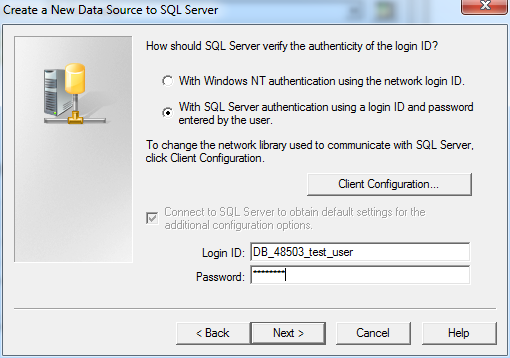
9. In the Create a New Data Source to SQL Server window, check With SQL authentication, type in your Login ID and Password and click on the Next button.
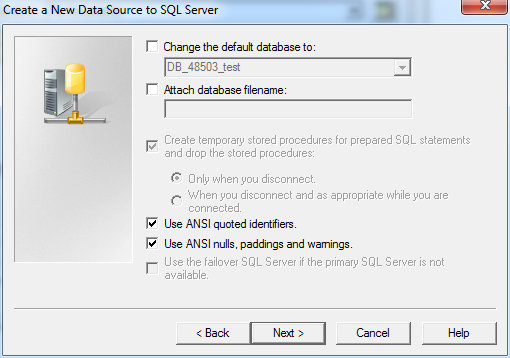
10. In the Create a New Data Source to SQL Server window, you can leave the options as is or change them. Click on the Next button.
11. In the Create a New Data Source to SQL Server window, you can leave the options as is or change them. Click on the Finish button.
12. In the ODBC Microsoft SQL Server Setup window, click on the OK button.

13. In the Select Data Source window, click on the OK button.
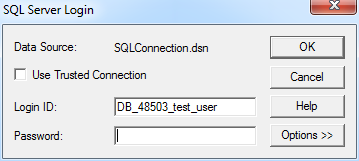
14. In the SQL Server Login window, enter the Login ID and Password.
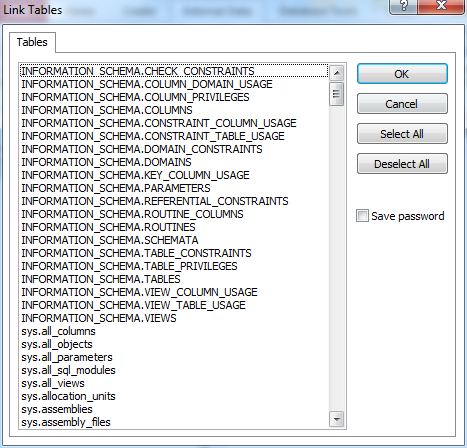
15. In the Link Tables window, select the table(s) you want to link and click on the OK button.
16. In the Select Unique Record Identifier window, choose the fields that will uniquely identify the record and click on the OK button.

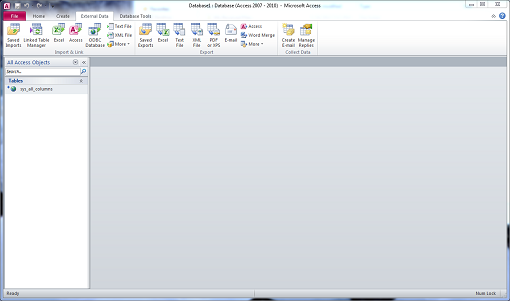
17. You have now created a linked table in Microsoft Access!
![]()
In my previous blogs, I showed you how you can tighten up the settings in SmarterMail to help prevent too much spam from ending up in your Inbox:
Content Filtering, the other Spam Crime Fighter
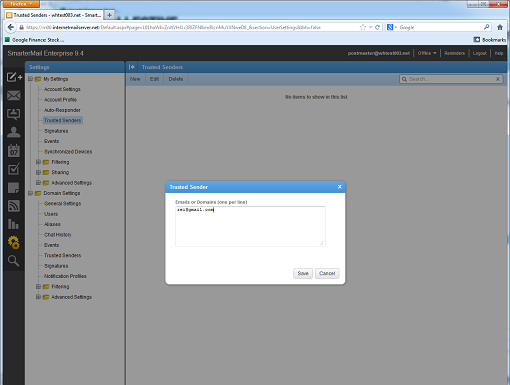
But what happens if legitimate email messages are being marked accidently as spam, and you know it’s from a legitimate email address? Fortunately, there is a way to rectify this problem by using the Trusted Senders feature in SmarterMail. This feature allows you to whitelist email addresses or domains, thus bypassing the spam/content filtering rules you have setup. And here are instructions on how to set it up:
1. Log into SmarterMail with the email account you want to apply this setting to.
2. Click the Settings icon (2 cogs) on the menu to your left.
3. Expand the My Settings folder and click on Trusted Senders.
4. Click on the New button.

1. Enter the email addresses/domains you want to whitelist, line by line.
2. Click on the Save button, and you’re done!
If you want this setting to be applied to all the email accounts in your domain, log in with the postmaster account instead, and use the Trusted Senders under Domain Settings.