First of all, I want you to understand this email message you received is nothing but a scam and you weren’t really hacked. I’ll explain in more details as you read on.
This is by far one of the best spam email messages I’ve seen since I started working here at Winhost. Not only is it creative but some people are really paying bitcoins to not get “exposed.” That’s why this scam is popular.

Why are people falling for this scam?
This scam is often effective because the email message may contain your real password that you are using. Or, it may contain part of a password that you used in the past.
Or
The email states that the email message was sent from your email account to make you believe that your email was hacked. They may use the following text in their email message to you:
“I’m a programmer who cracked your email account and device about half year ago.
You entered a password on one of the insecure site you visited, and I catched it.”
“I have very bad news for you.
17/07/2019 – on this day I hacked your OS and got full access to your account [email protected].
You can check it – I sent this message from your account.”

The hacker goes on to claim that they installed a Rat program on your computer and no matter what you do, you won’t be able to stop them unless you pay up. Don’t pay them anything. I’ll tell you why…

You might be asking… “well… How did they get my password?“
Well you probably heard of all of those nasty data breaches that have been reported on the news and all over the internet? If you were not aware or if you have no idea how anyone might have gotten your account information, there is a website that you can use to check your email address – or any known passwords you like to use and see if it’s part of a data breach. The website is called, “have i been pawned?“. This website’s main purpose is for ordinary people to visit and check if their information was part of any data breach. More about the creator can be found here.
Should I really use this website?
Well, the email message you received already contains your single plain text password. Your password has obviously been compromised before and checking how the hacker may have gotten it can’t hurt you at this point. The hackers also have the same tool to check your password. Hopefully, you are not using that password no more. If you are, change your password.
In the website, you enter the password that you received in the spam email. Their search will bring up what company or list contained that same password.
If your password was compromised, you will get the following message.

“But, they sent me an email from my own email address. So how did they do that?”
Glad you asked. We need to check the email headers and check to see exactly where the email message come from. To get your email header we have the following knowledge base article that shows you how to retrieve this information. An email header may look ugly to a lot of people, but the coolest part is that it tells the story of how you received that email message. Email headers tell a story of the path the email took to get to your inbox.
The email header can be a little tricky to read but you can use some tools to decipher the email header.
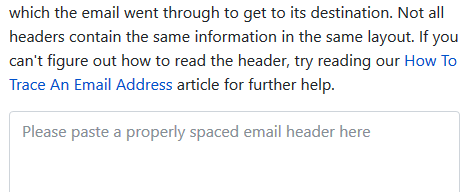
The What’s my IP website has the ability to tell you the origin of the email message. Simply copy and paste the email header into the empty field.

Once you paste in the email header, click on the blue Analyze button. You will get the results of the originating IP number. This is the IP number of the mail server that sent out an email message.
You can check if the IP of the mail server is the same IP number or company that you’re using for your email service. If the IPs don’t match, then the email message has been spoofed – meaning someone just used an email system and changed the “From address” to use your email address. Email addresses are easily spoofed. Just YouTube “how to spoof an email address” if you are interested to learn more.
How do I prevent this from happening again? I hate seeing these damn emails!?
If the email messages you’re receiving are in fact being spoofed, then you have to set up an SPF record and DKIM for your domain name. If you’re using our email services we have the following knowledge base article that provides you with the correct SPF record you should use with our email service.
Is there anything else I can do to stop this email scam?

Yes, we also offer a spam filtering service that stops the bad email messages from ever touching our email systems. The spam filtering service starts to work at the MX level of the email service. This occurs when you change the MX record for your domain name to use the spam filtering service’s MX Records instead. The email messages that are sent to your domain users get routed to the spam filtering service first. Within their system the email messages get scrubbed and filtered and only the legitmate emails get sent to your inbox. Also, a nice feature that comes with our Spam Filtering service – if for some reason our mail server has an issue and can’t receive email messages for any reason – the Spam Filtering service holds on to the incoming email messages and sends it to the main mail server once the issue has resolved. Out of all of the services we offer, the Spam Filtering service is by far one of my favorite ones we provide to our customers.
If you have any questions or concerns about any email spam/scams, feel free to reach out to our technical support team.
Visit Winhost to learn more about our Windows hosting solution
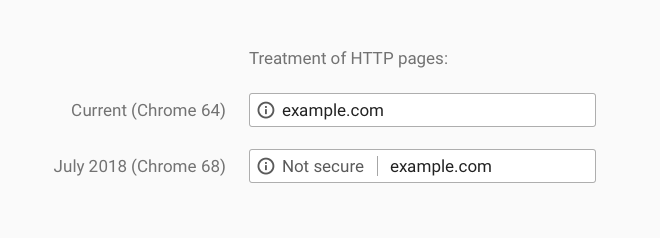
Earlier this year, Google announced that their Chrome browser v68 update will warn users that any non-HTTPS site is “Not Secure”. The release date for this update is slated for July 2018 – this month!
Check out what the Chrome browser will display (from the Chromium Blog):

Over the past years, Google has been slowly pushing all sites to be under SSL. Their efforts thus far shows that over 60% of Chrome traffic is now protected. Now that a majority of sites are protected, Google is moving to their next phase, which is to use their large install base of the Chrome browser to push even further. From our research, the update hasn’t made it out yet but it is slated for this month.
RapidSSL Flash Sale
So it is time to consider securing your site. And to help you out we are having a Flash Sale on RapidSSL SSL certificates.
For the rest of July we are reducing the RapidSSL pricing to:
1 Year: $29
2 Years: $50
Customers can order RapidSSL through their Control Panel and they can get this special pricing during this time period.
Other SSL Options
Please also note that you can use an SSL certificate that was purchased/obtained elsewhere with your Max and Ultimate hosting plan.
If you have any questions, please contact our technical support team.
I just found out that March 31st, 2018 is World Backup Day!
We had a quick meeting and decided to celebrate this special day by checking our backup system to make sure its functioning and continuing to backup our customer’s site/data like we do every day for disaster recovery.
If you haven’t done so in a while, we do recommend that you take the time to backup your websites and databases. March 31st would be a good day as any but it’s a good idea to make a schedule for backups at whatever time interval works for you and your needs. If you have any questions about backups, please contact our technical support team.
And if you want to celebrate World Backup Day everyday like us, then you can check out our SiteBackup service, which will automatically perform a daily backup of your website and databases for any of your websites hosted at Winhost or even websites and databases that are hosted at another hosting provider.
Happy World Backup Day!
You may be aware of the problem that Symantec has been having with Google over issuing of a large number of SSL certificates for major domains to individuals who were not associated with the domains. It’s a long story, but the result was Google informing Symantec that the Chrome browser would no longer trust SSL certificates issued by Symantec. The revocation of trust was to occur gradually over certain dates.
As a result, Symantec sold their SSL certificate business to another company that Google does trust. It becomes a little confusing though, since the new company is keeping the Symantec name for the certificates they issue.
If you bought an SSL certificate from us, you have either a RapidSSL, GeoTrust QuickSSL or GeoTrust True BusinessID certificate, and those are Symantec certificates.
If, like most users, you renew your SSL certificate every year, this issue should not affect you. When you renew, the certificate will still be issued by Symantec, but it will be issued by the new incarnation of Symantec which Google trusts.
If you purchased a multi-year SSL certificate, check this timeline to see if there are any important dates that you should be aware of:
The Chrome browser will no longer trust this certificate after March 15, 2018. In order to retain trust by the Chrome browser, you need to replace this certificate.
The Chrome browser will no longer trust this certificate after September 13, 2018.
If you have a multi-year cert and aren’t quite sure if you’re affected, open up a support ticket and we’ll help you out.
SSL certificates are necessary if you do credit card transactions on your site, or if you simply want to make your site available via an HTTPS URL (such as: https://example.com). If you visit that URL without the HTTPS prefix, you’ll notice that there’s no security “lock” displayed in your browser. That lock icon means your connection to a site is encrypted.
If you’ve never cared about HTTPS, it’s probably time to start. The days when you could avoid using HTTPS are rapidly coming to an end, and Google and the other big web browser makers are more or less forcing the change on everyone. So it’s a change we’re all going to have to make, or one day in the not-too-distant future, security warnings could be greeting every visitor who loads our sites.
With that in mind, here’s a high level overview of what SSL is and how it’s implemented. Think of it as an introduction to the concepts and a peek at the inner workings for anyone who is new to the subject.
Technical note: modern web servers don’t really use the SSL (Secure Socket Layer) protocol anymore, but the name has stuck to the certificates as kind of a generic identifier, so we use “SSL” in this article. The TLS (Transport Layer Security) protocol has replaced SSL for most uses. We’re also using the example of a web browser connecting to a web server, but the concept is the same no matter what kind of client is making a secure connection to a server.
An SSL certificate is really just a text file that is installed on the web server. It ensures that the domain name in the certificate matches the domain name of the site, and enables a visitor’s browser to make a secure connection to the site, so that the traffic back and forth is encrypted and no third-party can listen in on the conversation.
The reason for encrypting transferred data may be obvious where financial transactions are concerned, but even if you’re not sending financial data across the web, quite a bit of private data can be passed between your site and a visitor’s browser (like usernames and passwords). That private data is valuable to unscrupulous types, so encrypting the connection protects the data. Without an SSL certificate and the HTTPS connection, that encryption doesn’t happen.
It’s worth noting here that an HTTPS connection doesn’t prevent someone from finding out which domains you’ve visited. It just makes it (theoretically) impossible for them to see any of the data that was exchanged during the visit.
An SSL certificate contains information about your business or organization (or simply you as a person), and a cryptographic key unique to your domain or certificate. That key is used to establish the encrypted connection. Your website presents the key to the visitor’s browser, and if the browser determines the key is valid (more on that in a minute), the encrypted connection is established.
The entire SSL system is based on trust. When the HTTPS protocol was established, everyone agreed to trust certain organizations (and later companies) to issue legitimate certificates. Those organizations and companies are called certificate authorities. The certificate authority verifies who you are when they issue the certificate and the browser trusts the that the certificate authority has done that verification.
You might see a bit of a problem there if you’ve ever requested a “domain validated” SSL certificate and noticed that no one actually checked anything other than the fact that you had an email address on the domain. It wasn’t always that way. In the early days of SSL, the certificate authority did verify that you were who you said you were, and the owner of the domain you were requesting a certificate for. But as you might imagine, that time-consuming kind of validation quickly became impossible, so now that level of manual human validation is only done for expensive “extended validation” certificates.
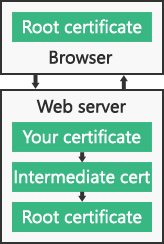
Every certificate authority issues a “root certificate,” which is like a master certificate for that authority. If the authority operates under different names or resells certificates through other companies, they issue “intermediate certificates” that are related or connected to the root certificate. Then the certificate for your domain is associated with the intermediate or root certificate, and that makes up a certificate chain. So the browser trusts the certificate for your domain because it’s associated with a root certificate.
Your certificate, any intermediate certificates and the root certificate are all installed on the web server. The same root certificates are also pre-installed in web browsers and many computer operating systems, so the browser can validate the root certificate on the web server. There are actually a few checks and validations that take place between the different certificates, but her’s a simplified diagram of the chain:

The connection is trusted if:
It’s pretty easy to get lost in the tall weeds here, because the underlying system that handles HTTPS encryption between a client (browser) and a server (your site) is quite complicated (and to add to the complication, the system is always changing, as better and stronger encryption methods are introduced).
But in a nutshell:
– The browser makes a TCP (standard Internet) connection to the site on the web server.
– The browser starts an SSL “handshake,” which is a transfer of data to the server about which version of SSL/TLS the browser is running, and which encryption methods it wants to use.
– The web server determines the highest SSL/TLS version that is supported by both the server and the browser, then sends its certificate(s) to the browser.
– If the certificate(s) meet all the criteria described above (in the “connection is trusted if” section), a cryptographic key is then exchanged and the browser tells the server that all further communication will be encrypted, and sends an encrypted authentication message to the server.
– The server verifies that the message is correct, then returns a similar message that the browser verifies.
– That’s the end of the “handshake,” and until it is broken, the browser and server can communicate securely.
Luckily all of those steps typically take place in a fraction of a second, and the browser and web serer don’t have to do them again (unless the secure connection is broken).
Well, that’s a lot of words for a “simplified” explanation, isn’t it. Sorry about that. But hopefully this has helped you to better understand what an SSL certificate is and what it does.
Still curious about SSL/HTTPS? Check out these other articles:
Ready or Not, It’s Time to Consider HTTPS
Let’s (not) Encrypt. But let’s not ignore https either.
How to Secure Your Primary Domain for Free When Ordering an SSL Certificate
Google Chrome, SSL certificates, SHA-1, SHA-2 and the “obsolete cryptography” message
![]()
This little factoid should freak you out: More than 80,000 websites are hacked every day.
That’s almost one every second, or about 29 million every year. Those numbers translate to a lot of pain and inconvenience for a lot of people. Count yourself lucky if you’ve never been one of them.
There are a quarter of a billion domains with active websites. If 29 million sites are hacked every year, that means we’re living in a world where more than 1 in 10 websites are likely to be compromised. Every year.
How does this happen?
Security starts at home. It’s an old saying, but it applies to a lot of website compromises. We see a lot of hacks that aren’t actually website hacks at all, because the perpetrator is using valid FTP login credentials that were harvested by logging keystrokes or reading log files on a home computer or laptop that has been infected with a virus or malware.
But perhaps the most common way in to a website or server is through old, unpatched third-party software. And a large percentage of that old, unpatched third-party software is WordPress, or WordPress plugins.
Before I give you some tips on locking up your WordPress site, I’d be remiss if I didn’t mention that Winhost has a fully managed WordPress hosting, security and hardening service. The service includes WordPress hardening for maximum security, WordPress-specific support and personalized assistance, and maybe most importantly, monthly updates of WordPress core, Plugins and Themes. The monthly updates consist of one of our in-house WordPress security experts personally examining your WordPress installation for malicious files and signs of compromise. If we discover that your WordPress installation is compromised or hacked, we’ll clean up the mess.
Okay, that’s it for the sales pitch. But if you’ve ever had to clean up a WordPress compromise, I’m pretty sure that you’ll be able to see the value in that service.
The first step in WordPress security doesn’t have anything to do with WordPress itself, but rather site backups. If you always have a current backup, it’s much easier to bounce back from a compromise. Simply identify your most recent “clean” backup, delete everything on your site and upload the clean backup.
We do periodic backups of our entire network for disaster recovery purposes, so if you are compromised you could just request a backup from us. The problem with that approach is we back up every day, and we only retain one copy of those backups. So if you don’t notice that your site has been compromised for a few days, our backup will likely be a copy of the compromised site. That’s not going to be of much help.
So we recommend a cloud backup service. There are a lot of them out there, or you can set one up from your Winhost Control Panel with a few clicks. Our SiteBackup service backs up your website files and databases on a schedule that you choose, retaining as many versions of the backup as you want to keep.
Okay, so that’s a good place to start, with a daily backup of your WordPress site and database. Next are a number of things that you should do to prevent a compromise of your WordPress site.
Update, update, update
How often do you log in to the admin section of your WordPress site? If it’s less than every week – or even every month – you need to start checking in more regularly and updating both the core WordPress files and all of your plugins. If you use a plugin and can’t remember ever updating it, check out the plugin’s page on WordPress.org and make sure it hasn’t been abandoned. If it seems like it has, uninstall it. Chances are there’s a well-maintained plugin out there that will do the same thing.
Kill the admin user
If you installed WordPress some time ago, it may have created a user named “admin” by default. Most brute-force WordPress hacks attempts are on the “admin” username, so you don’t want it to be there. To check, go to your Users page (/wp-admin/users.php) and see if admin is listed there. If it is, create another user or give another existing user the administrator role and delete the default admin user.
Don’t use the default WordPress MySQL table prefix
If the bad guys do manage to find a vulnerability within your site and one of their attempts is to query a table or insert into a table and you used the default table prefix, you could be in trouble. When you’re installing WordPress it’s best to change the table prefix from the default “wp_” to something different. One easy way to do that is to insert random characters after “wp_” – for example wp1od02l_ or wp5434fs_.
Change the WordPress login error
By default, WordPress gives hints about your login when a login fails. One of the steps in our hardening service is to change the login error to “You have entered the wrong Username or Password!” That way someone trying to compromise your site will never know if the username or password is incorrect, making it much more difficult to force or guess a login.
Remove the WordPress version information
It really helps the bad guys to know which WordPress version you’re using. Once they know the version, they can try known vulnerabilities giving them a better chance of getting into your site. They’ll also use Google to find WordPress blogs running a specific version of WordPress that’s easily hackable. You can use a plugin to remove version information.
Disabling Theme and Plugin Editing
The theme editor within WordPress is there to allow you to make quick changes to the code within a theme’s files. Chances are you won’t ever use that feature, but you can be pretty sure that the bad guys will make use of it to enter malicious code. In fact, that is how a lot of WordPress sites get hacked. To prevent that, enter the following rule in your Wp-config.php file, right before the “Stop Editing” tag:
/** Disable File Theme and Plugin Editing */ define('DISALLOW_FILE_EDIT', true);What else?
The Winhost hosting environment goes the extra mile by disabling executable files from running within the uploads folder, as well as IP restriction of the wp-admin directory. That way the wp-admin directory can only be accessed from IP addresses you specify.Last but not least, install a Security plugin
If you haven’t already done so, we would highly recommend installing one of the WordPress security plugins. As part of our hardening service we make the security plugin a “Must Use” plugin. That means the plugin can’t be disabled from the admin section of WordPress. The only way to disable it is by deleting the plugin via FTP.That’s a lot to install, configure and keep track of, but following these recommendations will make your WordPress installation much less susceptible to compromise. If it all sounds good but you don’t really have the time or inclination to do it yourself, let us do it for you.