Site hosting news, tutorials, tips, How Tos and more
![]()
This little factoid should freak you out: More than 80,000 websites are hacked every day.
That’s almost one every second, or about 29 million every year. Those numbers translate to a lot of pain and inconvenience for a lot of people. Count yourself lucky if you’ve never been one of them.
There are a quarter of a billion domains with active websites. If 29 million sites are hacked every year, that means we’re living in a world where more than 1 in 10 websites are likely to be compromised. Every year.
How does this happen?
Security starts at home. It’s an old saying, but it applies to a lot of website compromises. We see a lot of hacks that aren’t actually website hacks at all, because the perpetrator is using valid FTP login credentials that were harvested by logging keystrokes or reading log files on a home computer or laptop that has been infected with a virus or malware.
But perhaps the most common way in to a website or server is through old, unpatched third-party software. And a large percentage of that old, unpatched third-party software is WordPress, or WordPress plugins.
Before I give you some tips on locking up your WordPress site, I’d be remiss if I didn’t mention that Winhost has a fully managed WordPress hosting, security and hardening service. The service includes WordPress hardening for maximum security, WordPress-specific support and personalized assistance, and maybe most importantly, monthly updates of WordPress core, Plugins and Themes. The monthly updates consist of one of our in-house WordPress security experts personally examining your WordPress installation for malicious files and signs of compromise. If we discover that your WordPress installation is compromised or hacked, we’ll clean up the mess.
Okay, that’s it for the sales pitch. But if you’ve ever had to clean up a WordPress compromise, I’m pretty sure that you’ll be able to see the value in that service.
The first step in WordPress security doesn’t have anything to do with WordPress itself, but rather site backups. If you always have a current backup, it’s much easier to bounce back from a compromise. Simply identify your most recent “clean” backup, delete everything on your site and upload the clean backup.
We do periodic backups of our entire network for disaster recovery purposes, so if you are compromised you could just request a backup from us. The problem with that approach is we back up every day, and we only retain one copy of those backups. So if you don’t notice that your site has been compromised for a few days, our backup will likely be a copy of the compromised site. That’s not going to be of much help.
So we recommend a cloud backup service. There are a lot of them out there, or you can set one up from your Winhost Control Panel with a few clicks. Our SiteBackup service backs up your website files and databases on a schedule that you choose, retaining as many versions of the backup as you want to keep.
Okay, so that’s a good place to start, with a daily backup of your WordPress site and database. Next are a number of things that you should do to prevent a compromise of your WordPress site.
Update, update, update
How often do you log in to the admin section of your WordPress site? If it’s less than every week – or even every month – you need to start checking in more regularly and updating both the core WordPress files and all of your plugins. If you use a plugin and can’t remember ever updating it, check out the plugin’s page on WordPress.org and make sure it hasn’t been abandoned. If it seems like it has, uninstall it. Chances are there’s a well-maintained plugin out there that will do the same thing.
Kill the admin user
If you installed WordPress some time ago, it may have created a user named “admin” by default. Most brute-force WordPress hacks attempts are on the “admin” username, so you don’t want it to be there. To check, go to your Users page (/wp-admin/users.php) and see if admin is listed there. If it is, create another user or give another existing user the administrator role and delete the default admin user.
Don’t use the default WordPress MySQL table prefix
If the bad guys do manage to find a vulnerability within your site and one of their attempts is to query a table or insert into a table and you used the default table prefix, you could be in trouble. When you’re installing WordPress it’s best to change the table prefix from the default “wp_” to something different. One easy way to do that is to insert random characters after “wp_” – for example wp1od02l_ or wp5434fs_.
Change the WordPress login error
By default, WordPress gives hints about your login when a login fails. One of the steps in our hardening service is to change the login error to “You have entered the wrong Username or Password!” That way someone trying to compromise your site will never know if the username or password is incorrect, making it much more difficult to force or guess a login.
Remove the WordPress version information
It really helps the bad guys to know which WordPress version you’re using. Once they know the version, they can try known vulnerabilities giving them a better chance of getting into your site. They’ll also use Google to find WordPress blogs running a specific version of WordPress that’s easily hackable. You can use a plugin to remove version information.
Disabling Theme and Plugin Editing
The theme editor within WordPress is there to allow you to make quick changes to the code within a theme’s files. Chances are you won’t ever use that feature, but you can be pretty sure that the bad guys will make use of it to enter malicious code. In fact, that is how a lot of WordPress sites get hacked. To prevent that, enter the following rule in your Wp-config.php file, right before the “Stop Editing” tag:
/** Disable File Theme and Plugin Editing */ define('DISALLOW_FILE_EDIT', true);What else?
The Winhost hosting environment goes the extra mile by disabling executable files from running within the uploads folder, as well as IP restriction of the wp-admin directory. That way the wp-admin directory can only be accessed from IP addresses you specify.Last but not least, install a Security plugin
If you haven’t already done so, we would highly recommend installing one of the WordPress security plugins. As part of our hardening service we make the security plugin a “Must Use” plugin. That means the plugin can’t be disabled from the admin section of WordPress. The only way to disable it is by deleting the plugin via FTP.That’s a lot to install, configure and keep track of, but following these recommendations will make your WordPress installation much less susceptible to compromise. If it all sounds good but you don’t really have the time or inclination to do it yourself, let us do it for you.
The great thing about ASP.NET Core is that it’s portable, allowing you to run your Core application on any OWIN-compatible server. So, even if a particular version of .NET Core is not installed on the server, you can still deploy your Core app in “self-contained” mode.
In this example, we’re going to use the Orchard Core application. Orchard Core is a re-write of the original Orchard application (the thing that runs all the MSDN blogs) in ASP.NET Core. As of the time of this writing, Orchard Core is using ASP.NET Core 2.0. And, at the time of this writing, we have not yet updated our servers with the newest .NET Core to support ASP.NET Core 2.0 natively, but, to repeat: you can still deploy your Core app in “self-contained” mode.
First, some house-keeping. Make sure you have the .NET Core 2.0 SDK installed and Visual Studio is updated.
Orchard Core supports different databases, SQL, SQLite, MySQL and Postgres. I’m going to use SQL, which is included with all Winhost plans. This is a good time to create the SQL database in your Winhost control panel.
Onto the instructions:
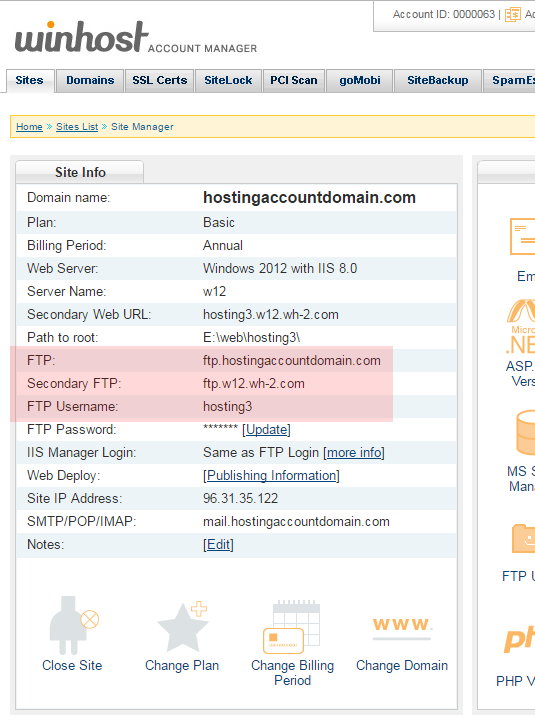
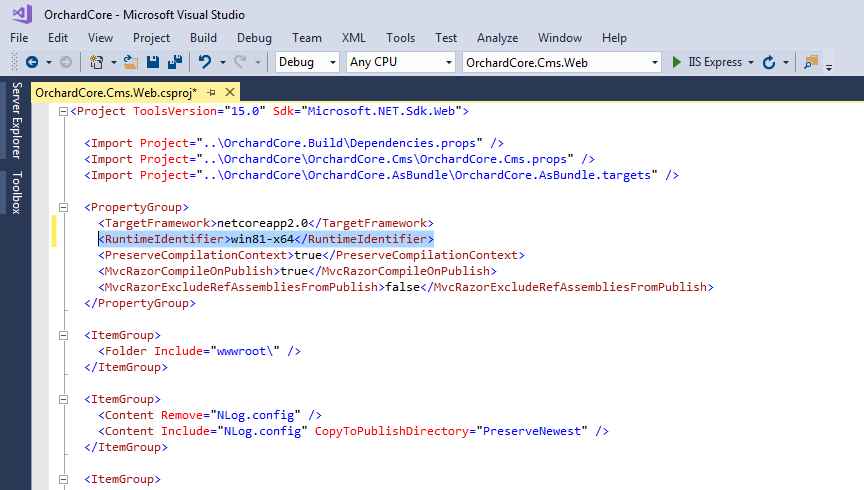
By default, Orchard Core is Framework-dependent. We have to change that to make it self-contained. We have to specify the target platform (tell the application what kind of server it’s going to be running on). In my case, my Winhost site is running on Windows 2012/IIS 8. You can find this information in your Winhost control panel, under the Site Info section. The Runtime Identifier for Windows 2012/IIS 8 is: win8-x64. If you’re site is running on a different server, you can check out the full catalog of Runtime Identifiers here.
<RuntimeIdentifier>win8-x64</RuntimeIdentifier>
Now we’re just about ready to publish. This would be a good time to remove the parts of Orchard Core that you’re not going to use. (For this example site, I didn’t remove anything.)
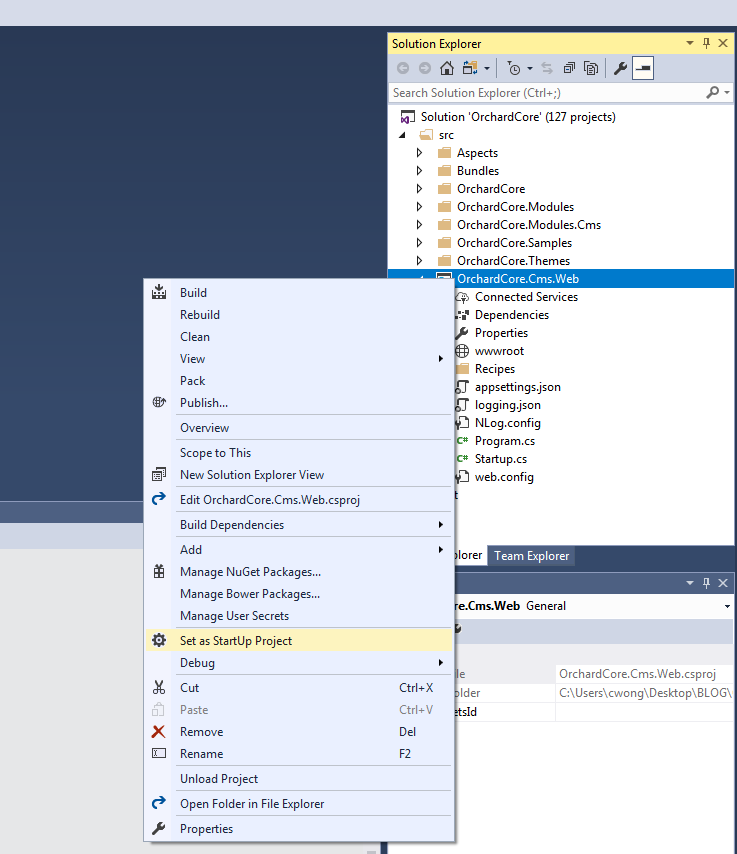
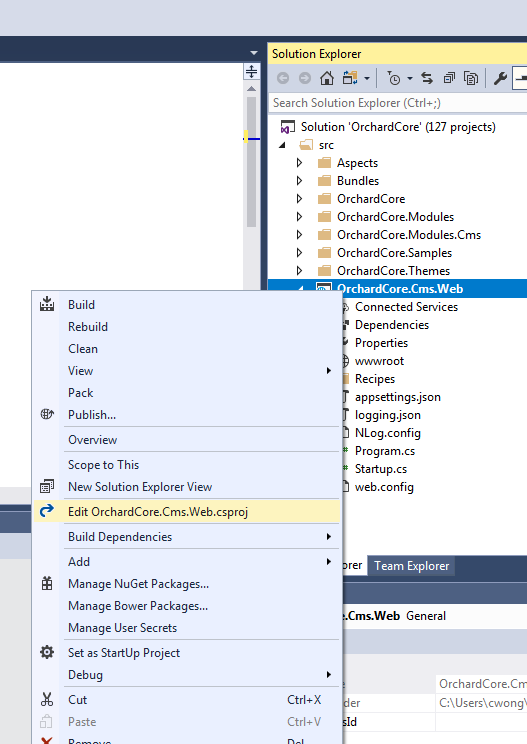
Before, pre-2.0, we would have run the dotnet restore and dotnet build commands at this point. But now, those are implicit commands with publish. So you can just run the publish command (right-click OrchardCore.Cms.Web and select “Publish…”). I used FTP to publish the project directly onto the Winhost servers. Instructions for different deployment methods are available here.
Wait for the project to publish, then navigate to your site and you should see the Orchard Core setup page:
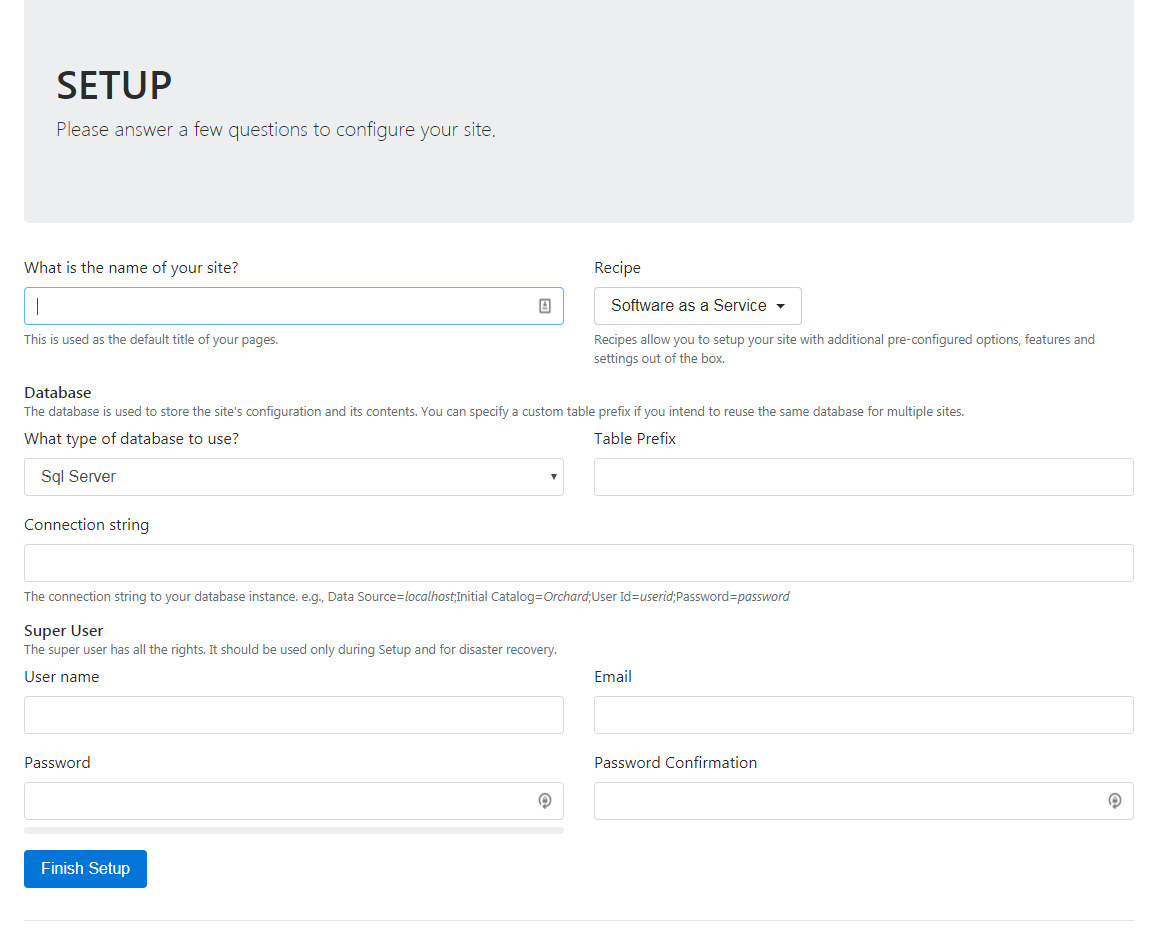
I picked the Agency Recipe. Fill out all the fields, click the Finish Setup button and you should see your new site:

![]()
We support secure SSL/TLS connections to our email server. We’re going to show you how to setup a secure connection with your iPhone.

For the “Incoming mail server”, enter:
For the “Outgoing mail server (SMTP)”, enter:
You will get a certificate warning about the server identity. We installed an SSL certificate on our email server for the convenience and security of our customers. But the problem is that we can’t install a certificate for every customer domain on the server. Instead, we installed a certificate for *.internetmailservice.net. The iPhone will display the warning because of the domain name mismatch; you are trying to reach mail.HostingAccountDomain.com, but the SSL certificate was issued to *.internetmailserver.net. The certificate we installed is safe to use.
Your iPhone may set the default SMTP port to 25. Many internet service providers block port 25, so you should change the SMTP port to 587.
You’re all set! Now your iPhone now has secured, encrypted communication with our email server.
![]()
We’re rolling out a change to the email system that you should be aware of.
The “postmaster” account is set up by default when we establish email service for a domain, but you have the ability to delete that account. The problem with deleting postmaster@ is that some important messages can be addressed to that address, and that’s because the SMTP RFP says the postmaster account for a domain is required to accept mail.
The change we’ve made is implementing behind-the-scenes forwarding that makes your primary domain admin the “postmaster” account (assuming you have deleted the postmaster@ account – if you have not deleted that account, you won’t see any changes). What that effectively does is ensure that email addressed to the postmaster@ address for your domain is delivered.
The side effect of this change is that you may see an increase in spam on your primary domain admin account, since spammers sometimes send to postmaster@, assuming that it exists on every domain (because they know that it’s supposed to exist).
A possible increase in spam is an unfortunate side effect of this change, but the alternative is the possibility of missing legitimate email addressed to your postmaster@ address. Those legitimate messages can be important, so we had to weigh the value of those important messages against the possibility of an increase in spam.
It’s worth noting though that we made this change on a small group of servers a couple of weeks ago, and we didn’t receive any feedback regarding an increase in spam, so the likelihood is you won’t notice much of a change with this new configuration.
As always, if you have any questions or concerns, open up a support ticket and let us know.
It used to be that unless your site accepted payments for products or services, you didn’t really need to concern yourself with an SSL certificate, which allows you to encrypt and secure your site traffic using the https protocol. Those days are quickly coming to an end as web security becomes a larger issue, and giants like Google are making an aggressive push to encrypt all web traffic.
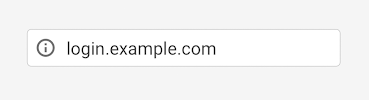
Maybe you have even already received a warning email from Google: “Beginning in January 2017, Chrome (version 56 and later) will mark pages that collect passwords or credit card details as ‘Not Secure’ unless the pages are served over HTTPS.” But what does that mean?
Right now (December, 2016) Chrome shows an “information” icon on all non-https pages (Firefox also uses a similar icon):
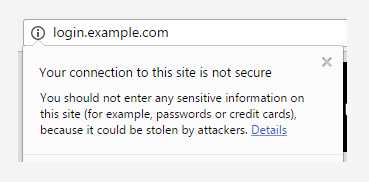
Which seems pretty benign, unless you click that icon and get the insecure site warning:
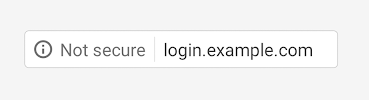
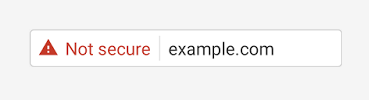
Starting in January of 2017 Chrome is going to take that a step further and add a text warning:
Then “eventually” – which, knowing Google, could be any time – they are going to throw the red flag at non-https pages:
At the moment those warnings only apply to http pages containing password or credit card input fields, but Google definitely plans to extend the Chrome warnings to all http pages, regardless of whether they accept user credit card or authentication input.
Using https encrypts connections to prevent anyone from tapping in to the communication between your website and your visitor’s browsers. It also prevents the bad guys from exploiting your site by injecting malicious code or unwanted advertising into your user’s browser.
The https connection lets your visitors know that they’re securely connected to your site. That what they’re seeing is legitimate information. It also prevents anyone from accumulating of a lot of user data or behavior related to your site traffic. Aggregate data like that can be used for a number of malicious purposes, so blocking access to it is a good thing.
Right about now you may be thinking, “Okay, I get it, but I’m not really concerned about someone listening in to my site traffic.” That’s understandable. Most sites run a pretty low risk of being targeted in that way. But you probably don’t want to see every page of your site displaying a red “Not secure” warning in Chrome (and eventually in other browsers as well).
That’s reason enough to take steps now to make every page of your site available via https (and redirect http requests to https). You might even consider it a priority, since the Chrome browser currently has a 56% market share, and that percentage is increasing.
But aside from avoiding the warning label, there can be other benefits to using https. In their own words:
“Google uses HTTPS as a positive ranking signal. This signal is one amongst many others, and currently carries less weight than high-quality site content; you should not expect a major SEO advantage for moving to HTTPS in the short term. In the longer term, Google may increase the strength of the HTTPS boost.”
Google is making it pretty clear that in the future they are going to give an edge in search result rankings to sites that use https. And who doesn’t want an edge where that’s concerned?
The good news is it isn’t exactly a “move.” Your site stays on the same server, you just add an SSL certificate to your account and make the necessary changes to redirect http traffic to https. This article is already pretty long, so we won’t do a tutorial here, but other than redirecting to https, there are a few other things you’ll want to watch out for:
If you use Google Webmaster Tools, after you’ve made the switch, add the https version of your URL as a new property, set the “preferred version” of that property to https and (re)submit your sitemap. Here’s a Google-centric FAQ on transitioning to https that you may also want to take a look at.
Finally, you may have heard that you can get a free SSL certificate from Let’s Encrypt. That’s true, and you can use those certs here at Winhost. But the Let’s Encrypt certificates come with some drawbacks. Make sure you’re aware of what’s involved in using such a cert before you commit to one.
We’ll have more information on this subject in the coming months. We expect that there will be a lot of questions when Google makes the changes to Chrome, and we’ll do our best to address those questions here and in our Knowledge Base.
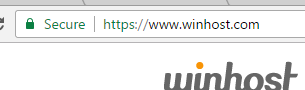
The changes have already begun in the latest version of Chrome (55.x). They aren’t flagging insecure sites yet, but they are spelling out “Secure” now:
![]() If you’re using the anti-virus application Kaspersky Endpoint Security 10 for Windows and Filezilla for FTP, you might have encountered an ENETUNREACH “Network unreachable” error when trying to upload your files to the server. Or, perhaps you updated Filezilla to version 3.11.0 (or above) and it stopped working, giving you the same ENETUNREACH error.
If you’re using the anti-virus application Kaspersky Endpoint Security 10 for Windows and Filezilla for FTP, you might have encountered an ENETUNREACH “Network unreachable” error when trying to upload your files to the server. Or, perhaps you updated Filezilla to version 3.11.0 (or above) and it stopped working, giving you the same ENETUNREACH error.
![]() This is a known issue between Filezilla and Kaspersky. It happens because of the new way Filezilla binds IP addresses to prevent data connection stealing. You can read about the details in this forum post.
This is a known issue between Filezilla and Kaspersky. It happens because of the new way Filezilla binds IP addresses to prevent data connection stealing. You can read about the details in this forum post.
You can fix this issue by either reverting back to an earlier version of Filezilla (version 3.10) or by adding an exclusion to the Kaspersky firewall.
Follow these directions to add an exclusion for Filezilla:
You should be able to connect to the server with Filezilla now.
Of course, there are lots of other reasons why you may get an FTP error. If you do, we offer free (and excellent) technical support for our customers. You can always reach our Support team 24/7 at [email protected] or through our support portal at support.winhost.com.
Starting today, December 1st, new ICANN rules are in effect that change the way some domain contact information changes are done. The change affects all generic top level domains, such as .com, .net, .org, .biz, .info, etc., (including all of the new domain extensions, like .blog, .photo, etc.). Country code domains (.uk, .TV, .co, etc.) are not affected.
When you change the first name, last name, email address or organization for the registrant (i.e., the domain name owner) you have to acknowledge the change in two separate emails. This applies to changes made to the registrant’s contact information. Changes to the admin, billing and technical contacts are not affected.
Changes to the registrant’s name, organization or email information are now treated the same way a “registrant change” was treated in the past. But in the past the registrant change was assumed to be a change of ownership from one person to another, so emailing both parties was necessary.
Now those emails are triggered any time you update your name or email address, and two emails will go to the same person. You need to approve the change by clicking the link in both emails, or the change will fail.
If you want to learn more about the new policy, check out this Knowledge Base article.
![]()
Sometimes you want to give someone FTP access to your site, but you don’t want them to have access to all of the site files. So we’re going to go through the steps to set up an FTP user that only has access to a directory that you specify.
 The first thing we’re going to do is go to the Site Tools section of Control Panel and click on the “FTP Users” icon or link:
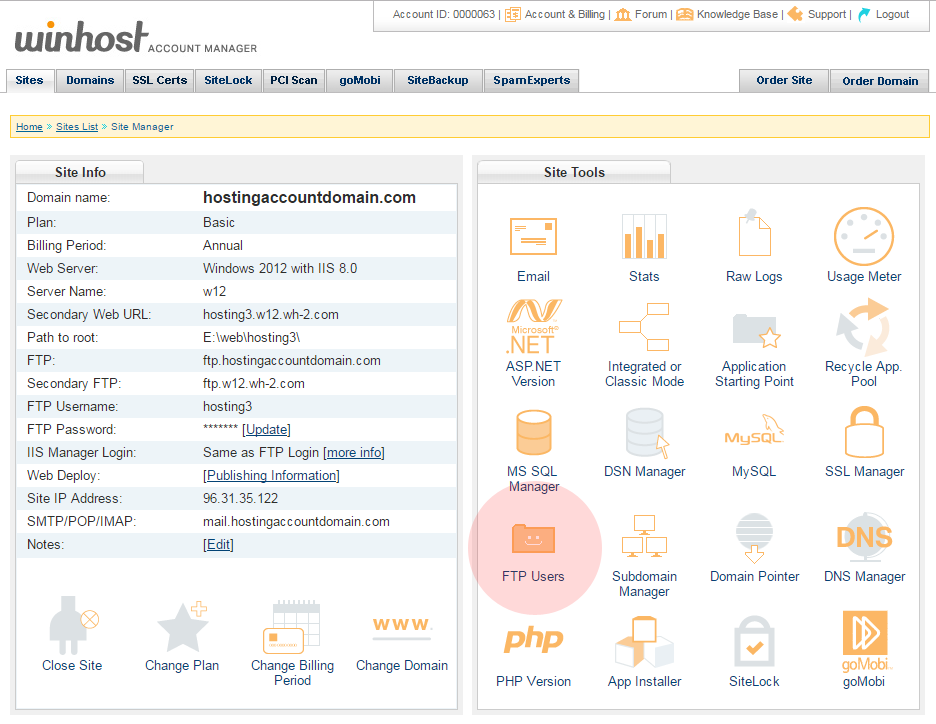
 Click the “Add” button:
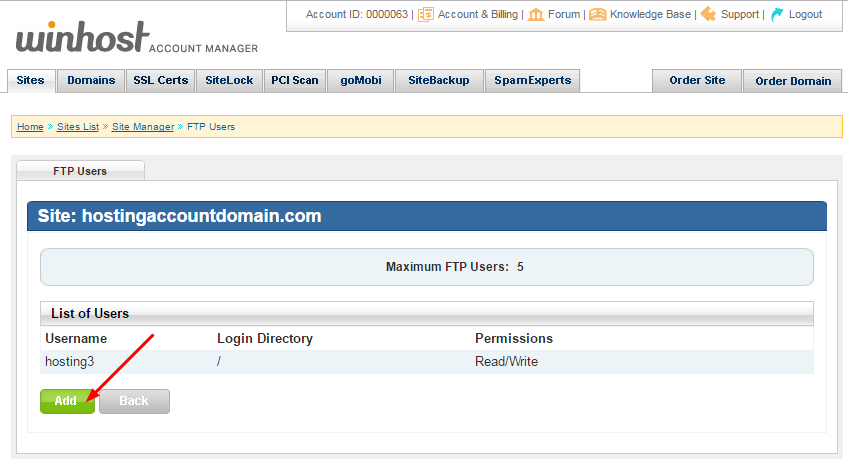
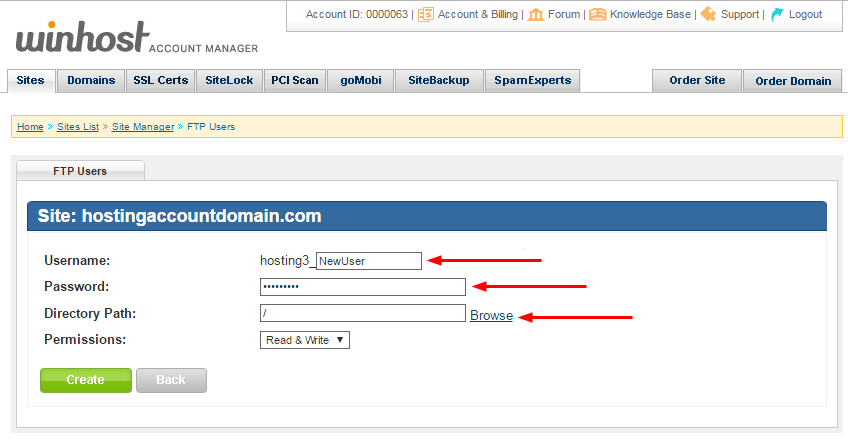
 Enter a username (it will be appended to the primary FTP username, that format can’t be changed) and a password. Enter the directory name or click the “Browse” link to choose from directories on the server:
Note that entering the name of a directory that does not exist does not create that directory on the server. You must enter the name of an existing directory.
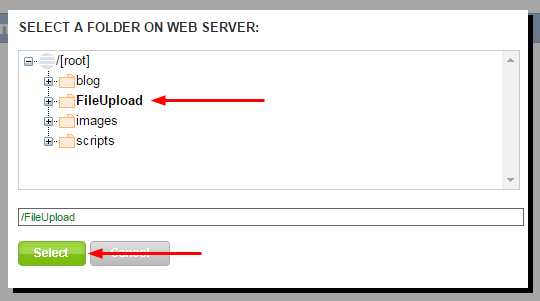
 If you clicked the “Browse” link, select the directory (it will turn bold and the path will be automatically entered in the text field below) and click the “Select” button:
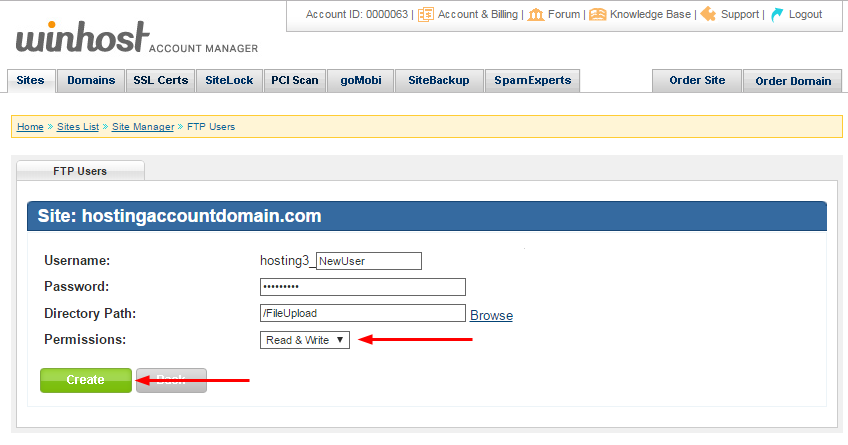
 Make sure you leave the “Permissions” field set to “Read & Write,” since this user will be uploading files (the other option is “Read Only”). Click the “Create” button:
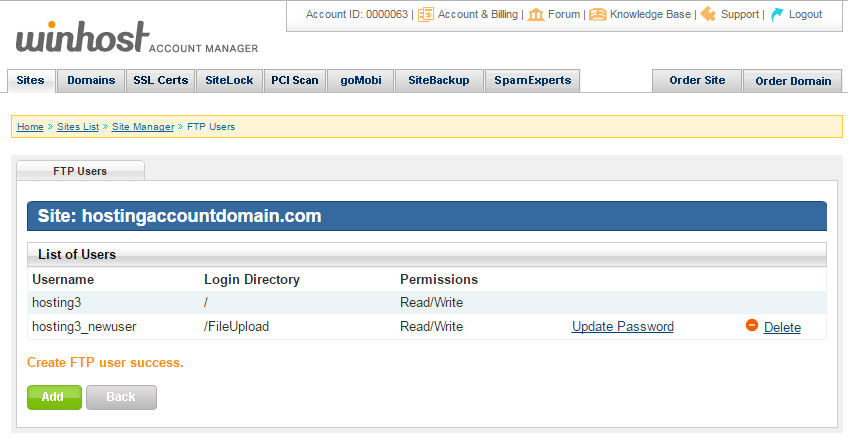
 When the user is added you will see it listed in the FTP Users section. Here you have the option to update the user’s password, or delete the user. The username cannot be edited once the user is created.
 The new user will log in to the same hostname as your existing user(s), but of course the username and password will be those that you just created.