
Site hosting news, tutorials, tips, How Tos and more
![]() I’ve seen this before, a small or medium sized business pays a developer to build a NopCommerce website to run their online store. They pay several hundred – or even thousands – of dollars to get it up and running. Customized design and themes are added to give NopCommerce a custom look unique to the company. Everything goes well, the site is launched and the customer is happy. The developer has done their job and now they’ve moved on to their next project.
I’ve seen this before, a small or medium sized business pays a developer to build a NopCommerce website to run their online store. They pay several hundred – or even thousands – of dollars to get it up and running. Customized design and themes are added to give NopCommerce a custom look unique to the company. Everything goes well, the site is launched and the customer is happy. The developer has done their job and now they’ve moved on to their next project.
Then some months later the unthinkable happens, and the previously happy customer forgets the username or password to the NopCommerce admin account. They try to run through the NopCommerce password recovery process but it’s not working. They either don’t remember, or no longer have access to, the email address to the account. Regardless, the bottom line is that they do not know the credentials to your NopCommerce Admin account and the password recovery process is simply not working.
Luckily, if this ever happens to you there’s a work-around. You’ll need access to the SQL database that NopCommerce is using for the back end data source. You’re going to go directly to the database and change the password in the table that stores the admin account password.
But first you’ll need to create a new registered user in NopCommerce so that you will have a password that you can use to replace the admin account password. Log in to your NopCommerce site and click the “Register” link to set up a new user. You’re going to use the email address and password for this new user in the next steps.
Once the new user is created, log in to the NopCommerce database and search for the new user you just registered by running this SQL command against your database:
use [Database Name]

go

Select ID, Username, Password, PasswordSalt from dbo.Customer WHERE Username='[email protected]'
Replace [email protected] with the actual email address of the new user just registered. From the results of that command, copy the “Password” and “PasswordSalt” values.
Then run this update command:
use [Database Name]

go

Update dbo.Customer

Set Password='<password copied from previous query>', PasswordSalt='<password salt copied from previous query>' WHERE ID='1';
The WHERE clause specifies the admin account, which will have ID value of ‘1’ since it is the first account created when setting up NopCommerce. Now you should be able to log in to the NopCommerce Admin account with the new password.
![]() Prompted by a few customers who are boldly going where no programmer has gone before, I’m proud to say that you can deploy an ASP.NET 5 (vNext) application to Winhost. Even though it’s in Beta right now, and this article will show you how.
Prompted by a few customers who are boldly going where no programmer has gone before, I’m proud to say that you can deploy an ASP.NET 5 (vNext) application to Winhost. Even though it’s in Beta right now, and this article will show you how.
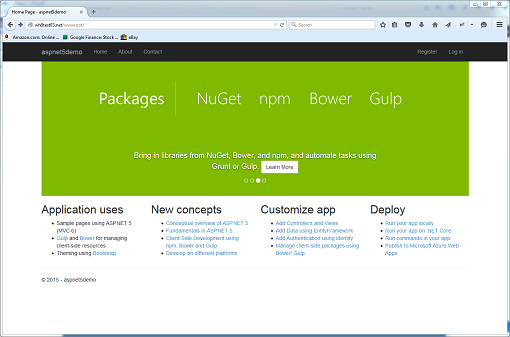
ASP.NET 5 (vNext) represents a fundamental shift in how applications are going to be developed in the future as you will be able to deploy the application in any environment (Linux, Mac, or Windows). It no longer requires a Global Assembly Cache (GAC) as all the assemblies and runtime libraries are obtained using NuGet and then packaged with your application making it self-contained. They are placed in a special approot folder which also contains your source code. The approot folder replaces the functionality of the App_Code or Bin folders. Another folder named wwwroot is also created which contains static files (e.g. html, css, images, etc) and is where your application is launched from.
Because it’s in Beta, I highly recommend that you pay attention to Microsoft’s Roadmap for the release schedule as I’m sure things will have changed by the time it’s officially released. And for the same reason, I can only say these instructions are applicable up to Beta6 in case things change in the future. I’m afraid this guide only covers the publishing portion. If you need help with developing an ASP.NET 5 (vNext) application and don’t know where to start, please make sure you visit the Official Website. I’m also sorry to say that Web Deploy publishing is not supported at this time, only FTP publishing.
Publishing to a sub-directory at Winhost:
A vNext application can only be created using Visual Studio 2015 Professional or higher, so you’ll need to obtain a copy, install it, and then launch the program.
A) Create a new project by selecting File -> New -> Project…

B) Under Visual C# (or the language of your choice), select Web and to the right, select ASP.NET Web Application. Give your project a name if you’d like.
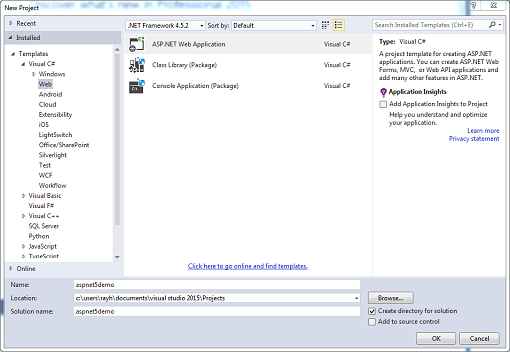
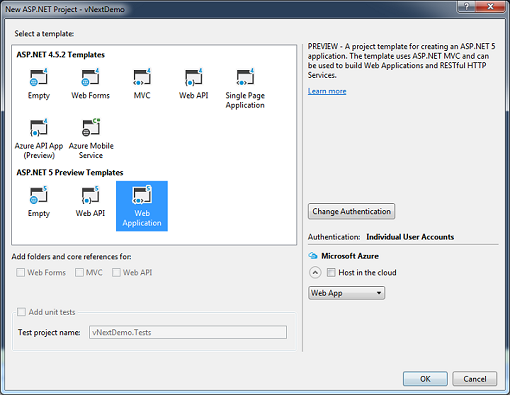
C) In the New ASP.NET Project window, select Web Application for the ASP.NET 5 Preview Template and uncheck Host in the cloud under Microsoft Azure. Click OK continue.
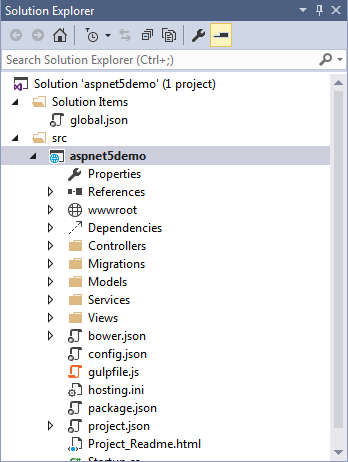
D) If you take a look at the Solution Explorer window, you’ll notice that the file structure is very different from that of a web forms or MVC application. One key change is that the configuration details are no longer stored in .config files. They are stored in JSON (JavaScript Object Notation) format. Again, this tutorial won’t cover any of the programming aspects, but if you’d like to learn more, you can read the official ASP.NET 5 documentation.
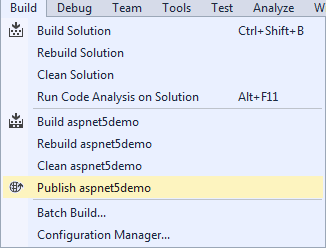
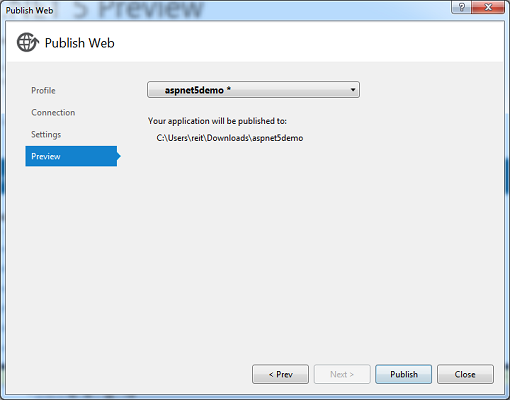
E) Since this is sample application, we can just publish it without making any changes. Select Build -> Publish on the menu bar.
F) In the Profile section, select File System.
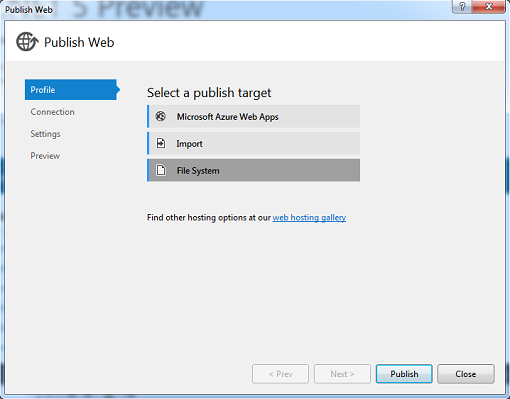
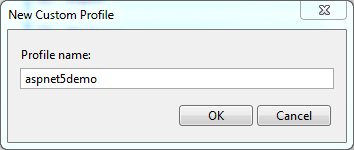
G) Name the profile.
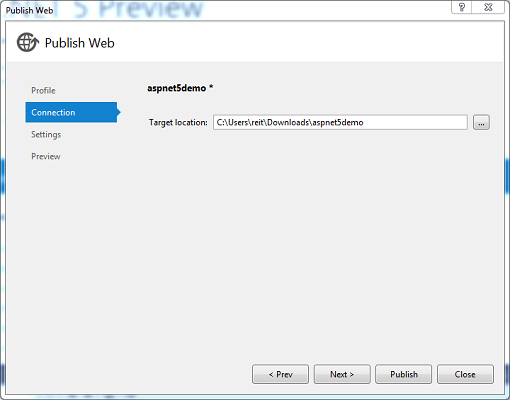
H) In the Connection section, set the Target location to a directory that is easily accessible and click on the Next> button.
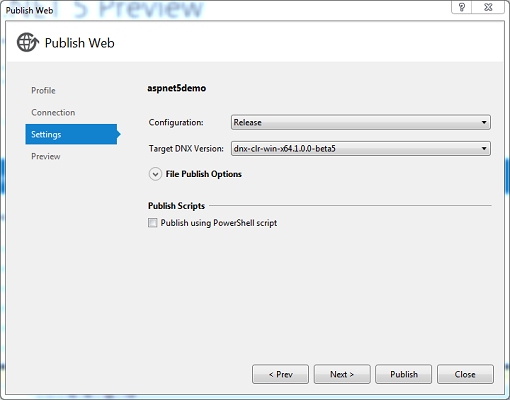
I) In the Settings section, set the Configuration to Release. For the Target DNX Version, it should match the framework your application is written in. DNX stands for .NET Execution Environment which allows your application to be deployed across different platforms (Windows, Mac and Linux). For more information, you can consult the DNX documentation.
If you plan to use the 64 bit versions of the CLRs, you’ll need to open up a support ticket to request that we disable 32-bit support for your application pool, otherwise, it won’t work properly. Uncheck Publish using Powershell script and click on the Next> button.
J) Click the Publish button to start.
K) Once the publishing has finished, you will see the two folders I mentioned earlier, approot and wwwroot. In the wwwroot folder, there is a web.config file that is used to direct the application on how to start. To protect the approot folder from being viewed, we’ll use Request Filtering, create a web.config file with the following markup, and place it in the root level of the site. Some applications require “Full” trust in order to run, so we’ll go ahead and add that to the web.config file as well.
<?xml version="1.0" encoding="UTF-8"?>
<configuration>
  <system.web>
    <trust level="Full" />
  </system.web>
  <system.webServer>
    <security>
      <requestFiltering>
        <hiddenSegments>
          <add segment="approot" />
        </hiddenSegments>
      </requestFiltering>
    </security>
  </system.webServer>
</configuration>
L) Upload these two folders to your site and ignore the other files. Create an Application Starting Point for the wwwroot folder using the tool in the Winhost Control Panel.
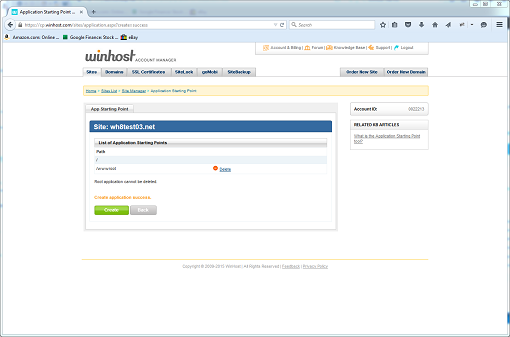
Voila! Your application works but only from a sub-directory (i.e. http://www.mysite.com/wwwroot).
Publishing to the root at Winhost:
If you want your application to run from the root of your site, you just need to make a few modifications post publishing. Locate the project.json file in /approot/src/projectname directory and open it. Change the second line from “webroot”: “../../../wwwroot” to “webroot”: “../../..” Move the contents of the wwwroot directory up one file level. You’ll also need to merge the two web.config files and change the following lines:
<add key=”runtime-path” value=”..\approot\runtimes” />
To:
<add key=”runtime-path” value=”.\approot\runtimes” />
And
<add key=”dnx-app-base” value=”..\approot\src\aspnet5demo” />
To:
<add key=”dnx-app-base” value=”.\approot\src\aspnet5demo” />
Your application now works from the root.

Ftp’ing through Visual Studio
You can also use FTP to publish your files within Visual Studio by creating a publishing profile. Take any text editor, create a file and name it with a .publishsettings extension (e.g. my.publishsettings), and paste the following XML markup into the page:
<?xml version="1.0" encoding="utf-8"?>
<publishData>
  <publishProfile
    profileName="FTP"
    publishMethod="FTP"
    publishUrl="ftp://ftpaddress"
    userName="username"
    userPWD="password"
    destinationAppUrl="http://httpaddress"
    />
</publishData>
Replace ftpaddress, username, password, and httpaddress with the appropriate values. Save the file. At Step F, instead of choosing File System, select the Import option instead and load the my.publishsettings file. Follow the rest of the steps to finish configuring the application. I wouldn’t recommend this method since you’ll need to download some files to make edits and then re-upload them, however, I wanted to make you aware that it is possible.
Please also take note that an ASP.NET 5 (vNext) application must be deployed to an IIS 7.5 or higher server.
![]()
Did your current host drop support for Active Server Pages, or Classic ASP? (We’re looking at you, GoDaddy!) Well, we support it! And we’re committed to continuing support for Classic ASP sites on modern servers.
We also support using Access databases with your Classic ASP site. Here is a Knowledge Base article to get you up and running:
How to query an Access database with ASP using a DSN-less connection
Classic ASP, Access and the Persits components are available on all of our plans.
![]()
Note: beginning with Chrome version 46 the yellow caution triangle has been removed from the https URL when Chrome encounters minor errors such as those described in this article.
If you use an SSL certificate (https) on your site, you may have seen a couple of new things happening in Google Chrome.
When you upgrade the Google Chrome browser to version 41 or later, you may see various warning messages such as, “The identity of this website has not been verified,” “Your connection to <domain> is not encrypted,” or other visual indications that the https connection is not secure.
Those indications can appear when your SSL certificate uses a SHA-1 signature (most SSL certificates issued before 2015 use SHA-1).
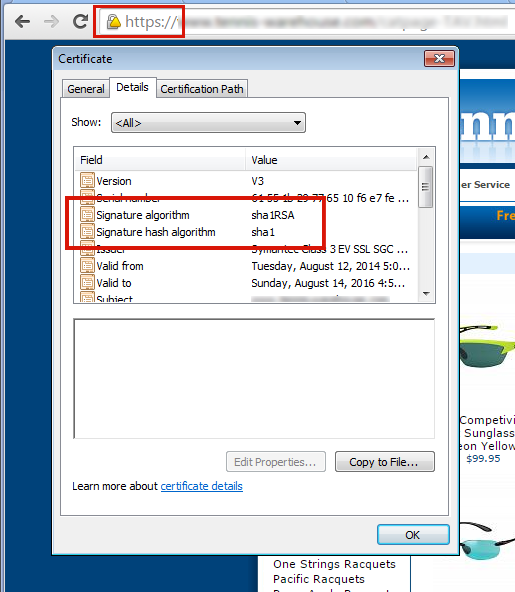
To fix the problem of browser security warnings you must get your SSL certificate re-keyed for SHA-2. If you don’t see those warnings in Chrome and you purchased your certificate recently, it may already be SHA-2. You can verify using this test site.
1) Contact us and we will re-generate and re-submit the CSR.
2) You’ll then get an email from GeoTrust with a link to complete the process. When completing the re-key on the GeoTrust site, be sure that SHA-2 is selected as the “Hashtag Algorithm.” You can find step-by-step instructions (and a video) here.
3) After you’ve completed the reissuing process, you’ll receive an email with the new certificate. Go to Control Panel and paste the new certificate into the SSL manager and you’re finished.
1) Contact us and we will re-generate the CSR and email it to you. Then you’ll have to contact the issuer of your certificate to get your certificate re-keyed for SHA-2.
2) When you receive the re-keyed certificate, go to Control Panel and paste the new certificate into the SSL manager and you’re finished.
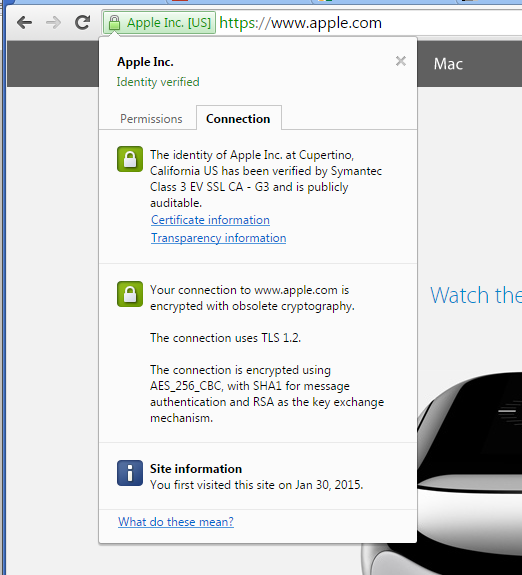
There is another potential problem after you’ve re-keyed your SSL certificate. While the address bar will show the green lock icon, if visitors dig deeper in Chrome, they may see an “Obsolete Cryptography” message.
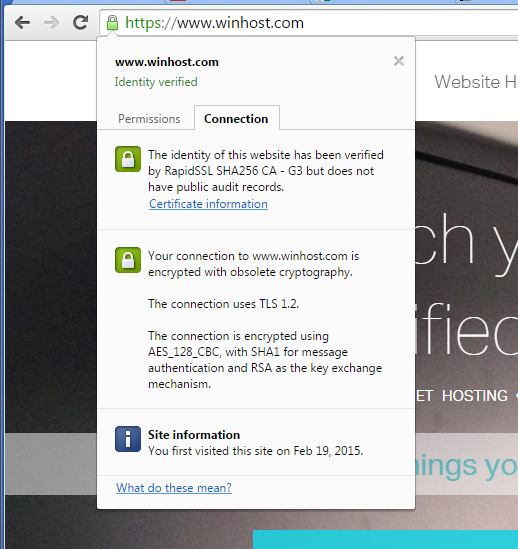
Basically what’s happening now is they are ignoring the cipher preference we use on the server (which includes their preferred ciphers) and pointing out any “weak ciphers” they find. You might notice that many large corporate sites (such as Apple) are also insecure according to Chrome, for similar reasons.
That “obsolete cryptography” message may be with us for a while because Google is not providing any information (yet) on exactly what they want from the server to stop calling it insecure. It would seem that what Google would like to see is every server everywhere removing support for all older cryptographic methods.
The problem with that is removing some of those methods will shut out visitors using some older browsers and operating systems that don’t support newer methods (i.e. Windows XP). Since our servers are shared by many customers, it isn’t really an option for us to make global changes that prevent some visitors – even a small number – from accessing our customer’s sites.
We do run some special servers that do not support any of the older cryptography methods, they are primarily used by customers who need a “hardened” server to pass a PCI compliance scan. But the added security comes at a cost, as older browsers can’t connect to sites on those servers via https. Additionally, a few other things that you may take for granted now may not work, or may require adjustment or a work-around on your part. But if you’d like to move your site to such a server, just let us know.
And of course we continue to monitor information from Google on recommended server configuration, as well as continuing to test various configurations ourselves to prevent the “obsolete cryptography” message.
If you have any trouble re-keying a certificate, or if you have any questions about these ongoing changes, drop us a line and we’ll do our best to help.
![]()
Did you know you could use a MySQL database to store your ASP.NET Membership Table information rather than Microsoft SQL Server? I’ve written this simple guide to help you get started.
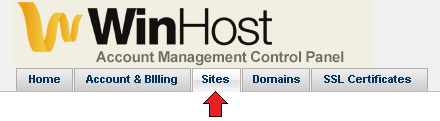
First, create a MySQL database through the Winhost Control Panel. Click on the Sites tab.
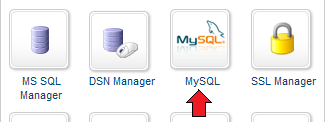
 Click on the Manage link and then click on the MySQL button.
 Click the Add button and enter the values for Database Name, Database User, and Quota. Click the Create button to finish creating the database. Now click on the Manage link and record the connection information (Database Name, Database Server, Database User, and Database Password) on a piece of paper or a text editor such as Notepad.
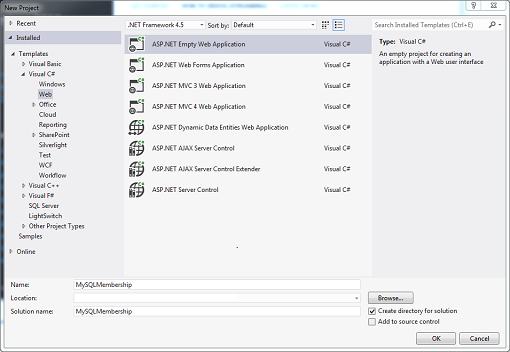
Start Visual Studio and create a New Project by going to File -> New –> Project… (Ctrl+Shift+N).
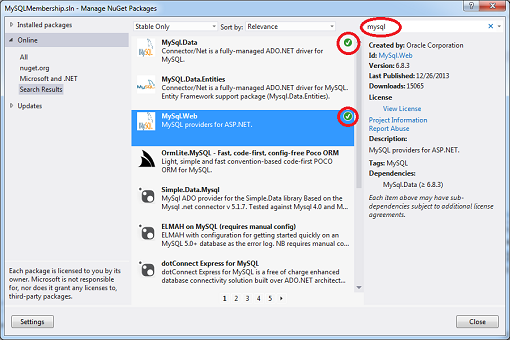
 Add the necessary .NET assemblies to your project using NuGet. Go to TOOLS -> Library Package Manager -> Manage NuGet Packages for a Solution… Type mysql in the Search field and hit Enter. Install both the MySql.Data and MySql.Web assemblies. A check mark will appear to the right when the assemblies have been installed.
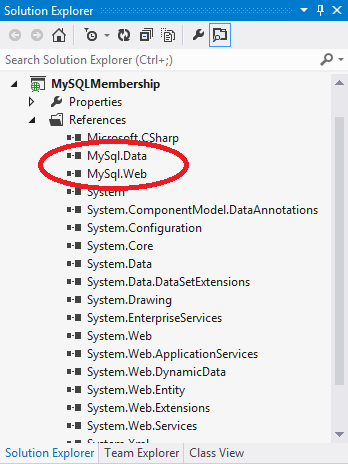
 Another way to verify that the assemblies have been installed correctly is that they will appear as References in the Solution Explorer window.
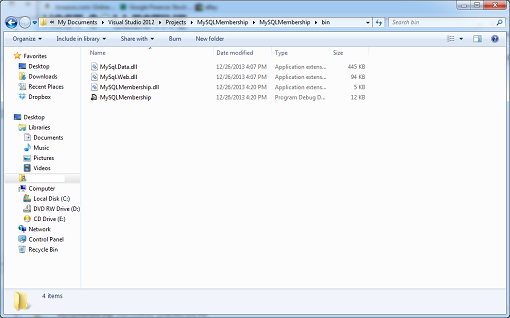
 When you compile your project, a copy of these assemblies will be added to your local /bin folder which you will need to upload to your site account.
 The next step is to modify the Web.config file with this markup:
<?xml version="1.0"?>

<!--
For more information on how to configure your ASP.NET application, please visit
http://go.microsoft.com/fwlink/?LinkId=169433
-->

<configuration>
  <connectionStrings>
    <add name="MySqlMembershipConnection"
         connectionString="Data Source=my02.winhost.com;user id=membership;password=password;database=mysql_48503_membership;"
         providerName="MySql.Data.MySqlClient"/>
  </connectionStrings>
  <system.web>
    <compilation debug="true" targetFramework="4.5" />
    <httpRuntime targetFramework="4.5" />
    <authentication mode="Forms">
      <forms loginUrl="~/Account/Logon"
             timeout="30"
             name=".ASPXFORM$"
             path="/"
             requireSSL="false"
             slidingExpiration="true"
             defaultUrl="Default.aspx"
             enableCrossAppRedirects="false" />
    </authentication>
    <membership defaultProvider="MySqlMembershipProvider">
      <providers>
        <clear/>
        <add name="MySqlMembershipProvider"
             type="MySql.Web.Security.MySQLMembershipProvider, mysql.web"
             connectionStringName="MySqlMembershipConnection"
             enablePasswordRetrieval="false"
             enablePasswordReset="true"
             requiresQuestionAndAnswer="false"
             requiresUniqueEmail="true"
             passwordFormat="Hashed"
             maxInvalidPasswordAttempts="5"
             minRequiredPasswordLength="6"
             minRequiredNonalphanumericCharacters="0"
             passwordAttemptWindow="10"
             applicationName="/"
             autogenerateschema="true"/>
       </providers>
    </membership>
    <roleManager enabled="true" defaultProvider="MySqlRoleProvider">
      <providers>
        <clear />
        <add connectionStringName="MySqlMembershipConnection"
             applicationName="/"
             name="MySqlRoleProvider"
             type="MySql.Web.Security.MySQLRoleProvider, mysql.web"
             autogenerateschema="true"/>
      </providers>
    </roleManager>
    <profile>
      <providers>
        <clear/>
        <add type="MySql.Web.Security.MySqlProfileProvider, mysql.web"
             name="MySqlProfileProvider"
             applicationName="/"
             connectionStringName="MySqlMembershipConnection"
             autogenerateschema="true"/>
      </providers>
    </profile>
  </system.web>
</configuration>
Replacing the connection string section with the Winhost Connection String to your MySQL database. Save the file. The key to creating the tables is this attribute in the XML markup: autogenerateschema=”true” Now, select BUILD -> Build Solution (Ctrl+Shift+B) to compile your application, and then select PROJECT -> ASP.NET Configuration. This will launch the ASP.NET Web Site Administration Tool.
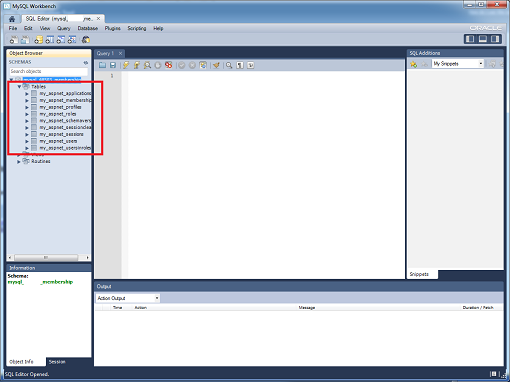
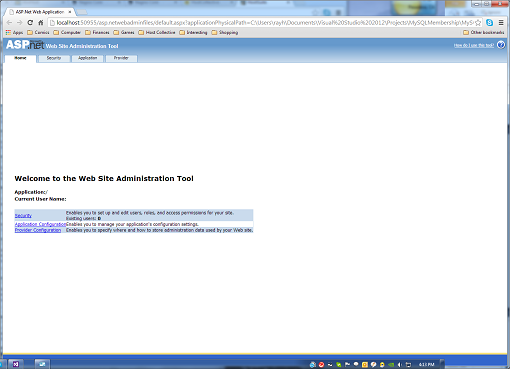 Once the tool has been launched, the tables will be created, and you can check by logging into your MySQL database using an administration tool like MySQL WorkBench.
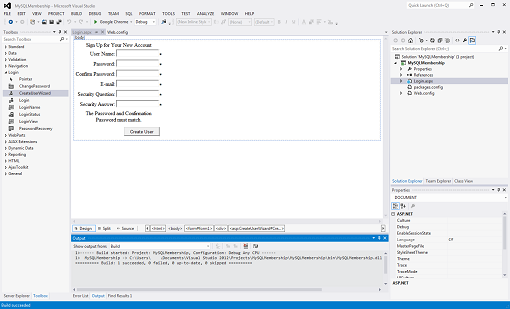
 Now, let’s build a very simple ASP.NET application that will allow you to create users. Go back to your project in Visual Studio, right click on your project name in Solution Explorer and select Add -> New Item… (Ctrl+Shift+A). Select Web Form and name the file. Switch to Design Mode. In the Toolbox Window, expand Login of the tree view, and drag and drop the CreateUserWizard control on to the page. Build your application.
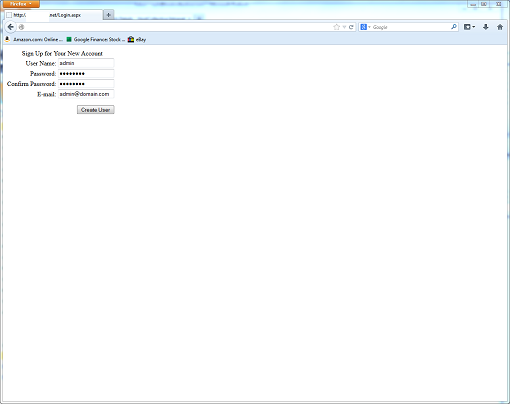
 Deploy your files to the Winhost server using FTP or Web Deploy and then access your site using a browser either with your domain name or Secondary URL. Fill out the create user form and click on the Create User button.
 If you go back and access your database using MySQL WorkBench and query the my_aspnet_users table, you can see that the user was created.
 You can also just use the ASP.NET Web Site Administration Tool to create the users. Of course, none of this information is necessarily new, so I want to thank Nathan Bridgewater’s blog and Oracle for helping me put together this tutorial for our customers at Winhost.
![]()
phpMyAdmin is a free software tool designed to help administrate a MySQL database over the Web, and in this quick tutorial, I will show you how to install it here at Winhost. First, you need to create a MySQL database through the Control Panel.
Click on the Sites tab.
Click on the Manage link and then click on the MySQL button.
Click the Add button and enter the values for Database Name, Database User, and Quota. Click the Create button to finish creating the database. Now click on the Manage link and record the connection information (Database Name, Database Server, Database User, and Database Password) on a piece of paper or a text editor such as Notepad.
Now download the source code from the phpMyAdmin website.
Extract the contents using a decompression program such as 7-Zip. Now make a copy of the config.sample.inc.php file and save the new file as config.inc.php. In the config.inc.php file, alter line 31:
$cfg['Servers'][$i]['host'] = 'localhost';
By changing ‘localhost’ to the database server name. For example:
$cfg['Servers'][$i]['host'] = 'my01.winhost.com';
Now, upload the contents to your Winhost account and access it, adding a Default Document if necessary.
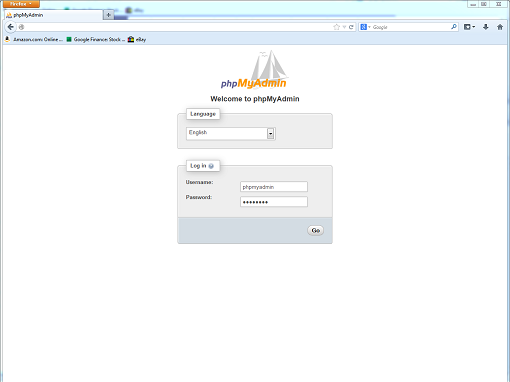 Voila! You are now ready to manage your MySQL database with phpMyAdmin.
![]()
Prompted by a forum post, here are instructions on how to install Elmah, an application-wide Error Logging Module and Handler for ASP.NET on your hosting account here at Winhost. First, you’ll need to download Elmah at this link. For this tutorial, I downloaded ELMAH-1.2-sp2-bin-x64.zip.
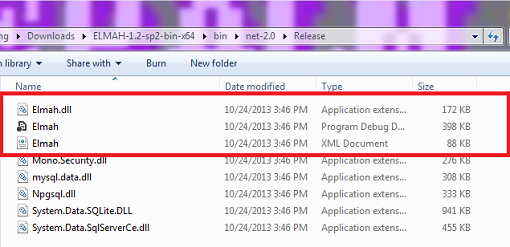
After you have downloaded the .zip file, extract its contents. Open the /bin directory and find the .NET Framework libraries you want to use. Most likely you will be using the assemblies in the net-2.0 -> Release folder. Upload only the Elmah assemblies (i.e. Elmah.dll, Elmah.pdb, and Elmah.xml) to the /bin folder of your web application.
You can configure Elmah to store the exception information in different types of databases, but for this tutorial, I will only be showing you how to set it up with Microsoft SQL Server. If you don’t have a database setup already, follow these instructions to create one:
1) Log into the Winhost Control Panel at https://cp.winhost.com
2) Click on the Sites tab.
3) Click on the Manage link next to the site you want to manage.
4) Click on the MS SQL Manager button.
5) Click on the Add button.
6) Select the database version in the drop down list, name the database, set the quota, and then click on the Create button.
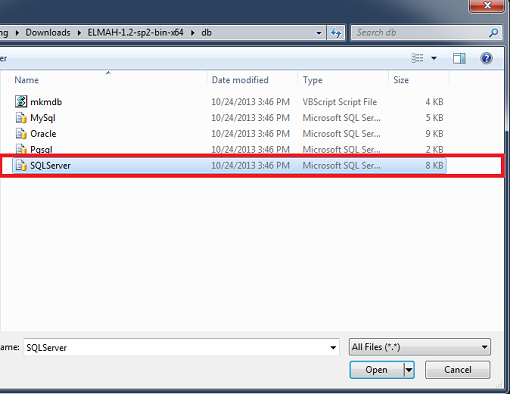
Then log into your database using SQL Server Management Studio. Select File -> Open -> File… (or hit CTRL-O) and navigate to the /db directory of your Elmah extracted files. Select the SQLServer.sql file and click on Open.
Hit F5 to execute the script. This will create the error logging database objects in your database. The final step is to configure your web.config file. The configuration will depend on what type Application Pool Pipeline mode you use. For Classic mode, add the following XML markup to your web.config file to enable Elmah, only substituting Winhost_Database_Connection_String with your actual database connection string.
<configuration>
  <configSections>
    <sectionGroup name="elmah">
      <section name="security" requirePermission="false" type="Elmah.SecuritySectionHandler, Elmah" />
      <section name="errorLog" requirePermission="false" type="Elmah.ErrorLogSectionHandler, Elmah" />
      <section name="errorMail" requirePermission="false" type="Elmah.ErrorMailSectionHandler, Elmah" />
      <section name="errorFilter" requirePermission="false" type="Elmah.ErrorFilterSectionHandler, Elmah" />
    </sectionGroup>
  </configSections>
  <elmah>
    <security allowRemoteAccess="yes" />
    <errorLog type="Elmah.SqlErrorLog, Elmah" connectionStringName="Elmah" />
  </elmah>
  <connectionStrings>
    <clear />
    <add name="Elmah" connectionString="Winhost_Database_Connection_String" />
  </connectionStrings>
  <system.web>
    <httpHandlers>
      <add verb="POST,GET,HEAD" path="elmah.axd" type="Elmah.ErrorLogPageFactory, Elmah" />
    </httpHandlers>
    <httpModules>
      <add name="ErrorLog" type="Elmah.ErrorLogModule, Elmah" />
    </httpModules>
  </system.web>
</configuration>
For Integrated mode, use the following XML markup:
<configuration>
  <configSections>
    <sectionGroup name="elmah">
      <section name="security" requirePermission="false" type="Elmah.SecuritySectionHandler, Elmah" />
      <section name="errorLog" requirePermission="false" type="Elmah.ErrorLogSectionHandler, Elmah" />
      <section name="errorMail" requirePermission="false" type="Elmah.ErrorMailSectionHandler, Elmah" />
      <section name="errorFilter" requirePermission="false" type="Elmah.ErrorFilterSectionHandler, Elmah" />
    </sectionGroup>
  </configSections>
  <elmah>
    <security allowRemoteAccess="yes" />
    <errorLog type="Elmah.SqlErrorLog, Elmah" connectionStringName="Elmah" />
  </elmah>
  <connectionStrings>
    <clear />
    <add name="Elmah" connectionString="Winhost_Database_Connection_String" />
  </connectionStrings>
  <system.webServer>
    <handlers>
      <add name="Elmah" verb="POST,GET,HEAD" path="elmah.axd" type="Elmah.ErrorLogPageFactory, Elmah"/>
    </handlers>
    <modules>
      <add name="ErrorLog" type="Elmah.ErrorLogModule, Elmah" />
      <add name="ErrorMail" type="Elmah.ErrorMailModule, Elmah" />
    </modules>
  </system.webServer>
</configuration>
You can find your Winhost database connection string by:
1) Log into the Winhost Control Panel at https://cp.winhost.com
2) Click on the Sites tab.
3) Click on the Manage link next to the site you want to manage.
4) Click on the MS SQL Manager button.
5) Click on the Manage link next to the database you want to manage.
The connection string information will appear at the bottom. Remember to replace the ****** in the password section with your actual database password. If you have forgotten it, use the Edit link next to Database Password to change it. If you need more details on other Elmah settings, refer to the sample web.config file in the /samples directory.
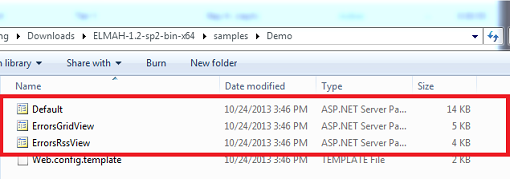
That’s it! Elmah is now configured to trap exceptions from your web application. It also comes with some sample reporting pages in the /samples/Demo directory which you can upload to review the errors trapped.
![]()
Some of us (like me) have at one time or another forgotten the Admin Login for our WordPress site. Maybe you’ve tried using the Lost your password? function, but for whatever reason that doesn’t work.
So what do you do now? Start all over?
Nope. We’re going to modify our user table on the MySQL database by creating a new MD5 hash.
Well, first you need to create a new MD5 hash using this handy web site. Enter your new password in the string field of the site. Now save the MD5 hash text the site created for you and save it in a text file. You might also want to save the password in the text file just in case, but don’t forget to delete it once you’re done.
Now, you’re going to use MySQL Workbench to connect to the WordPress database. To learn how to connect to your MySQL database using Workbench please read our Knowledge Base article.
Once connected with MySQL Workbench expand the database. Expand your tables and right click on the users (this table may also be called wp_users depending on which table prefix you used when you installed WordPress).
After right clicking on the users tabled select Edit table data.
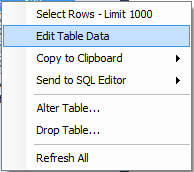
Find your admin user. Under the user_pass column next to the admin user and enter the MD5 hash you created. It should look like this:

Now click on the Apply button in MySQL Workbench. Click Apply again on the next window. Now click Finish.
After you completed all those steps you should now be able to log in to your admin section with the new password you created.