
Site hosting news, tutorials, tips, How Tos and more
PHP 7.3 that’s been recently installed on all of our IIS 8 and IIS 10 servers. One major difference is the speed of PHP sites running on PHP 7.3. Reading the buzz around the internet you’ll see claims that PHP 7.3 being 31% faster than PHP 7.0 and 3 times faster than PHP5.

Curious about this myself, I decided to check to see how much better the speed was for a based WordPress site running on our Windows 2012 IIS 8 Servers.
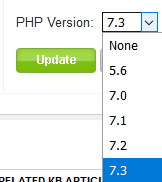
Users can easily change the PHP version of their site account within the Winhost control panel.
Sites > Site Account > PHP Version
I used Google’s PageSpeed Insights Tool to test a website. And sure enough, I got a lot better results while using 7.3. While just using a base WordPress install with the canned plugins it comes shipped with, 7.3 did in fact preform better than PHP 5.6.


Please note that your results will vary depending on how large your site is and what plugins and themes you are using.
If you’re using an older version of WordPress. Please be sure to update to the latest version before changing your PHP version within the control panel. You should also upgrade all plugins and themes your site is using as well. Otherwise, your WordPress site could break until you switch it back to the old PHP version you were using before. Contact our technical support team if you run into any issues.
If you’re still currently on our Windows 2008 IIS 7 servers. You can contact our support department and asked to be migrated to the newer servers.
Visit Winhost to learn more about our Windows hosting plans supporting PHP 7.3.
Having an email message to take forever to arrive can be very annoying and sometimes it leaves people wondering why is this even happening. In this article I’ll show you how to analyze email headers of an email message.
What is an email header?
An email header is a timeline of where the email message went through to get to you and the different email systems it touched during the delivery process. It’s sort of like looking at the tracking information of your UPS delivery. The only way to find out where the slowness is happening is to review the email header of that sluggish email message.
Where can I find the email header?
First, the email message must arrive at the destination before you can review the headers. We have instructions on how to view email headers in our knowledge base. There are multiple ways of viewing the headers. Here is another list that can help you find your email headers.
How to analyze the email header
Email headers can look ugly and hard to understand. Luckily there is a email header analyzing tool provided by MxToolBox.com that can help with that.

Copy and paste that ugly looking email header into the empty field and click on Analyze Header.
In the results, the email server with the longest bar graph is going to be the email server that is causing the most delay.
Why is this occurring?
There are many different reasons why an email message could be slow. One common reason is that the email server that caused the most delay had a large amount of email messages to process. If you see that the latency is happening in one of our email servers, we will gladly check our system for you and the logs to see what might be happening. Please contact our support department via our support portal for assistance.
For the most part most email servers are temporarily handling large volume of emails and will go back to normal performance on their own. However, if you’re seeing this issue keeps happening at a particular email server, you can contact the email administrator of that email system and provide them with the email header as proof.
Visit Winhost to learn more about our Windows hosting solution
One of the most popular ways attackers are able to compromise WordPress sites is through a brute force attack. Through this method, they can try large number of passwords in a very short time. If your password can be easily guessed, there is a higher chance of an attacker gaining access.
In this post we will be covering how to add reCAPTCHA to your WordPress site. This can effectively shut down bots that are trying to abuse your pages, especially your login page.
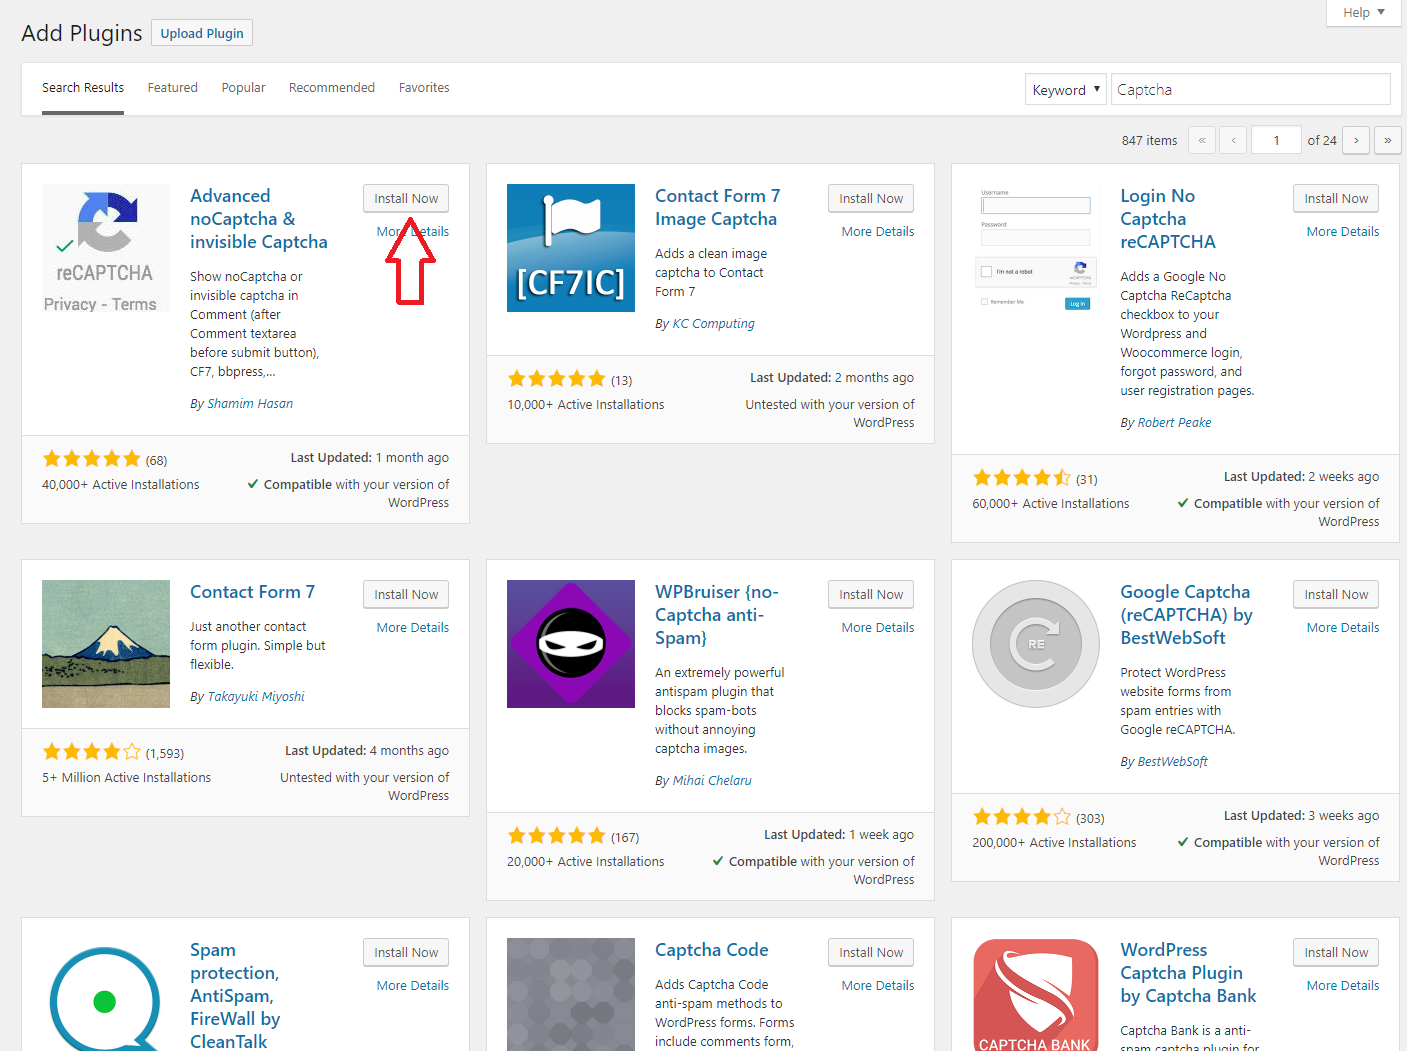
To begin, you will need to log in to your admin section of your WordPress site. Go to Plugins > Add New, on this screen search for “captcha”. The plugin I have used and have not had any problems with is the “Advanced noCaptcha & invisible Captcha” plugin. Click “Install Now” , “Activate”, and then click settings.
For this next step a Google account is required. Go to this link:
https://www.google.com/recaptcha/intro/v3.html# and click Admin console on the top right. Fill in the label field with your domain name, be sure to choose reCAPTCHA v2, enter your domain, and accept the Terms of Service.
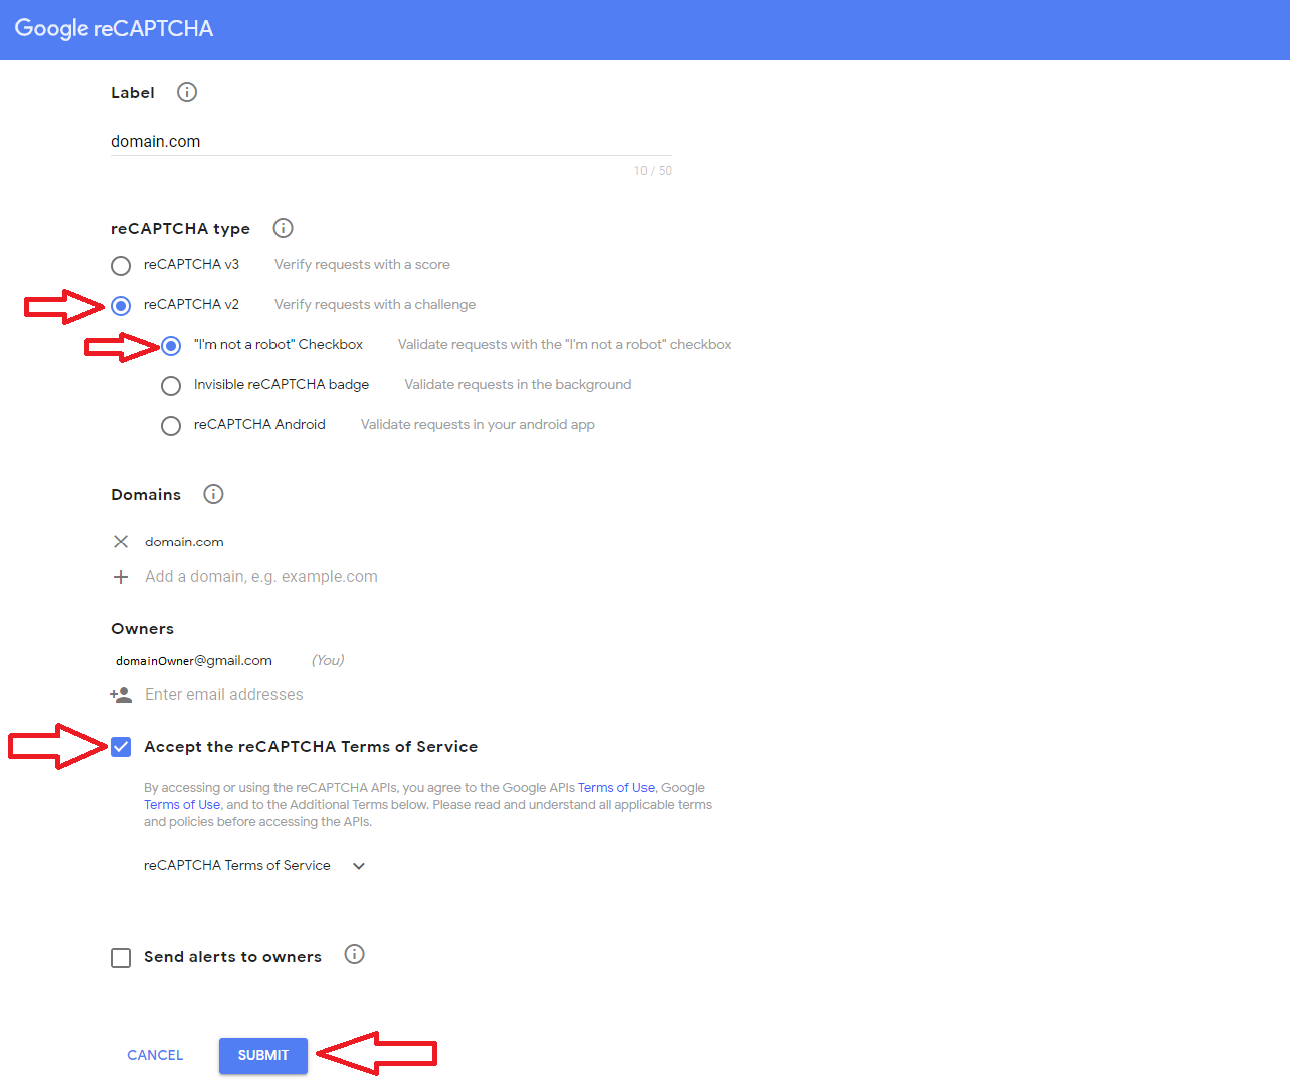
Click submit to be given your “Site Key” and “Secret Key”, go back to the settings page for the plug in and paste the keys in there. Fill in the rest of the fields as needed. **I would highly recommend testing it on only the Comment Form first and not the Login as it can lock you out if done incorrectly. ** You can also set how many attempts are allowed before a user is prompted, the default is set to always ask.

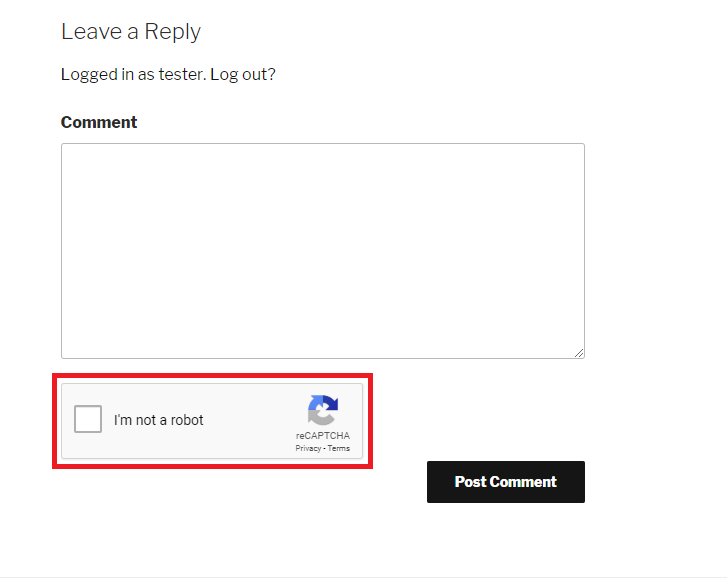
Click “Save Changes”, then visit a comment section on your site. The result should be the newly added reCAPTCHA prompting you to verify you are not a robot.
Congratulations! You can now go back to the settings page and enable it on the log in page, as well as any other pages you would like to protect from bots. Should you encounter any problems during the process please open a support ticket.
Visit Winhost to learn more about our WordPress hosting solution
When I see one of these tickets, I know I’m in for the long haul. I’ve seen this problem a handful of times and each time the solution was different and less obvious than it’s predecessor. So instead of struggling to remember what it was I had done the previous time that succeeded , I decided to consolidate some of the fixes into this blog post.
1) Check your database.
In the control panel go to the MySQL icon and look for “Usage”. If you reached the assigned quota for that database, you may have found the issue. You will either have to raise the quota or if you have reached the max quota for the account, then you will have to free up some space. Once you make this change check back in an hour and your login may start working again.

2) Disable Plugins or Themes.
If you recently installed a new plugin or theme when you encounter this login problem, that may be the culprit. Connect to your site via FTP, navigate to the “wp-content folder”, and find your “plugins” folder. Try renaming the “plugins” folder to “pluginszzz” and attempt to log in. If it works, then you know for sure that one of the plugins was interfering with the login.
If the last step did not reveal anything check the “themes” folder by double clicking it. Rename the theme you are currently using to anything so WordPress will revert back to the default theme. If the login is successful then you know the theme was the cause.
3) Define your site URLs in wp-config file.
Connect to the site via FTP. In the root of your WordPress directory look for your “wp-config” file. Download it and open it in a text editor such as Notepad or Notepad++. Add the following two lines to the file, save it, and upload it back to the site.
define(‘WP_HOME’,’http://domain.com’);
define(‘WP_SITEURL’,’http://domain.com’);
***Be sure to change ‘domain.com’ to your actual domain name***
4) Reset your password.
This is a fairly self-explanatory step. Just click on the forgot my password link, reset it and try again.
The above list has been the solutions that worked to resolve the login issue for me, but there could be other resolutions to the login problem that I haven’t encountered yet.
If none of the above successfully resolves your issue, the next step would be to open a technical support ticket so we can try looking into the issue further and find the cause. If we find more solutions we’ll try to post them in the future.
Visit Winhost to learn more about our WordPress hosting solution
In this tutorial we’ll be using an empty ASP.NET Core application within Visual Studio 2017 and show you how to deploy an ASP.NET Core 2.2 application that is running in InProcess on a Windows IIS Server.
ASP.NET Core 2.2 was recently released and with some new cool features. You are now able to use InProcess with your ASP.NET Core application. By default older versions of ASP.NET Core used OutOfProcess. When using InProcess the ASP.NET Core application only uses the IIS Worker process (w3wp.exe) whereas the OutOfProcess Core application uses the Kestrel server along with the IIS Worker process.
Kestrel is used in ASP.NET Core because it’s supported on different web servers like Apache, IIS, and Nginx. In a Windows server environment, OutOfProcess uses the Kestrel process (dotnet.exe) and IIS Worker process as a reverse proxy to handle the HTTP requests and other various requests normally handled by the IIS Worker Process.
When using InProcess hosting the IIS worker process handles all of the HTTP requests without Kestrel. No more reverse proxies being utilized meaning for a quicker result and a boost in performance.
On Winhost we support both InProcess hosting and OutOfProcess hosting with ASP.NET Core 2.2. If you want to test this on Winhost try to find our hidden promo code within this blog post. (Hint: It’s not a clickable link.)
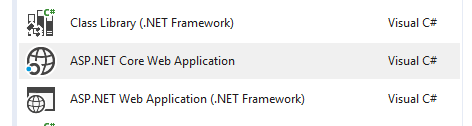
Open a new Visual Studio Project as shown below:

Select ASP.NET Core Web Application.
Click OK and on the next window select Empty making sure ASP.NET Core 2.2 is selected from the drop down menu as well. Click Okay again.
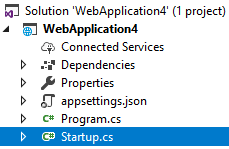
In this project we’re only interested to focus on what process the ASP.NET Core 2.2 is running on. To do this we need to edit the Startup.cs file from the Solution Explorer page.
Go to Line 30 and replace the following code:
await context.Response.WriteAsync("Hello World!");
With the following:
await context.Response.WriteAsync(System.Diagnostics.Process.GetCurrentProcess().ProcessName);
The above code replaces the typical “Hello World!” text from the empty application and displays the process name the application is running on. This step isn’t necessary if you want your application to use InProcess hosting model. We are doing this here just to see what process is being used once it’s been deployed onto the web server.
When selecting a new ASP.NET Core 2.2 project in Visual Studio 2017 the defaults to InProcess within the Application’s Project file. However, you have the ability to check what hosting model your core application is going to use by checking the Project file. See below example:
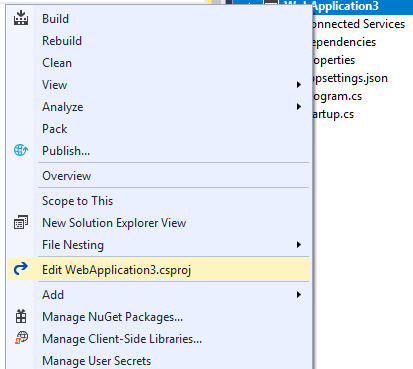
In the project file on line 5 you should see the following:
<AspNetCoreHostingModel>InProcess</AspNetCoreHostingModel>
Log into your Winhost control panel if you haven’t done so already.
In the Publishing information section you will need these settings within Visual Studio when doing a Web Deployment. See below:
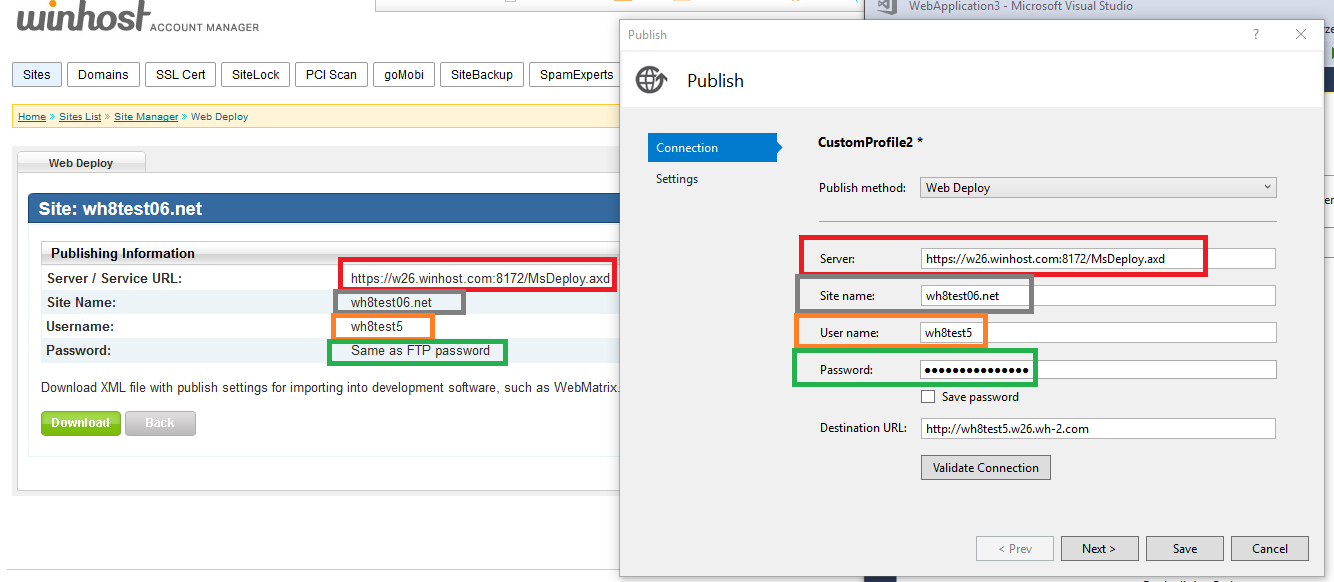
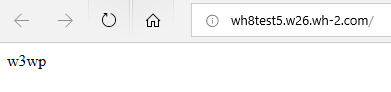
If your application is on a IIS server and it’s running InProcess the text you will see in the web browser is: w3wp
If your Core application is running OutOfProcess then it will return: dotnet

In closing, InProcess according to Microsoft is, quicker compared to OutOfProcess. Nicely done Microsoft… Nicely done, indeed.
Visit Winhost to learn more about our ASP.NET Core hosting solution
Some customers have asked what is the best way to prevent visitors from accessing certain files on their sites. The solution we generally recommend is what I am going to cover in this article.
First you will need to connect to your site through IIS Manager and the instructions can be found here: https://support.winhost.com/kb/a628/using-the-microsoft-iis-manager.aspx
Once you have made a successful connection you should get a screen that looks like the one below:
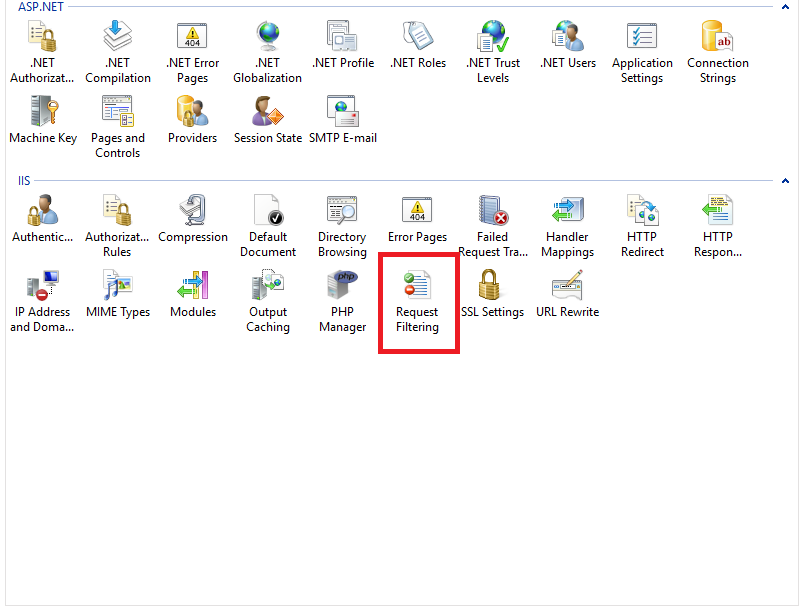
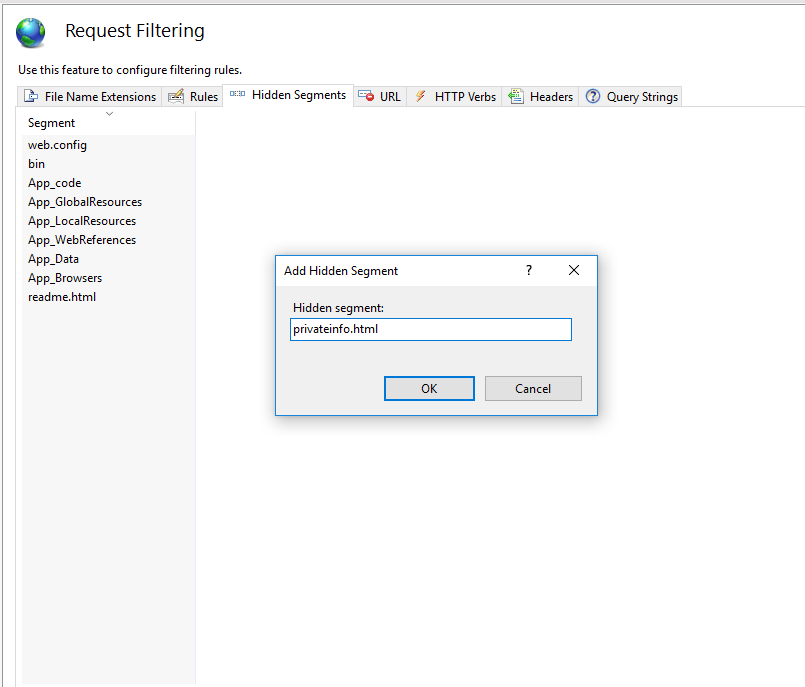
Double click on the highlighted (red box) “Request Filtering” option. On the next screen, navigate to the “Hidden Segments” tab.
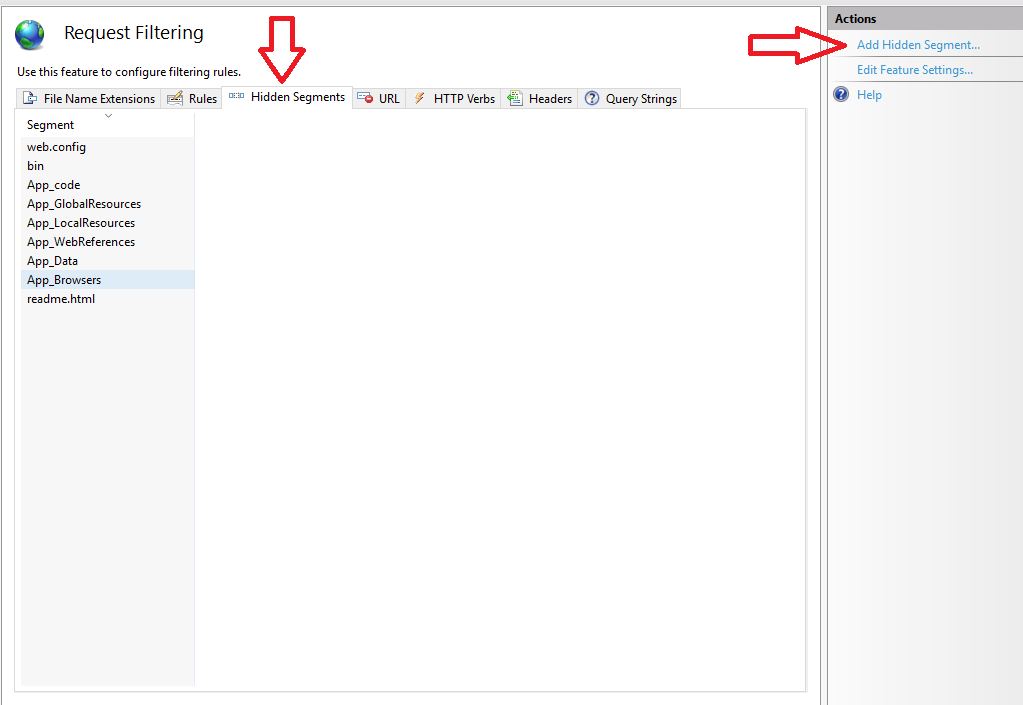
This screen will probably list some default files that are blocked. We will add the file from our site that we don’t want visitors to access. To do this, click on “Add Hidden Segment” and type in the filename you want to deny access.
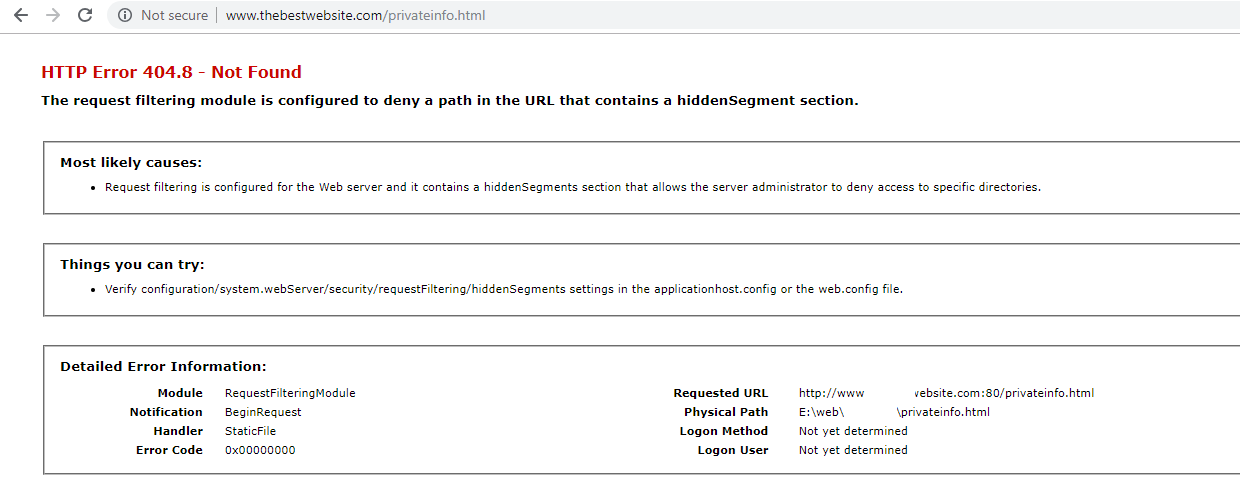
And that’s all there is to it. Now when someone tries to navigate to that file they will get the error demonstrated below.
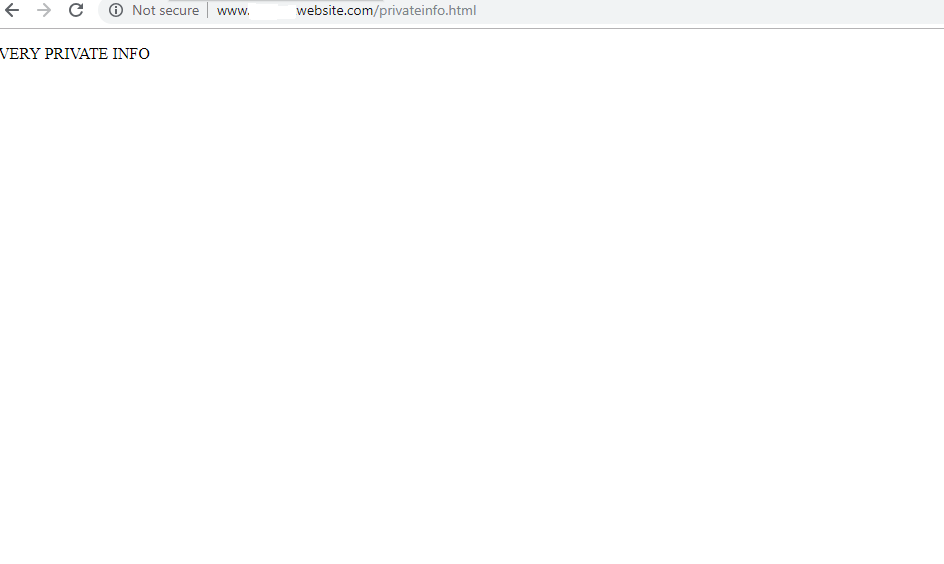
Before:
After:
This is how the rule appears in your web.config after created.
<?xml version="1.0" encoding="UTF-8"?>
<configuration>
  <system.webServer>
    <security>
       <requestFiltering>
          <hiddenSegments>
             <add segment="readme.html" />
             <add segment="privateinfo.html" />
          </hiddenSegments>
       </requestFiltering>
    </security>
  </system.webServer>
</configuration>
I hope this helps you protect your site.
![]()
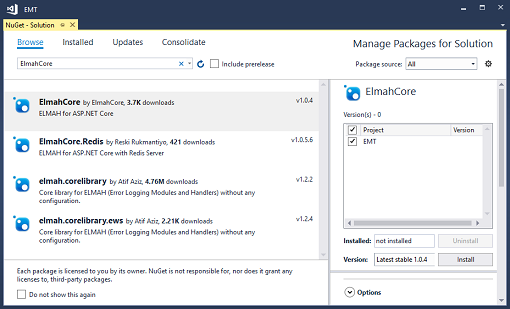
Years ago, I wrote an article on how to configure Elmah to be used on Winhost. You may have noticed that there is no official support for ASP.NET Core, however, you can use ElmahCore by barestan to perform the same logging to a database, and this blog provides an example on how to set that up.
First, we’ll start by creating a New Project in Visual Studio:

services.AddElmah<SqlErrorLog>(options =>
{
    options.ConnectionString = @"connection_string";
});
app.UseElmah();
That’s it. If you want to know if it’s working, you can generate a sample exception like this:
app.Run(async (context) =>
{
    await context.Response.WriteAsync("Hello World!");
    int[] numbers = new int[5];
    await context.Response.WriteAsync(numbers[6].ToString());
});
That will generate an “Index was outside the bounds of the array.” exception which will be logged into the database. You can query the dbo.ELMAH_Error table to see the results.
Visit Winhost to learn more about our .NET Core hosting solutions
SSL certificates are necessary if you do credit card transactions on your site, or if you simply want to make your site available via an HTTPS URL (such as: https://example.com). If you visit that URL without the HTTPS prefix, you’ll notice that there’s no security “lock” displayed in your browser. That lock icon means your connection to a site is encrypted.
If you’ve never cared about HTTPS, it’s probably time to start. The days when you could avoid using HTTPS are rapidly coming to an end, and Google and the other big web browser makers are more or less forcing the change on everyone. So it’s a change we’re all going to have to make, or one day in the not-too-distant future, security warnings could be greeting every visitor who loads our sites.
With that in mind, here’s a high level overview of what SSL is and how it’s implemented. Think of it as an introduction to the concepts and a peek at the inner workings for anyone who is new to the subject.
Technical note: modern web servers don’t really use the SSL (Secure Socket Layer) protocol anymore, but the name has stuck to the certificates as kind of a generic identifier, so we use “SSL” in this article. The TLS (Transport Layer Security) protocol has replaced SSL for most uses. We’re also using the example of a web browser connecting to a web server, but the concept is the same no matter what kind of client is making a secure connection to a server.
An SSL certificate is really just a text file that is installed on the web server. It ensures that the domain name in the certificate matches the domain name of the site, and enables a visitor’s browser to make a secure connection to the site, so that the traffic back and forth is encrypted and no third-party can listen in on the conversation.
The reason for encrypting transferred data may be obvious where financial transactions are concerned, but even if you’re not sending financial data across the web, quite a bit of private data can be passed between your site and a visitor’s browser (like usernames and passwords). That private data is valuable to unscrupulous types, so encrypting the connection protects the data. Without an SSL certificate and the HTTPS connection, that encryption doesn’t happen.
It’s worth noting here that an HTTPS connection doesn’t prevent someone from finding out which domains you’ve visited. It just makes it (theoretically) impossible for them to see any of the data that was exchanged during the visit.
An SSL certificate contains information about your business or organization (or simply you as a person), and a cryptographic key unique to your domain or certificate. That key is used to establish the encrypted connection. Your website presents the key to the visitor’s browser, and if the browser determines the key is valid (more on that in a minute), the encrypted connection is established.
The entire SSL system is based on trust. When the HTTPS protocol was established, everyone agreed to trust certain organizations (and later companies) to issue legitimate certificates. Those organizations and companies are called certificate authorities. The certificate authority verifies who you are when they issue the certificate and the browser trusts the that the certificate authority has done that verification.
You might see a bit of a problem there if you’ve ever requested a “domain validated” SSL certificate and noticed that no one actually checked anything other than the fact that you had an email address on the domain. It wasn’t always that way. In the early days of SSL, the certificate authority did verify that you were who you said you were, and the owner of the domain you were requesting a certificate for. But as you might imagine, that time-consuming kind of validation quickly became impossible, so now that level of manual human validation is only done for expensive “extended validation” certificates.
Every certificate authority issues a “root certificate,” which is like a master certificate for that authority. If the authority operates under different names or resells certificates through other companies, they issue “intermediate certificates” that are related or connected to the root certificate. Then the certificate for your domain is associated with the intermediate or root certificate, and that makes up a certificate chain. So the browser trusts the certificate for your domain because it’s associated with a root certificate.
Your certificate, any intermediate certificates and the root certificate are all installed on the web server. The same root certificates are also pre-installed in web browsers and many computer operating systems, so the browser can validate the root certificate on the web server. There are actually a few checks and validations that take place between the different certificates, but her’s a simplified diagram of the chain:
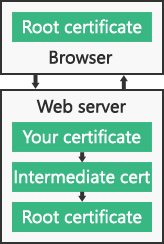
The connection is trusted if:
It’s pretty easy to get lost in the tall weeds here, because the underlying system that handles HTTPS encryption between a client (browser) and a server (your site) is quite complicated (and to add to the complication, the system is always changing, as better and stronger encryption methods are introduced).
But in a nutshell:
– The browser makes a TCP (standard Internet) connection to the site on the web server.
– The browser starts an SSL “handshake,” which is a transfer of data to the server about which version of SSL/TLS the browser is running, and which encryption methods it wants to use.
– The web server determines the highest SSL/TLS version that is supported by both the server and the browser, then sends its certificate(s) to the browser.
– If the certificate(s) meet all the criteria described above (in the “connection is trusted if” section), a cryptographic key is then exchanged and the browser tells the server that all further communication will be encrypted, and sends an encrypted authentication message to the server.
– The server verifies that the message is correct, then returns a similar message that the browser verifies.
– That’s the end of the “handshake,” and until it is broken, the browser and server can communicate securely.
Luckily all of those steps typically take place in a fraction of a second, and the browser and web serer don’t have to do them again (unless the secure connection is broken).
Well, that’s a lot of words for a “simplified” explanation, isn’t it. Sorry about that. But hopefully this has helped you to better understand what an SSL certificate is and what it does.
Still curious about SSL/HTTPS? Check out these other articles:
Ready or Not, It’s Time to Consider HTTPS
Let’s (not) Encrypt. But let’s not ignore https either.
How to Secure Your Primary Domain for Free When Ordering an SSL Certificate
Google Chrome, SSL certificates, SHA-1, SHA-2 and the “obsolete cryptography” message