
Site hosting news, tutorials, tips, How Tos and more
![]()
In addition to the Spam Filtering tool offered by SmarterMail, you can use Content Filtering to further reduce the amount of spam you receive. The difference between Spam Filtering and Content Filtering is that Spam Filtering filters a message on a more generic basis (think of a wide net) while Content Filtering filters a message specifically based on the rule you set up (think of plugging up a particular hole in the net).
Let’s see this in action. First, let’s access the feature by:
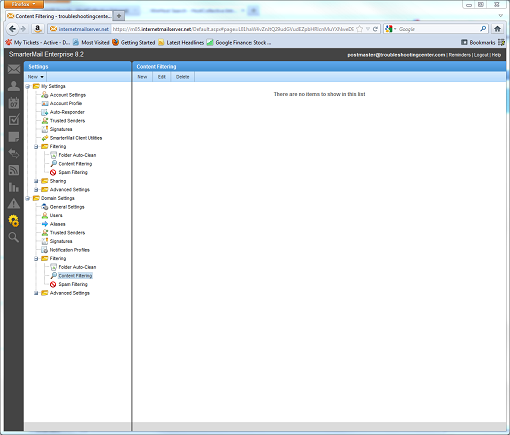
Now, click on the New button to create a new rule. This will start a wizard and bring up the next screen which provides a plethora of specific criteria you can filter messages by. For example, if you notice that a lot of the spam messages are coming from a particular email address, you can filter all messages from that address.
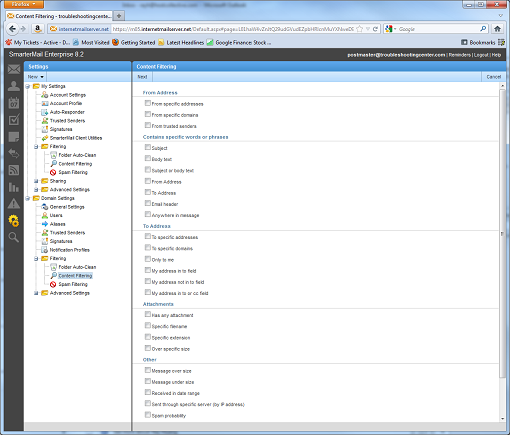
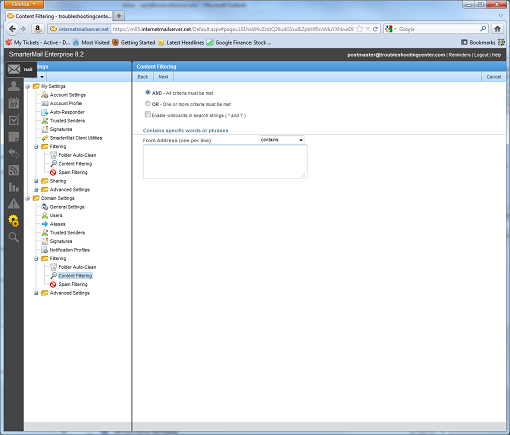
In this tutorial, I will do just that. I will go ahead and check the From Address box and click on Next. This brings up an AND/OR conditional screen which allows you to define more ‘complex’ rules. I will keep it simple by entering a single Gmail address I will be sending a test message from and click on Next to continue.
Now, I will name my rule and select one of 7 actions to take:
Mark as read
Do not deliver
Move message
Prefix subject
Add Header
Copy Message
Reroute message
I have checked the Move message box and in the field, I typed in “Deleted Items” for the name of the folder I want the message placed in. I click on Save to complete the rule. Now, I send a test message from my specific Gmail account, and voila, the message is automatically placed in the Deleted Items folder.

If you notice, there is another message waiting in my Inbox. I discovered on initial testing that the Spam Filtering rules take precedent over any Content Filtering rules. This means if the message was processed by Spam Filtering, it will not trigger any of the rules you’ve setup in Content Filtering. Please keep this in mind when you are setting up new rules. By using a proper combination of Spam Filtering and Content Filtering, you can greatly reduce the amount of spam you receive.
![]()
There may be some confusion regarding how to properly configure the spam settings in SmarterMail, so I decided to write this tutorial to give everyone a clearer understanding of how it actually works.
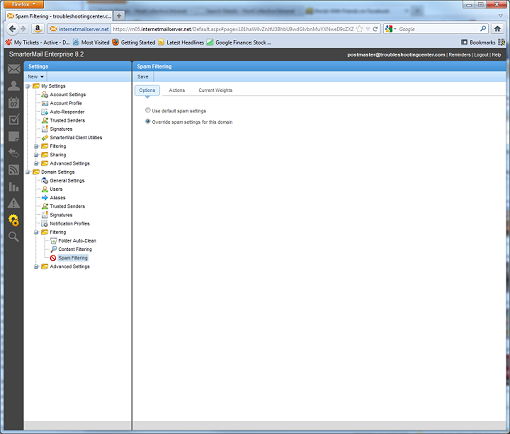
Spam is filtered based on the sum of the weights assigned to a number of predefined criteria. These settings can only be adjusted by the Primary Domain Administrator which is the postmaster account. To gain access to the settings page:
Now we can begin the process of adjusting the spam settings. Under the Options tab, check the Override spam settings for this domain radio button.
Next, click on the Current Weights tab. You’ll notice a list of criteria with text boxes which you can edit now. Here is where you can assign values to each criterion. Please note you can assign both negative and positive values which are important to understand because it affects the total weight of a message. I didn’t adjust the settings for now, but remember if you make any changes to the Spam Filtering window to click on Save so that the changes will be applied.
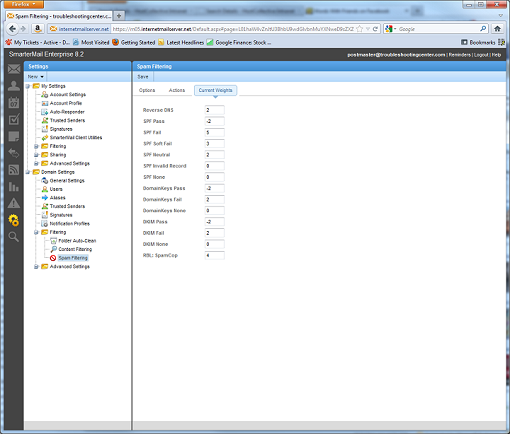
Now, we will take a look at the Actions tab. Here, there are two fields which you can edit. The Weight value here represents the total weight before the spam filter will take action. Any value over this total weight will trigger the action selected in the drop down box. There are only 3 actions you can apply:
Delete Message
Move to Junk E-mail Folder
Add Text to Subject
This will make more sense when we review an email header. Remember to click on Save to save your changes.

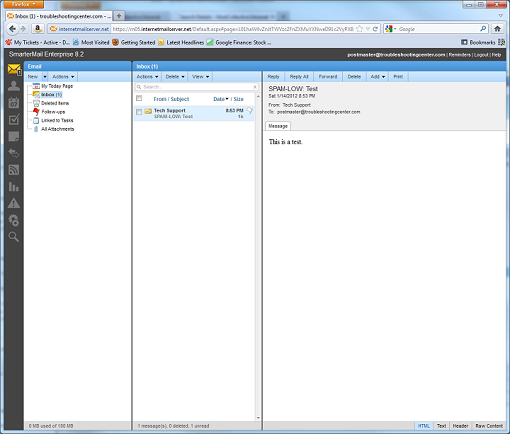
For testing purposes and this tutorial, I set the weight for the Low Probability of Being Spam to -5 and set the action to Add Text to Subject with the text “SPAM-LOW:” Then I sent myself a test message from Gmail and voila, the message was filtered.
Now, to see which criteria were used to calculate the total weight, we’ll need to look at the header information. On the bottom right hand corner, click on Header. You’ll want to pay attention to these tags:
X-SmarterMail-Spam
X-SmarterMail-TotalSpamWeight
For the test message I sent, this is the complete header information:
X-SmarterMail-Spam: SPF_Pass, SpamAssassin 0 [raw: 0], DK_None, DKIM_Pass
X-SmarterMail-TotalSpamWeight: -4
If you notice, many of the tags correlate directly with the values assigned under Current Weights, so the total weight is the sum of the values you assigned to the criteria. In this case, it was (-2) + (0) + (0) + (-2) which equals -4. Since I set the weight in the Actions pane to be -5, this message was filtered properly because -4 is greater than -5. If you feel you’re receiving too much spam, you can review the spam message’s header information to determine which criteria were used and make adjustments accordingly.
![]()
You know, when you’re naming a company you might think all you have to do is come up with an appropriate, catchy name, secure the .com and you’re all set. Funny thing is, you can do all those things and still have some unpleasant neighbors in search results.
 Let’s take, oh, I don’t know, Winhost for example. For a company that specializes in Windows hosting like we do, it seems perfect. And it is perfect. But when you search for Winhost on any big search engine (meaning Google, but I’m trying to be fair to scrappy little upstart bing), the first things you’ll see is us, but also on that first page you’ll see listings for pages describing a nasty malware Trojan infecting people’s computers.
Yes, we share the name of a virus! Cool, isn’t it?
No?
Yeah, I didn’t think so either.
Luckily winhost.exe is a relatively old piece of maliciousness, so it’s slowly fading from view. But I figured if we’re going to talk about it, I may as well tell you how to get rid of it! So if you’re suffering from this nasty old threat, here’s a solution:
First you want to delete the file itself. It’s commonly found in C:/Windows/System32. It can also be found in your startup directory, so be sure to check there. Also, perform a search on your System folder just in case the file has been copied to other locations.
Okay, here comes the fun part. Of course deleting the winhost.exe file from your hard drive is not enough. Once you have deleted the file(s), you also have to delete it from the registry.
Before you start modifying the registry it is a good idea to back it up. To backup your registry go to Start/Run and type regedit. Click File/Export and save the file.
You may also want to set a restore point on your computer (though you’d be restoring the virus too if you reverted), go to Start/Run and type RSTRUI and follow the wizard to create your restore point.
Now for the registry.
The fastest way to find and delete all of the winhost.exe entries in your registry is to go to Start/Run and type regedit. Make sure you are focused on the top level of the registry key which should be “Computer” so that it will search the entire registry tree. Go to Edit/Find and type winhost.exe. It will go through the registry and you can delete the winhost.exe records one by one. It is important to make sure all the entries are deleted, but the most important registry keys to be sure to clean up are:
HKEY_LOCAL_MACHINE\SOFTWARE\Microsoft\Windows\CurrentVersion\Run
HKEY_LOCAL_MACHINE\SOFTWARE\Microsoft\Windows\CurrentVersion\RunServices
HKEY_CURRENT_USER\SOFTWARE\Microsoft\Windows\CurrentVersion\Run
Next, go to the refrigerator and have a cold drink. because you’re finished!
![]()
Note: The manual methods in this tutorial are great, but if you’re looking for a “set-it-and-forget-it” automated backup solution, we now offer a site backup service that can also back up your MS SQL and MySQL databases. Read more about it on our site, or activate it in Control Panel. It’s easy, it’s inexpensive and it’s cool. What more could you ask for?
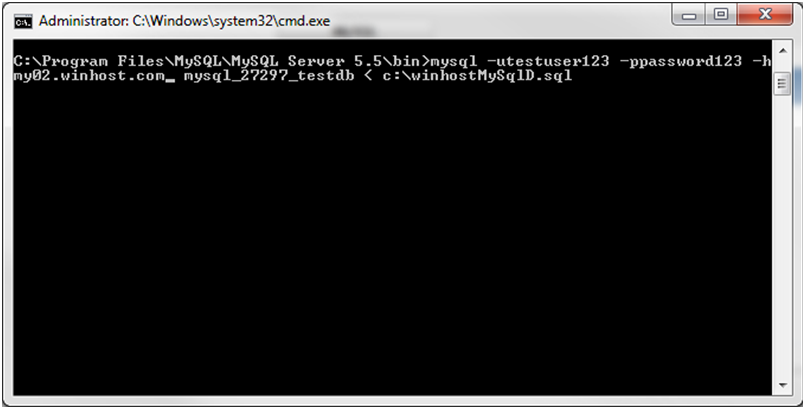
A lot of people seem to have a problem doing backup and restoration of a MySQL database easily and quickly. However, I am going to show you how to do just that using MySQL’s built in mysqldump.exe utility through a Windows MS-DOS prompt.
There are some limitations to this utility given that Winhost customers cannot add and drop databases when trying to restore a backup, so the restore section is only recommended for new empty databases. My local environment also consisted of using MySQL version 5.5.13 so that this information would be as up to date as possible. You can find additional features, commands, and details on this tool straight from the MySQL site.
First you are going to want to download the latest version of MySQL from the MySQL site.
Note: If you are not sure whether to download the MSI installer file or the .zip archive I would recommend to downloading MSI package. This file provides you with everything you need including a Configuration Wizard which is not included in the No-install Archive.
 Now install MySQL on your local machine in the default directory
 C:\Program Files\MySQL\MySQL Server 5.5 since this is what Oracle recommends. Here is the installation documentation for both the MSI Installer package and the ZIP Archive:
Installer – http://dev.mysql.com/doc/refman/5.5/en/windows-using-installer.html
Archive – http://dev.mysql.com/doc/refman/5.5/en/windows-install-archive.html
Here is an example of the command line syntax:

Note: The following command will only write the data that is in the .sql file. This will not drop and create the database or truncate any of your other tables in your database. The command will script all the table data in the .sql file to your Winhost database. If you have a table name present in your Winhost database that matches a table name in the .sql file, the table will be overwritten with the new data. Otherwise the script will create a new table and populate it with the new data.
There are many other features and commands available if you would like to dig a little deeper into this useful utility, including setting character sets, changing ports, and selectively choosing tables to dump. In case you missed it earlier I have included the link below:
http://dev.mysql.com/doc/refman/5.5/en/mysqldump.html
Jaime
Winhost Technical Support
![]()
There are a lot of developers out there that create and test web applications on their local computers. For the most part things are done correctly and everything on their end seems to be correct. But when they upload or publish it to their hosting service, they get errors and all sorts of different problems. This can leave a developer confused and scratching their heads. They go back to their computer, check the code, and everything looks correct. Then they run their web application on their computer and it pulls up nicely. No errors and no hint of anything are wrong with the application. Yet when they publish the files to the web server, it doesn’t work.
Why?
 I believe the problem lies in the IDE the developer is using, namely Visual Studio and Web Matrix. These IDE have a feature that allows you to run your application and view it on your browser directly. It is commonly known as View in Browser Mode. Developers use it to quickly debug their web applications and find potential coding problems before they deploy to production.
 But these features run off on their own engine behind the scenes. For the most part they are a great tool to see how the site will be displayed in the browser. But for more complex applications such as MVC applications, it can be very misleading.
When you use these tools, the IDE engine that will render the site automatically plugs in all the required assemblies and components, thus giving you a false perception that the application is fully functional. But when you upload it to a hosting web server, the assemblies and components needed to run the application are not attached with the deployment unless you manually set them to be.
If you really want to test your web application before you deploy it to a production server, install IIS Server on your computer. For Windows 7 and Windows Vista, it already comes with IIS, you merely have to enable it. The application can be enabled in Control Panel/Programs/Turn Windows Features On/Off. Scroll down and install all of the IIS components. IIS stands for Internet Information Services, and it is the application that Microsoft uses to publish a web site. The root will be created under C:/Inetpub/wwwroot. Copy your test site into that folder and in your browser type; http://localhost. IIS will automatically serve it to you just as a production web server would.
You will be surprised to see that it may generate an error, while the View in Browser mode in your IDE it is displayed without any problem. This is a tell-tale sign that something is missing, and if your IIS web service cannot render the page correctly on your local computer, you can be fairly sure it will not be rendered correctly on a web hosting production server.