
Site hosting news, tutorials, tips, How Tos and more
There is a nice step-by-step “Deploying a Lightswitch Application to Winhost” tutorial on this here blog. Thanks Stu!
![]()
Note: The manual methods in this tutorial are great, but if you’re looking for a “set-it-and-forget-it” automated backup solution, we now offer a site backup service that can also back up your MS SQL and MySQL databases. Read more about it on our site, or activate it in Control Panel. It’s easy, it’s inexpensive and it’s cool. What more could you ask for?
A lot of people seem to have a problem doing backup and restoration of a MySQL database easily and quickly. However, I am going to show you how to do just that using MySQL’s built in mysqldump.exe utility through a Windows MS-DOS prompt.
There are some limitations to this utility given that Winhost customers cannot add and drop databases when trying to restore a backup, so the restore section is only recommended for new empty databases. My local environment also consisted of using MySQL version 5.5.13 so that this information would be as up to date as possible. You can find additional features, commands, and details on this tool straight from the MySQL site.
First you are going to want to download the latest version of MySQL from the MySQL site.
Note: If you are not sure whether to download the MSI installer file or the .zip archive I would recommend to downloading MSI package. This file provides you with everything you need including a Configuration Wizard which is not included in the No-install Archive.
 Now install MySQL on your local machine in the default directory
 C:\Program Files\MySQL\MySQL Server 5.5 since this is what Oracle recommends. Here is the installation documentation for both the MSI Installer package and the ZIP Archive:
Installer – http://dev.mysql.com/doc/refman/5.5/en/windows-using-installer.html
Archive – http://dev.mysql.com/doc/refman/5.5/en/windows-install-archive.html
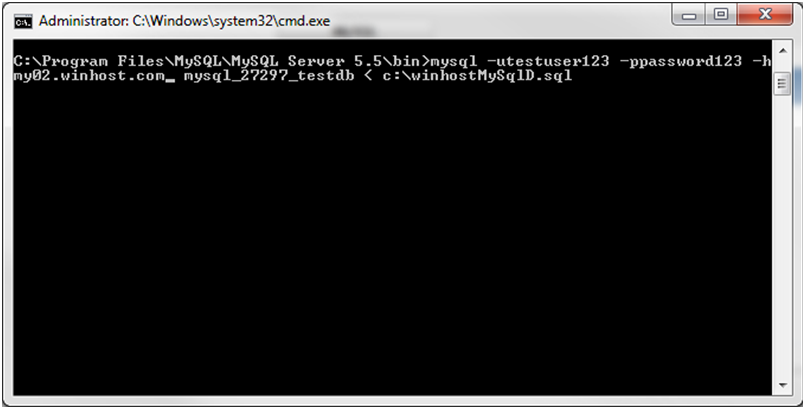
Here is an example of the command line syntax:

Note: The following command will only write the data that is in the .sql file. This will not drop and create the database or truncate any of your other tables in your database. The command will script all the table data in the .sql file to your Winhost database. If you have a table name present in your Winhost database that matches a table name in the .sql file, the table will be overwritten with the new data. Otherwise the script will create a new table and populate it with the new data.
There are many other features and commands available if you would like to dig a little deeper into this useful utility, including setting character sets, changing ports, and selectively choosing tables to dump. In case you missed it earlier I have included the link below:
http://dev.mysql.com/doc/refman/5.5/en/mysqldump.html
Jaime
Winhost Technical Support
![]()
It’s easy, it’s fast, what are you waiting for?
Connecting to your Winhost server using Expression Web Designer
Note: Expression Web Designer uses the Internet Explorer engine to connect via FTP. To establish an FTP connection in Expression Web Designer you will need to go to Internet Explorer Tools/Internet Options/Advanced and ensure that “Use Passive FTP (for firewall and DSL compatibility)” is checked.
![]()
We’ve added some videos to our Knowledge Base that provide step-by-step instructions for preparing to move your domain names to Winhost. They cover the 10 most popular registrars, and you can find them here.
Here’s an example that shows you what you need to do to prepare a domain registered at GoDaddy for transfer:
![]()
There are a lot of developers out there that create and test web applications on their local computers. For the most part things are done correctly and everything on their end seems to be correct. But when they upload or publish it to their hosting service, they get errors and all sorts of different problems. This can leave a developer confused and scratching their heads. They go back to their computer, check the code, and everything looks correct. Then they run their web application on their computer and it pulls up nicely. No errors and no hint of anything are wrong with the application. Yet when they publish the files to the web server, it doesn’t work.
Why?
 I believe the problem lies in the IDE the developer is using, namely Visual Studio and Web Matrix. These IDE have a feature that allows you to run your application and view it on your browser directly. It is commonly known as View in Browser Mode. Developers use it to quickly debug their web applications and find potential coding problems before they deploy to production.
 But these features run off on their own engine behind the scenes. For the most part they are a great tool to see how the site will be displayed in the browser. But for more complex applications such as MVC applications, it can be very misleading.
When you use these tools, the IDE engine that will render the site automatically plugs in all the required assemblies and components, thus giving you a false perception that the application is fully functional. But when you upload it to a hosting web server, the assemblies and components needed to run the application are not attached with the deployment unless you manually set them to be.
If you really want to test your web application before you deploy it to a production server, install IIS Server on your computer. For Windows 7 and Windows Vista, it already comes with IIS, you merely have to enable it. The application can be enabled in Control Panel/Programs/Turn Windows Features On/Off. Scroll down and install all of the IIS components. IIS stands for Internet Information Services, and it is the application that Microsoft uses to publish a web site. The root will be created under C:/Inetpub/wwwroot. Copy your test site into that folder and in your browser type; http://localhost. IIS will automatically serve it to you just as a production web server would.
You will be surprised to see that it may generate an error, while the View in Browser mode in your IDE it is displayed without any problem. This is a tell-tale sign that something is missing, and if your IIS web service cannot render the page correctly on your local computer, you can be fairly sure it will not be rendered correctly on a web hosting production server.