
Site hosting news, tutorials, tips, How Tos and more
If you haven’t noticed we updated PHP version 7.3 with the latest minor update 7.3.17 and we also installed PHP 7.4.
Back in October I wrote about speed improvements that came with PHP 7.3. Now with the PHP 7.4 the internet world is claiming that this new version also has speed improvements compared to previous PHP versions.
Okay, but how much faster?!
Curious, I installed WordPress using the Winhost Max plan. This was a base WordPress installation using the default template and I evaluated the speed with Google Chrome’s Developer Tools and Google’s Page Insights.
The following are the results I got. Please note that your results will vary depending on plugins, themes, and PHP versions that you are using.


Just based on these test results, it appears that PHP 7.4 has improved its speed over the latest version PHP 7.3.
So how do you get started with PHP 7.4 and should you really use it?
Both PHP versions 7.3 and 7.4 require your site to be on our Windows Server 2012 / IIS 8 or 2016 / IIS 10 servers.
If your WordPress site is on an Windows 2012 /IIS 8 or Window 2016 / IIS 10 server, then you can go ahead and change the PHP version within the Winhost control panel.
Here is how to change the PHP version within the Winhost control panel.
If your WordPress site is on a Windows 2008 server and your site is using an older PHP 5.3 – 5.6 version and you want to use the higher PHP versions., then you will need to first update your WordPress site to the latest version. Then your site will need to be migrated to our Windows 2012 or Windows 2016 servers. Note that using newer versions of WordPress will result in an error/warning if you’re using an older version of PHP. And remember, before doing any updating on your WordPress site, please be sure to back up the web site files and MySQL Database. That way if something goes wrong, you can always revert back to the old version of your site.
If your WordPress site needs to be migrated to our IIS 8 or IIS 10 servers, then just contact our support team and ask them to migrate your site to an IIS 8 or IIS 10 server. We’ll do the migration at no cost to you. Migration typically takes about one hour but really depends on how large your site is. We won’t have to migrate your database or email server as these are already on separate servers.
I also wanted to mention that even though we have PHP 7.4 installed on our servers, since it is new, there are still a limited amount of components/modules available. And although we tested PHP 7.4 with WordPress and everything appears to be working fine, at this time we are still not recommending using it in your production site – until the components/modules catch up. For now we have the latest 7.3 minor update installed and PHP 7.3 will work with the latest version of WordPress and provide you with adequate speed for your site.
It should also be mentioned that it is always important to backup your site before doing any work on your production WordPress site and that we do offer a great SiteBackup service that can automatically backup your site files and MySQL database on a nightly basis. Earlier this year, I wrote about why having backups are important. Please check out that blog post. If you need help setting up the SiteBackup service, please feel free to contact our support department for assistance. We will help you set it up free of charge.
That’s it for now. Have fun with PHP!
Visit Winhost to learn more about our WordPress Hosting solution

The base installation of WordPress can be more than enough for somebody to start their blog or site. With plenty of features already at a user’s disposal you may never even realize that more are available. Where are these additional features you might ask… Plugins!
Plugins are scripts written by the WordPress community that can add a variety of features or functionality to your site and the best part is most of them are free. In today’s tutorial we are going to install a plugin to help beef up the security of our WordPress site.
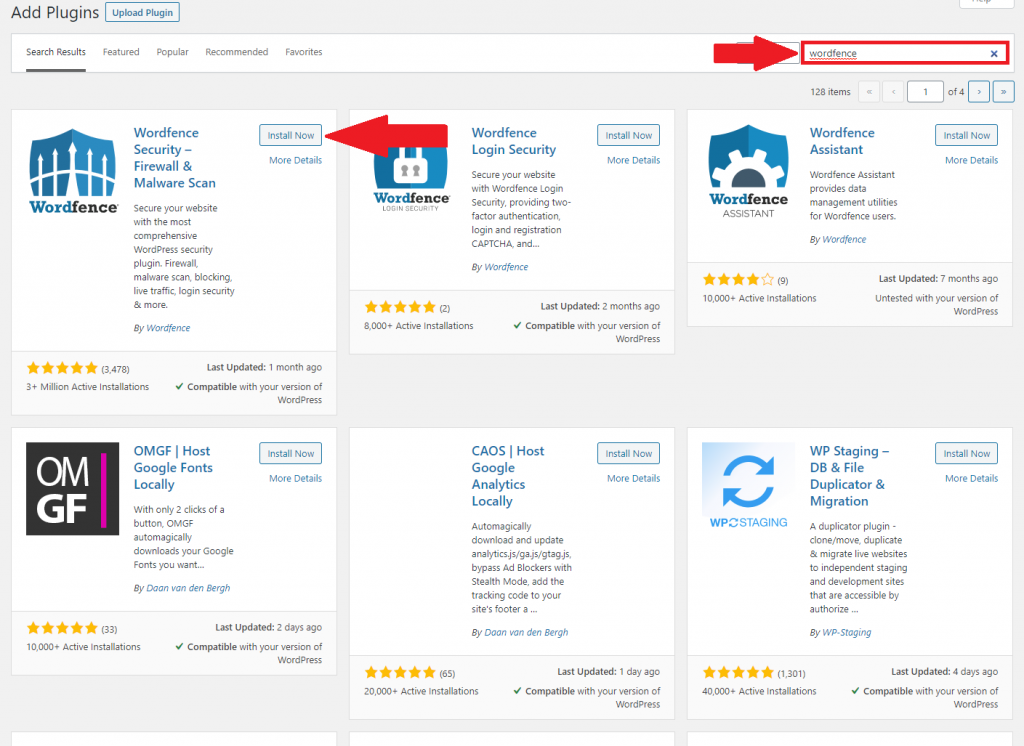
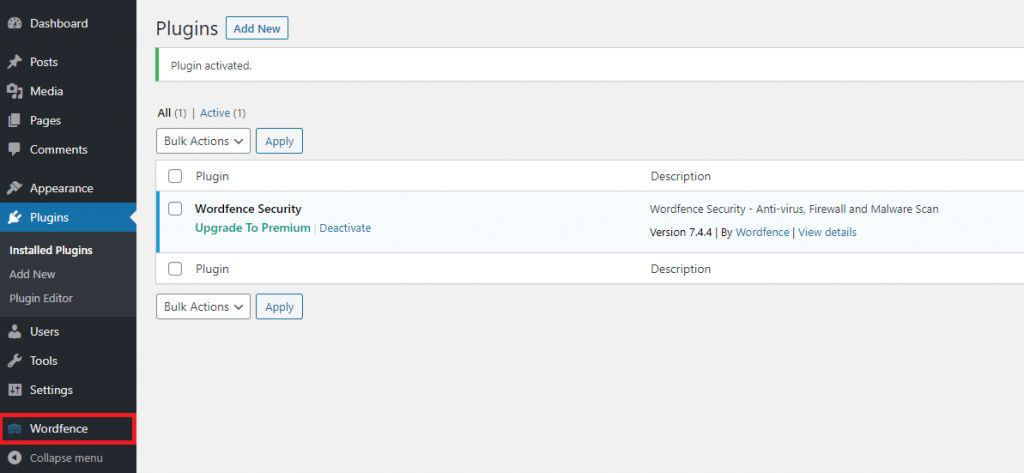
In the admin section of your WordPress site on the left hand side you’ll want to click the “Plugins” tab. Once in the plugins manager page, click on “Add New” toward the top. You will be presented with all the different plugin options you can install. For now, we are looking for a specific plugin. In the search bar in the top right, search for “Wordfence” and the first result should be the one we are looking for.
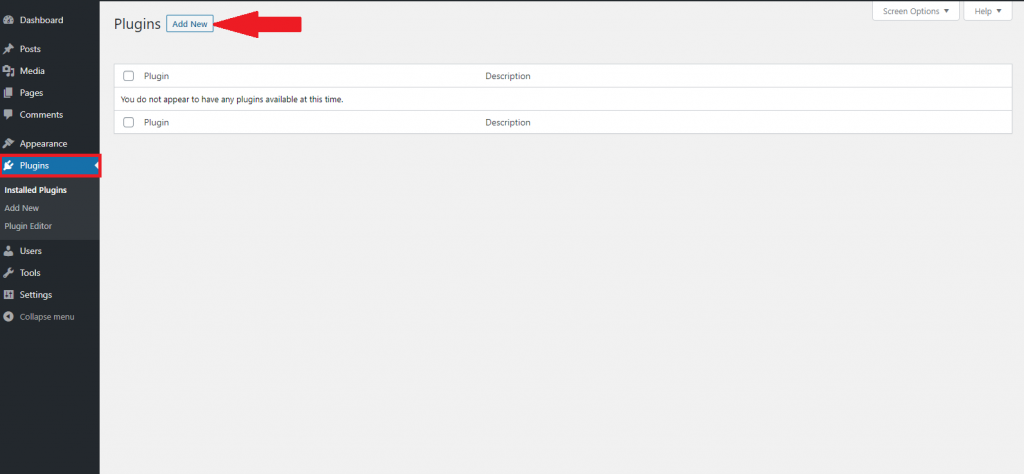
Click the “Install Now” button and then also click “Activate” once the installation is complete.
To give some quick background on what we are installing, Wordfence is a security plugin that we recommend to pretty much any WordPress site. With Wordfence you can secure your site against a variety of malicious attacks that I will cover in a future post.
After installation you will see the plugin show up under the plugins tab. Another thing to note is that for some plugins a new tab may appear where you can adjust its settings.
If you have any questions or run into any issues feel free to leave a comment down below or open a support ticket.
Visit Winhost to learn more about our WordPress Hosting solution

Welcome back folks to the next installment in our WordPress tutorial series. Last time we covered the installation of WordPress as well as getting your first post up and running. In this article we will be covering the steps on how upload and insert images to your posts like this one.

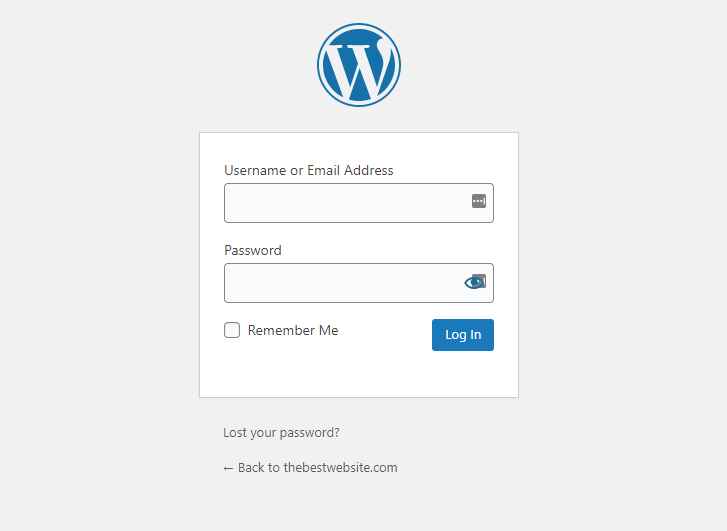
As with most cases we are going to start by logging in to the admin section of your site. (The URL should be something like HostingAccountDomain.com/wp-login)
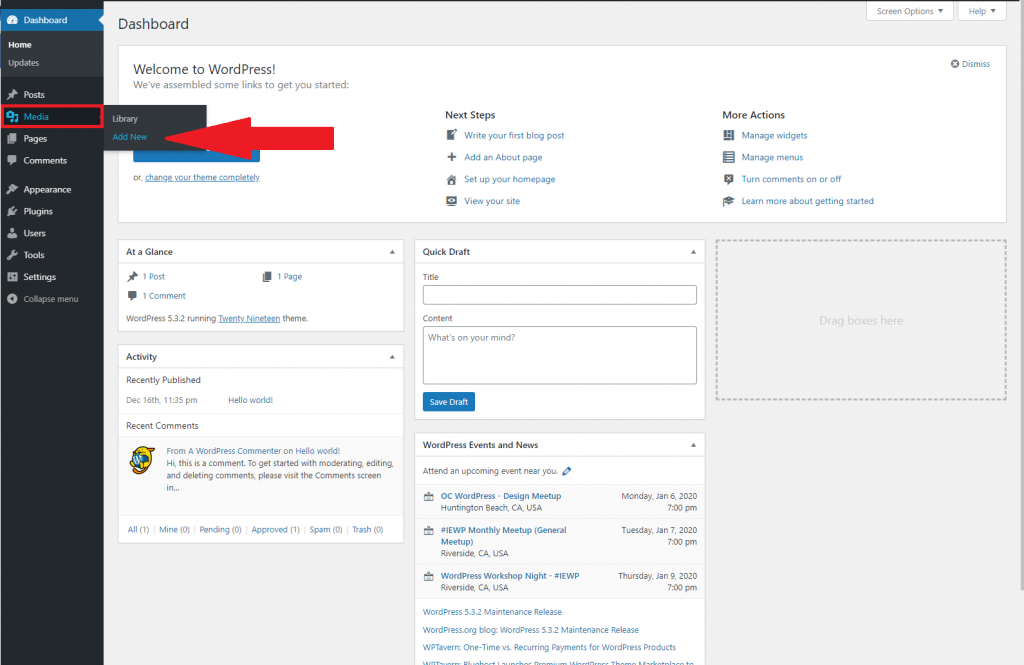
Once you are logged in you will be taken to the WordPress admin dashboard displayed below. On the left hand side you will want to hover over the icon of a camera/music note. On the options that appear you will want to click “Add New”
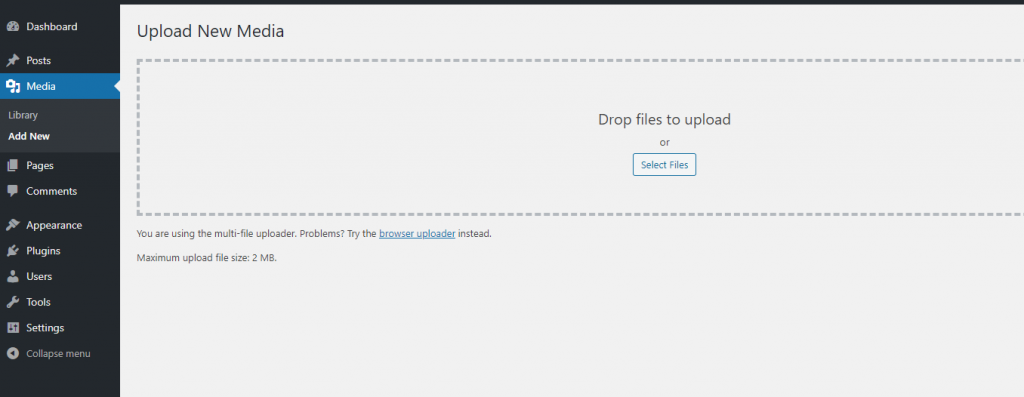
To upload your images you can either drag the file straight from your computer to the page or click the “Select Files” button.
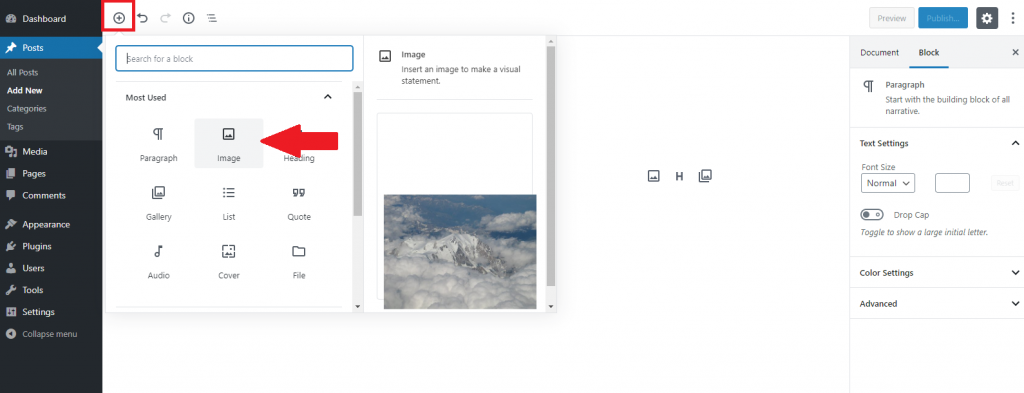
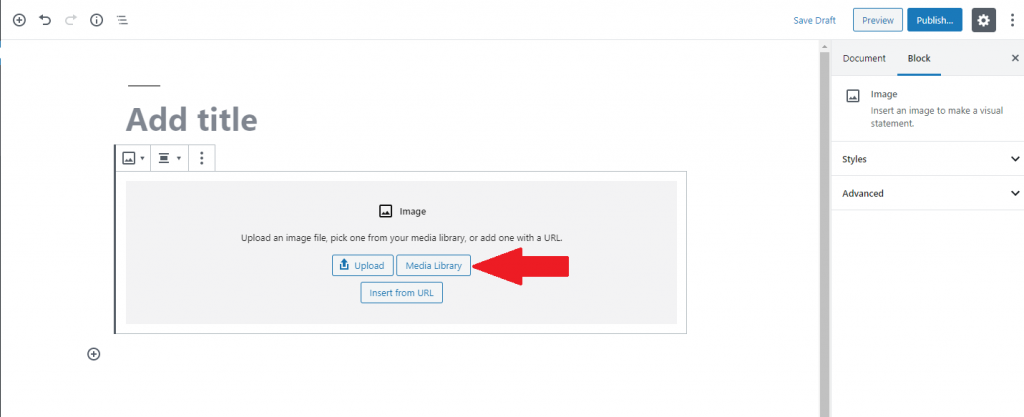
Now that the image is in your library it can be used across your site such as in a post or page. Below is an example of using the image in a post. First you would create a new post, then you click the “Add Block” button, finally you would click the block for “Image”.
Once the block is added, click on “Media Library” and select your desired image.
That’s about all there is to it and with that we will wrap up this WordPress tutorial, in our next one we will cover installing and configuring plugins and themes. As I mentioned in the last post please feel free to comment if there is anything specific you would like to be covered in a tutorial.
Visit Winhost to learn more about our WordPress Hosting solution
WordPress is an incredibly popular content management system (CMS). I have seen estimates say the it accounts for around 20%+ of self-hosted sites. This can be attributed to a variety of reasons such as a painless installation, low initial cost (free), and general ease of use. Due to this immense popularity I wanted to take some time a work on a tutorial series on some of the basics for users that may need some help getting started.
The first step of course would be to sign up for a Winhost hosting account so your site can be seen by the world.
Once you gain access to the control panel you can then easily install WordPress using our app installer. The steps are to so can be found here https://support.winhost.com/kb/a1214/app-installer-how-to-set-up-wordpress.aspx. Be sure to remember the username and password you choose as you will need them in just a few moments.
Congratulations! You are now a proud owner of your very first WordPress site, now lets get your first post up.
To accomplish this you will need to log into the admin section of your site. Maybe the fastest way would be to navigate to the /login page on your site, for example www.HostingAccountDomain.com/login. You’ll be met with a login screen where you will use the credentials that you selected during the installation process.
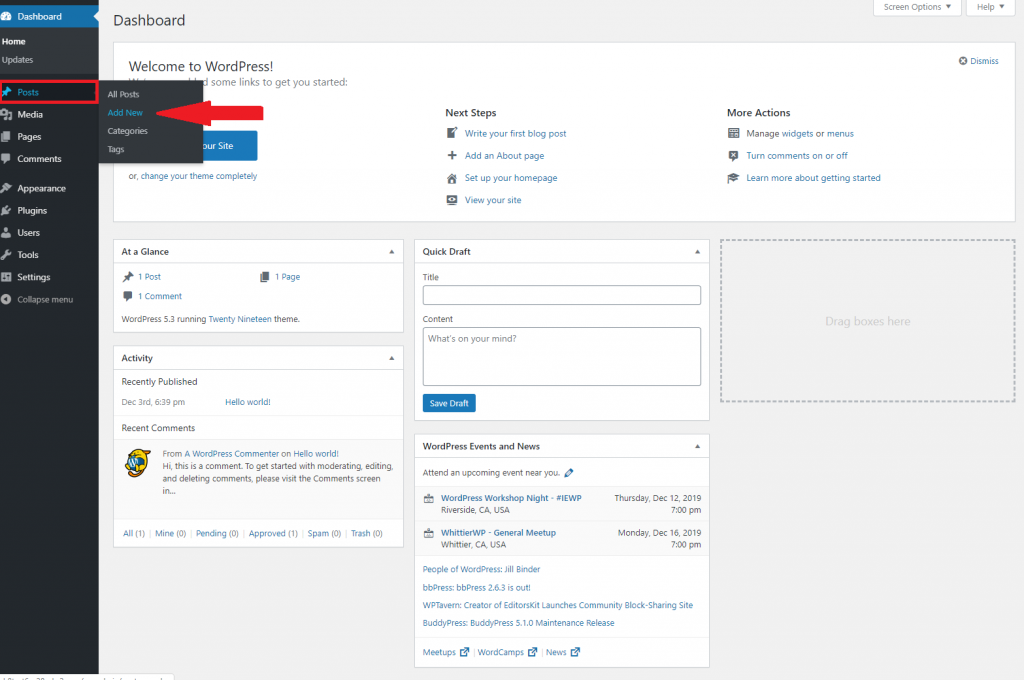
After you log in you will be taken to the admin section dashboard which may, at first glance, look intimidating, but after some use it will become very familiar. I will hopefully be covering all of the options in future tutorials, but here I will only focus on adding a new post.
You will click on Posts on the left menu (the icon looks like a thumbtack) and from there click “Add New”.
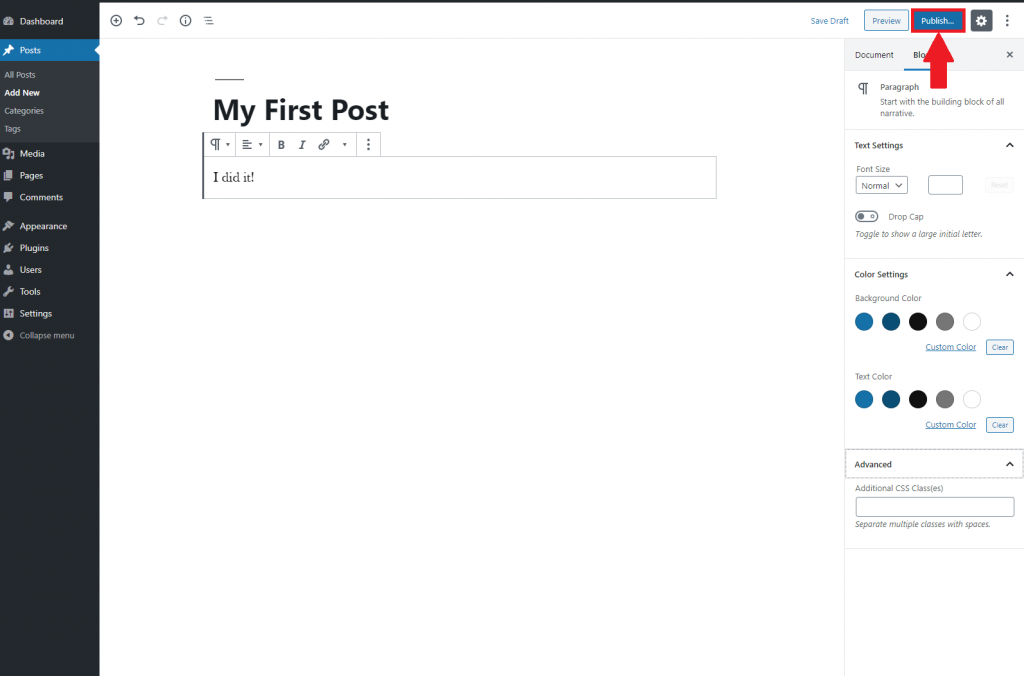
You can add your content title and main text. There are some editing options on the right hand side that you can experiment with, and when the your test post is ready go ahead hit the big blue “Publish” button in the top right.
There you have it, your first WordPress post! Hopefully the steps were easy enough to follow, if you happen to get lost please feel free to open up a support ticket and we can assist you.
Also please let me know if there is anything specific you would like to see covered in a future tutorial in the comments below.
Visit Winhost to learn more about our WordPress Hosting solution
WordPress is one of the most popular applications on the web with over 74 million installations – that’s a staggering 35% of all the active websites! Unfortunately, with its massive install base, it is natural for hackers to focus a lot of attention on hacking WordPress sites.
In this post, I’ll describe the most common attacks and what you can do about it to lessen the probability of being a victim.
In general, we have found that hackers compromise WordPress installations mostly by one of the two following methods:
Hackers operate many bots that worm through sites and test random login and passwords in the WordPress Admin page.
To get an idea of the scale of attempted logins we’ll take a look at some stats from our own infrastructure. At Winhost, we deploy an Intrusion Prevention System (IPS) on the network edge to detect many malicious activities and try to stop hackers before requests hit our servers. We have rules deployed on the IPS system to thwart Brute Force attacks. However, we cannot make the rules too aggressive because then it can block legitimate requests. It’s a delicate balancing game which we tweak constantly.
Based on the statistics of our IPS system, we typically track 9-10 million WordPress login attempts a month (both malicious and legitimate attempts). Check out the plot below.

About 20% of these attempts are blocked by our IPS system.
2. Outdated Plugins / Themes
Many WordPress sites use various plugins and themes to enhance their sites. The problem is that many plugins and themes have security holes that allow hackers to upload malicious files to the server without the need to log in as an administrator. As a result, we constantly see malicious bots testing for these plugins.
What does Winhost recommend to protect your WordPress site from getting hacked?
Credential Security
<?xml version="1.0" encoding="UTF-8"?>
<configuration>
    <system.webServer>
        <security>
            <ipSecurity allowUnlisted="false">
                <add ipAddress="1.2.3.4" allowed="true" />
            </ipSecurity>
        </security>
    </system.webServer>
</configuration>
PHP Version
Set your site’s PHP version to 7.1 or above
Update WordPress Frequently
Backup Site and Database
We recommend that you backup your site and MySQL database. We recommend you keep at least 2 weeks worth of backup because you may not realize your site is hacked immediately. Don’t rely on Winhost’s nightly backups because it will only store about 3 days worth of backups. You can automate the backups by using our SiteBackup service.
SiteLock Security service
Consider subscribing to SiteLock Premium or Enterprise Service and enable SmartScan. SmartScan will check your site daily for malicious files and also report on newly created files.
What we do at Winhost to protect your WordPress site
Visit Winhost to learn more about our WordPress Hosting solution
One of the most popular ways attackers are able to compromise WordPress sites is through a brute force attack. Through this method, they can try large number of passwords in a very short time. If your password can be easily guessed, there is a higher chance of an attacker gaining access.
In this post we will be covering how to add reCAPTCHA to your WordPress site. This can effectively shut down bots that are trying to abuse your pages, especially your login page.
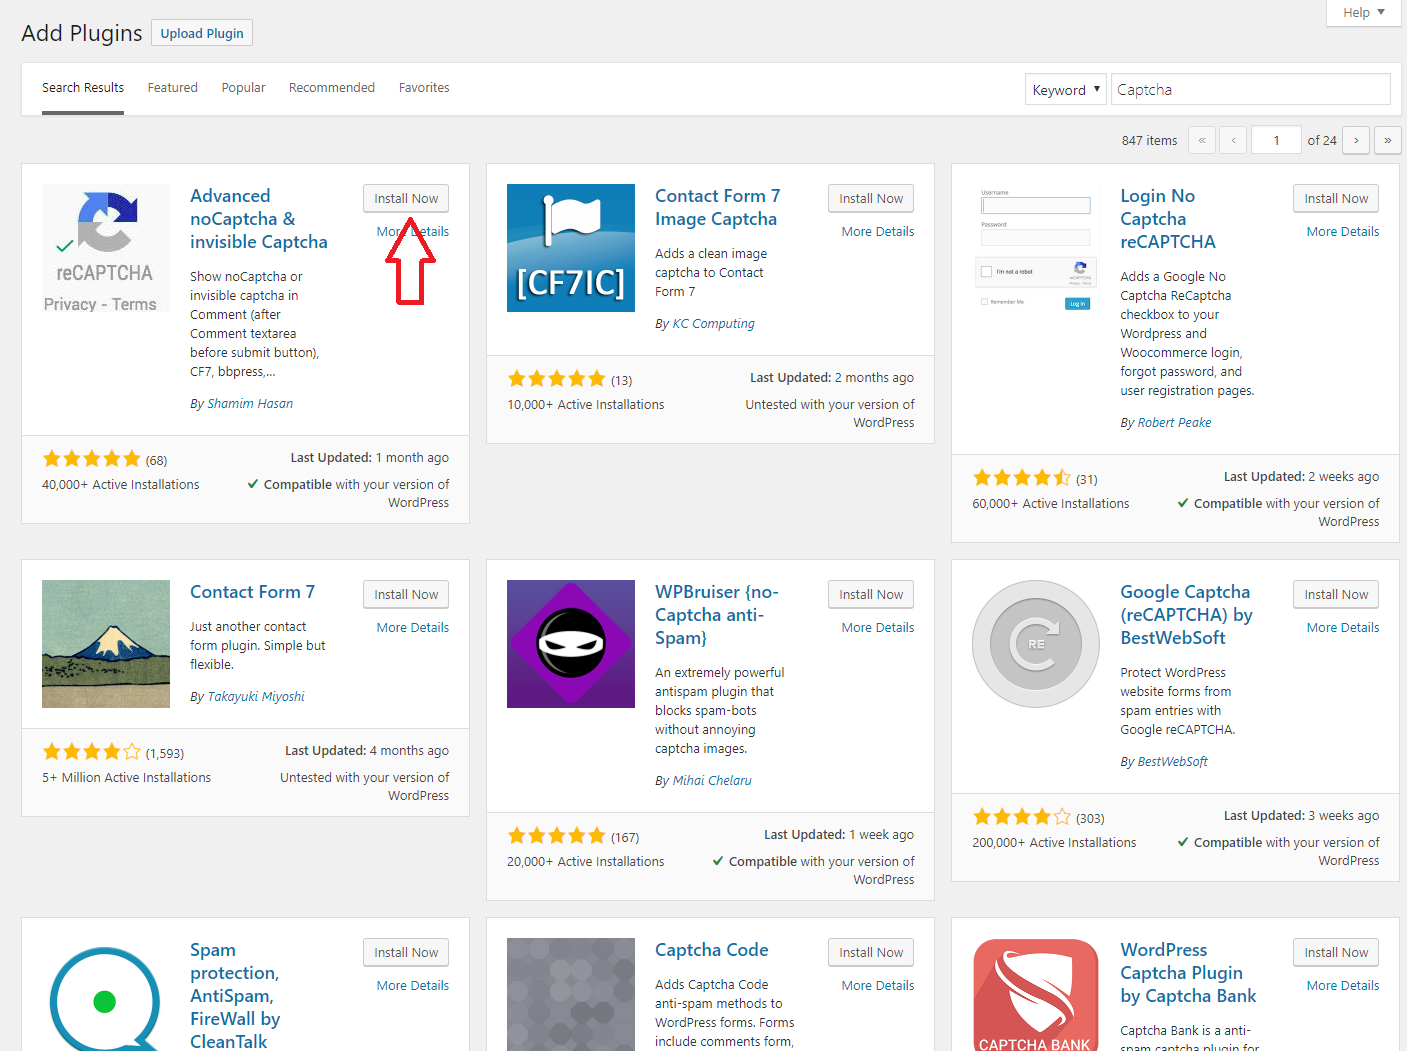
To begin, you will need to log in to your admin section of your WordPress site. Go to Plugins > Add New, on this screen search for “captcha”. The plugin I have used and have not had any problems with is the “Advanced noCaptcha & invisible Captcha” plugin. Click “Install Now” , “Activate”, and then click settings.
For this next step a Google account is required. Go to this link:
https://www.google.com/recaptcha/intro/v3.html# and click Admin console on the top right. Fill in the label field with your domain name, be sure to choose reCAPTCHA v2, enter your domain, and accept the Terms of Service.
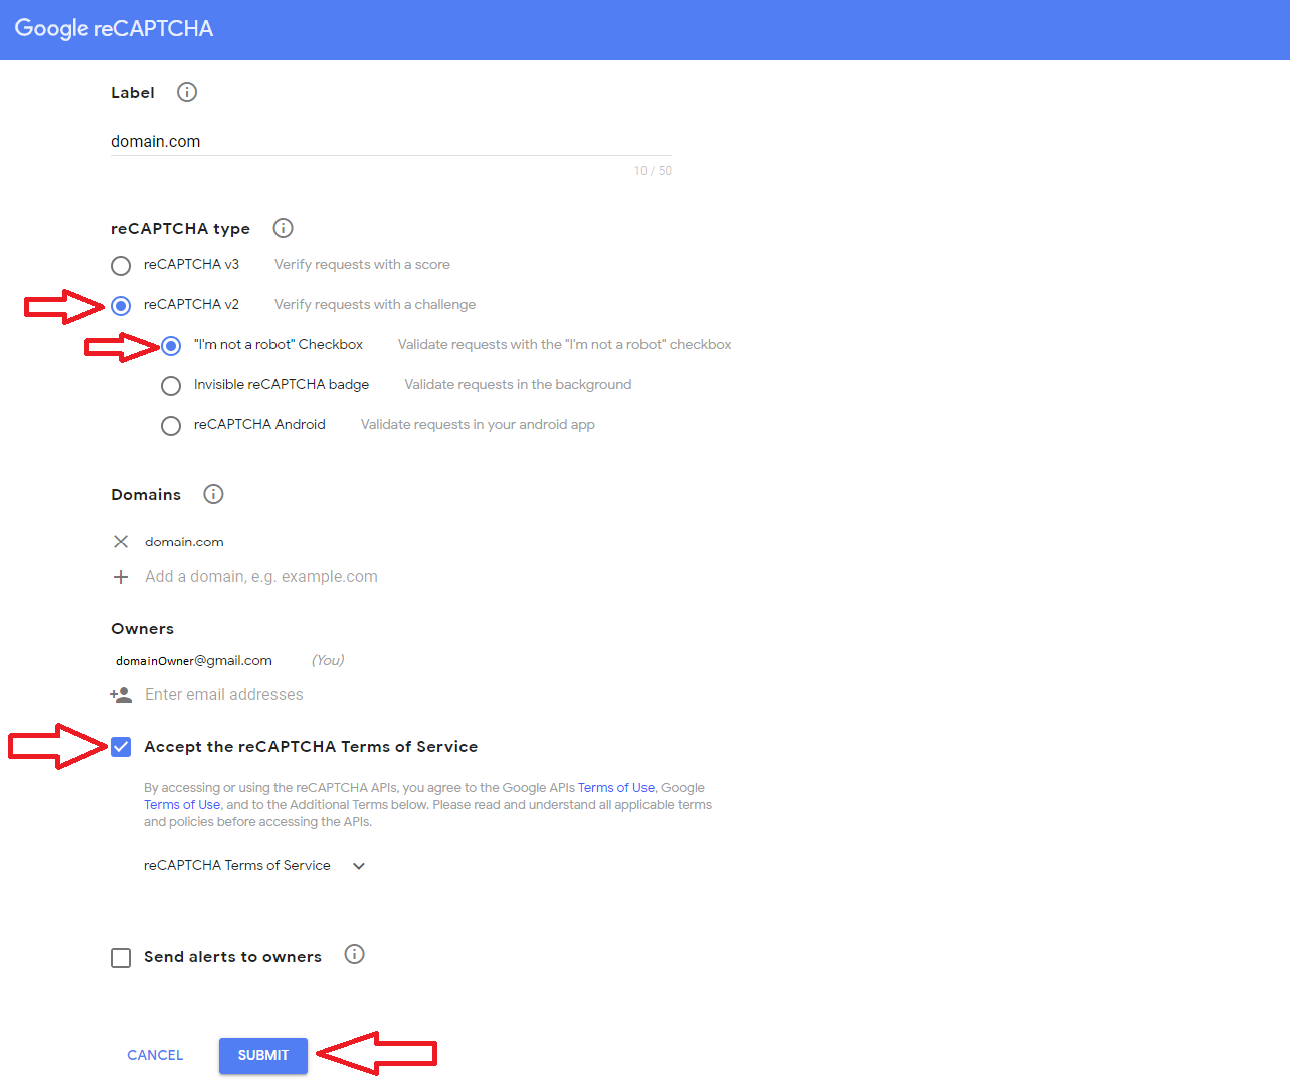
Click submit to be given your “Site Key” and “Secret Key”, go back to the settings page for the plug in and paste the keys in there. Fill in the rest of the fields as needed. **I would highly recommend testing it on only the Comment Form first and not the Login as it can lock you out if done incorrectly. ** You can also set how many attempts are allowed before a user is prompted, the default is set to always ask.

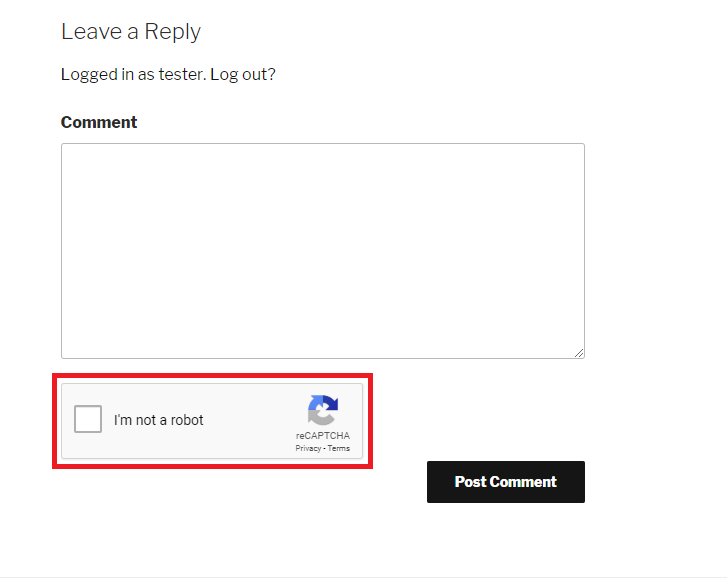
Click “Save Changes”, then visit a comment section on your site. The result should be the newly added reCAPTCHA prompting you to verify you are not a robot.
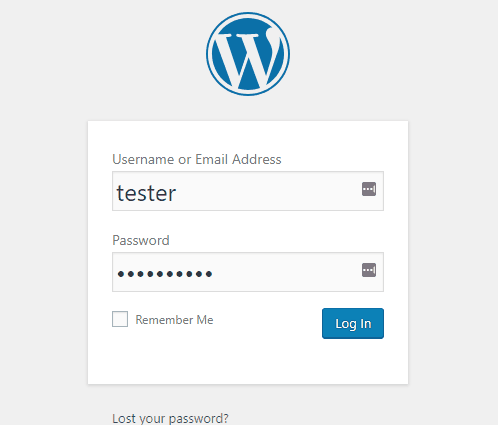
Congratulations! You can now go back to the settings page and enable it on the log in page, as well as any other pages you would like to protect from bots. Should you encounter any problems during the process please open a support ticket.
Visit Winhost to learn more about our WordPress hosting solution
When I see one of these tickets, I know I’m in for the long haul. I’ve seen this problem a handful of times and each time the solution was different and less obvious than it’s predecessor. So instead of struggling to remember what it was I had done the previous time that succeeded , I decided to consolidate some of the fixes into this blog post.
1) Check your database.
In the control panel go to the MySQL icon and look for “Usage”. If you reached the assigned quota for that database, you may have found the issue. You will either have to raise the quota or if you have reached the max quota for the account, then you will have to free up some space. Once you make this change check back in an hour and your login may start working again.

2) Disable Plugins or Themes.
If you recently installed a new plugin or theme when you encounter this login problem, that may be the culprit. Connect to your site via FTP, navigate to the “wp-content folder”, and find your “plugins” folder. Try renaming the “plugins” folder to “pluginszzz” and attempt to log in. If it works, then you know for sure that one of the plugins was interfering with the login.
If the last step did not reveal anything check the “themes” folder by double clicking it. Rename the theme you are currently using to anything so WordPress will revert back to the default theme. If the login is successful then you know the theme was the cause.
3) Define your site URLs in wp-config file.
Connect to the site via FTP. In the root of your WordPress directory look for your “wp-config” file. Download it and open it in a text editor such as Notepad or Notepad++. Add the following two lines to the file, save it, and upload it back to the site.
define(‘WP_HOME’,’http://domain.com’);
define(‘WP_SITEURL’,’http://domain.com’);
***Be sure to change ‘domain.com’ to your actual domain name***
4) Reset your password.
This is a fairly self-explanatory step. Just click on the forgot my password link, reset it and try again.
The above list has been the solutions that worked to resolve the login issue for me, but there could be other resolutions to the login problem that I haven’t encountered yet.
If none of the above successfully resolves your issue, the next step would be to open a technical support ticket so we can try looking into the issue further and find the cause. If we find more solutions we’ll try to post them in the future.
Visit Winhost to learn more about our WordPress hosting solution
![]()
**This article assumes that you have a WordPress site installed at Winhost. If you don’t and want to install WordPress, go to your Winhost control panel and find WordPress under the App Installer.**
To begin you will need to log in to the Admin section of your WordPress site which can be accessed by adding /wp-admin after your domain name such as: HostingAccountDomain.com/wp-admin
Enter your Username and Password and Log In to be taken to the Administrator Dashboard.
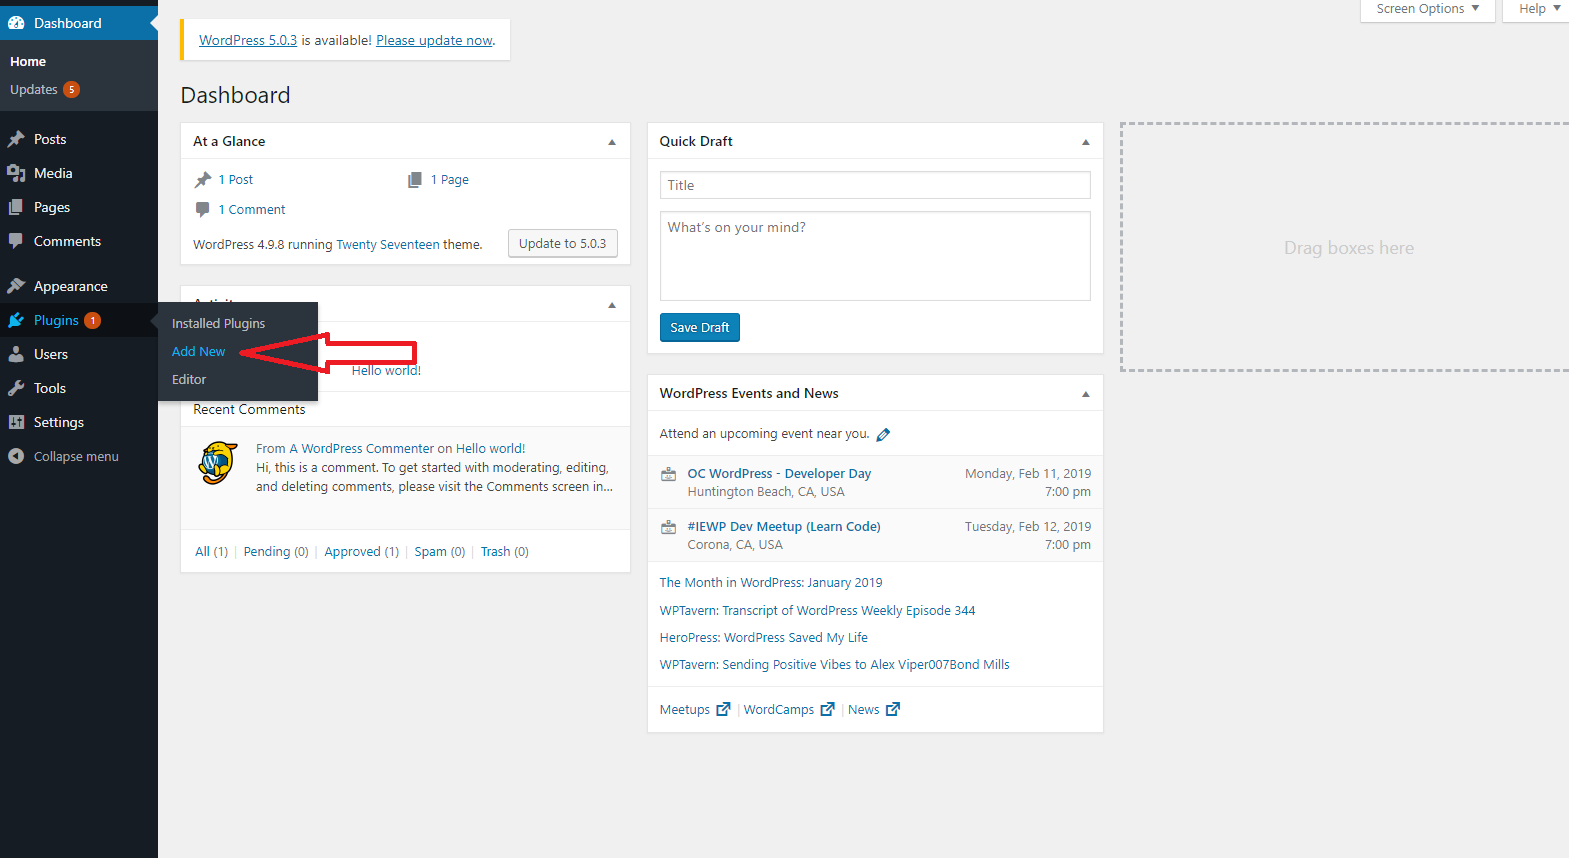
From the Dashboard, head down to Plugins – hover over it for a second and in the sub-menu click on “Add New”.
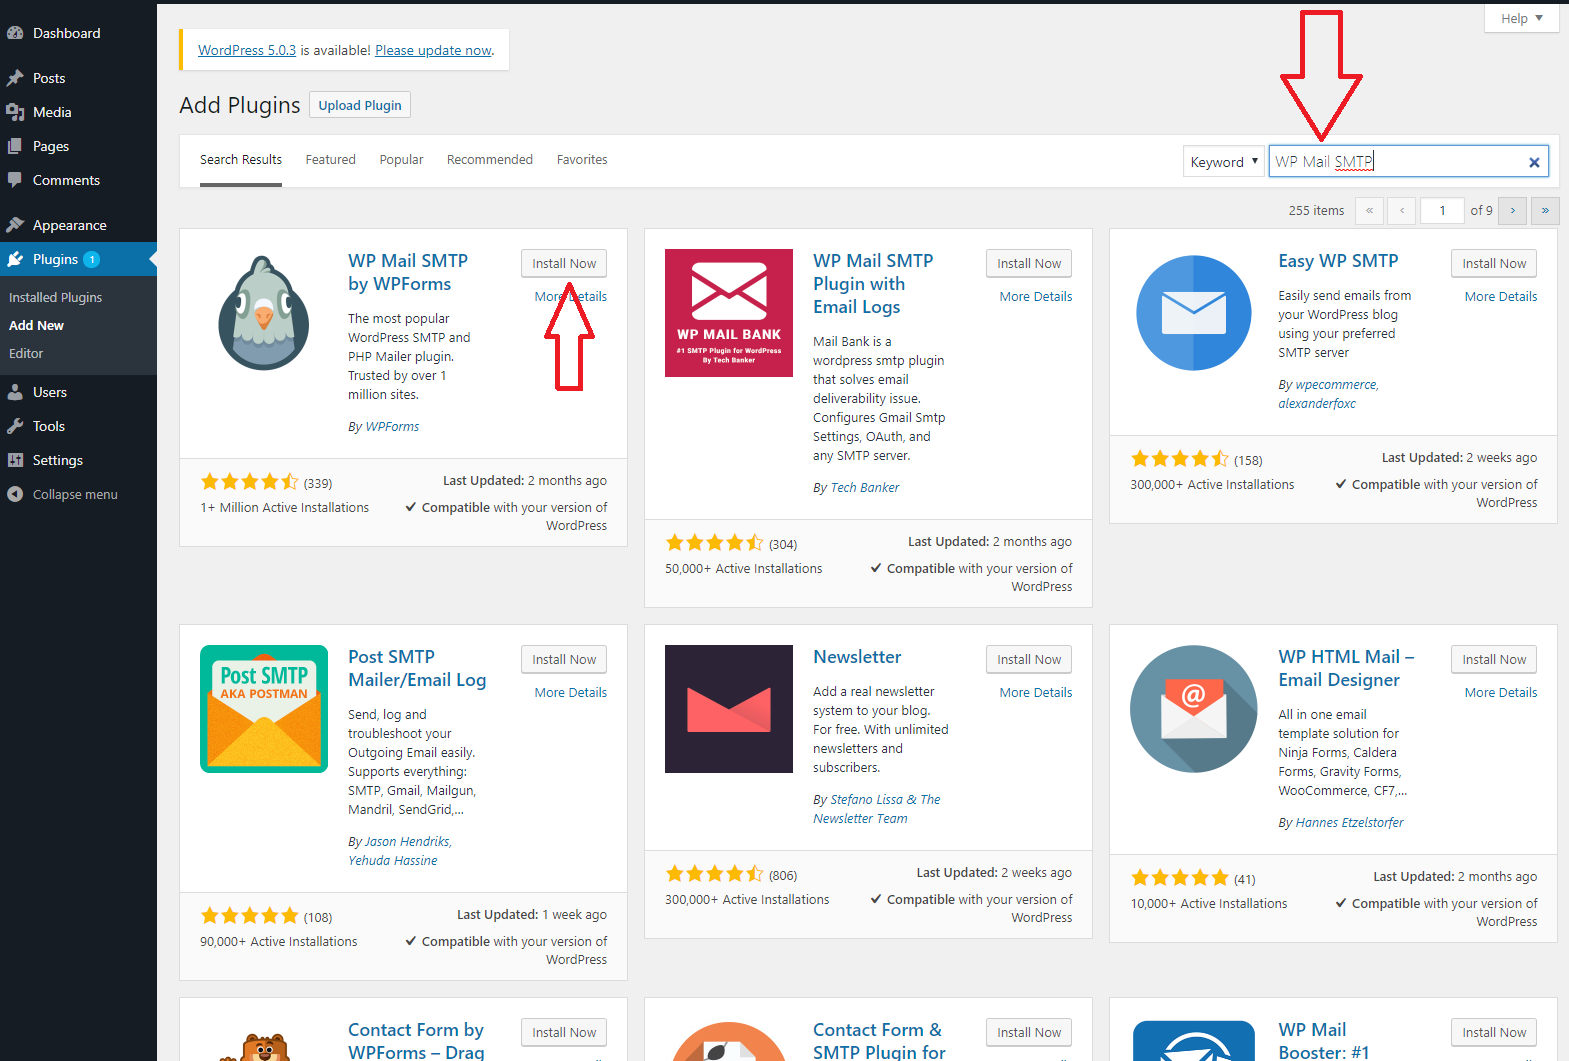
From the Plugins store go to the search bar in the top right and enter “WP Mail SMTP”. The one you’re looking for should be the first option with the bird as the icon. Go ahead and click on “Install Now”. Wait for the plugin to install and click Activate once it has installed.
Now you’re going to want to go to settings and you’ll notice there is now the option for “WP Mail SMTP” Settings.
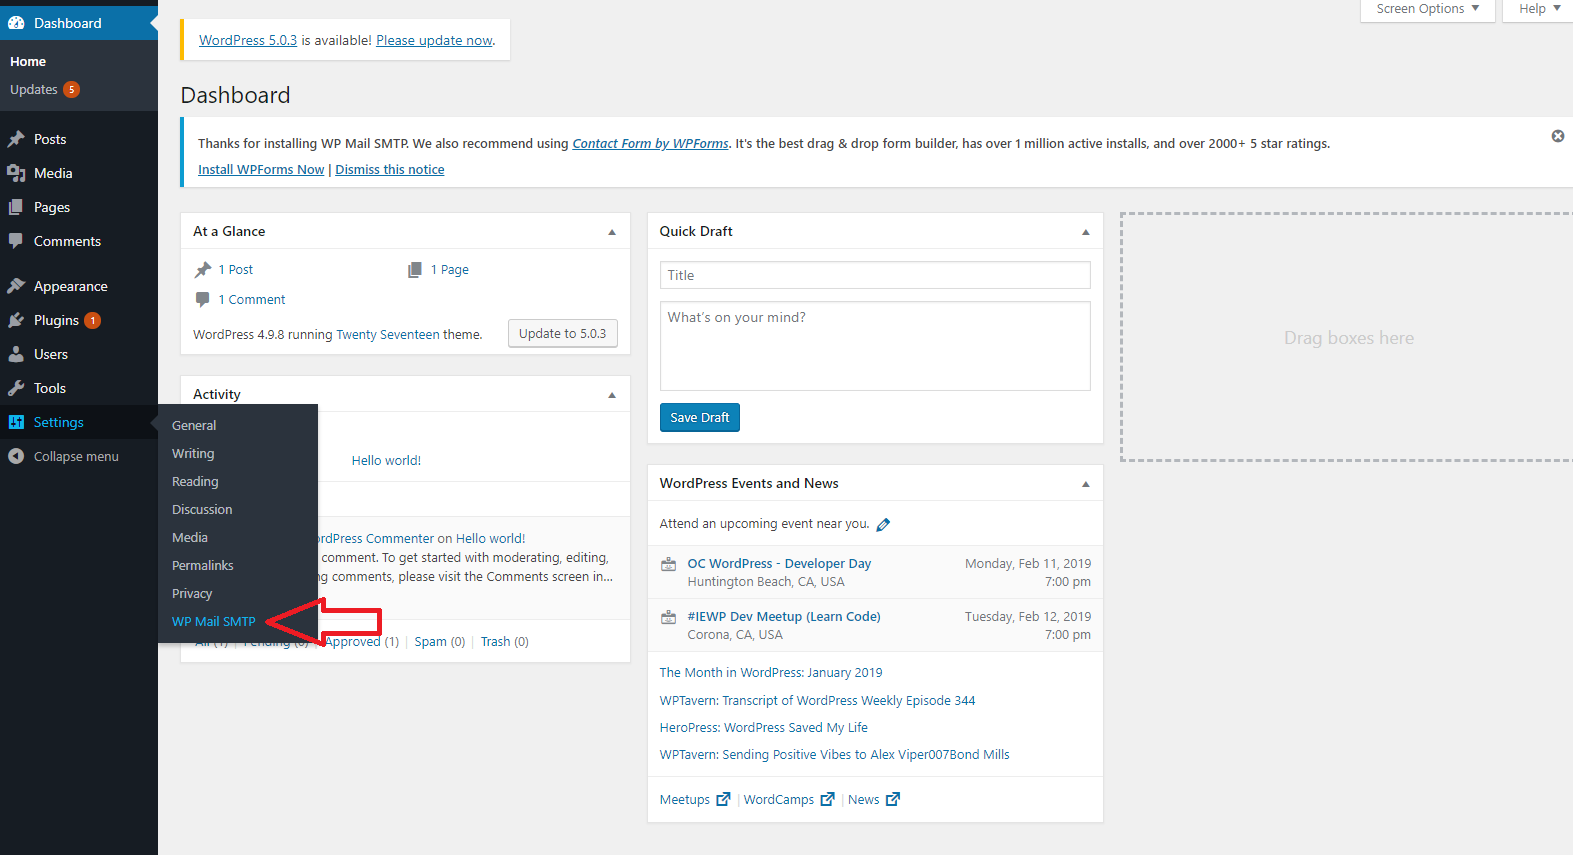
Click on this to be taken to the screen below:
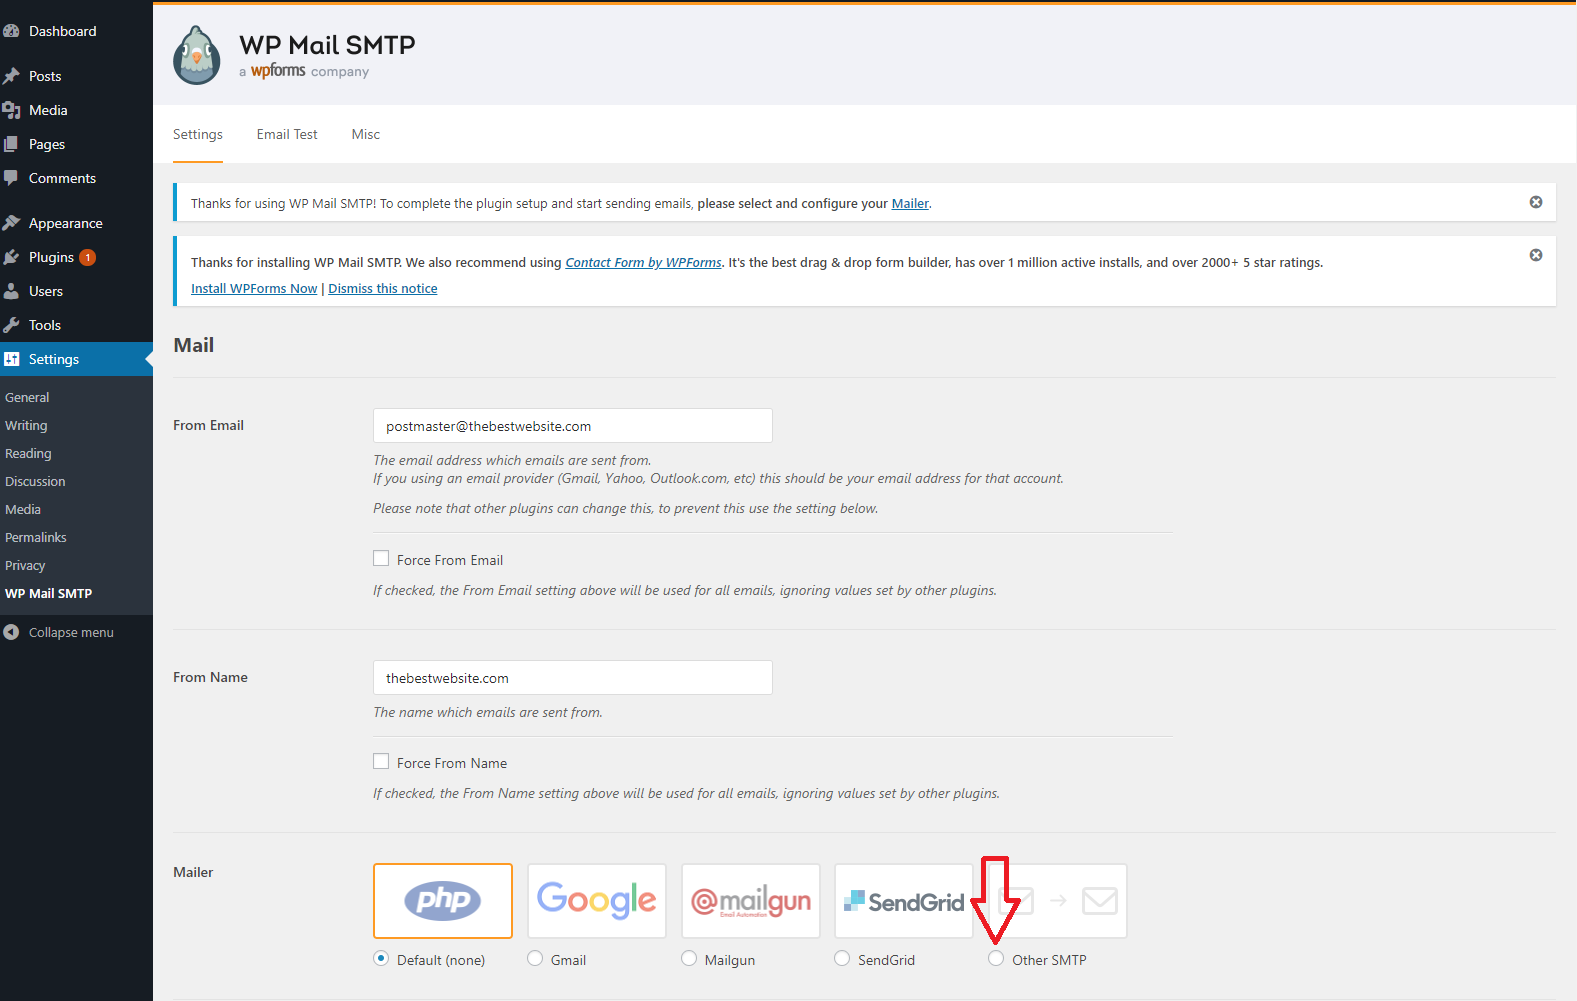
On this page you can adjust some mail settings. The one we want to focus on is in the Mailer section. We want to change this to “Other SMTP” where the red arrow is pointing to above.
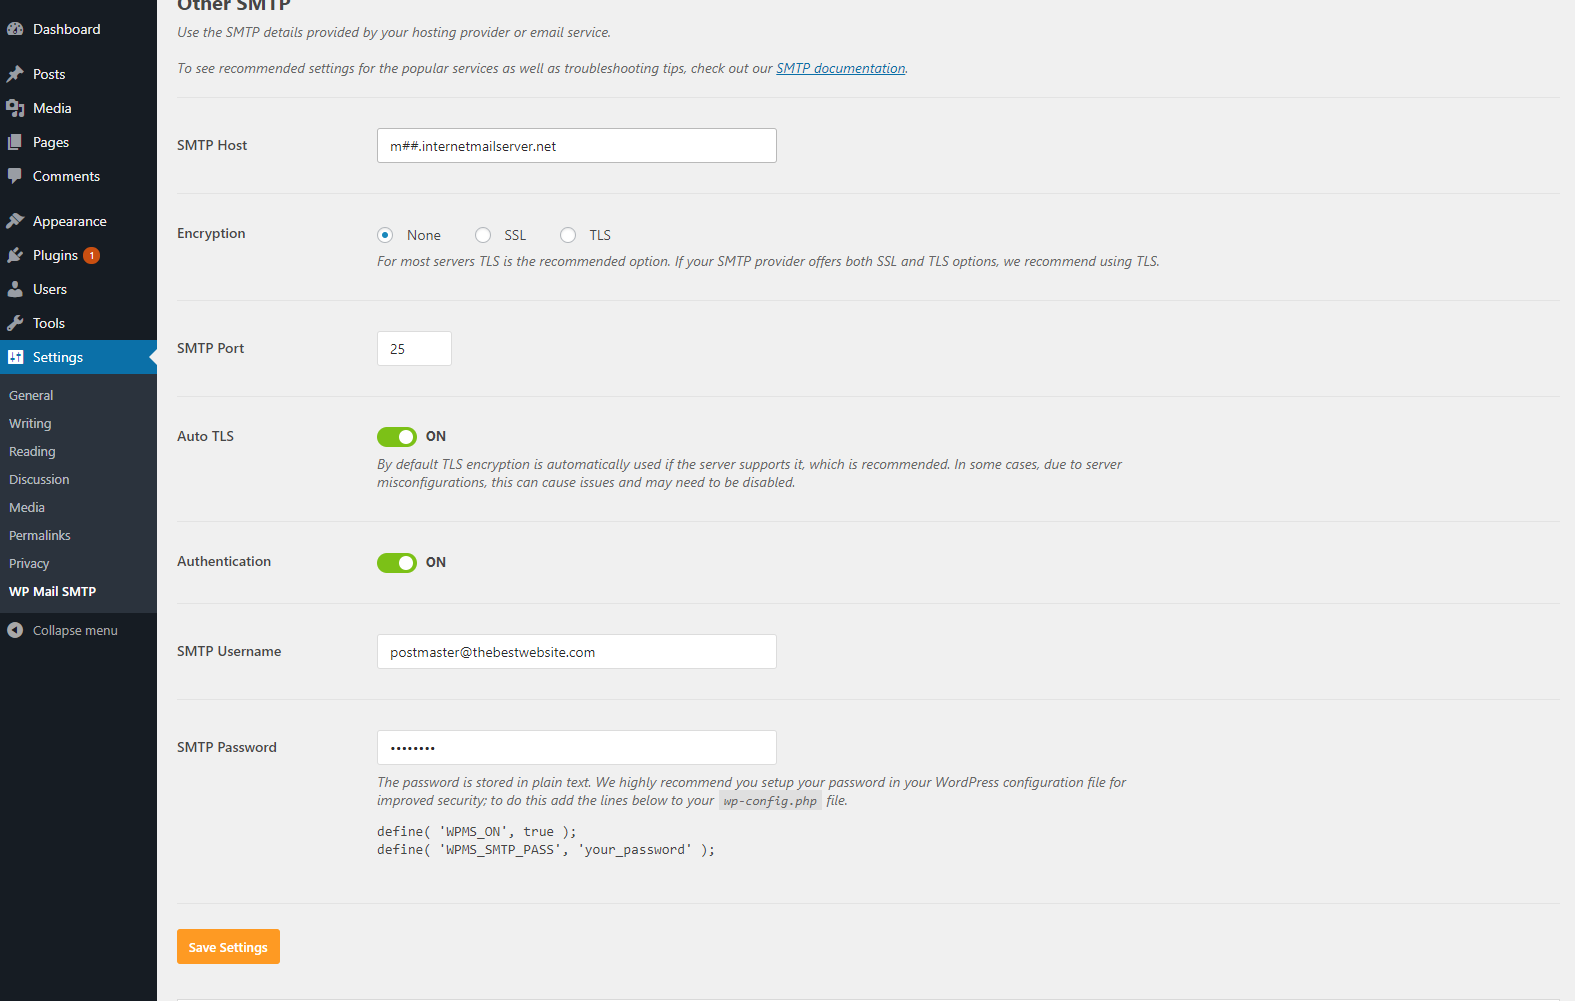
Once you change that, new settings will appear that you must fill out.
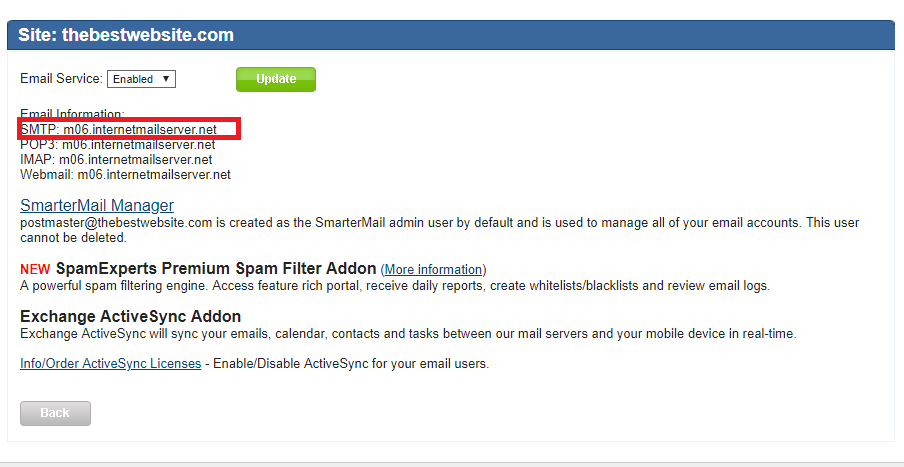
SMTP Host: This can be found in the Winhost Control Panel under Email. You will see your Email server information next to SMTP and should look like m##.internalmailserver.net
Encryption: Leave at None for now
SMTP Port: 25
Auto TLS: Leave this on
Authentication: You’ll want to click this “ON”
SMTP Username: Your full email address
SMTP Password: The password for your email account.
After entering your Email information in all the fields click on Save Settings. This will take you back to the top of the page and everything should be all set (if there was no information entered incorrectly).
You should see a tab for Email Test, go ahead and click the tab and enter an email account you have access to and click Send Email to send a test message. You should be receiving an email that looks like below.
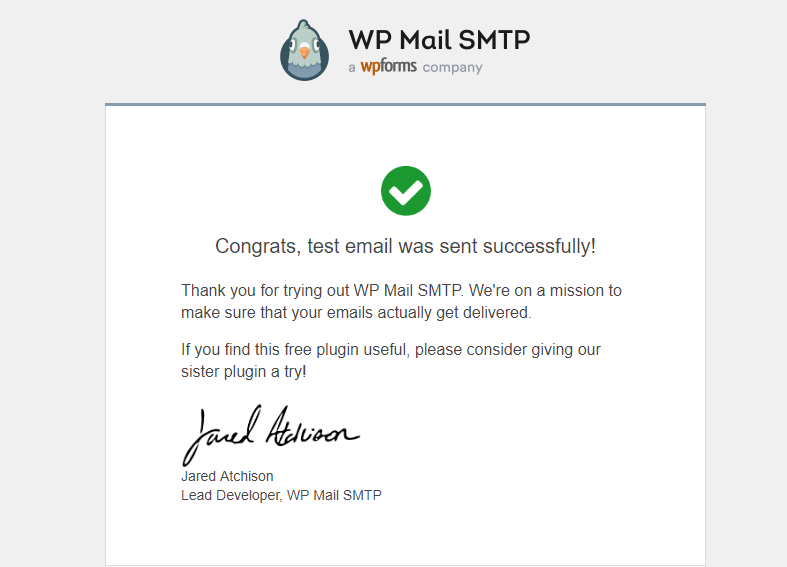
If you received this test email, then congratulations! You are all set to send and receive email through your WordPress site.
If you did not and received an error somewhere along the way, submit a support ticket and we will help walk you through the process.
Visit Winhost to learn more about our WordPress hosting solution