In this tutorial I’m going to show you how to configure goMobi to work with your WordPress site. Many of our users are using WordPress for their sites, and now you can have a Mobile web site for your WordPress-based site.
If you don’t have goMobi service yet, you can order goMobi through Control Panel. If you don’t have a WordPress site yet, we have a blog post article that shows you how to install WordPress using our Control Panel Application Installer.
Once your WordPress site is up and running and you have ordered goMobi for your site, check out this video on some the different things you can do with goMobi.
When you’re done watching the video you’re ready to configure WordPress with goMobi.
Log in to your goMobi account through our control panel by click on the goMobi tab at the top.
Now click on the blue Launch Mobile Site Builder link to log in. This will open a small window in your web browser.
Creating your mobile site can be relatively simple, or you can take full advantage of everything goMobi offers and spend some time setting up your mobile site. It can be a lot to go through, so we won’t step through it here. We’re primarily concerned with getting your mobile site to work with WordPress.
After you’ve created your goMobi site, you’ll need to create the redirection code that you will install on your WordPress application. This is necessary to properly route mobile traffic to your new mobile site.
In the goMobi window click on the Tools tab at the top.
![]()
Now expand the Redirection Code Generator section.
Place a check mark next to Redirect tablet computers if you want to redirect tablet computers too.
Select WordPress from the drop down menu and click Generate.
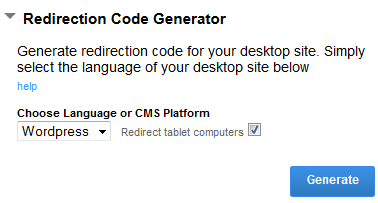
Clicking on the Generate button will create a mredirect.zip file that you will need to download locally onto your computer.
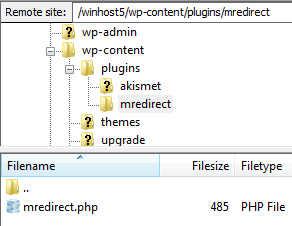
Now extract the .zip file onto your computer and connect to your site via FTP. We are going to upload the file into your WordPress site files directory.
If you don’t have an FTP client, we suggest FileZilla. If you install FileZilla, we have a knowledge base article that shows you how to use it to connect to your site.
When connected via FTP double click on the wp-content directory folder. Now go in to your plugins folder by double clicking on that too.
You want to upload the exacted mredirect folder containing the mredirect.php file to the plugins directory:
Now simply log in to your WordPress site as the Admin and activate the plug-in.

Once you have activated the plug-in, any mobile traffic to your WordPress application will be redirected to your mobile web site.
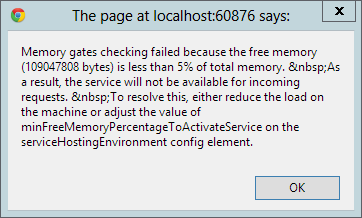
Recently, a few of our customers ran into this error when hosting their WCF service with us on our IIS8 servers; Memory gates checking failed because the free memory is less than 5% of total memory.
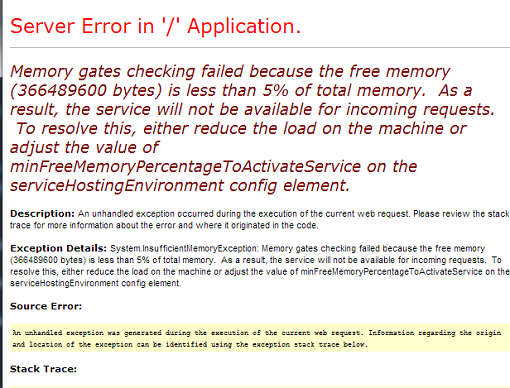
Before you panic, this does not mean that our servers are overloaded or running out of memory as this check is performed on the total amount of memory available on the server. 5% in our hosting environment still means a lot of memory free. Instead, you need to make sure ‘Full’ trust is enabled and that you add this to your web.config file:
<configuration>
<system.serviceModel>
<serviceHostingEnvironment ... minFreeMemoryPercentageToActivateService="0" />
</system.serviceModel>
</configuration>
The attribute to modify is minFreeMemoryPercentageToActivateService. Setting it to 0 will bypass the check and allow the service to run. For more information on the attribute, please see this link.
Can you believe it? There is a new framework to learn and use. It is called YII Framework. YII stands for Yes It Is (how quaint, I must say). YII is a PHP based MVC framework created specifically for highly active web applications, such as portals, forums, CMS, and e-commerce systems. It is designed to be light-weight, with a sophisticated caching mechanism.
You’ll want to look at the official YII home page to understand more about this framework.
The good news is it works on our shared hosting platform. According to YII’s documentation, the only requirement it needs is to have PHP version 5.1 or higher installed on the server; which we do have (PHP ver 5.3.13). Now, setting up a YII web application on our shared hosting environment does require some specialized steps you’ll need to take.
First you’ll need to download the YII Framework folder. Inside this folder are the YII files and extensions. You can download it here.
The second step you’ll need to incorporate is to modify the path your application will be looking for the YII framework. By default it’s set to look outside the root. A lot of the documentation was for an Apache web server therefore they had one standardized YII Framework folder that everyone accessed. That will be impossible on our shared hosting environment since each application only has permission within its’ own root. You will upload the YII Framework folder on your root and modify your application to search the framework from within.
As an example set the code from:
$yii=dirname(__FILE__).'/../framework/yii.php';
to:
$yii=dirname(__FILE__).'./framework/yii.php';
Next, you may need to modify the default time zone setting. By default it is set to UTC, which may not be the same as the server. The application will throw this error if left unchanged.
PHP Warning: phpinfo(): It is not safe to rely on the system’s timezone settings. You are *required* to use the date.timezone setting or the date_default_timezone_set() function.
In case you used any of those methods and you are still getting this warning, you most likely misspelled the timezone identifier. We selected the timezone ‘UTC’ for now, but please set date.timezone to select your timezone. in E:\ \YII_Framework\testdrive\test.php on line 3
To fix this problem, you’ll need to create a user.ini file. The file name should be user.ini and place it in your root folder. The default time zone should be delegated to the user level. Add this code in your user.ini file:
[DATE]
date.timezone = “GMT”
Save the user.ini file and that should solve it.
Note: I tested this several times and it may not throw this specific time zone error, but regardless, setting up a user.ini file shouldn’t hurt your application. The user.ini file acts like the PHP.INI file which is the basic PHP configuration for all PHP applications. The user.ini file allows for PHP.INI control at the account level. This is very useful in a Windows platform where we can only have one PHP.INI for the entire server. Keep in mind that some PHP elements/settings cannot be delegated to the account level due to security reasons.
One last step you will want to take before you are done is to protect your YII framework files/extensions from being downloaded. Because the framework itself uses PHP files, it can potentially be downloaded by a browser, modify certain configuration settings on the framework and potentially get re-uploaded back to the server. That can open security holes or exploits to your YII Framework application.
What you will want to do is setup the Framework folder with the same security restrictions as an ASP.Net Bin folder, where your application can access it, but no browser can directly navigate to it and download the files. You will use the RequestFiltering Module to protect the folder Framework. Create a web.config file if you don’t already have one, and place it on the root. Add this XML element within the system.webServer section of the web.config file.
<security>
  <requestFiltering>
    <hiddenSegments>
    <add segment="Framework" />
    </hiddenSegments>
  </requestFiltering>
</security>
That’s it, you’re all done. As you can see YII Framework is compatible with our Windows shared hosting platform.
The following instructions apply to both our Windows 2008 IIS 7 servers & our Windows 2012 IIS 8 Servers.
In this tutorial I’m going to show you how to back up your SQL database and web site files. Then we’ll use the IIS Manager to back up your site and SQL Databases all in one shot. These instructions will place a .zip file locally on your computer for safe keeping. The .zip file will contain the .bak file of your SQL database.
Step 1: Use our SQL backup tool in Control Panel to back up your SQL Database. When using this tool the .bak file will be stored in your App_data directory. Please read our knowledge base article on how to use the backup SQL Tool in our control panel.
Step 2: Once you’ve created the .bak file in your App_data directory on your site account using the SQL backup tool in our control panel, you’re ready to connect to your site using IIS Manager. Please read our knowledge base article about Using the Microsoft IIS Manager.
Step 3: In IIS Manager Right click on your site. Selected Deploy and click on Export Application…
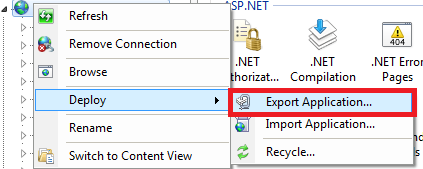
Step 4: In the Export Application Package window click the Next button (do not change any settings).
Step 5: Click the Next button in the Select Parameters window (again, do not changing any settings).
Step 6: Click the Browse… button and select a directory on your local computer (this is where the backup .zip file containing your site’s web files will be placed on your local computer). Select a file name with today’s date for your reference. Now click the Save button.
Step 7: Click the Next button in the Save Package box and wait for your site to be saved locally on your computer. Now click the Finish button when you receive the notice “The package was created successfully.”
The .zip file that you saved locally will also contain the SQL database backup (.bak) file that you created when you used the SQL Backup tool in the control panel. It’s important to back up your SQL database at the same time as your web site files to maintain consistency for your site.
If you ever need to fall back and restore your web site to a previous state from a certain date, you can use the same tool in IIS Manager, but this time you will need to select Import Application in the Deploy option in IIS Manager.
Instructions for restoring your site:
Step 1: Right click on your site in IIS Manager. Select Deploy and click Import Application.
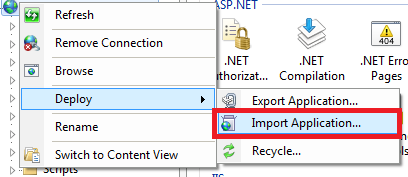
Step 2: Click the Browse… button and select the .zip file located on your computer of the web site backup you created in IIS Manager. Then click Next.
Step 3: Do not change any settings in the Select The Contents of the Package box and click the Next button.
Step 4: On the next page Enter Application Package Information you will need to remove the text from the box so the backup is restored to the root of your hosting account. So you should only see:
HostingAccountDomain.com/ [Empty Text Box]
Now click the Next button.
Step 5: You will receive the following warning from IIS Manager: “This application will be installed into “HostingAccountDomain.com”. Most applications are usually installed into a folder beneath the root, such as “HostingAccountDomain.com/Blog” Are you sure?” Go ahead and click the OK button.
Step 6: In the next box, Overwrite Existing Files, choose the option, “Yes, delete all extra files and folders on the destination that are not in the application package.” This will delete any extra files or folders that don’t exist in the backup .zip folder (we’re choosing this option because you want to restore the entire site as it existed on the date that you created the .zip files).
If you don’t wish to delete the extra files then select the option: “No, just append the files in the application package to the destination.” Now click the Next button.
IIS Manager will now restore your site files to the state they were in when you created the .zip file. It will also contain your .bak file too, if you created the SQL backup first using the SQL Backup tool in the control panel on the day you created the .zip file in IIS Manager. To restore the database, read our knowledge base article on how to restore your .bak file to the SQL database.
If you need instructions on backing up your MySQL database please read our blog post article: Using mysqldump to backup and restore your MySQL database/tables.
One really cool thing about this tool in IIS Manager is that you can also use it to transfer your site to our Winhost web servers. Granted, that is only if your current host provides you with the ability to Export your site using IIS Manager. If they don’t, you should be at Winhost!
Have you ever setup your smart phone to connect to a POP3 and/or SMTP server only to get errors? You looked through your email providers’ documentation and spoke with their tech support only to have them tell you that the problem is not on their end.
Frustrating as it is, they are often right. The true culprit is typically your carrier. Often times they either restrict or obstruct certain ports. How to find if your Smart Phone is able to use these ports; you ask?
Luckily for Android users, there are some nifty free apps you can download and install to perform some port checks for you. The specific one I would like to point out is the Android Net Swiss Tool (this was tested using a Galaxy S3).
![]() It’s very easy to use and comes in really handy when you’re wondering if the hot spot you are connected to or your phone carrier is obstructing specific ports.
It’s very easy to use and comes in really handy when you’re wondering if the hot spot you are connected to or your phone carrier is obstructing specific ports.
Once you have Net Swiss Tool installed, tap the icon. You will see on the top a drop down list where you can choose Portscan TCP. You have two options on how you can define the ports. The first and easiest method is to tap on the Port List button. The second is to manually input the port numbers in the blank text box. When you manually type the ports you want to test, separate the port numbers by spaces not commas. Also pay close attention to the Timeout setting. Some servers may take longer then usual to respond back to a port check. If you’re Timeout setting is set too low, the app will assume the port is closed if it has not received a reply back within a short period of time.
Tap the Test bar and you will see whether the port is open or not.
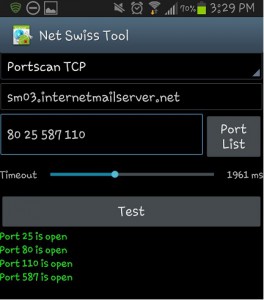 You will need to keep in mind that it will test the current backbone your phone is using at the time. Meaning if you are connected to WiFi, it is testing the ports through that WiFi. If you are away from any hot spots, then your phone is testing through your phone carrier’s backbone.
Here’s a short tutorial on how to link your Microsoft Access database to your Microsoft SQL Server database. (Note: Screenshots from Microsoft Access 2010)
1. First, you will need to create an Access database or open up an existing one.
2. Next, you’ll want to click on the External Data tab and then ODBC Database icon which will start a wizard.
3. Select Link to the data source by creating a linked table and click on OK.
4. In the Select Data Source window, type in the DSN Name and click on the New button.
5. In the Create New Data Source window, select SQL Server and click on the Next button.
6. In the Create New Data Source window, type in the file name and click on the Next button.
7. In the Create New Data Source window, click on the Finish button.
8. In the Create a New Data Source to SQL Server window, type in the name of the database for the Description and enter the fully qualified domain name for the Server.
9. In the Create a New Data Source to SQL Server window, check With SQL authentication, type in your Login ID and Password and click on the Next button.
10. In the Create a New Data Source to SQL Server window, you can leave the options as is or change them. Click on the Next button.
11. In the Create a New Data Source to SQL Server window, you can leave the options as is or change them. Click on the Finish button.
12. In the ODBC Microsoft SQL Server Setup window, click on the OK button.
13. In the Select Data Source window, click on the OK button.
14. In the SQL Server Login window, enter the Login ID and Password.
15. In the Link Tables window, select the table(s) you want to link and click on the OK button.
16. In the Select Unique Record Identifier window, choose the fields that will uniquely identify the record and click on the OK button.
17. You have now created a linked table in Microsoft Access!
In my previous blogs, I showed you how you can tighten up the settings in SmarterMail to help prevent too much spam from ending up in your Inbox:
Content Filtering, the other Spam Crime Fighter
But what happens if legitimate email messages are being marked accidently as spam, and you know it’s from a legitimate email address? Fortunately, there is a way to rectify this problem by using the Trusted Senders feature in SmarterMail. This feature allows you to whitelist email addresses or domains, thus bypassing the spam/content filtering rules you have setup. And here are instructions on how to set it up:
1. Log into SmarterMail with the email account you want to apply this setting to.
2. Click the Settings icon (2 cogs) on the menu to your left.
3. Expand the My Settings folder and click on Trusted Senders.
4. Click on the New button.
1. Enter the email addresses/domains you want to whitelist, line by line.
2. Click on the Save button, and you’re done!
If you want this setting to be applied to all the email accounts in your domain, log in with the postmaster account instead, and use the Trusted Senders under Domain Settings.
For those of you who use Joomla on your web site, here are some tips to maintain the security of your Joomla web application.
Every application is susceptible to exploit. Therefore it is very important to maintain an updated application and install all the latest security patches.
This link will take you to the known vulnerabilities within Joomla. It is a comprehensive list, so you should carefully read through it. If you find that you meet any of these criteria, there should be a link next to the criteria to help you patch up the exploit.
To those who have already had their Joomla site hacked, try downloading a tool to help you clear your site. I found this web tool that will audit your site and clean up your files: http://myjoomla.com/
Now, from my experience the most common exploits to a web site start from the users own personal computer. If your computer contracts a trojan or malware where a key logger is installed, your account login credentials will be recorded. No matter what security patches you have implemented in your web application, it will be compromised because an unauthorized party will have direct access to your web site.
You should always have an antivirus software installed on your computer and the latest updates installed.